Building a mountain bike trail is more than clearing a path in the woods. It’s an adventure that blends design, sustainability, and fun for both riders and nature. Whether you dream of a fast downhill trail or a winding singletrack, the process demands thoughtful planning, teamwork, and respect for the environment. Many beginners rush to dig, but a good trail is crafted, not just cut. This guide will walk you through each stage, from choosing your location to the final touches that keep riders coming back. If you’re ready to create a trail that stands the test of time, let’s dive in.
Understanding Trail Building Basics
Before you grab a shovel, it’s important to know what makes a mountain bike trail successful. Trails must be safe, enjoyable, and blend with the landscape. They should handle weather, resist erosion, and serve a variety of riders.
Types Of Mountain Bike Trails
Mountain bike trails come in many shapes. Here are the main types:
- Cross-country (XC): Narrow, winding paths with gentle slopes.
- Downhill (DH): Steep, fast trails designed for skilled riders.
- Freeride: Include jumps, drops, and technical features.
- Flow trails: Smooth, rolling paths with banked turns.
Each style needs different planning and building methods. Decide what fits your terrain and community.
The Importance Of Sustainability
A poorly built trail can cause erosion, disturb wildlife, and become unsafe. Sustainable trails use natural contours, resist heavy rain, and require less maintenance. They also protect the forest and allow riders to enjoy nature without harming it.
Planning Your Trail
Strong planning saves headaches later. It helps you avoid legal issues, reduce costs, and create a trail that lasts.
Choosing The Right Location
Pick a site with diverse terrain and good access. Avoid wetlands, steep slopes, and protected habitats. Talk to landowners and check local regulations.
| Factor | Best Practice | Common Mistake |
|---|---|---|
| Land Ownership | Secure written permission | Start building without consent |
| Terrain | Choose varied, stable ground | Pick flat or muddy areas |
| Access | Ensure easy entry and exit | Ignore parking or emergency access |
Mapping And Design
Use maps and GPS to sketch your trail. Walk the land and mark possible routes with flags or tape. Look for natural features like rocks, trees, and hills. Avoid straight lines; curves and switchbacks control speed and add fun.
Non-obvious insight: Mapping in dry weather can hide drainage problems. Visit after rain to spot water flow and muddy spots.
Getting Permissions
Most trails need approval from landowners, local government, or park managers. Prepare a plan that shows the trail layout, expected users, and environmental impact. Include details like parking, signage, and maintenance.
Tip: Working with local mountain bike clubs can help your case and provide volunteers.
Credit: cutlaps.com
Trail Design Principles
A well-designed trail feels natural and keeps riders safe. It’s shaped by the land, not forced against it.
Trail Alignment
Follow the contour of the land. Avoid going straight up or down steep slopes, which causes erosion and makes riding harder. Use grade reversals—short dips and rises—to shed water and control speed.
Width And Surface
- Singletrack: 18–24 inches wide, for one bike at a time.
- Doubletrack: 36–48 inches wide, for two bikes or emergency vehicles.
Surface materials depend on your area. Use dirt, gravel, or local rocks. Avoid sand or clay, which can become slippery or sticky.
Drainage And Erosion Control
Water is your biggest enemy. Plan for drainage by placing the trail on a slope and adding outslopes (slanted sections) to let water run off. Build rolling dips or small mounds to slow water and reduce erosion.
Non-obvious insight: Place trails above flood lines and avoid low spots, even if they look fun to ride.
Gathering Tools And Materials
You’ll need the right tools for each job. Here’s what most builders use:
- Hand tools: Shovels, rakes, mattocks, loppers, and saws.
- Power tools: Chainsaws, brush cutters, and compactors.
- Materials: Flagging tape, signage, gravel, wood for bridges or jumps.
Don’t forget safety gear: gloves, boots, eye protection, and first aid kits.
| Tool | Use | Safety Precaution |
|---|---|---|
| Shovel | Digging, shaping | Lift with legs, not back |
| Chainsaw | Clearing trees | Wear helmet and goggles |
| Mattock | Breaking hard soil | Check for rocks before swinging |
| Flagging tape | Marking route | Use visible colors |
Clearing And Preparing The Trail Corridor
Start by clearing a corridor for your trail. This is the path where you’ll build.
Removing Vegetation
Cut back shrubs, branches, and small trees. Leave larger trees for shade and challenge. Stack cut wood away from the trail to avoid fire risk.
Example: In Vermont, trails often use natural rock gardens and tree roots as features.
Managing Roots And Rocks
Some roots and rocks add fun. Remove only those that pose safety risks. If you find large rocks, consider using them for jumps or technical sections.
Creating A Bench
A bench is a flat surface cut into a slope. Use a mattock or shovel to dig into the hillside. Make sure it’s wide enough for your intended trail type. Smooth the surface and pack it firmly.
Building The Trail Surface
A solid trail surface keeps riders happy and reduces maintenance.
Shaping The Trail
Dig and shape the trail to match your design. Remove loose soil, roots, and debris. Use a rake to smooth bumps and a compactor to press the surface.
Tip: In wet climates, add gravel or rocks to improve drainage.
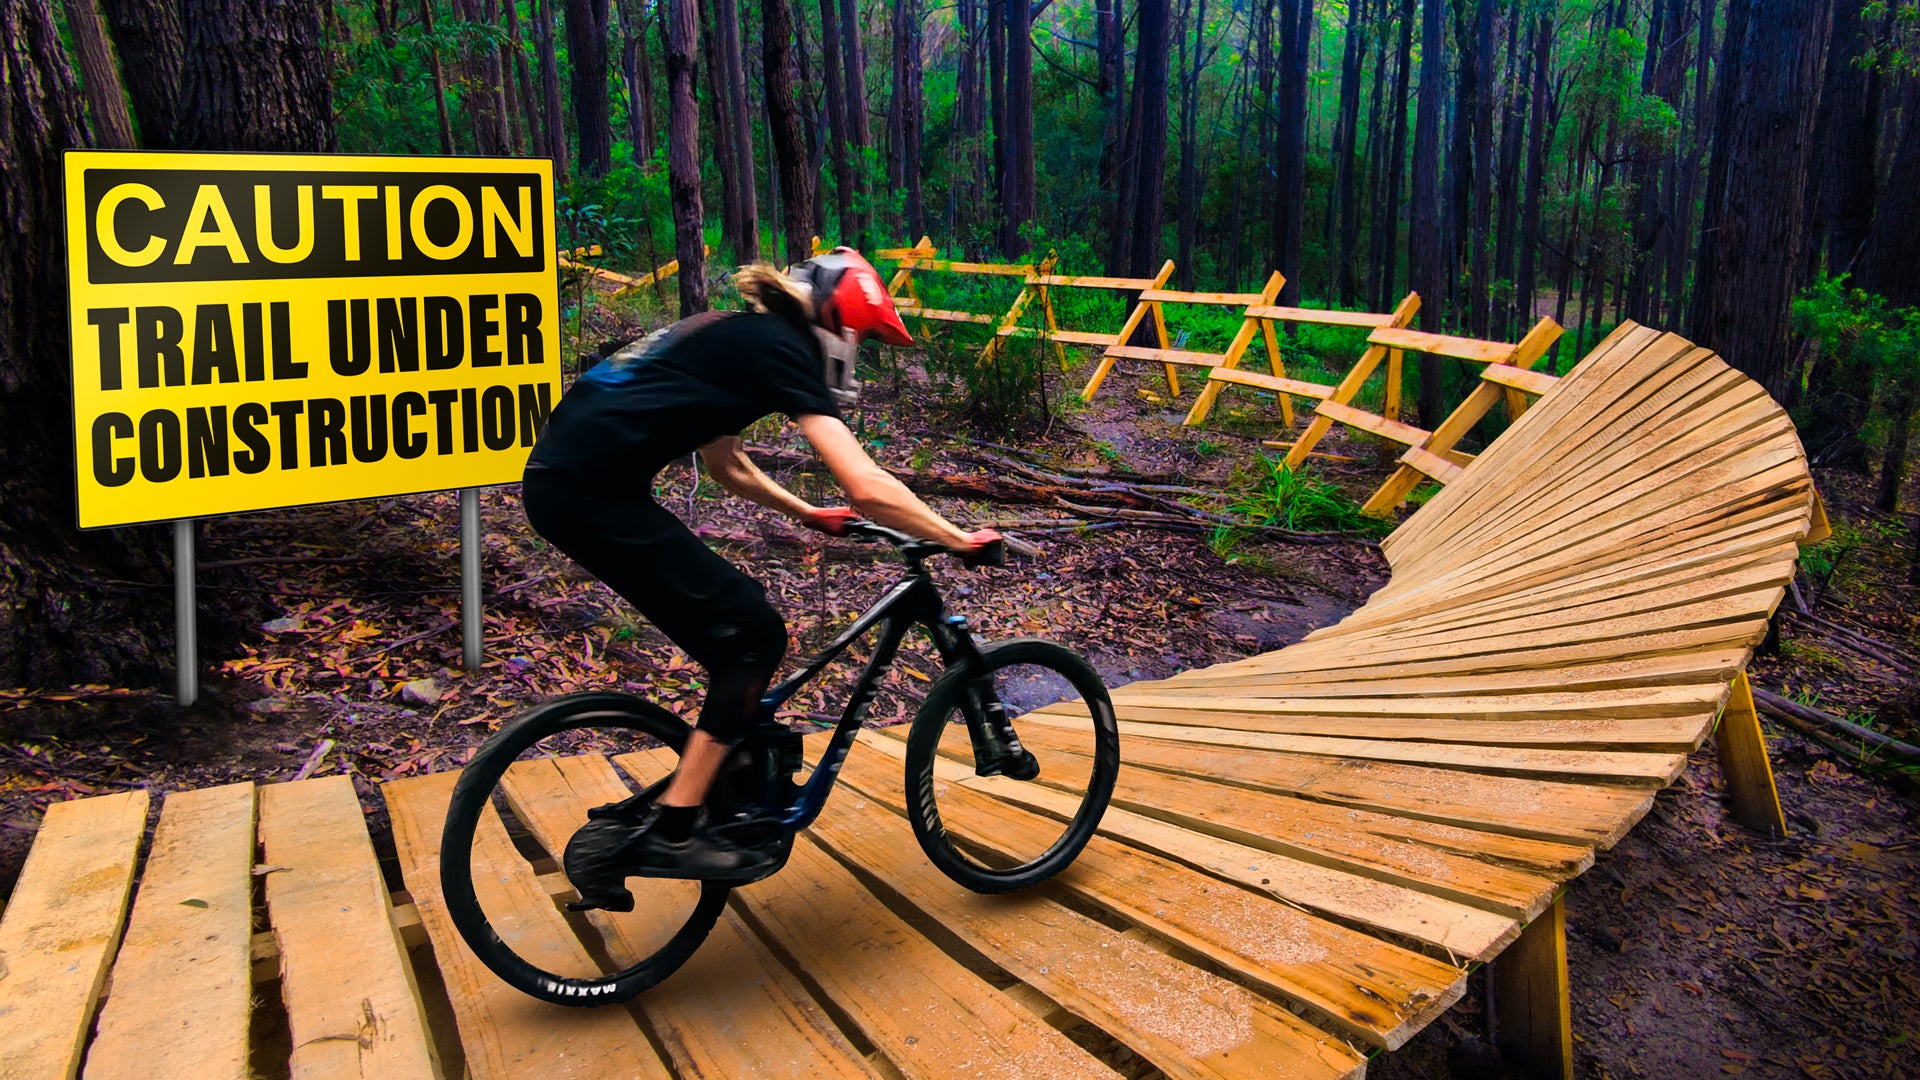
Installing Features
Add berms (banked turns), rollers (small hills), and jumps as planned. Use natural materials when possible. Build bridges over streams with treated wood and secure them well.
Common mistake: Adding too many features too soon. Start simple and add complexity as riders test the trail.
Final Packing
Once shaped, pack the trail firmly. Ride it yourself or ask volunteers to test it. Fill holes and adjust curves as needed.
Erosion Control And Maintenance
A trail is never finished. It needs care to stay safe and enjoyable.
Preventing Erosion
Monitor the trail after rain. Look for puddles, ruts, and mud. Fix problems quickly by adding gravel or reshaping dips.
Non-obvious insight: Place rocks or logs on the downhill side to slow runoff and protect the trail edge.
Regular Maintenance
Schedule monthly checks and after heavy storms. Remove fallen branches, repair holes, and trim overgrown plants. Keep the trail clear and well-marked.
Volunteer Groups
Many trails use local bike clubs or volunteers for maintenance. Create a schedule and reward helpers with rides or gear.
Building For Safety And Accessibility
Safety is key for any mountain bike trail. Make sure your trail is safe for all skill levels.
Signage And Marking
Use signs to mark trail entrances, exits, and difficult sections. Color-code trails by difficulty:
- Green: Easy
- Blue: Intermediate
- Black: Advanced
Add signs for hazards like drops, narrow bridges, and steep slopes.
Emergency Access
Leave space for emergency vehicles or rescue teams. Share your trail map with local officials. Place markers every half-mile for easy location.
Accessibility
Consider adding wider, smoother sections for beginners or disabled riders. Build ramps instead of stairs and avoid barriers.

Credit: www.vermontpublic.org
Trail Features And Enhancements
Adding features makes your trail unique and enjoyable.
Berms And Banked Turns
Berms help riders maintain speed through turns. Build them with packed dirt and reinforce with rocks if needed. Angle them to match expected speed.
Jumps And Rollers
Start with small jumps and rollers. Use dirt or rocks and shape them with shovels. Test each feature for safety before opening.
Bridges And Boardwalks
Build bridges over streams or muddy spots. Use treated wood and anchor both ends firmly. Boardwalks are good for wet areas; space boards to prevent slipping.
Technical Features
Add rock gardens, log rides, and drops for advanced riders. Always test features and add warning signs.
Rest Areas And Viewpoints
Create spots to rest and enjoy the view. Use benches or logs. These areas encourage riders to respect nature and reduce trail congestion.
Monitoring Trail Impact
Trails affect wildlife and the environment. Monitor your trail to reduce harm.
Wildlife
Watch for signs of animals crossing the trail. Adjust the route if needed. Avoid building during nesting seasons.
Vegetation
Check for invasive plants. Remove them quickly and encourage native growth.
Trail Usage Data
Use trail counters or surveys to track riders. Adjust maintenance and features based on feedback.
Cost, Funding, And Community Support
Building a trail costs money, but smart planning and community help can reduce expenses.
Typical Costs
- Tools and materials: $2,000–$10,000
- Signage: $500–$1,500
- Bridges and features: $1,000–$5,000
Volunteer labor can save thousands.
Funding Sources
Seek grants from outdoor groups, government agencies, and bike companies. Host fundraisers and ask local businesses for support.
Building Community
Invite riders to help build and maintain the trail. Host opening events and group rides. Strong community support keeps your trail alive.
Comparing Trail Types And Building Difficulty
To help you decide which trail to build, here’s a comparison of common types.
| Trail Type | Building Difficulty | Average Cost | Maintenance Needs |
|---|---|---|---|
| Cross-country | Medium | $5,000–$15,000 | Low |
| Downhill | High | $10,000–$30,000 | High |
| Flow trail | Medium | $8,000–$20,000 | Medium |
| Freeride | High | $12,000–$40,000 | High |
Tip: Start with a cross-country trail if you’re new to building.
Common Mistakes And How To Avoid Them
Many new builders make mistakes that can ruin a trail or harm the environment. Here are some to watch for:
- Ignoring drainage: Poor water management leads to muddy, eroded trails.
- Building too steep: Steep trails are hard to ride and prone to erosion.
- Skipping permissions: Building without approval can lead to legal trouble.
- Overbuilding features: Too many jumps or berms overwhelm beginners.
- Neglecting maintenance: Trails quickly become unsafe if not cared for.
Non-obvious insight: Don’t rush to finish. Trails improve over time as you learn from rider feedback and nature’s response.
Final Steps And Opening The Trail
Once your trail is built, prepare for the grand opening.
Testing And Adjustments
Invite experienced riders to test the trail. Watch for unsafe spots, confusing signs, or needed changes. Make adjustments before opening to the public.
Marketing And Outreach
Share your trail with the community. Use social media, local bike shops, and clubs. Host a group ride or opening event.
Trail Etiquette
Teach riders to respect the trail and nature. Share rules like yielding, not littering, and reporting issues.

Credit: www.youtube.com
Frequently Asked Questions
How Long Does It Take To Build A Mountain Bike Trail?
Building a trail can take a few weeks to several months. Time depends on length, features, weather, and volunteer help. A basic singletrack may take 4–8 weeks, while complex trails need up to a year.
Do I Need Permission To Build A Trail?
Yes. Always get written permission from landowners, local government, or park managers. Unauthorized building can lead to fines or removal.
How Much Does It Cost To Build A Trail?
Costs vary. Expect $5,000–$30,000 depending on trail length, features, and materials. Volunteer labor and local donations can reduce costs.
What Tools Are Essential For Trail Building?
Key tools include shovels, mattocks, rakes, loppers, chainsaws, and safety gear. For advanced features, you may need compactors and treated wood.
How Can I Make My Trail Sustainable?
Build with the land’s natural contours, manage drainage, use durable materials, and schedule regular maintenance. Follow best practices from groups like the International Mountain Bicycling Association (IMBA Trail Building Resources).
Building a mountain bike trail is a rewarding project that connects people, nature, and adventure. With careful planning, the right tools, and community support, your trail can become a lasting treasure for riders of all levels.

Hello Guys! I am John Reese, a professional biker and my hobby is biking! I have been biking for last 12 years and I love using bikes while outing as well. Based on my experiences with the different type of bikes (mountain bikes, road bikes and hybrid bikes); I am sharing my opinion about various bikes so that a beginner can get started right away. Happy reading!