Mountain bikes give you freedom to ride on tough trails, muddy roads, and steep hills. But to ride safely, your brakes must work well. Rim brakes are common on many mountain bikes. They use pads that press against the wheel rim to slow you down.
If rim brakes are not adjusted correctly, you may lose control or damage your bike. Knowing how to adjust rim brakes is important for every rider—whether you’re new or experienced. This guide will show you step-by-step how to adjust rim brakes on a mountain bike, explain the tools needed, and help you avoid common mistakes.
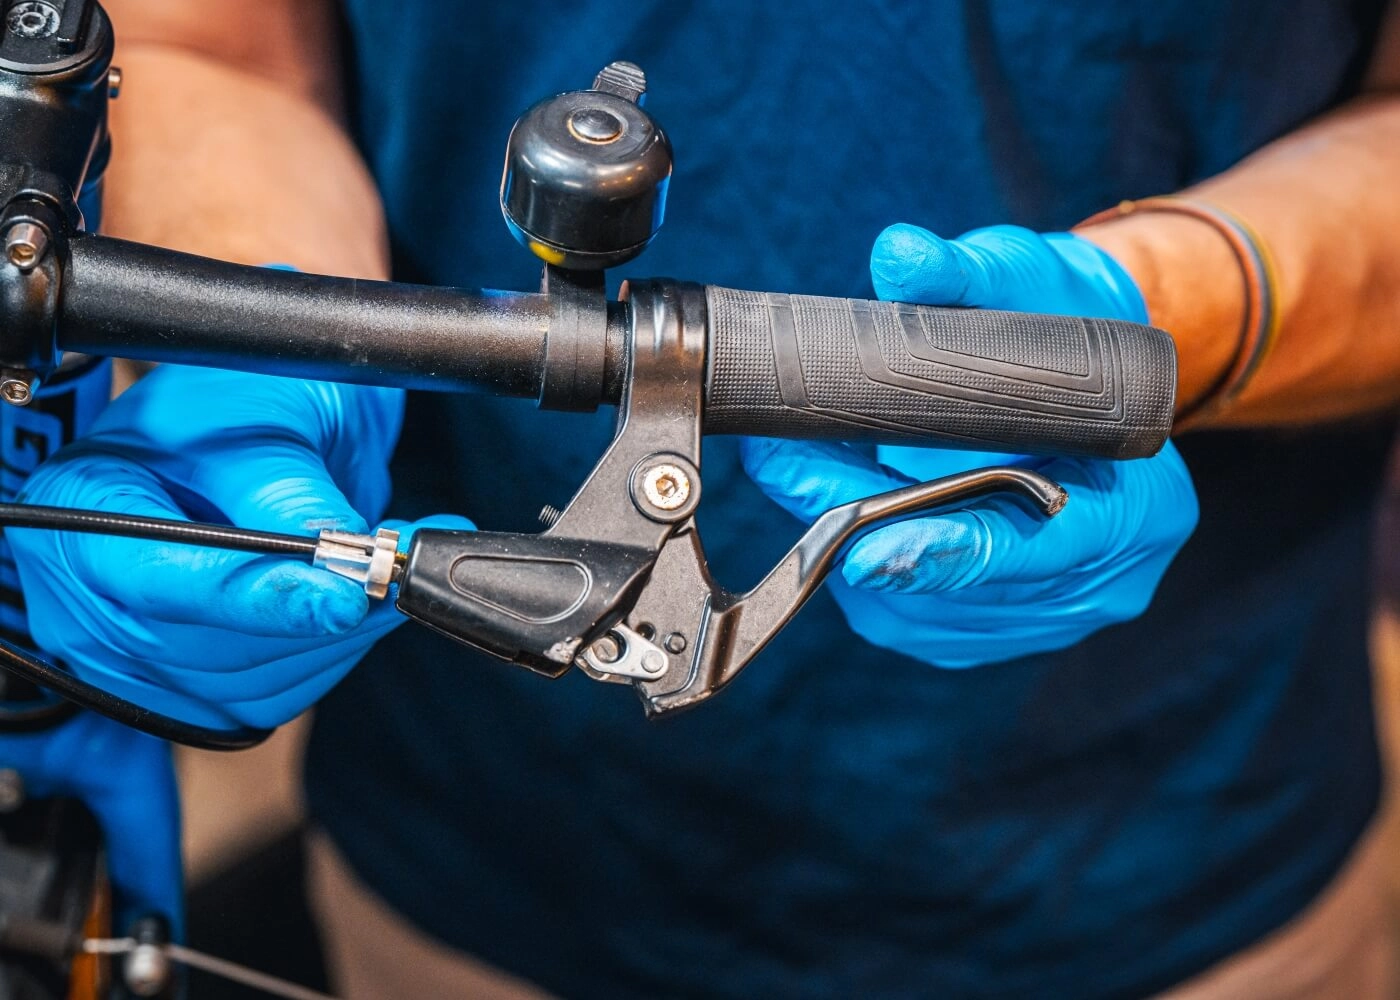
Understanding Rim Brakes On Mountain Bikes
Rim brakes are simple and lightweight. They are popular for mountain bikes because they are easy to fix and cost less than disc brakes. There are two main types of rim brakes:
- V-brakes (linear-pull brakes): These are common on modern mountain bikes. They have long arms and strong stopping power.
- Cantilever brakes: Older mountain bikes often use these. They have shorter arms and different mounting.
Both types use brake pads that press against the rim. When you pull the brake lever, the pads move in and slow the wheel. Good adjustment means the pads touch the rim evenly and stop the bike quickly.
Rim Brake Parts
To adjust rim brakes, you should know the main parts:
- Brake lever: Controls the brakes from the handlebar.
- Brake cable: Connects the lever to the brake arms.
- Brake arms: Hold the pads and move them.
- Brake pads: Rubber pieces that press against the rim.
- Rim: The metal edge of the wheel.
Knowing these parts helps you understand what needs fixing and how each part affects braking.
Tools Needed For Adjusting Rim Brakes
Before starting, gather these tools:
- 5mm Allen wrench: For most bolts on brake arms and pads.
- Phillips screwdriver: For some brake pad holders or arm adjustments.
- Needle-nose pliers: Useful for pulling cables tight.
- Cable cutters: To trim brake cables if needed.
- Lubricant: To keep moving parts smooth.
- Rag: For cleaning the rim and pads.
Having the right tools makes the job easier and prevents damage.
Preparing The Bike For Brake Adjustment
Start by preparing your bike:
- Place your bike in a stable position. Use a bike stand or lean it against a wall.
- Spin the wheels. Make sure they are true (not wobbling). If the rim is bent, brake adjustment will not work well.
- Check the brake pads. They should not be worn out or cracked. Replace if needed.
- Clean the rim and pads. Dirt reduces braking power. Use a rag and some water or rubbing alcohol.
A clean and stable bike helps you see problems and makes adjustment easier.
Step-by-step Guide To Adjusting Rim Brakes
Now, let’s walk through the steps. Each step is important for good braking.
Step 1: Check Brake Pad Alignment
The pads must hit the rim squarely. If they touch the tire or miss the rim, braking will be weak or dangerous.
- Look at the brake pads as they touch the rim.
- Pads should be centered on the rim, not touching the tire or hanging below.
- Pads should hit the rim flat, not at an angle.
If the pads are misaligned:
- Use the 5mm Allen wrench to loosen the pad bolt.
- Move the pad into the right position.
- Tighten the bolt firmly.
Step 2: Set Brake Pad Toe-in
Toe-in means the front of the pad touches the rim slightly before the back. This reduces brake squeal.
- Place a thin piece of paper between the back half of the pad and the rim.
- Loosen the pad and adjust so the front touches the rim, but the back rests on the paper.
- Tighten the pad bolt.
Toe-in adjustment can take a few tries. It is a small detail, but it makes brakes quieter and smoother.
Step 3: Adjust Brake Cable Tension
Cable tension controls how hard the pads press the rim.
- Squeeze the brake lever. It should feel firm, not mushy.
- If the lever goes to the handlebar, the cable is too loose.
- If the lever is stiff and the pads rub the rim, the cable is too tight.
To adjust:
- Find the cable anchor bolt (usually on the brake arm).
- Loosen the bolt with the Allen wrench.
- Pull the cable tighter (for more tension) or let it out (for less).
- Tighten the bolt.
Fine-tune with the barrel adjuster (small knob near the lever or brake arm). Turn it clockwise to loosen, counterclockwise to tighten.
Step 4: Center The Brake Arms
Brake arms must move evenly. If one arm moves more, the pads will not touch the rim at the same time.
- Squeeze the brake lever. Watch both arms.
- If one arm moves more, use the small spring tension screws (usually on the arms).
- Turn the screw clockwise to move the arm out, counterclockwise to move it in.
Do this for both arms until they move together.
Step 5: Test Braking Performance
After adjustment:
- Spin the wheel and squeeze the lever. The wheel should stop quickly.
- Release the lever. Pads should move away from the rim.
- Check for pad rub. Pads should not touch the rim when the lever is released.
If you hear squealing, re-check toe-in. If braking feels weak, check cable tension.
Common Problems And Solutions
Rim brakes can have issues. Here’s how to fix the most common ones:
- Brake squeal: Usually caused by poor toe-in or dirty pads/rim. Adjust toe-in, clean pads and rim.
- Weak braking: Check for worn pads, loose cable, or oily rim. Replace pads, tighten cable, clean rim.
- Pad rub: Center the brake arms, check for bent rim.
- Sticky brake arms: Add lubricant to the arm pivots.
- Brake lever feels soft: Increase cable tension, check for frayed cable.
Many beginners forget to clean the rim. Even a little dirt can make brakes weak. Also, some riders do not notice pad wear. Pads should have clear grooves. If they are smooth, replace them.
How Often Should You Adjust Rim Brakes?
Adjustment depends on your riding:
- Heavy riders or those on muddy trails need more frequent adjustments.
- After every 30-50 hours of riding, check brake pads and cable tension.
- If you notice the lever feels different or hear strange sounds, check brakes right away.
Professional riders check brakes before every ride. For most riders, once a month is enough.
Comparing Rim Brakes To Disc Brakes
Many riders ask: Are rim brakes good enough? Here’s how they compare to disc brakes:
| Feature | Rim Brakes | Disc Brakes |
|---|---|---|
| Stopping Power | Good for dry conditions | Excellent in all conditions |
| Weight | Lighter | Heavier |
| Maintenance | Easy, low cost | Complex, higher cost |
| Performance in Mud | Reduced | Unaffected |
| Replacement Cost | Low | High |
Rim brakes are best for light bikes and easy maintenance. Disc brakes work better in rain or mud but cost more.
Typical Mistakes Beginners Make When Adjusting Rim Brakes
Adjusting rim brakes is simple, but many beginners make mistakes:
- Not aligning pads correctly: Pads must hit the rim, not the tire.
- Ignoring toe-in: Toe-in prevents squeal.
- Over-tightening cable: This makes brakes stiff and pads rub the rim.
- Forgetting to center arms: Uneven arms cause one pad to hit first.
- Skipping cleaning: Dirt reduces braking power.
One non-obvious tip: Check pad wear angle. If pads wear unevenly, it means alignment is off. Also, some riders forget to check cable fraying. A frayed cable can snap suddenly.

Credit: www.sepr.es
Brake Pad Types And Which To Choose
Not all brake pads are the same. Here’s a comparison of common types:
| Pad Type | Best For | Durability | Cost |
|---|---|---|---|
| Standard rubber | Dry conditions | Medium | Low |
| Soft compound | Wet conditions | Low | Medium |
| Hard compound | Long lasting | High | High |
| Cartridge pads | Easy replacement | Medium | Medium |
Choose pads based on the weather and your riding style. Soft compound pads work well in rain but wear out faster. Cartridge pads are good for frequent riders—they are easy to swap out.
Safety Tips For Riding With Rim Brakes
To stay safe while riding with rim brakes:
- Check brakes before every ride: Quick squeeze of the lever.
- Replace pads before they are worn out: Don’t wait for them to disappear.
- Clean the rim and pads regularly.
- Avoid oil or grease near brakes: It reduces friction.
- Carry an Allen wrench and spare pads: Useful for trail repairs.
If you ride in wet conditions, know that rim brakes lose stopping power. Slow down earlier and keep your brakes clean.

Credit: www.youtube.com
Real-life Example: Adjusting Rim Brakes For Trail Riding
Let’s look at a real example. Sarah rides trails every weekend. She noticed her brakes squealed and her lever felt soft.
She followed these steps:
- Cleaned her rim and pads.
- Adjusted pad toe-in using a piece of paper.
- Increased cable tension with the barrel adjuster.
- Centered brake arms using the spring screws.
After these steps, her brakes were quiet and strong. She learned that cleaning and toe-in were the biggest improvements. Many riders focus only on cable tension, but toe-in often solves squealing.
Advanced Tips For Expert Adjustment
If you want perfect brakes:
- Use a brake pad gauge to check pad alignment.
- Change cables every year for best performance.
- Lubricate pivots, but avoid the pads and rim.
- Swap to cartridge pads for easy replacement.
- Upgrade to stainless steel cables for smoother action.
For riders in wet climates, consider hard compound pads. They last longer and resist water.
When Should You Replace Rim Brake Parts?
Brakes wear out over time. Replace parts when:
- Pads have no grooves: They are worn out.
- Cable is frayed: Replace immediately.
- Brake arms feel loose: Check for worn bushings.
- Levers are sticky: Lubricate or replace.
Most brake pads last 500–1,000 miles. Cables should be replaced every year if you ride often.
Rim Brake Adjustment Data
Here’s some data about rim brake performance:
| Condition | Stopping Distance (feet) | Notes |
|---|---|---|
| Dry pavement | 12 | Good performance |
| Wet pavement | 20 | Reduced grip |
| Muddy trail | 28 | Significant loss |
| After adjustment | 10 | Best possible |
Adjusting brakes can reduce stopping distance by up to 25%. This can mean the difference between stopping safely or crashing.
Credit: www.bike24.com
Frequently Asked Questions
What If My Rim Brakes Still Squeal After Adjustment?
Brake squeal usually means the pads are not toe-in correctly or the rim is dirty. Try adjusting toe-in again and clean both the rim and pads. If the problem continues, check for worn pads or a damaged rim.
How Do I Know When To Replace Brake Pads?
Look at the grooves on the pads. If they are gone or the pad is less than 1/8 inch thick, replace them. Also, replace pads if you see cracks or they feel hard.
Can I Use Rim Brakes In Wet Or Muddy Conditions?
Rim brakes work less well in wet or muddy conditions. Stopping distances are longer, and pads wear out faster. Clean the rim often and use soft compound pads for better grip.
How Tight Should The Brake Cable Be?
The brake lever should feel firm and stop the bike quickly. If the lever touches the handlebar, the cable is too loose. If the pads rub the rim, the cable is too tight. Adjust until the lever feels right.
Are Rim Brakes Still Good For Mountain Biking?
Yes, rim brakes are good for many mountain bikes, especially for beginners and those riding in dry conditions. They are simple, easy to fix, and cost less than disc brakes. For muddy or wet trails, disc brakes offer better performance.
Rim brakes are a reliable choice for mountain biking when adjusted properly. With the right tools and a few careful steps, you can keep your brakes strong and safe. Many riders overlook small details like pad alignment and toe-in, but these can change your riding experience. If you ride often or in tough conditions, check your brakes regularly. Remember, a well-adjusted rim brake can stop you quickly and keep you safe on the trails. For more technical information, visit the Sheldon Brown’s brake adjustment guide. By following these steps and tips, you’ll gain confidence, avoid common mistakes, and enjoy smoother, safer rides every time.

Hello Guys! I am John Reese, a professional biker and my hobby is biking! I have been biking for last 12 years and I love using bikes while outing as well. Based on my experiences with the different type of bikes (mountain bikes, road bikes and hybrid bikes); I am sharing my opinion about various bikes so that a beginner can get started right away. Happy reading!