Changing mountain bike pedals seems simple, but there’s more to it than just turning a wrench. Many riders struggle with stuck pedals, wrong tools, or confusing thread directions. If you’ve never replaced pedals, this guide will help you avoid common mistakes and show every step clearly.
Whether you’re upgrading to lighter pedals or swapping out damaged ones, knowing how to do it right can save you time, frustration, and money.
Mountain bike pedals connect you to your bike, affecting comfort, control, and performance. The right pedals can improve grip, help you climb steep trails, and make your rides safer. But to get these benefits, you need to install them correctly.
Let’s look at what you need, how to prepare, and the step-by-step process, so you can confidently replace pedals at home.
Why Replace Pedals On A Mountain Bike?
Most riders change pedals for one of three reasons: upgrading for better performance, replacing damaged pedals, or switching between clipless and flat types. Upgrading to lighter or more durable pedals can reduce bike weight, improve grip, and make riding easier. Damaged pedals can make riding unsafe, causing slips or sudden failures. Switching pedal types lets you adapt to different terrain or riding styles.
Some beginners miss that pedal choice affects how much power you transfer to the bike. For example, clipless pedals let you pull up on the pedal as well as push down, making climbs easier. Flat pedals are simpler and let you quickly put your foot down if you need to stop or balance.
Replacing pedals isn’t just about the pedals themselves. It’s also a chance to check crank arms, clean threads, and make sure everything is tight and safe. This basic maintenance can prevent bigger problems later.
Tools And Materials Needed
To replace mountain bike pedals safely, you’ll need the right tools. Using the wrong tool is a top reason pedals get damaged or stuck. Here’s what you need:
- Pedal wrench or a 15mm open-end wrench: Most pedals use a 15mm size. Some modern pedals use a 6mm or 8mm Allen key instead.
- Grease: This prevents threads from seizing and makes removal easier next time.
- Clean rag: For wiping off dirt and old grease.
- New pedals: Check compatibility with your crank arms.
- Optional: Threadlocker: For extra security if riding in wet or rough conditions.
Always check your new pedals for instructions. Some brands use different wrench sizes or thread directions.
Understanding Pedal Threads And Sides
Pedals are not identical. The left pedal and right pedal have different thread directions to prevent them from unscrewing while you ride. This detail confuses many beginners.
- Right pedal (drive side): Has a right-hand thread. Turn clockwise to tighten, counterclockwise to loosen.
- Left pedal (non-drive side): Has a left-hand thread. Turn counterclockwise to tighten, clockwise to loosen.
If you try to install a left pedal on the right side, it won’t fit and may damage the threads. Always check for “L” or “R” markings on the pedal spindle.
| Pedal Side | Thread Direction | Tighten | Loosen |
|---|---|---|---|
| Right (Drive) | Right-hand | Clockwise | Counterclockwise |
| Left (Non-Drive) | Left-hand | Counterclockwise | Clockwise |
Many people miss that proper thread direction is not just a design choice—it stops pedals from unscrewing during use. This is especially important for mountain bikers who face rough terrain.
Preparing Your Bike And Workspace
Good preparation makes pedal replacement easier. Find a flat, clean area to work. If you have a bike stand, use it to keep your bike stable and lift the pedals off the ground. If not, lean your bike against a wall or lay it gently on its side.
Before removing pedals:
- Shift the chain to the smallest chainring. This keeps your hands away from sharp teeth.
- Clean the area around the pedal and crank arm with a rag. Dirt and old grease can hide damage or cause threads to stick.
- Inspect crank arms for cracks or wear. Damaged cranks can break under stress.
A common mistake is not checking pedal compatibility. Some pedals require a different wrench or Allen key size. Confirm before starting, so you don’t get stuck halfway through.
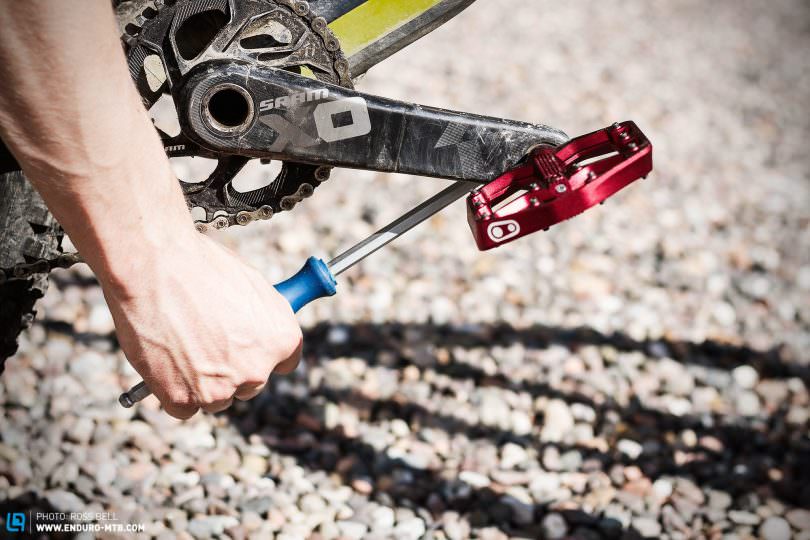
Removing Old Pedals
Now, let’s remove the old pedals step by step. If pedals are stuck, use extra force or a longer wrench. Don’t hit with a hammer—this can damage the crank arms.
- Identify pedal side: Look for “L” (left) or “R” (right) markings.
- Position the wrench: Place the wrench or Allen key on the pedal spindle. For most bikes, the wrench fits between the pedal and crank arm.
- Rotate in the correct direction:
- Right pedal: Turn counterclockwise.
- Left pedal: Turn clockwise.
- Apply steady force: Hold the crank arm for support. If stuck, try a penetrating oil and wait a few minutes.
- Remove pedal: Once loose, unscrew fully by hand.
Some pedals use an Allen key from the inside of the crank arm. Insert the key and turn as above.
Troubleshooting Stuck Pedals
Stuck pedals are common. Here are solutions:
- Apply penetrating oil to the threads and wait 15–20 minutes.
- Use a longer wrench for more leverage.
- Rock the pedal gently back and forth to break it free.
- Check for corrosion—if threads are rusty, clean them as much as possible before removal.
Never force pedals with extreme pressure. If the pedal won’t budge, visit a bike shop to avoid damaging the crank.
Cleaning And Inspecting Crank Threads
After removing pedals, inspect the threads on the crank arms. Clean them with a rag to remove dirt, old grease, or metal shavings. Look for cross-threading (damaged or uneven threads), which can cause new pedals to install poorly.
If threads look damaged:
- Try running a pedal thread tap through to clean and restore the threads.
- If threads are badly stripped, you may need a professional repair or crank replacement.
Apply fresh grease to threads before installing new pedals. This helps prevent seizing and makes removal easier next time.

Credit: catalogue-bois-construction.fr
Installing New Pedals
Installing new pedals is simple, but there are details to watch for. Incorrect installation can damage threads or cause pedals to loosen while riding.
- Check pedal markings: Find “L” or “R” and match to correct side.
- Apply grease: Coat pedal threads lightly.
- Thread by hand: Start threading the pedal by hand to avoid cross-threading. If it resists, stop and check alignment.
- Tighten with wrench/Allen key: Once threaded, use the correct tool to tighten.
- Right pedal: Turn clockwise.
- Left pedal: Turn counterclockwise.
- Torque: Pedals should be snug, but not overtightened. Most pedals require about 25–30 Nm of torque.
If you ride in wet or muddy areas, consider a drop of threadlocker for extra security.
Common Mistakes When Installing Pedals
- Cross-threading: Starting with the wrong angle damages crank threads. Always thread by hand first.
- Wrong pedal on wrong side: Double-check “L” and “R” before tightening.
- Skipping grease: Dry threads can seize, making removal very difficult later.
| Installation Step | Common Error | How to Avoid |
|---|---|---|
| Threading | Cross-threading | Start by hand, check alignment |
| Side selection | Wrong pedal on wrong side | Check “L” and “R” markings |
| Greasing | Skipped grease | Apply grease before installing |
| Tightening | Over-tightening | Use proper torque, avoid excessive force |
Many beginners forget that pedal threads are delicate. Even a small mistake can ruin crank arms, which are expensive to replace.
Choosing The Right Pedals For Your Mountain Bike
If you’re replacing pedals, it’s smart to consider which type best suits your riding style. Mountain bike pedals fall into two main categories:
- Flat pedals: Good for technical trails, quick foot movement, and beginners.
- Clipless pedals: Secure your foot with a cleat, ideal for efficient power transfer and aggressive riding.
Pedal material also matters. Aluminum pedals are light and durable, while plastic pedals are cheaper but wear out faster. Steel spindles are strong but heavier.
Let’s compare popular pedal types:
| Pedal Type | Best For | Advantages | Drawbacks |
|---|---|---|---|
| Flat | Technical, beginners | Easy foot removal, versatile | Less power transfer |
| Clipless | Climbing, racing | Secure, efficient | Harder to remove foot quickly |
| Hybrid | Mixed terrain | Flexible use | Heavier, complex |
When choosing pedals, check your shoe compatibility. Clipless pedals need specific shoes and cleats. Flat pedals work with most shoes but grip can vary.
A non-obvious tip: For muddy trails, go for pedals with removable pins. These let you adjust grip and replace pins when worn out.

Credit: www.youtube.com
Tips For Safe And Lasting Pedal Installation
Replacing pedals is not just about the first ride. Doing it right means your pedals stay tight and safe for months.
- Use quality grease: Cheap grease breaks down and lets dirt inside threads. Invest in bike-specific grease for best results.
- Check pedal tightness regularly: After first ride, recheck pedal tightness. Pedals can settle in and loosen.
- Inspect pedal body: Look for cracks or loose parts, especially after rough rides.
- Avoid water pressure on pedal bearings: When cleaning your bike, don’t blast pedals with high-pressure water. This can push dirt into bearings and cause early failure.
A useful insight: Pedal bearings are often ignored. If your pedals spin roughly or make noise, consider cleaning or replacing bearings as well.
When To Seek Professional Help
Most pedal replacements are easy at home. But if you face problems like:
- Severely stuck pedals
- Damaged crank threads
- Pedals won’t fit or spin correctly
It’s best to visit a local bike shop. Repairs can save crank arms and prevent injury. Professionals have special tools and experience for tough cases.
Real-world Examples And Statistics
According to cycling industry data, about 20% of mountain bike repairs involve pedal or crank issues. Most are caused by improper installation or lack of maintenance. Riders who grease pedal threads and check tightness regularly have fewer problems and longer-lasting pedals.
A common story from trail riders: After a muddy ride, pedals sometimes seize up due to grit in the threads. Cleaning and re-greasing prevents this. Another example—riders who switch between clipless and flat pedals for different rides often forget to check thread direction, leading to cross-threading.
For more detailed pedal and bike maintenance statistics, the Bicycling Magazine offers useful repair guides and industry data.
Frequently Asked Questions
How Do I Know Which Pedal Goes On Which Side?
Pedals are marked “L” for left and “R” for right. The right pedal (drive side) tightens clockwise, while the left pedal (non-drive side) tightens counterclockwise. Always check markings before installing.
What Happens If I Install The Pedals Incorrectly?
Incorrect installation, like cross-threading or putting the wrong pedal on the wrong side, can damage crank threads. This may require expensive repairs. Pedals may also loosen or fall off during riding.
How Tight Should I Install My Pedals?
Pedals should be snug but not overtightened. Recommended torque is usually 25–30 Nm. Too loose and pedals may unscrew; too tight and you risk damaging threads.
Can I Use Any Pedals On My Mountain Bike?
Most mountain bikes use standard 9/16-inch pedal threads. However, some kids’ bikes or older models use 1/2-inch. Always check your crank arm and pedal compatibility before buying.
How Often Should I Check Or Replace My Pedals?
Inspect pedals and crank threads every few months, especially after muddy or rough rides. Replace pedals if you see damage, excessive wear, or if bearings spin poorly.
Mountain bike pedal replacement is a simple job that makes a big difference in performance and safety. With the right tools, careful preparation, and a clear understanding of pedal threads, you can easily swap pedals at home. Remember to check pedal tightness after your first ride, use quality grease, and choose pedals that fit your riding style.
If you face stubborn problems, don’t hesitate to ask for help at a local bike shop. A well-installed set of pedals means smoother rides, safer adventures, and more confidence on the trail.
Credit: enduro-mtb.com

Hello Guys! I am John Reese, a professional biker and my hobby is biking! I have been biking for last 12 years and I love using bikes while outing as well. Based on my experiences with the different type of bikes (mountain bikes, road bikes and hybrid bikes); I am sharing my opinion about various bikes so that a beginner can get started right away. Happy reading!