Mountain biking is more than just riding trails—it’s about control, comfort, and confidence. One part of your bike that makes a huge difference is the front fork. The fork absorbs bumps, helps you steer, and keeps your hands from taking a beating. But if your fork is not adjusted correctly, every root or rock can feel harsh, and your ride can be less safe. Knowing how to adjust forks on a mountain bike is a skill that every serious rider should have. Whether you’re new to suspension or looking to fine-tune your setup, this guide walks you through everything you need for a smooth, responsive ride.
Understanding Mountain Bike Forks
Before you adjust anything, it helps to know what you’re working with. Most modern mountain bikes have suspension forks. These use either air or coil springs, sometimes with extra adjustments for damping.
Air forks are popular because they are lighter and easy to adjust for your weight. You just add or release air. Coil forks use a metal spring, which is less adjustable but often provides smoother action for some riders. Both types may have external dials for rebound and compression.
A common misconception is that “set and forget” works for forks. In reality, trail conditions, your weight, and riding style all matter. If you’re switching from road cycling or hardtail bikes, suspension setup may seem complicated at first, but you’ll soon notice the benefits.
Why Proper Fork Adjustment Matters
A well-adjusted fork doesn’t just make your ride more comfortable—it makes it safer and more efficient. Here’s why:
- Improved control: The fork absorbs impacts, keeping your front wheel in contact with the ground. This helps you steer and brake better.
- Reduced fatigue: Less shock travels to your hands and arms, so you can ride longer.
- Better traction: A fork that moves smoothly lets your tire grip the trail, even on bumpy or loose sections.
- Protection for your bike: Proper setup prevents damage to the fork’s internal parts and keeps seals from wearing out too soon.
One beginner mistake is to ride with too much or too little air, or to ignore rebound settings. The result? Either a harsh, bouncy ride or a fork that bottoms out and feels unsafe.
Tools And Preparation
Adjusting your mountain bike fork isn’t hard, but you need the right tools and a bit of time. Here’s what you should have ready:
- Shock pump: A special high-pressure pump for air forks (don’t use a regular tire pump).
- Allen wrenches: Most forks use 4mm, 5mm, or 6mm sizes.
- Clean rag: For wiping off dirt before you adjust.
- Suspension manual: Each fork is different. If you don’t have yours, most brands have guides online.
- Tape measure or ruler: To check sag (how much the fork compresses with your weight).
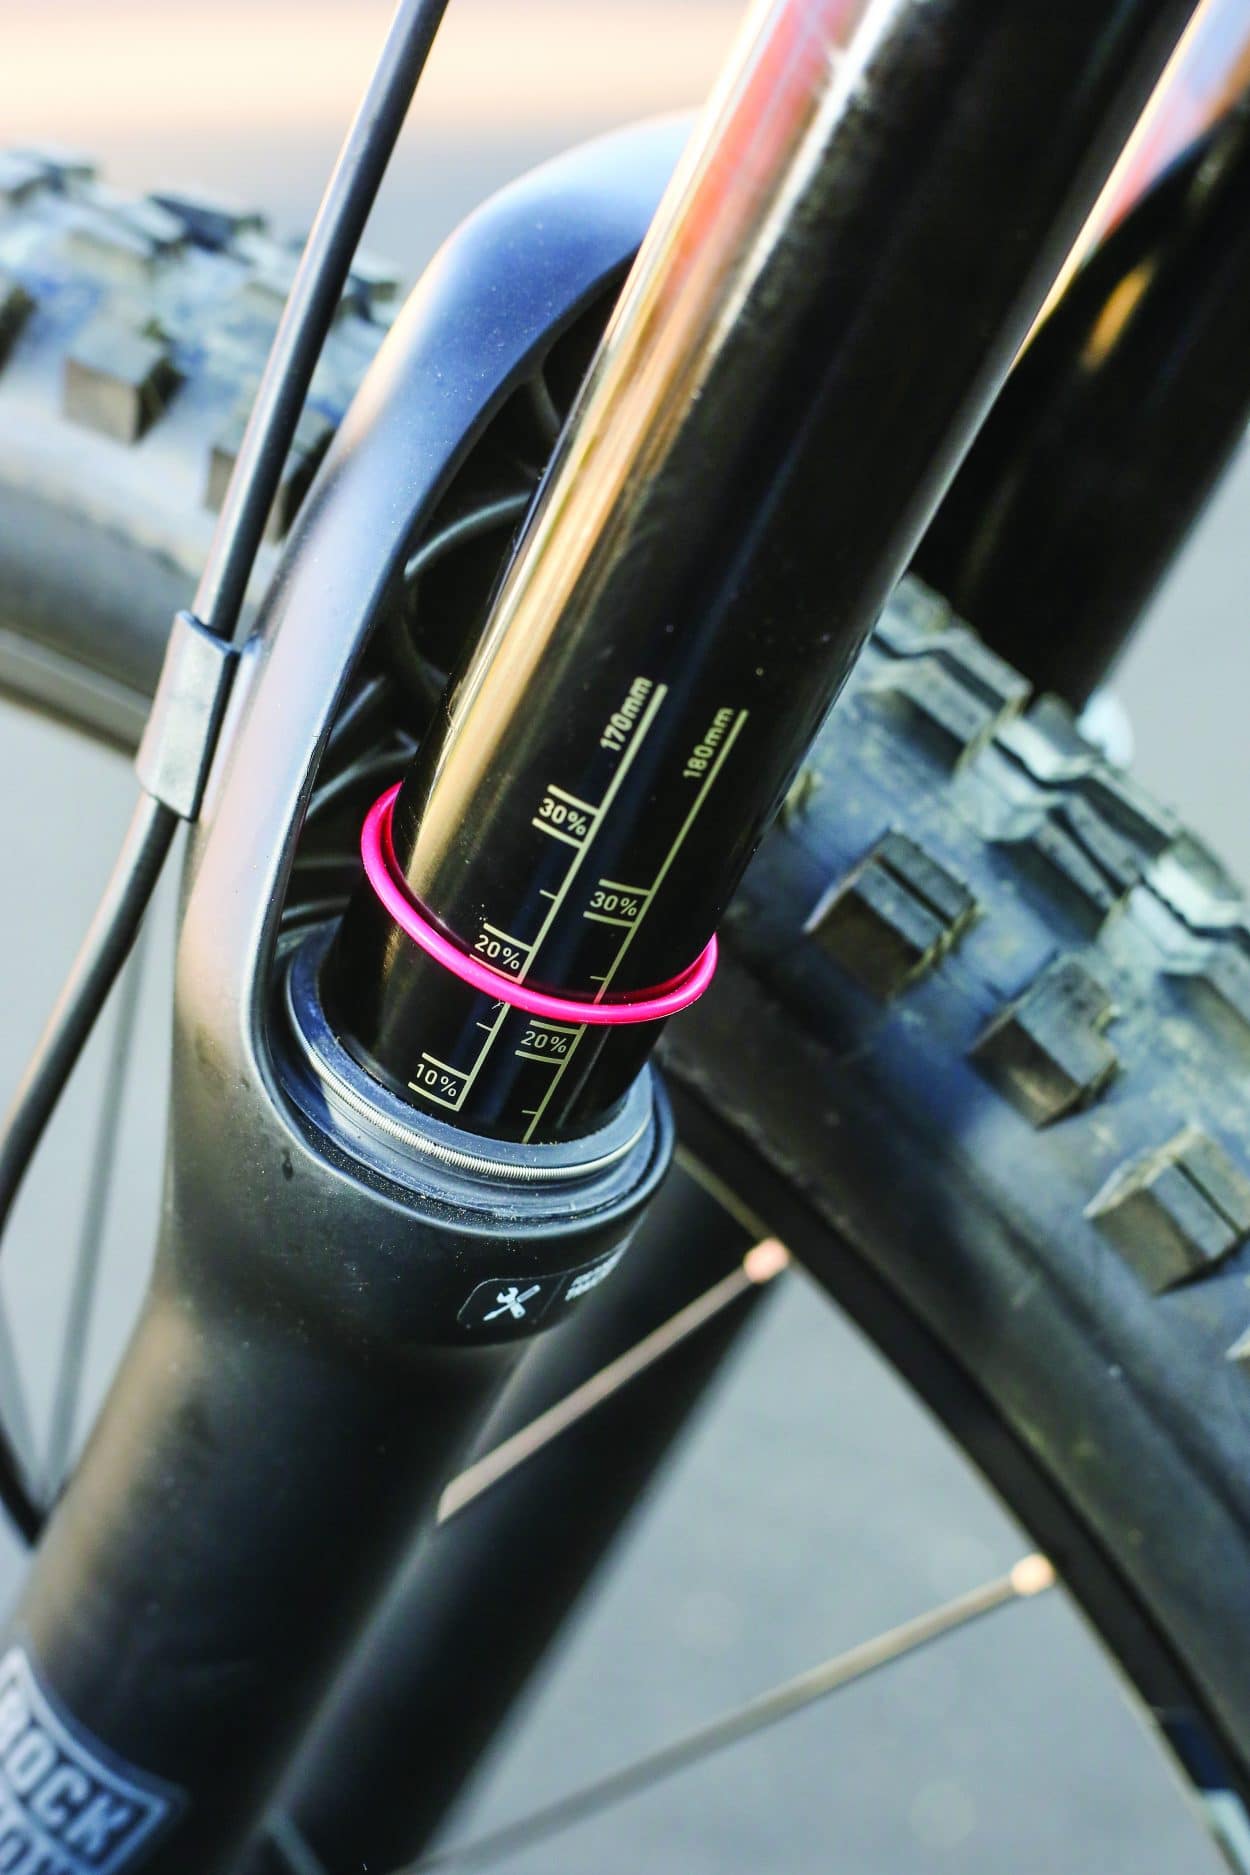
- Zip tie or O-ring: Some forks come with an O-ring on the stanchion (the shiny upper tube). If yours doesn’t, a zip tie works fine.
Set your bike up in a safe, flat place. If you have a bike stand, use it—but you can also lean your bike against a wall.
Key Fork Adjustments Explained
Modern mountain bike forks offer several adjustments. It’s easy to get confused by all the knobs and dials. Here’s what matters and how each one affects your ride:
Sag
Sag is the amount your fork compresses under your weight when you sit on the bike. Getting sag right is the single most important step in fork setup. Too little sag, and the fork feels harsh; too much, and it bottoms out too easily.
- Typical sag range: 15–25% of total fork travel for cross-country riding, 20–30% for trail/enduro.
- How to measure: Sit on your bike in riding gear, gently lower yourself onto the saddle, and have a friend steady the bike. Measure how much the O-ring or zip tie moves down the stanchion.
Air Pressure (for Air Forks)
Adjusting air pressure controls sag. More air means less sag (firmer ride), less air gives more sag (softer ride). Every fork has a recommended air pressure chart based on rider weight.
Preload (for Coil Forks)
Preload adjusts how much the coil spring is compressed before you start riding. Too much preload makes the fork stiff and can damage the spring.
Rebound
Rebound controls how fast the fork returns to its full length after compressing. Too fast, and the fork feels bouncy (“pogo stick” effect). Too slow, and it feels sluggish, or “packs down” over bumps.
Compression
Some forks offer compression adjustment, which sets how easily the fork compresses. Low-speed compression affects small bumps and pedal bob; high-speed compression is for bigger hits.
Lockout
Lockout makes the fork rigid for climbing or road riding. Use it when you want zero fork movement, but never on rough trails.

Credit: enduro-mtb.com
Step-by-step Guide: Adjusting Your Fork
Now, let’s get hands-on. Follow these steps for a basic fork setup that you can fine-tune later.
1. Clean And Inspect Your Fork
Before you adjust anything, wipe the stanchions and seals. Check for scratches or oil leaks. A clean fork works better and lasts longer.
2. Set Your Sag
- Wear your usual riding gear and fill your hydration pack as usual.
- Stand next to your bike and slide the O-ring or zip tie against the fork seal.
- Mount your bike gently, balancing without bouncing.
- Settle into your riding position (either sitting or standing, depending on your style).
- Carefully step off without compressing the fork further.
- Measure how much the O-ring has moved.
- Check this against your fork’s travel (usually marked on the stanchion or in the specs).
Example: If your fork has 120mm of travel, and the O-ring moved 24mm, you have 20% sag.
- Too little sag? Let out some air (or decrease preload).
- Too much sag? Add air (or increase preload).
Repeat until you hit the target sag range.
3. Adjust Air Pressure Or Preload
For air forks, use your shock pump. For coil forks, turn the preload knob. Always make small changes and re-check sag.
Pro tip: Don’t be afraid to go for a short test ride between adjustments. Trails give better feedback than your garage.
4. Set Rebound
Find the red rebound dial, usually at the fork’s bottom. Most dials have a tortoise (slow) and hare (fast) icon.
- Start in the middle of the range.
- Ride over a curb or small bump.
- Watch how the fork returns. If it “tops out” with a clunk or feels bouncy, slow the rebound. If it feels sticky or doesn’t extend quickly, speed it up.
A good test: Lift the front wheel and drop it. The fork should rebound smoothly, not shoot up or lag behind.
5. Fine-tune Compression (if Available)
Turn the blue (or sometimes black) compression dial. Start in the middle, then adjust:
- More compression for smoother trails, sprinting, or climbing.
- Less compression for rough, technical descents.
Don’t max out the compression unless you’re on pavement.
6. Check Lockout
Engage and disengage the lockout. Make sure it works smoothly. Never use lockout on rough terrain—this can damage your fork.
7. Test Ride And Readjust
Take your bike on a short loop that matches your usual trails. Pay attention to how the fork feels on small bumps, big hits, and corners. Make small changes and repeat as needed.
Common Problems And How To Fix Them
Even after adjusting, you might notice issues. Here’s how to solve the most common ones:
Fork Feels Too Stiff
- Check if sag is below 15%.
- Let out some air (air fork) or reduce preload (coil fork).
- Make sure compression isn’t set too high.
Fork Bottoms Out Easily
- Sag is probably over 30%.
- Add air (air fork) or increase preload (coil fork).
- If you’re a heavier or aggressive rider, you may need a firmer spring (coil) or more air volume spacers (air).
Fork Feels Bouncy
- Rebound is too fast. Turn the rebound dial toward “tortoise.”
- Check that you’re not running too little air.
Fork Feels Harsh
- Sag may be too low.
- Too much compression damping.
- Try lowering air pressure or turning down compression.
Lockout Doesn’t Work
- Check the lever and cable (if remote).
- If the fork is old, the lockout cartridge might need service.
Comparison: Air Vs Coil Forks
When adjusting forks, the type matters. Here’s a quick comparison:
| Feature | Air Fork | Coil Fork |
|---|---|---|
| Adjustment | Easy (air pressure) | Limited (preload, spring swap) |
| Weight | Lighter | Heavier |
| Consistency | May change with temperature | Very consistent |
| Cost | Usually higher | Usually lower |
| Maintenance | Needs regular air checks | Spring lasts longer |
Trail-specific Fork Adjustments
Different trails need different setups. Here’s how to adjust forks for various riding styles:
Cross-country (xc)
- Sag: 15–20%
- Compression: Medium to firm
- Rebound: Faster for quick response
- Lockout: Useful on climbs
Trail/all-mountain
- Sag: 20–25%
- Compression: Balanced
- Rebound: Moderate
Enduro/downhill
- Sag: 25–30%
- Compression: Softer for big hits
- Rebound: Slightly slower for control
Adjusting for the trail is often overlooked by beginners. Many set their fork once and never change it, missing out on better performance.

Credit: www.youtube.com
Damping Adjustments: What Do They Really Do?
Damping is about controlling how fast the fork moves. Here’s a breakdown:
| Damping Type | Effect | When to Use |
|---|---|---|
| Rebound | Controls fork return speed | Slower for rough trails, faster for smooth |
| Compression | Controls fork compression speed | More for climbing, less for descending |
If your fork has only one damping adjustment, it’s usually rebound.
Volume Spacers: The Secret To Custom Feel
Many air forks allow you to add or remove volume spacers. These change how the fork behaves deeper in its travel:
- More spacers: Fork feels more progressive, harder to bottom out.
- Fewer spacers: Fork feels more linear, uses travel more easily.
Installing spacers requires opening the fork. Check your manual or have a shop do it if you’re not comfortable.
Mistakes To Avoid When Adjusting Forks
- Ignoring your weight: Always set air pressure based on your actual riding weight, including gear.
- Skipping sag measurement: Eyeballing doesn’t work. Use a ruler for accuracy.
- Making big changes: Adjust one setting at a time, in small steps.
- Not recording settings: Write down your air pressure, rebound, and compression so you can repeat or tweak later.
- Neglecting maintenance: Dirty or dry forks can’t perform well, no matter how you adjust them.
A common beginner mistake is to change too many things at once, leading to confusion. If you get lost, reset to factory settings and start over.
How Suspension Affects Your Ride
Proper fork adjustment does more than just improve comfort. It changes how your bike handles:
- Cornering: A balanced fork lets the front tire grip better, so you can turn faster with confidence.
- Braking: The front stays planted, reducing the risk of going over the bars.
- Climbing: With the right settings, your fork won’t bob or waste energy.
- Descending: The fork absorbs hits, making steep or rocky trails less scary.
Suspension setup is personal. What works for a 150-pound rider may not suit a 200-pound rider, even on the same trail.
Credit: mbaction.com
When To Service Your Fork
Adjustment is only part of fork performance. Regular service keeps everything smooth and safe.
- Clean and lube: After muddy rides or every few weeks.
- Seal and oil change: Every 50–100 hours of riding (check your manual).
- Professional service: Once a year or if you notice leaking oil, strange noises, or poor performance.
A well-maintained fork makes every adjustment count.
Advanced Tuning: For Experienced Riders
If you want to push your fork beyond basic adjustments, consider:
Air Tokens Or Volume Spacers
As mentioned earlier, these change the “ramp-up” at the end of travel. More tokens = less bottom-out, but the fork may feel firmer.
Aftermarket Damper Upgrades
Some brands offer upgraded dampers for more precise control, especially on long-travel forks.
Custom Spring Rates
For coil forks, swapping to a softer or firmer spring can match your weight or riding style.
Data Logging
Advanced riders sometimes use suspension data loggers to track fork movement on the trail. This helps dial in settings perfectly.
These upgrades can improve performance but aren’t needed for most riders. Start with the basics before investing more money.
How To Troubleshoot After A Fork Adjustment
If your fork doesn’t feel right after adjusting, try this approach:
- Reset to recommended settings: Use the manufacturer’s chart.
- Check all bolts: Make sure the axle and stem bolts are tight.
- Test one change at a time: Adjust air, then rebound, then compression.
- Ride familiar trails: You’ll notice differences more easily.
- Ask for help: Local bike shops or experienced friends can spot issues you may miss.
Sometimes, the problem isn’t the fork itself—worn tires, loose headsets, or even a bent rim can affect handling.
Real-world Example: Adjusting A Rockshox Air Fork
Suppose you have a RockShox Recon with 120mm travel. You weigh 170 pounds with gear. Here’s a quick setup:
- Air pressure: Check RockShox’s chart—about 75 psi.
- Set sag: Sit on the bike, measure O-ring movement. Adjust air to get about 24mm (20% of travel).
- Rebound: Start in the middle. Ride a trail. If it bounces, slow it down.
- Compression: Middle setting for mixed terrain.
- Test ride: Make small tweaks as needed.
Always check the manufacturer’s recommendations, but listen to your own feel on the trail. No chart can tell you exactly what feels best for your riding style.
How Fork Adjustment Compares To Rear Suspension
Many mountain bikes have rear shocks with similar adjustments. Here’s how front and rear setup interact:
| Adjustment | Fork | Rear Shock |
|---|---|---|
| Sag | 15–30% | 25–35% |
| Rebound | Controls front wheel | Controls rear wheel |
| Compression | Helps with climbing/descending | Helps with pedal efficiency |
| Lockout | For climbs/road | For climbs/road |
For best performance, balance both ends. If your fork is soft and the rear is firm, the bike may “dive” on descents. Matching settings keeps handling predictable.
When To Consult A Professional
If you try all the steps but your fork still doesn’t feel right, it’s okay to ask for help. Local bike shops have experience with all types of forks. They can:
- Check for internal problems (damaged seals, worn bushings)
- Service the fork if needed
- Offer advice for your specific trails and riding style
Some brands also offer online setup guides. For example, RockShox Suspension Setup is a great resource.
Frequently Asked Questions
How Often Should I Adjust My Mountain Bike Fork?
Adjust your fork whenever your riding weight changes (new gear, hydration packs), you switch trail types, or if the fork feels different. At minimum, check your settings every few months.
Can I Use A Regular Tire Pump For My Air Fork?
No. Use a shock pump designed for high-pressure, low-volume air chambers. A tire pump can damage the fork or give inaccurate readings.
What Is The Ideal Sag For My Riding Style?
For cross-country, aim for 15–20% sag. Trail and all-mountain riders use 20–25%. Enduro and downhill need 25–30%. Always measure with your full gear on.
How Do I Know If My Fork Needs Service?
Signs include leaking oil, sticky movement, strange noises, or loss of adjustment range. Most forks need basic service every 50–100 hours of riding.
Are Fork Adjustments The Same For All Brands?
No, each brand and model can have unique features. Always check your fork’s manual or the manufacturer’s website for specific instructions.
Getting your mountain bike fork dialed in isn’t just about numbers—it’s about feel and confidence on the trail. Start with the basics, experiment with settings, and don’t be afraid to fine-tune as your skills grow. With the right adjustments, your bike will handle better, last longer, and turn every ride into a true adventure.

Hello Guys! I am John Reese, a professional biker and my hobby is biking! I have been biking for last 12 years and I love using bikes while outing as well. Based on my experiences with the different type of bikes (mountain bikes, road bikes and hybrid bikes); I am sharing my opinion about various bikes so that a beginner can get started right away. Happy reading!