Adjusting rear disc brakes on a mountain bike is one of those tasks that can feel intimidating at first. Many riders worry they will do more harm than good, or that they need special skills and tools. In reality, with some patience and clear steps, almost anyone can learn to tune their rear disc brakes for better stopping power, safety, and riding confidence. If your brakes feel weak, noisy, or uneven, a careful adjustment can make a world of difference. Whether you’re a weekend trail explorer or a daily commuter, knowing how to handle this maintenance is a skill worth having. This guide will walk you through every detail, from understanding brake types to diagnosing issues, making adjustments, and preventing common mistakes. You’ll also find practical examples, comparison tables, and tips that even many seasoned riders miss.
Understanding Rear Disc Brakes
Before jumping into the adjustment process, it helps to know what you’re working with. Disc brakes use a rotor (metal disc) attached to the wheel hub. When you pull the brake lever, pads inside the caliper squeeze the rotor, slowing the wheel.
Types Of Disc Brakes
Mountain bikes commonly use two types of disc brakes:
- Mechanical disc brakes: These use a cable to move the pads. They are easier to work with and cheaper, but need frequent adjustment.
- Hydraulic disc brakes: These use fluid to push the pads. They offer more power and smoother feel, but require special tools and more careful handling.
Here’s a quick comparison:
| Feature | Mechanical Disc | Hydraulic Disc |
|---|---|---|
| Adjustment Difficulty | Easy | Moderate |
| Cost | Lower | Higher |
| Maintenance Frequency | Frequent | Less frequent |
| Brake Power | Good | Excellent |
| Tools Needed | Basic | Specialized |
If you’re unsure which you have, look at the caliper. If there’s a cable coming in, it’s mechanical. If there’s a hose, it’s hydraulic.
Why Rear Brakes Matter
On a mountain bike, the rear disc brake helps control speed, especially on loose surfaces or steep descents. While the front brake provides most stopping power, the rear is essential for balance, handling, and safe cornering. Well-adjusted rear brakes reduce skidding and improve control.
Tools And Preparation
To adjust your rear disc brake, gather these tools:
- Hex (Allen) wrenches (usually 4mm, 5mm, 6mm)
- Screwdriver (for mechanical brakes)
- Bike stand (optional, but helpful)
- Clean rag
- Isopropyl alcohol (for cleaning)
- Brake pad spreader or plastic tire lever
- For hydraulic brakes: Bleed kit (if needed)
Check your workspace. Make sure your bike is stable. If you don’t have a stand, lean the bike against a wall, but ensure it won’t tip over. Wear gloves to keep hands clean and avoid contaminating the pads.
Diagnosing Common Rear Brake Problems
Before adjusting, identify the issue. Many beginners miss this step and start tweaking randomly. Here are typical problems:
- Squeaking or squealing: Often caused by dirty pads or rotor, misalignment, or contaminated pads.
- Weak braking: Can be due to worn pads, air in hydraulic lines, stretched cable, or misaligned caliper.
- Dragging: Pads rub against the rotor even when not braking. Usually a sign of poor alignment or warped rotor.
- Lever feels spongy: Common with hydraulics. Air in the system or old fluid.
- Lever travel too long: You must pull the lever far before brakes engage. Can mean pads are worn or cable is loose.
A careful visual inspection goes a long way. Spin the wheel and watch the rotor. Does it run true, or wobble? Are the pads centered? Is the lever loose or tight? These clues help you decide which adjustment to make.
Cleaning And Preparing The Brake System
Dirt, oil, or residue can ruin brake performance. Before adjusting, clean the rotor and pads.
- Remove the wheel if needed. This gives better access.
- Use a clean rag with isopropyl alcohol to wipe the rotor. Avoid touching with bare hands.
- Inspect pads for glazing or contamination. If dirty, gently sand the surface or replace.
- Never use bike lubricants or WD-40 on brakes.
Many riders skip this cleaning and adjust dirty brakes—this leads to frustration and poor results. Clean first, then adjust.
Adjusting Mechanical Rear Disc Brakes
Mechanical disc brakes are more common on entry-level mountain bikes. Their adjustment is simpler, but still needs care.
Step-by-step Adjustment
1. Check Cable Tension
Squeeze the brake lever. If it feels loose or must be pulled too far, tighten the cable.
- Find the barrel adjuster (near the lever or caliper).
- Turn it counterclockwise to increase tension.
- If still loose, use a hex wrench to loosen the cable anchor bolt. Pull cable tight, retighten bolt.
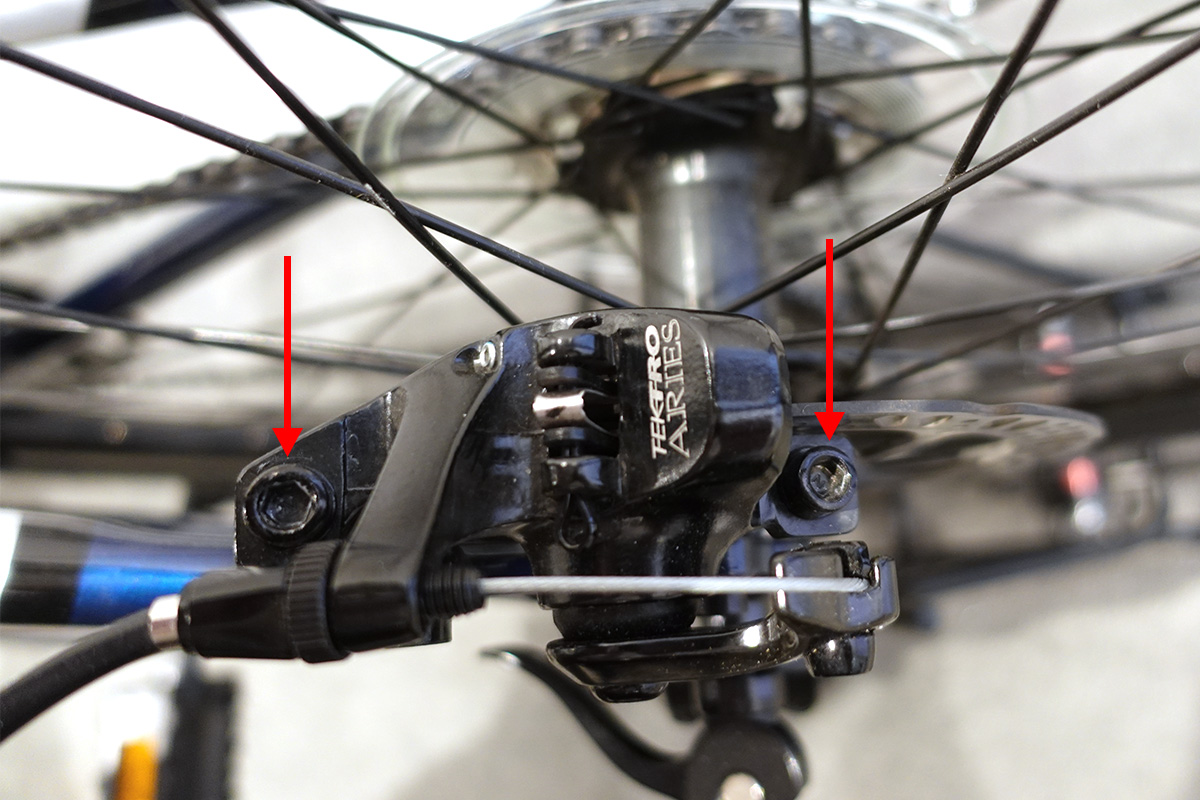
- Align the Caliper
Misalignment is a major cause of noise and poor braking.
- Loosen the two caliper mounting bolts slightly.
- Squeeze the brake lever fully. This centers the caliper over the rotor.
- While holding the lever, tighten the bolts evenly.
- Adjust Pad Distance
Most mechanical calipers have a dial or screw to move pads closer/farther from the rotor.
- Turn inward for more bite, outward for less.
- Pads should be close, but not rubbing.
- Test for Rub or Drag
Spin the wheel. Listen for rubbing. If pads touch, fine-tune pad distance or caliper alignment.
5. Final Check
Squeeze the lever. The brake should engage firmly after a short pull. If not, repeat the steps.
Here’s a comparison of cable tension adjustments:
| Adjustment Method | Ease | Effect |
|---|---|---|
| Barrel Adjuster | Easy | Small changes |
| Cable Anchor Bolt | Moderate | Large changes |
Adjusting Hydraulic Rear Disc Brakes
Hydraulic brakes offer stronger, smoother stopping but require more precision.
Step-by-step Adjustment
- Align the Caliper
- Loosen caliper mounting bolts.
- Squeeze the brake lever to center caliper over rotor.
- Tighten bolts while holding lever.
- Check Pad Wear
Hydraulic pads wear slower, but need checking. If thin (<1mm), replace pads.
3. Check For Air In System
Spongy feel means air is trapped.
- Bleed the brake using a kit (follow manufacturer steps).
- Use fresh fluid—old fluid absorbs moisture and weakens brakes.
- Pad Spacing
If pads rub, use a pad spreader or plastic tire lever to gently push pistons back into caliper.
5. Rotor True
If the rotor wobbles, use a truing tool to gently bend it straight.
6. Test Brake Action
Squeeze lever. The brake should engage smoothly and firmly.
Here’s a quick comparison between mechanical and hydraulic adjustment steps:
| Step | Mechanical | Hydraulic |
|---|---|---|
| Cable Tension | Yes | No |
| Fluid Bleeding | No | Yes |
| Pad Spacing | Manual dial | Pad spreader |
| Caliper Alignment | Same | Same |

Credit: www.amazon.com
Adjusting Pad Position And Rotor Alignment
Many riders focus only on the caliper, missing pad position and rotor alignment. These matter for smooth, quiet braking.
How To Adjust Pad Position
- For mechanical brakes, turn the pad dial until pads are close but not touching the rotor.
- For hydraulic brakes, use a pad spreader or push pistons back carefully.
Checking Rotor Alignment
- Spin the wheel and watch the rotor between pads.
- If the rotor wobbles, use a truing tool to gently adjust.
- Avoid excessive force; small bends make big changes.
Signs Of Poor Alignment
- Constant rubbing noise.
- Reduced speed when coasting.
- Pulsing brake feel.
Correcting these issues improves brake power and extends pad life.
Replacing Worn Brake Pads
Pads wear out with use. If they are thinner than 1mm, replace immediately.
Steps To Replace Pads
- Remove the wheel for easier access.
- Open the caliper (release clip or screw).
- Pull out old pads.
- Insert new pads, making sure they’re seated correctly.
- Close caliper and reinstall wheel.
- Pump brake lever to seat pads.
Choose quality pads—cheap pads wear faster and can damage rotors. Resin pads are quieter, while metal pads last longer.
Bleeding Hydraulic Brakes
Bleeding is needed if the lever feels spongy or brakes lose power. Air in the system is the culprit.
Quick Bleeding Guide
- Attach bleed kit to caliper and lever.
- Open bleed valve and slowly push fluid through.
- Watch for bubbles—continue until only fluid comes out.
- Close valve, remove kit, wipe any spills.
Always use fluid recommended by the manufacturer. Mixing fluids can damage seals.
Fine-tuning Brake Lever Reach
Lever reach matters for comfort and control, especially if you have small hands.
- Look for a small screw or dial near the lever.
- Turn to adjust reach closer or farther.
- Test by gripping and squeezing; should feel easy and natural.
A well-adjusted lever reduces fatigue and improves braking accuracy.
Credit: www.montaguebikes.com
Test Ride And Safety Checks
After adjustment, always test your brakes in a safe place.
- Ride slowly and gently squeeze rear brake.
- Try harder stops from low speed.
- Listen for rubbing or squealing.
- Check if the wheel spins freely when not braking.
If anything feels wrong, repeat alignment or pad adjustments. Don’t ride trails until brakes work smoothly.
Practical Tips And Common Mistakes
Many beginners make small errors that cause big problems. Here are tips to avoid them:
- Don’t touch pads with fingers: Oils from skin can contaminate pads.
- Don’t over-tighten bolts: This can strip threads or crack parts.
- Replace pads before they’re totally worn: Waiting too long damages the rotor.
- Check after every muddy ride: Dirt speeds up pad wear and reduces power.
- Use quality tools: Cheap wrenches can round bolts and make adjustment harder.
Two non-obvious insights:
- If your brake still squeals after cleaning and alignment, try lightly sanding the pads. This removes glazing and restores grip.
- When aligning the caliper, try using a business card between pad and rotor. This ensures a tiny gap and prevents rubbing.
Advanced Troubleshooting
Sometimes, problems persist even after adjustments. Here are advanced checks:
- Rotor thickness: Most rotors are 1.8–2mm thick. If thinner, replace.
- Frame or mounting tab alignment: If caliper won’t align, check if frame tabs are bent.
- Pad type: Mixing resin and metal pads can cause uneven wear and noise.
If you continue to have trouble, consult a bike shop or look for guidance from sources like Park Tool.
Maintenance Schedule
Regular brake maintenance prevents problems. Here’s a simple schedule:
- Every ride: Check for noise, rubbing, lever feel.
- Monthly: Clean rotors, check pad thickness, test cable/hose tension.
- Every 6 months: Deep clean, check for leaks (hydraulic), replace pads if needed.
- Yearly: Bleed hydraulic systems, inspect rotors, replace cables if stretched.
Keeping to this schedule ensures reliable braking and safer rides.
Credit: www.reddit.com
Frequently Asked Questions
How Often Should I Check And Adjust My Rear Disc Brakes?
Check your brakes before every ride. Adjust as needed if you notice noise, weak stopping, or excessive lever travel. Monthly checks for pad thickness and alignment help prevent problems.
What Should I Do If My Brakes Squeal Even After Cleaning?
If cleaning doesn’t solve squealing, try lightly sanding the pads, checking alignment, and ensuring no oil or grease is present. Sometimes, switching pad types (from resin to metal, or vice versa) can help.
Can I Use Any Brake Pads, Or Do I Need Specific Ones For My Bike?
You must use pads designed for your caliper model. Mixing incompatible pads causes poor performance and can damage the caliper or rotor. Check your bike manual or manufacturer website for correct pads.
How Do I Know If My Rotor Is Warped?
Spin the wheel and watch the rotor between pads. If it wobbles side to side, it’s warped. You may hear a rubbing sound at one spot. Small bends can be fixed with a truing tool; big bends require replacement.
Are Hydraulic Brakes Better Than Mechanical For Mountain Biking?
Hydraulic brakes give more stopping power and smoother action, making them ideal for tough trails. Mechanical brakes are easier to fix and cheaper, but may require more frequent adjustment. Choose based on your riding style and budget.
Adjusting rear disc brakes on a mountain bike isn’t just about fixing problems—it’s about making your ride safer and more enjoyable. With the right tools, careful steps, and attention to detail, you can achieve smooth, powerful braking every time. Remember to clean first, diagnose the real issue, and follow each step patiently.
Regular checks and maintenance will keep your brakes working perfectly, so you can focus on the trail ahead.

Hello Guys! I am John Reese, a professional biker and my hobby is biking! I have been biking for last 12 years and I love using bikes while outing as well. Based on my experiences with the different type of bikes (mountain bikes, road bikes and hybrid bikes); I am sharing my opinion about various bikes so that a beginner can get started right away. Happy reading!