Adjusting the stem on your mountain bike can make a huge difference in how your bike feels and performs. Whether you want more comfort, better handling, or just a safer ride, changing your stem position is one of the quickest ways to improve. Many riders don’t realize how much the stem affects their body position, steering, and even their confidence on the trail. If you’re not sure how to adjust the stem or why you should, this guide will help you every step of the way. You’ll learn what tools you need, which adjustments matter most, and how to avoid mistakes that could harm your bike or your riding experience. Let’s dive into the details and get your mountain bike set up just right.
What Is The Stem And Why Does It Matter?
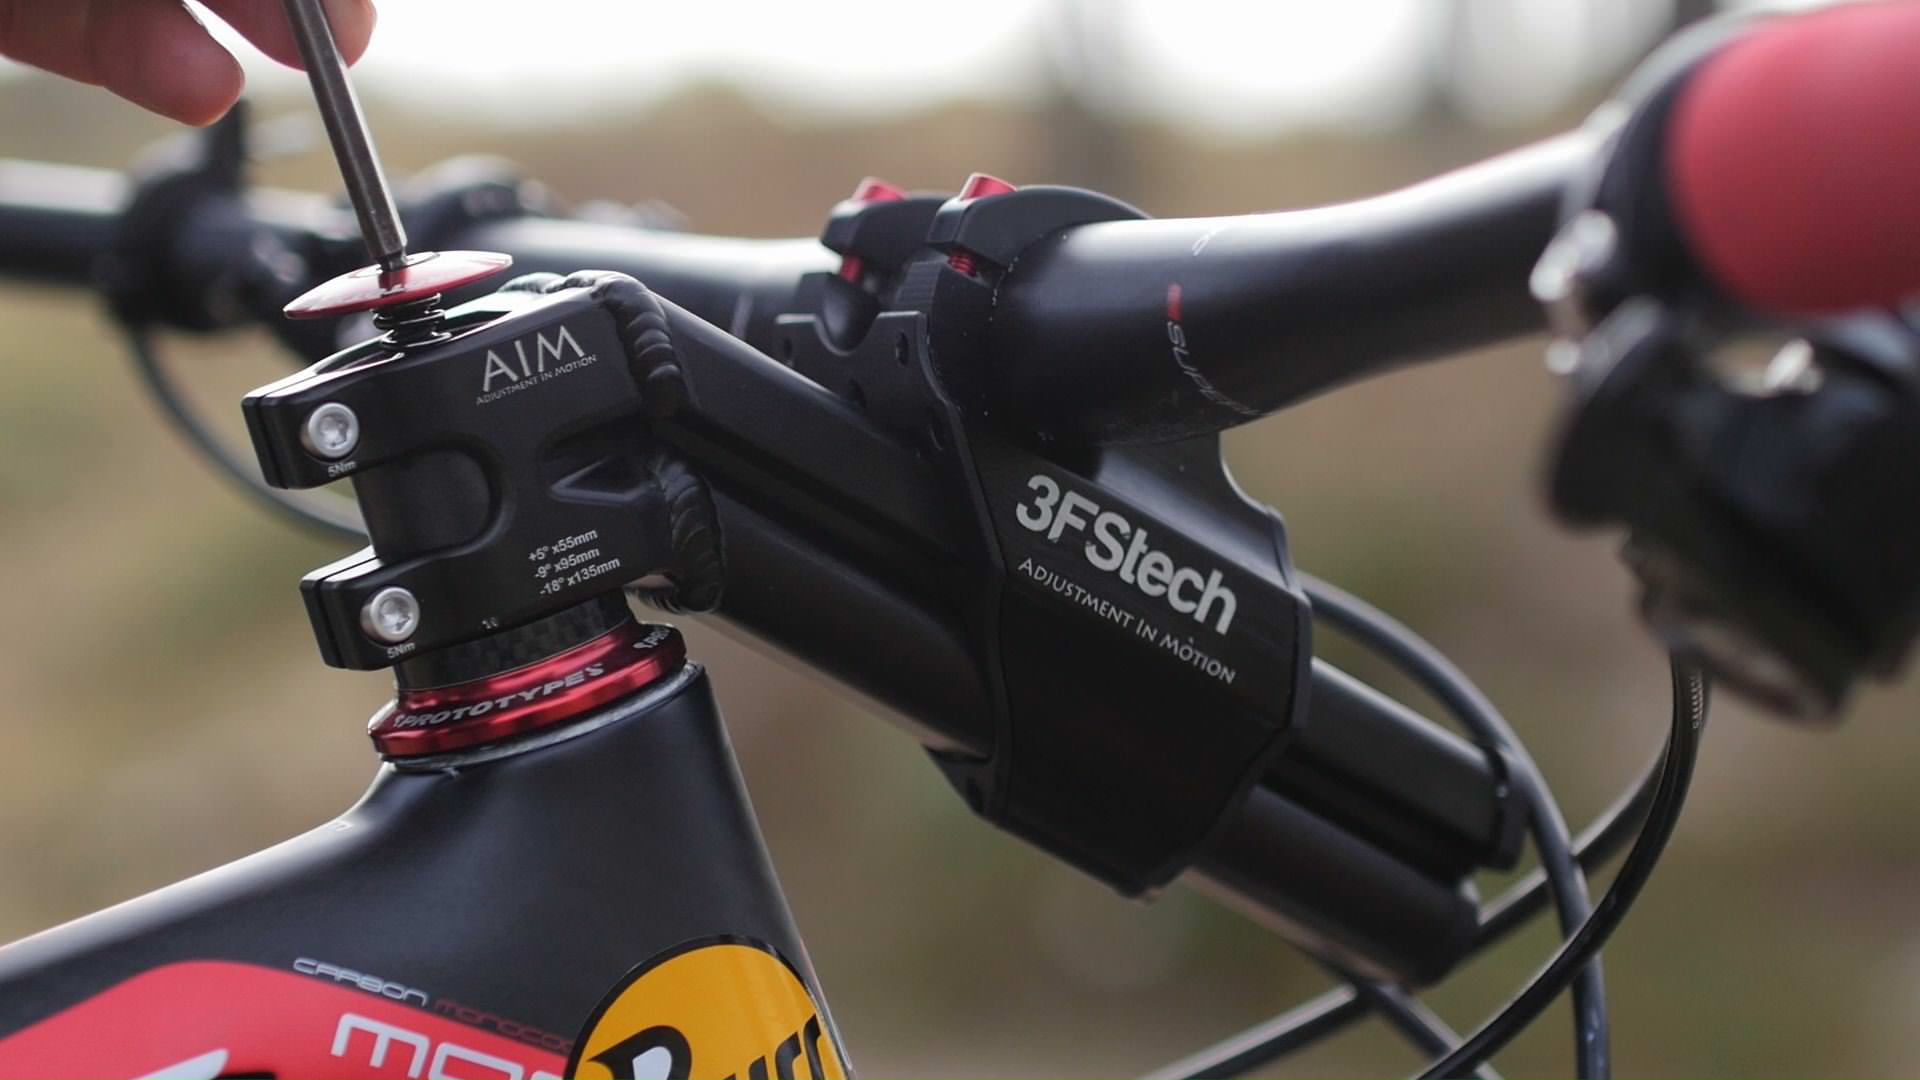
The stem is the part that connects your handlebars to the fork steerer tube. It controls how high, low, far forward, or back your handlebars are positioned. Changing the stem’s angle, height, or length affects your posture, steering, and comfort.
A longer stem stretches you out, while a shorter stem makes your position more upright and responsive. The angle of the stem (called “rise”) can lift or drop the handlebars. This is important for mountain biking because a lower position gives you better control for fast or technical trails, while a higher position is better for comfort and climbing.
Many beginners miss the fact that the wrong stem setup can cause pain in the wrists, neck, or back. It can also make your bike feel twitchy or sluggish. Professional riders often fine-tune their stem to match the terrain, their riding style, and even their body shape.
Types Of Mountain Bike Stems
There are several kinds of stems used in mountain biking. Each type offers different benefits and is suited for different riding styles.
| Stem Type | Main Feature | Best For |
|---|---|---|
| Threadless | Bolts clamp to steerer tube | Modern mountain bikes |
| Quill | Inserted into steerer, secured with bolt | Older or entry-level bikes |
| Adjustable | Angle can be changed | Riders needing flexibility |
| Direct Mount | Bolts directly to fork crown | Downhill/freeride bikes |
Most modern mountain bikes use the threadless stem. If your bike is older, it may have a quill stem. Knowing which type you have is important before making any adjustments.
Tools You Need To Adjust The Stem
Before you start, gather the right tools. Using the correct tools prevents damage and makes the process easier.
- Allen wrenches (Hex keys) – Most stems use 4mm, 5mm, or 6mm sizes.
- Torque wrench – For tightening bolts to the correct tension.
- Grease – Prevents corrosion and squeaks.
- Ruler or tape measure – For checking stem length and handlebar position.
- Handlebar alignment tool (optional) – Helps keep the bars straight.
Many beginners skip the torque wrench. This leads to over-tightened bolts, which can crack the stem or strip the threads. Always use a torque wrench for safety.
Preparing Your Bike For Stem Adjustment
Set your bike on a stable surface or bike stand. Remove any accessories from the handlebars, like lights or computers, so they don’t interfere. If you have hydraulic brakes or cables, check that they have enough slack for movement.
Quick tip: Take a photo of your current setup before changing anything. This makes it easier to return to your original position if needed.
Step-by-step Guide: Adjusting A Threadless Stem
Most mountain bikes today use the threadless stem. Here’s how to adjust it:
1. Loosen The Stem Bolts
Find the bolts at the side or rear of the stem. Use the appropriate Allen wrench to loosen them. Do not remove them completely—just loosen until the stem can rotate or move up/down.
2. Loosen The Top Cap
The top cap bolt is on the very top of the stem. Loosen this bolt, but don’t remove it yet. This releases pressure on the headset, allowing you to move the stem.
3. Adjust The Height
If you want to raise or lower the handlebars, move the stem up or down along the steerer tube. You may need to remove spacers (thin rings) or add them below or above the stem. Spacers are used to adjust height without changing the stem itself.
| Stem Position | Effect | Best For |
|---|---|---|
| Lower stem | More aggressive, quicker steering | Downhill, technical riding |
| Higher stem | More upright, comfortable | Climbing, long rides |
4. Adjust The Angle (rise)
Some stems have a slight angle. You can “flip” the stem to change the rise. If the angle points upward, the handlebars are higher. If downward, they are lower. Remove the stem, rotate it 180 degrees, and reinstall.
5. Adjust The Length
Changing stem length is more involved—it requires replacing the stem. Measure your current stem (from center of steerer tube to center of handlebar clamp) and compare with the new stem.
Longer stems stretch your reach, shorter stems bring the handlebars closer. For most mountain bikers, stems between 40mm and 80mm are common. Beginners often miss how much stem length affects handling: short stems make steering more responsive but can feel twitchy.
6. Align The Handlebars
Before tightening, make sure the handlebars are centered and straight. Stand over the bike and look down the front wheel to line up the bars. Small misalignments can cause steering problems.
7. Tighten Bolts To Correct Torque
Use your torque wrench to tighten the side/rear stem bolts first. Typical torque settings are 5–6 Nm (Newton-meters), but check your stem’s instructions. Tighten the top cap bolt last, just enough to remove play (side-to-side movement) but not so tight that steering feels stiff.
8. Test For Safety
Lift the front wheel and turn the handlebars. Check for smooth movement and no play. Ride slowly in a safe area to confirm everything feels right.
Adjusting A Quill Stem
Older mountain bikes use a quill stem. The process is a bit different:
- Loosen the bolt on top of the stem with an Allen wrench.
- Tap the bolt gently with a rubber mallet to loosen the wedge inside.
- Adjust the height by sliding the stem up or down.
- Make sure not to raise the stem above the minimum insertion line (marked on the stem).
- Align the handlebars and retighten the bolt.
Quill stems are less adjustable than threadless stems. If you want more options, consider upgrading to a threadless system.

Credit: funnmtb.com
Common Mistakes And How To Avoid Them
Many riders make simple mistakes when adjusting their stem. Here are a few to watch out for:
- Over-tightening bolts – Can crack the stem or strip threads.
- Under-tightening bolts – Causes loose steering and dangerous play.
- Misaligning handlebars – Leads to uneven steering and discomfort.
- Ignoring spacer placement – Spacers above and below the stem matter for headset stability.
- Exceeding minimum insertion line (for quill stems) – Risks sudden failure.
A non-obvious insight: Always check for cable tension after adjusting the stem. Brake and shifter cables can become stretched or pinched, leading to poor performance.
How Stem Adjustment Impacts Riding
Changing your stem isn’t just about comfort—it affects your control, speed, and even your safety. Here’s how:
- Shorter stems are best for technical trails, allowing quicker response and better handling.
- Longer stems suit smoother, less technical rides, giving more stability and stretched-out posture.
- Higher rise helps with climbs and reduces strain on your back.
- Lower rise improves control for aggressive descents.
Professional racers often change stem position for different events. For example, downhill riders use short, low stems for fast reactions, while cross-country racers use longer, higher stems for endurance.
Comparing Stem Adjustments: What Suits Your Riding?
Choosing the right stem setup depends on your riding style and body shape. Here’s a simple comparison to help decide:
| Riding Style | Recommended Stem Length | Recommended Rise |
|---|---|---|
| Downhill | 40–50mm | Low |
| Cross-country | 70–100mm | Medium–High |
| Trail/All-mountain | 50–80mm | Medium |
| Beginner | 60–80mm | Medium–High |
A non-obvious tip: Your arm length and shoulder width also affect stem choice. Riders with longer arms may prefer slightly longer stems, while shorter arms benefit from shorter stems.
Signs Your Stem Needs Adjustment
Sometimes, you won’t realize your stem is wrong until you feel pain or discomfort. Here are signs to look for:
- Wrist pain – Usually means handlebars are too low or too far away.
- Neck or back pain – Often from stretching too much or a low handlebar position.
- Steering feels twitchy – Stem is too short.
- Bike feels slow to turn – Stem is too long.
If you notice any of these, try adjusting the stem slightly and see if it improves.
Safety Checks After Adjusting The Stem
After making changes, always check:
- All bolts are tight (but not over-tightened).
- Handlebars are straight and centered.
- No movement or “play” in the headset.
- Cables are not stretched or pinched.
- The front wheel spins freely.
Ride on flat ground first and test turns. If anything feels strange, check your adjustments again.
Practical Tips For Fine-tuning Stem Position
- Make small changes—don’t jump from a long stem to a short one in one go.
- Keep a log of your adjustments and how they feel on the trail.
- Try different stem setups for different trails—what works for climbing may not work for downhill.
- Ask experienced riders for feedback on your position.
- Use a professional bike fitting service if you want the best results.
Many riders overlook the benefit of experimenting. Try a few setups before settling on your favorite.
Credit: enduro-mtb.com
Upgrading Your Stem: When And Why
If your current stem isn’t adjustable enough, or you want better performance, upgrading is a good option. Look for:
- Lightweight materials (like aluminum or carbon).
- Adjustable angle stems.
- Shorter/longer length options.
- Better clamp quality for safety.
Upgrading can also solve problems with old or worn-out stems, especially on older bikes.
How Stem Adjustment Fits With Overall Bike Setup
Remember, your stem works together with saddle position, handlebar width, and suspension settings. Adjusting only the stem may not solve all problems. For full comfort and performance, consider:
- Saddle height and tilt
- Handlebar width and sweep
- Suspension pressure
A pro bike fit considers all these factors together.
Real-life Examples: Stem Adjustment Success Stories
Many riders share stories of improved comfort and confidence after simple stem changes.
- Sam, a trail rider: Swapped a 90mm stem for a 60mm. Result: “My bike feels quicker and easier to steer. No more wrist pain.”
- Linda, a beginner: Flipped her stem for higher rise. Result: “Climbs are easier, and my back feels much better.”
- Mike, a downhill racer: Uses a 40mm direct mount stem. Result: “I can react faster and feel safer on technical runs.”
These examples show that small changes can lead to big improvements.
Advanced Adjustments: Customizing For Your Body
Some riders go further and match stem position to their body shape.
- Use a bike fit calculator to measure ideal stem length and angle.
- Consider shoulder width and arm reach.
- Test different spacers below the stem for fine height adjustments.
A non-obvious insight: Sometimes changing handlebar width can solve stem issues, so think about the whole cockpit.
When To Seek Professional Help
If you’re unsure or have persistent pain, see a bike fitting specialist. They use tools and measurements to find your perfect setup. This is especially helpful for riders with injuries or unusual body shapes.
Frequently Asked Questions
How Often Should I Check My Stem Adjustment?
Check your stem position every few months, or after a crash or hard ride. If you feel pain or discomfort, check immediately.
Can I Adjust The Stem Myself Or Do I Need A Bike Shop?
Most stem adjustments are simple and can be done at home. If you need to change stem length or have a complicated setup, a bike shop can help.
Is It Safe To Use Spacers Above The Stem?
Yes, but too many spacers can weaken the setup. Ideally, keep spacers to 30mm or less above the stem for safety.
How Do I Know If My Stem Is The Right Length?
If your elbows are slightly bent and you can reach the handlebars comfortably, the stem is likely correct. Test different lengths to find what feels best.
Where Can I Find More Information On Bike Fitting?
For detailed guides and calculators, visit Bike Fit Guide.
Adjusting your mountain bike stem is one of the most effective ways to improve your ride. With careful steps, the right tools, and attention to detail, you can transform your bike into a more comfortable, responsive, and safe machine. Remember to experiment, check your adjustments regularly, and don’t hesitate to seek help if needed.
Happy riding!

Credit: www.youtube.com

Hello Guys! I am John Reese, a professional biker and my hobby is biking! I have been biking for last 12 years and I love using bikes while outing as well. Based on my experiences with the different type of bikes (mountain bikes, road bikes and hybrid bikes); I am sharing my opinion about various bikes so that a beginner can get started right away. Happy reading!