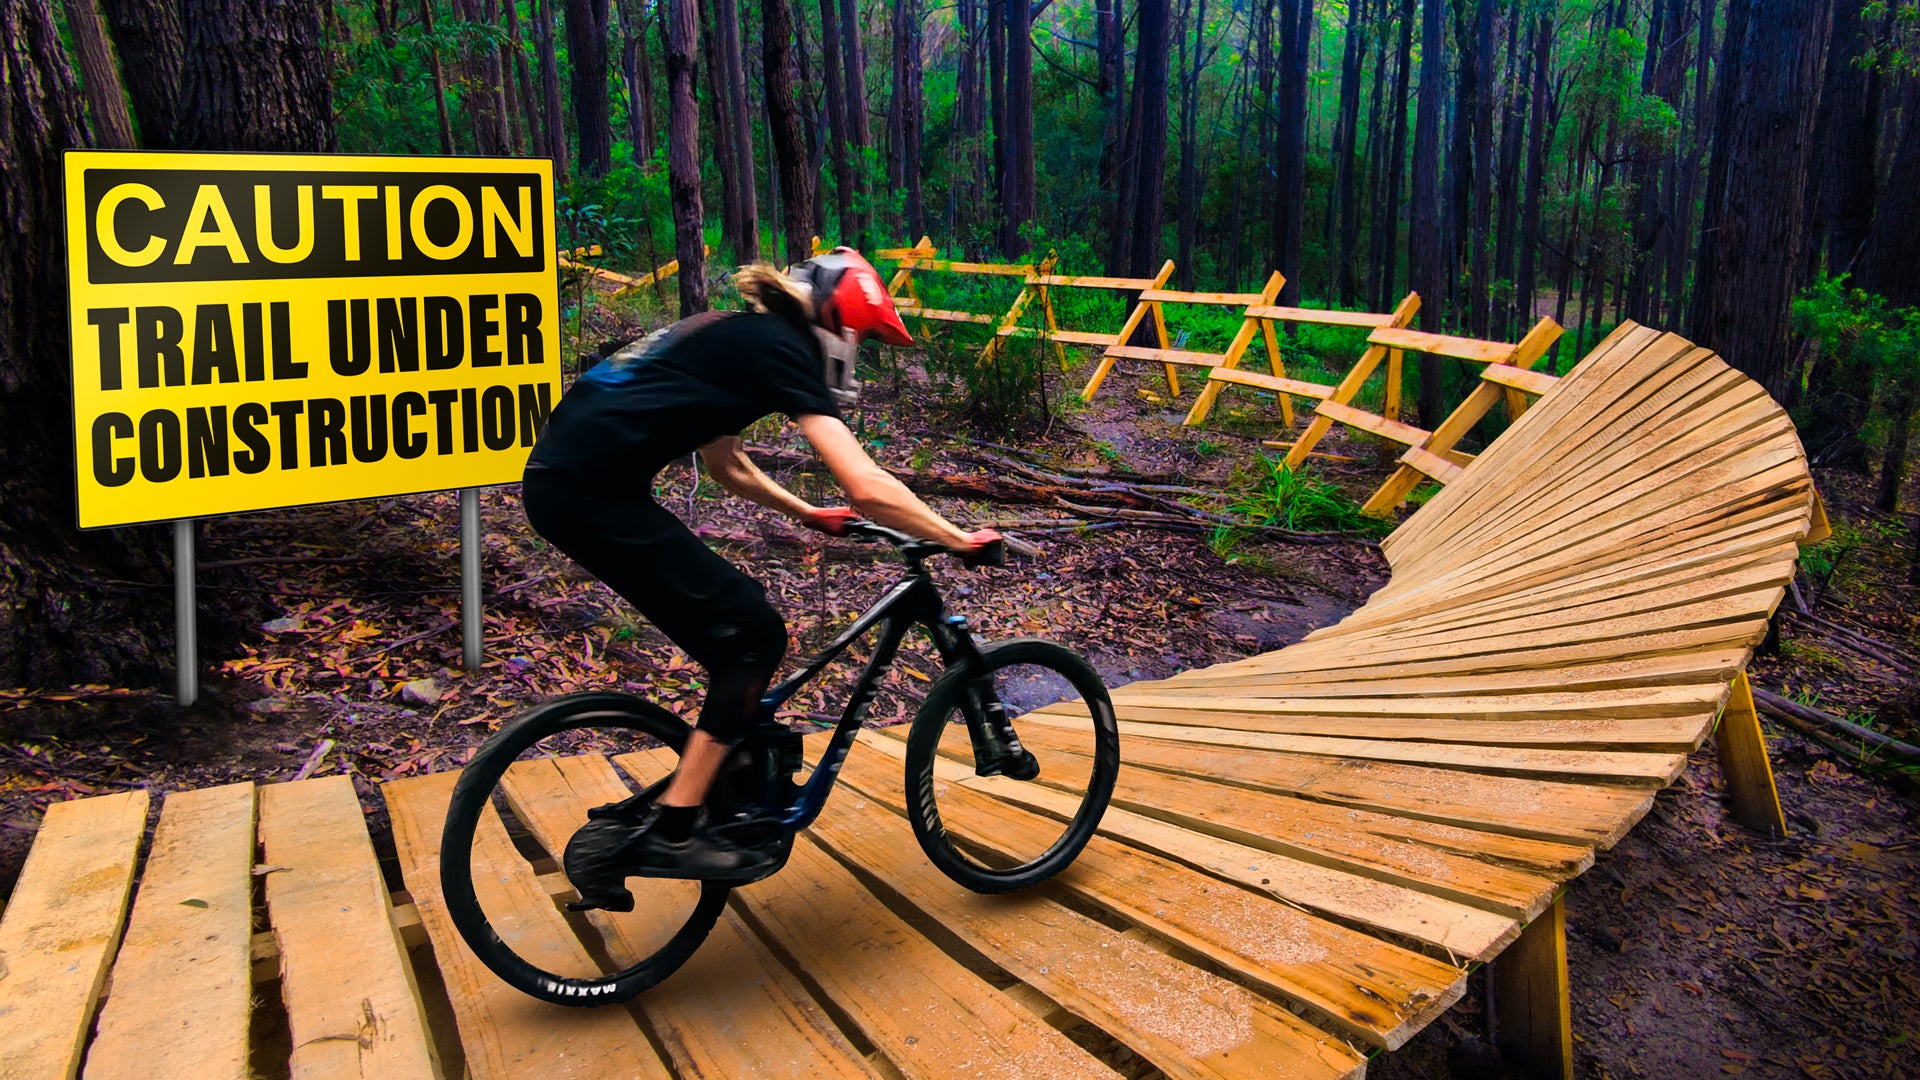
Building a wooden mountain bike berm is an exciting project that can turn an ordinary trail into a fun and technical riding experience. Berms help riders maintain speed through corners, improve safety, and create memorable trail features. While many berms are built from dirt, using wood can be a smart solution in areas with erosion, poor soil, or where you want a fast-draining, long-lasting structure.
This guide will walk you through every step—from planning and material selection to safe construction techniques and maintenance—so you can confidently build a wooden berm that stands the test of time and weather.
Why Build A Wooden Mountain Bike Berm?
Berms made from wood are not just visually striking—they solve real problems for trail builders. Dirt berms often erode in wet climates, require constant maintenance, and may not be possible in rocky or sandy terrain. Wooden berms offer:
- Durability: They resist erosion and can last for years with proper design.
- Versatility: Ideal for locations with unsuitable soil.
- Consistent performance: Riders get predictable grip and shape, even after heavy rain.
- Trail creativity: You can create unique shapes and angles not possible with dirt.
However, building a wooden berm is more complex and costly than shaping dirt. You must plan carefully, use the right materials, and follow safety standards to create a structure that’s both fun and safe.
Planning Your Wooden Berm
A successful wooden berm starts with detailed planning. Mistakes in this stage are hard to fix later and can lead to unsafe or unsatisfying results.
Site Selection
Choose your location with care. Look for:
- Natural turns: The best berms follow the land’s natural flow.
- Stable ground: Avoid areas prone to flooding or shifting.
- Space: Make sure there’s enough room for the berm’s length, width, and rider approach/exit.
Measuring The Curve
The berm’s radius and angle affect how it rides. A tight radius offers a sharper turn, but can be challenging for beginners. A gentle radius is safer and easier to ride at various speeds.
- Common berm radius: 8-16 feet (2.5–5 meters)
- Angle: Most wooden berms are banked between 30–45 degrees.
Tip: Use a rope and stake to trace the curve on the ground. This helps you visualize the berm and check for obstacles.
Sizing: Width And Height
- Width: 3–4 feet (0.9–1.2 meters) is typical. Wider berms allow for different line choices.
- Height: The outside edge should be higher than the inside. For a 45-degree berm, the outside edge is usually 2–4 feet (0.6–1.2 meters) above the inside.
Approval And Permits
Don’t skip this step. Many trails are on public or shared land. Get permission from landowners or local authorities. In some areas, you may need a building permit or environmental approval.
Example Planning Data
| Berm Feature | Typical Measurement | Reason |
|---|---|---|
| Radius | 8–16 ft | Good balance of speed and control |
| Width | 3–4 ft | Allows for safe line choice |
| Banking Angle | 30–45° | Supports rider at speed |
| Height (outside edge) | 2–4 ft | Prevents riders from overshooting |
Credit: cutlaps.com
Choosing The Right Materials
Quality materials are essential for a safe, durable wooden berm. Inferior wood or fasteners can lead to early failure and safety issues.
Wood Selection
- Pressure-treated lumber is the most common. It resists rot, insects, and moisture.
- Cedar and redwood are naturally rot-resistant but may cost more.
- Thickness: Decking slats should be 2 inches (50 mm) thick. Supports (“stringers”) need to be at least 4×4 inches (100×100 mm).
Avoid untreated pine or softwoods unless you’re building in a very dry climate.
Fasteners
- Use galvanized or stainless steel screws. Nails can loosen over time, especially with vibration.
- 3–4 inch (75–100 mm) screws are standard for deck slats.
- For main supports, use longer lag bolts or carriage bolts.
Tools Needed
- Power drill/driver
- Circular saw or handsaw
- Level
- Measuring tape
- Shovel and digging tools
- Safety gear (gloves, goggles, helmet)
Comparing Wood Types
| Wood Type | Rot Resistance | Cost | Availability |
|---|---|---|---|
| Pressure-treated Pine | High | Low | Widely available |
| Cedar | Very high | Medium–High | Regional |
| Redwood | Very high | High | Limited |
Insight: Many builders forget to use all-weather screws. Standard indoor screws rust quickly, causing wood to loosen and become dangerous.
Designing The Berm Structure
A well-designed berm structure supports riders’ weight, drains water, and blends into the trail.
Frame And Support
The frame, or “substructure,” is the backbone of your berm. It usually consists of:
- Main supports (stringers): Run along the length of the berm, following the curve.
- Posts: Vertical supports set into the ground.
- Decking: The riding surface slats, set perpendicular to the stringers.
Stringer Spacing
- Place stringers every 16–24 inches (40–60 cm).
- More stringers mean a stronger berm, but also more cost.
Post Depth
- Posts should be buried at least one-third of their length. For a 6-foot post, bury 2 feet.
- Use concrete or crushed gravel for extra stability, especially in soft soil.
Decking Layout
- Place decking boards with 1/4 inch (6 mm) gaps for drainage.
- Stagger joints for extra strength.
- Align boards perpendicular to the riding direction for best grip.
Berm Entry And Exit
- Smooth transitions are crucial. Both entry and exit should be slightly banked, not sudden.
- Avoid sharp lips or drops that can catch wheels.
Safety Features
- Make sure deck screws are flush or slightly below the surface.
- Consider adding anti-slip strips or rough-sawn wood for extra grip, especially in wet climates.
Example Berm Cross-section
| Component | Function | Best Material |
|---|---|---|
| Decking | Riding surface | Pressure-treated lumber or cedar |
| Stringers | Support deck, follow curve | 4×4 pressure-treated wood |
| Posts | Anchor structure to ground | 6×6 pressure-treated wood |
Non-obvious tip: Slightly angling your decking boards (not perfectly perpendicular) improves grip in wet conditions and sheds water faster.
Step-by-step Construction
Now let’s dive into building your wooden berm. This section explains each phase, including preparation, assembly, and finishing.
1. Marking And Clearing The Site
- Use stakes and string to outline the berm’s curve.
- Clear all vegetation and loose soil. Remove rocks or roots.
- Level the ground where posts will go.
2. Setting The Posts
- Space posts every 3–5 feet (1–1.5 meters) along the curve.
- Use an auger or post-hole digger to make holes at least 2 feet deep.
- Place posts in holes, check for vertical alignment with a level.
- Backfill with crushed gravel or concrete, tamping firmly.
- Let concrete set for at least 24 hours before loading.
3. Installing The Stringers
- Attach stringers to the inside and outside of the posts, following the curve.
- For a strong connection, use lag bolts or carriage bolts.
- Set stringers at the correct banking angle (e.g., 45 degrees). Use a level to check.
4. Adding Cross-bracing
- For wide or high berms, add diagonal bracing between posts to prevent racking (sideways movement).
- Secure bracing with galvanized hardware.
5. Laying The Decking
- Starting from the inside edge, lay deck boards perpendicular to the curve.
- Leave 1/4 inch (6 mm) gaps for drainage.
- Fix each board with two galvanized screws per stringer.
- Trim ends for a clean look.
Beginner mistake: Forgetting to stagger the deck joints. This weakens the surface and can cause boards to shift under heavy use.
6. Entry And Exit Transitions
- Shape the ground before and after the berm to guide riders smoothly on and off.
- Consider using soil, gravel, or short wood ramps.
- Test with a bike before finalizing.
7. Surface Treatment
- For extra grip, add non-slip strips or use rough-sawn wood.
- Avoid paint or varnish; these get slippery when wet.
8. Final Inspection
- Walk and bounce on the berm to check for movement.
- Look for protruding screws or sharp edges.
- Make sure all connections are tight.
Drainage And Erosion Control
Good drainage is vital for a long-lasting wooden berm. Water is the biggest enemy of both wood and trail surfaces.
Building For Drainage
- Always leave gaps between decking boards.
- Slope the berm slightly downhill so water runs off.
- Avoid placing berms in low spots or natural drains.
Site Drainage
- Dig shallow ditches (“swales”) on the uphill side to divert water.
- Use gravel or crushed rock under the berm to prevent mud buildup.
- For extreme climates, consider lining the base with landscape fabric.
Preventing Erosion
- Stabilize the soil around the berm with rocks or plants.
- Add a layer of mulch or gravel on disturbed ground.
Non-obvious insight: Many builders ignore uphill water sources, causing their berms to rot or shift within a year. Always walk the trail after a heavy rain to see where water flows.
Safety And Rider Experience
A good wooden berm is not just strong—it’s safe and fun to ride. Here’s how to make sure your berm delivers.
Sizing For Skill Level
- For beginner trails, use a gentle curve and banking angle.
- For advanced trails, you can build higher, steeper berms.
Surface Grip
- Sand or mud on the decking is slippery. Sweep regularly.
- In very wet climates, consider chicken wire or commercial grip tape, but check local trail rules first.
Visibility
- Place the berm in a visible spot. Riders should see it from a distance.
- Use bright flags or paint on the first few boards if the berm is hidden by vegetation.
Signage
- Mark advanced features with signs (“Expert Only”) if your berm is steep or has a sharp entry.
Testing
- Test ride with different skill levels before opening to the public.
- Listen to feedback, especially from less experienced riders.
Cost And Time Estimates
Building a wooden berm is an investment. Here’s what to expect.
Typical Costs
- Materials: $500–$2,000, depending on size and wood type.
- Tools: $100–$500, if you need to buy saws, drills, etc.
- Labor: DIY is cheapest. Hiring help or contractors adds cost.
Time Required
- Simple berm (one person, 10-foot length): 2–3 weekends.
- Large berm (crew of 3–4, 20-foot length): 3–5 weekends.
Example Cost Breakdown
- 20 pressure-treated deck boards (2″x6″x8’): $300
- 8 stringers (4″x4″x12’): $200
- 10 posts (6″x6″x8’): $350
- Galvanized screws/bolts: $100
- Concrete/gravel: $75
- Misc. (tools, paint, anti-slip): $100–$200
Total: $1,025–$1,225 (for a mid-size berm, not including labor)
Tip: Buying wood in bulk often lowers the price. Partner with local bike clubs for discounts.

Credit: cutlaps.com
Maintenance And Longevity
A well-built wooden berm can last 10+ years, but only with regular care.
Regular Maintenance
- Inspect monthly for loose boards or screws.
- Sweep off leaves, mud, and sand.
- Re-tighten screws or bolts as needed.
- Replace damaged boards right away.
Seasonal Checks
- After winter or heavy rains, check for rot or movement.
- Look underneath for insect damage.
- Refresh anti-slip surfaces yearly.
Repairs
- For minor rot, cut out and replace affected wood.
- For major movement, check post footing and re-stabilize.
Long-term insight: Most berms fail from ground movement, not the wood itself. If you notice shifting, reinforce the base before it gets worse.
Environmental Considerations
Building with wood has both pros and cons for the environment. Always follow best practices:
- Use certified, sustainably harvested wood.
- Avoid building in wetlands or sensitive habitats.
- Minimize soil disturbance and replant around the berm.
- Remove all construction debris from the site.
If you want more information on sustainable trail building, visit the International Mountain Bicycling Association.
Advanced Tips For Experienced Builders
Once you master the basics, consider these advanced techniques:
- Curved Stringers: Instead of straight stringers, use laminated or cut-to-curve beams. This creates smoother, more natural shapes.
- Modular Design: Build the berm in sections, then assemble on-site. This is great for remote locations.
- Integrated Features: Combine the berm with a jump or roller for extra challenge.
- Lighting: In urban trails, add solar-powered lights for night riding.
Expert tip: Test your design with 3D modeling software before starting. Free tools like SketchUp allow you to visualize the berm and check dimensions.
Common Mistakes And How To Avoid Them
Even experienced builders make errors. Here are the most common pitfalls—and how to prevent them:
- Ignoring Drainage: Poor drainage leads to rot and erosion. Always slope your berm and build on well-drained ground.
- Cutting Corners on Materials: Cheap wood or screws fail quickly. Invest in quality for safety and longevity.
- Poor Transitions: Sudden entry or exit angles cause crashes. Smooth is always safer and more fun.
- Skipping Permits: Building without permission can get your trail removed or fined.
- Overbuilding: Bigger isn’t always better. Match the berm’s size to the trail’s speed and rider skill level.

Credit: www.youtube.com
Frequently Asked Questions
How Long Does A Wooden Mountain Bike Berm Last?
With proper materials and maintenance, a wooden berm can last 10–15 years. Factors like climate, wood type, and drainage affect lifespan. Regular inspections and repairs are key to maximizing durability.
Is It Cheaper To Build A Dirt Berm Or A Wooden Berm?
Dirt berms are usually cheaper up front, as they require only soil and basic tools. However, they often need more maintenance, especially in wet climates. Wooden berms cost more initially, but can save time and effort in the long run, especially where dirt is unstable.
What’s The Best Wood For Building A Berm?
Pressure-treated pine is most common due to availability and cost. Cedar and redwood offer better natural resistance to rot but are more expensive. Always use wood rated for outdoor, ground-contact use.
Can I Build A Wooden Berm On Public Land?
Usually, you need permission from land managers or local authorities to build on public land. Building without approval can result in removal and fines. Always check local rules before starting your project.
How Do I Make A Wooden Berm Safer For Wet Weather?
Use rough-sawn wood or add anti-slip strips to the surface. Maintain gaps between boards for drainage. Regularly sweep off mud, leaves, and debris. In very wet areas, consider adding chicken wire or commercial grip tape (if allowed by trail rules).
Building a wooden mountain bike berm is a rewarding challenge that improves your trail and riding experience. With the right planning, materials, and care, your berm can become a favorite spot for riders for years to come. Take the time to build it well, stay safe, and enjoy the ride!

Hello Guys! I am John Reese, a professional biker and my hobby is biking! I have been biking for last 12 years and I love using bikes while outing as well. Based on my experiences with the different type of bikes (mountain bikes, road bikes and hybrid bikes); I am sharing my opinion about various bikes so that a beginner can get started right away. Happy reading!