Changing a mountain bike tire and tube is a skill every rider should learn. Whether you ride for fun, fitness, or adventure, flat tires are common. Knowing how to fix them quickly can get you back on the trail and avoid frustration.
Even if you’re a beginner, you don’t need to be afraid—this guide will help you do it confidently. We’ll cover tools, step-by-step instructions, important tips, and mistakes to avoid. By the end, you’ll know how to change a mountain bike tire and tube safely and efficiently.
Why Mountain Bike Tires And Tubes Need Changing
Mountain bikes are built for rough terrain. Rocks, roots, and sharp objects often cause punctures or damage. Sometimes, tires wear out and lose grip, or tubes start leaking slowly. If your tire tread is thin, or you notice cuts, it’s time to replace them. Tubes can also be damaged by improper inflation or age. Regular checks help you catch problems early.
Changing your own tire and tube saves money and time. Local bike shops can charge $20–$40 for this service. Doing it yourself takes less than 30 minutes after some practice. It also builds confidence for longer rides, where help might not be available.
Tools And Materials Needed
Before you start, gather everything you need. Having the right tools makes the job easier and prevents damage.
- Tire levers: Plastic levers are best; metal ones can damage rims.
- New tube: Make sure it matches your tire size (e.g., 27.5″, 29″).
- Bike pump: Floor pumps are faster, but mini pumps work for trails.
- Patch kit (optional): If you want to repair, not replace, the tube.
- Wrench: Only needed if your bike doesn’t have quick-release wheels.
- New tire: If the old tire is worn or cut.
Check your tire size on the sidewall. It will look like “29 x 2. 25”—the first number is the wheel diameter, the second is tire width. Tubes must match these numbers. Using the wrong size can make installation harder or cause leaks.
Preparing Your Bike And Work Area
Find a safe, clean place to work. Concrete or grass works well. Flip your bike upside down or use a bike stand to keep it stable. If you’re changing the rear tire, shift gears to the smallest cog. This makes removing the wheel easier.
Remove any dirt or debris from the tire and rim. Have all your tools within reach. If you’re on the trail, move away from traffic and lay your bike flat.
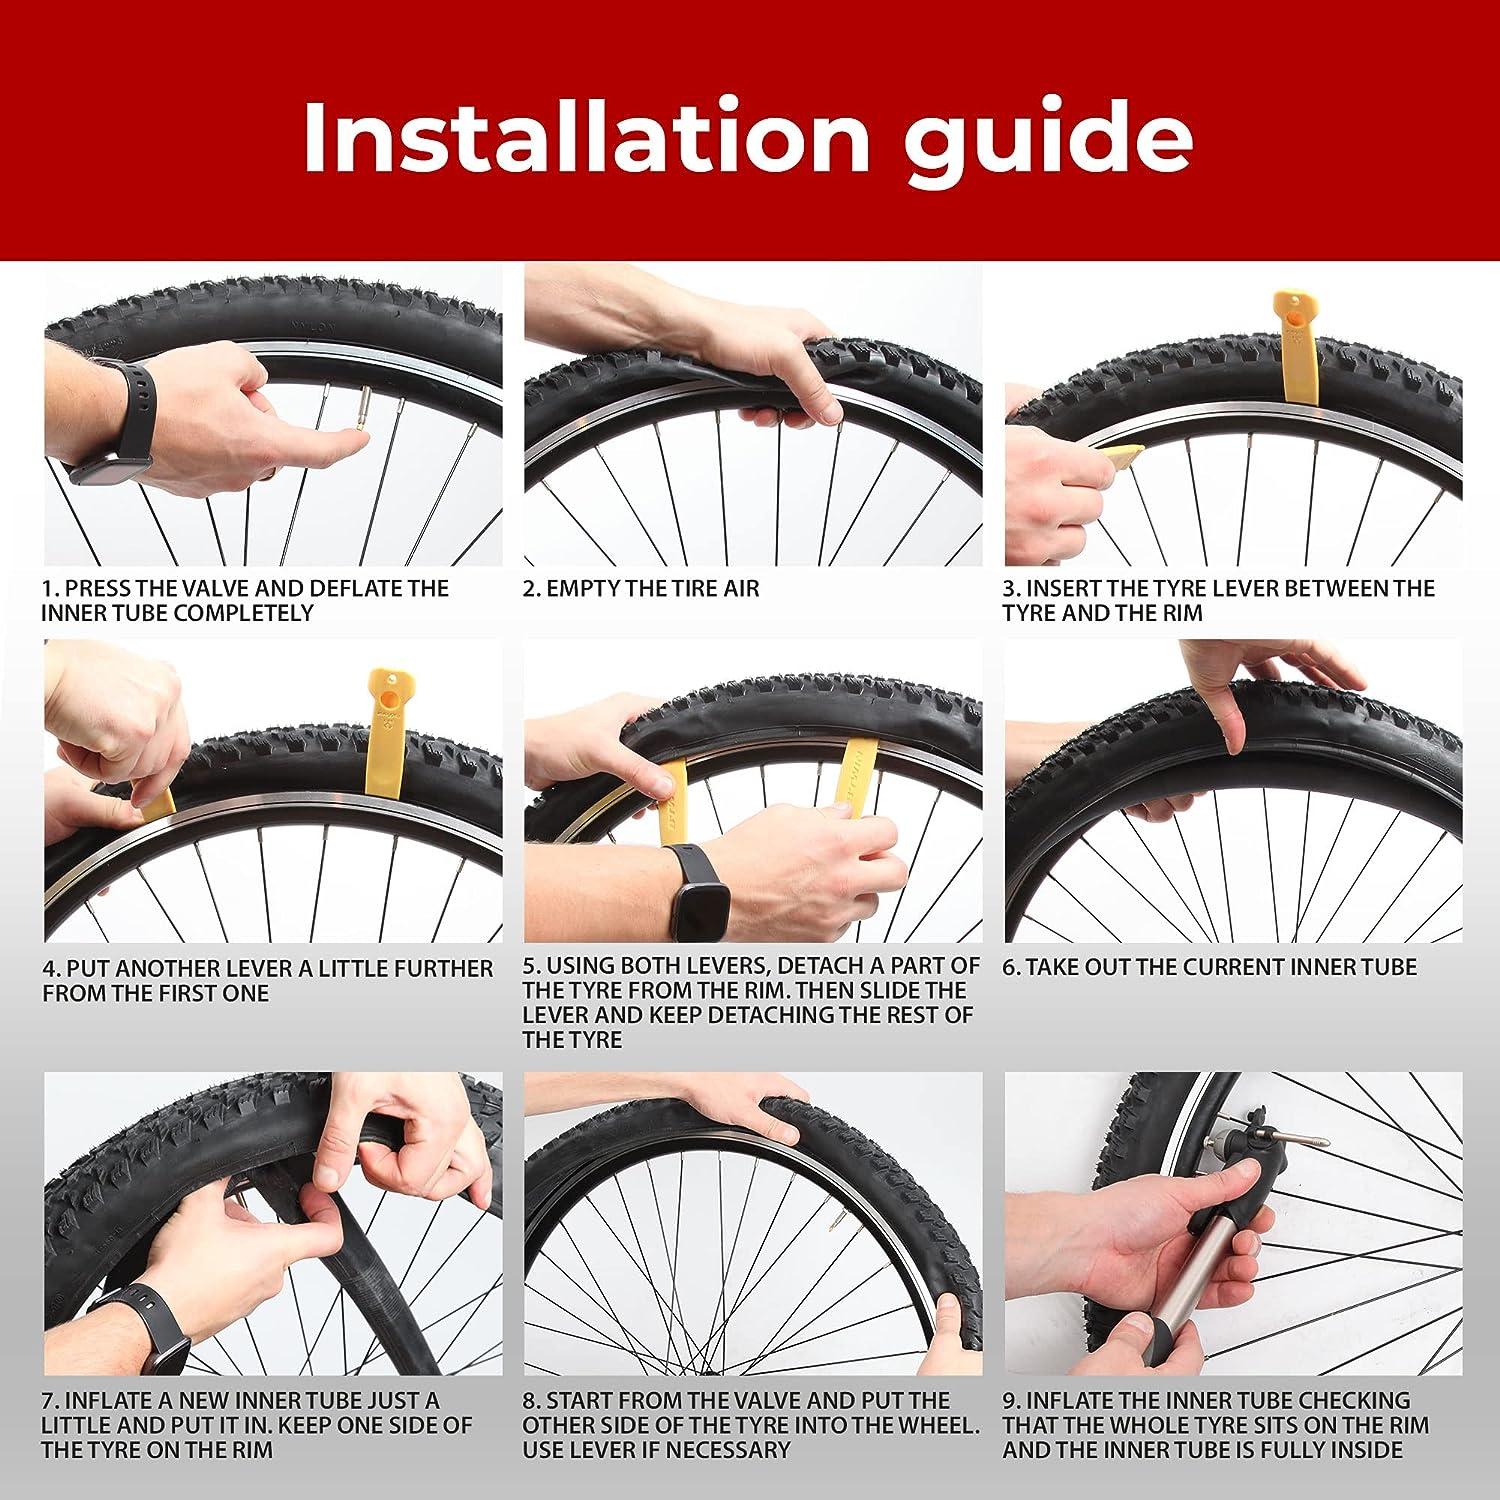
Removing The Wheel
Taking off the wheel is the first step. Most mountain bikes have quick-release skewers or thru-axles. Here’s how to do it:
- Quick-release: Open the lever and pull the wheel out.
- Thru-axle: Unscrew the axle, then slide the wheel out.
If your bike has nuts, use a wrench to loosen them. For the rear wheel, pull the derailleur back gently to clear the chain.
Common Mistake: Forgetting To Shift Gears
Many beginners forget to shift the rear derailleur to the smallest cog. This makes removing and installing the wheel much harder. Always shift before you start.
Deflating And Removing The Tire
Once the wheel is off, release all air from the tube. Press the valve to let the air out completely. If you have a Presta valve, unscrew the small tip before pressing.
Use tire levers to remove the tire:
- Insert the first lever under the tire bead (edge).
- Hook the lever onto a spoke.
- Insert the second lever a few inches away, and pry the tire up.
Work around the rim until one side of the tire is off. You usually only need to remove one side to access the tube.
Table: Tire Valve Types
Here’s a quick comparison of valve types you’ll see on mountain bike tubes.
| Valve Type | Appearance | Common Use | How to Inflate |
|---|---|---|---|
| Presta | Thin, with screw tip | High-end mountain bikes | Special pump head |
| Schrader | Wider, like car tires | Entry-level bikes | Standard pump |
Removing The Old Tube
Pull the tube out gently. If you’re fixing a flat, look for the cause—a thorn, glass, or pinch damage. Run your fingers inside the tire to check for sharp objects. Remove anything you find.
Non-obvious Insight: Check Rim Tape
Many beginners miss rim tape problems. Rim tape covers the spoke holes inside the rim. If it’s damaged or misplaced, it can cause repeated tube punctures. Always check rim tape before installing a new tube.
Inspecting The Tire
Look at the tire for cuts, worn tread, or holes. If the tire is damaged, replace it. Riding with a bad tire can cause sudden flats or accidents.
If you see small holes but want to reuse the tire, patch them with rubber cement. For larger cuts or exposed threads, it’s safer to replace the tire.
Installing The New Tube
Choose the right tube size. Lightly inflate the tube so it’s round but still soft. This makes it easier to fit and reduces the risk of pinching.
- Insert the valve through the rim hole.
- Place the tube inside the tire, working around the wheel.
- Make sure the tube isn’t twisted or folded.
Non-obvious Insight: Start Valve At Logo
It’s helpful to line up the valve with the tire logo. This helps you find the valve quickly and makes future repairs easier.
Reinstalling The Tire
Push the tire bead back onto the rim. Start opposite the valve and finish at the valve. This reduces the risk of pinching the tube.
Use your hands if possible. Tire levers can damage the tube if used roughly. For tight tires, use the lever carefully.
Check that the tube is not sticking out anywhere. Pinched tubes cause flats when you inflate them.
Table: Tire Installation Difficulty
Here’s a look at how hard it is to install common mountain bike tires.
| Tire Type | Installation Ease | Common Issues | Tips |
|---|---|---|---|
| Standard clincher | Easy | Pinching tube | Use hands |
| Wide/tubeless | Medium | Tight bead | Use tire lever |
| Fat bike | Hard | Heavy, stiff | Extra lever |
Inflating The Tube
Check that the tire is evenly seated. Inflate the tube slowly. Watch for bulges or spots where the tire isn’t sitting straight.
Inflate to the correct pressure—usually between 30–50 psi for mountain bikes. The right pressure depends on your weight, terrain, and tire width.
- Lower pressure gives better grip on rough terrain.
- Higher pressure reduces flats on rocky paths.
Check the tire sidewall for recommended psi. Use a gauge to avoid overinflating.
Common Mistake: Overinflating
Overinflating can cause the tube to burst. Beginners often pump too much, thinking it’s safer. Always follow the tire’s recommended range.

Credit: ambassadoradvertising.com
Reinstalling The Wheel
Put the wheel back on the bike. For quick-release, slide the axle through the fork or frame and close the lever. For thru-axles, screw the axle in tightly.
Spin the wheel to check alignment. Make sure the tire doesn’t rub against the brake pads or frame. If it’s not straight, adjust before tightening fully.
For rear wheels, check the chain is on the correct gear. Test shifting to make sure everything works smoothly.
Final Safety Checks
Before riding, do a few quick checks:
- Spin the wheel to check for wobbles.
- Squeeze the tire to check firmness.
- Check the brake function.
- Make sure the valve cap is on.
If everything looks good, you’re ready to ride.
Practical Tips For Changing Mountain Bike Tires And Tubes
Changing tires and tubes gets easier with practice. Here are some helpful tips:
- Carry spares: Always have a spare tube and small pump when you ride.
- Use gloves: Tire changing can be messy; gloves keep your hands clean.
- Bring a patch kit: Sometimes you can fix a tube and keep riding.
- Practice at home: Try changing your tire before a big ride.
- Know your tire size: Write it down or memorize it for buying spares.
- Check for debris: Always check inside the tire for glass or thorns.
- Keep tire levers handy: They fit in most small bags or pockets.
Troubleshooting Common Problems
Even with careful work, problems can happen. Here’s how to solve them:
- Tube won’t fit: Check if you have the right size. Sometimes packaging mistakes happen.
- Tire won’t seat: Try inflating, then deflating and working the bead around the rim. For stubborn tires, use a little soapy water.
- Repeated flats: Check rim tape and inside the tire for sharp edges.
- Valve leaks: Make sure the valve is straight and not damaged. Replace if needed.
Credit: www.lightscope.com.au
When To Replace Instead Of Repair
Not every flat means you need a new tube or tire. Patch kits work well for small holes. But replace if:
- The tube has several patches (usually after three).
- The tire has deep cuts or exposed threads.
- The valve is damaged.
- The tire is older than two years and has cracks.
Example: Real-life Tire Change Scenario
Imagine you’re riding a trail and feel the bike slowing down. You check and see a flat tire. Here’s how you’d fix it:
- Move to a safe spot.
- Remove the wheel using the quick-release.
- Deflate the tube fully.
- Use tire levers to take off one side of the tire.
- Remove the old tube and check for the cause.
- Check rim tape and inside the tire for sharp objects.
- Install a new tube, lining up the valve with the tire logo.
- Put the tire back, making sure not to pinch the tube.
- Inflate to the correct pressure.
- Reinstall the wheel and check alignment.
- Test brakes and tire firmness before riding.
With practice, this whole process can take less than 10 minutes.

Credit: www.amazon.com
Comparing Diy Vs. Bike Shop Tire Change
Some riders prefer doing it themselves; others go to a shop. Here’s a quick comparison.
| Aspect | DIY | Bike Shop |
|---|---|---|
| Cost | $0–$10 (tube/tire only) | $20–$40 labor + parts |
| Time | 10–30 minutes | 1–2 hours or more (waiting) |
| Skill Needed | Basic | None |
| Confidence | High after practice | Low (rely on others) |
Safety And Maintenance Advice
Changing tires and tubes is just part of good bike care. Here are some tips to keep your mountain bike running well:
- Clean your bike regularly to spot tire damage early.
- Check tire pressure before every ride.
- Store your bike indoors to prevent tire aging.
- Replace tires and tubes every 1–2 years, even if no flats.
- Learn how to fix chain and brake issues for emergencies.
For more detailed maintenance guides, visit the Bicycling Magazine Repair Section.
Frequently Asked Questions
How Often Should I Change My Mountain Bike Tires?
Most riders change tires every 1–2 years, or sooner if you see worn tread, cuts, or loss of grip. If you ride rough trails often, inspect tires every few months.
What Tire Pressure Is Best For Mountain Biking?
A good range is 30–50 psi. Lower pressure gives better grip, higher pressure reduces the risk of pinch flats. Check the tire sidewall for the recommended range.
Can I Patch A Tube Instead Of Replacing It?
Yes, patch kits work for small holes. But if you have more than three patches, or the tube is old, it’s better to replace it for safety.
What’s The Difference Between Presta And Schrader Valves?
Presta valves are thin and used on high-end bikes. Schrader valves are wider and found on entry-level bikes. Pumps must match the valve type.
Why Does My Tube Keep Getting Flats?
Repeated flats often mean a problem with rim tape, sharp objects inside the tire, or using the wrong tube size. Check all these before replacing the tube again.
Changing a mountain bike tire and tube is a basic skill that saves time, money, and stress. With the right tools and practice, you’ll feel confident fixing flats anywhere. Remember to check your tires regularly, carry spares, and keep your bike in good condition.
Whether you ride for adventure or daily transport, knowing how to change a tire and tube helps you stay safe and enjoy every ride.

Hello Guys! I am John Reese, a professional biker and my hobby is biking! I have been biking for last 12 years and I love using bikes while outing as well. Based on my experiences with the different type of bikes (mountain bikes, road bikes and hybrid bikes); I am sharing my opinion about various bikes so that a beginner can get started right away. Happy reading!