Putting a chain on a mountain bike is one of those skills every rider should know. Whether your chain snapped on a rough trail, slipped off during a ride, or you’re installing a new one, knowing how to do it yourself can save time, money, and frustration.
Many beginners think it’s tricky or messy, but with the right approach, it’s straightforward. In this guide, you’ll learn not just how to put a chain on a mountain bike, but also how to choose the right chain, avoid common mistakes, and keep your ride running smoothly.
Why Mountain Bike Chains Matter
The chain is the link between your pedaling power and your bike’s movement. It transfers energy from your legs to the wheels. A well-installed chain means smooth shifting and a safe ride. A poorly installed or wrong-size chain can cause skipping, breakage, or even crash risks.
Many new riders focus on tires or suspension but ignore the chain until it breaks. In reality, the chain is under high stress, especially on mountain bikes. Steep climbs, mud, and quick shifts all test the chain. Replacing or reinstalling it correctly will keep your bike in good shape and avoid bigger repairs later.
Tools And Materials You Need
Before you start, gather the right tools. Having everything ready makes the process faster and less stressful.
- New chain (or the old chain, if you’re reinstalling)
- Chain tool (chain breaker)
- Quick link pliers (if your chain uses a quick link)
- Chain wear checker (optional, but helpful)
- Gloves (optional, keeps hands clean)
- Rag and degreaser (for cleaning)
- Bike stand (optional, but makes things easier)
Not all chains are the same. Check your bike’s speed (how many cogs on the rear cassette) and get a chain to match. Most mountain bikes are 9, 10, 11, or 12-speed.

Credit: www.wikihow.com
Removing The Old Chain
If you’re replacing a chain, you need to remove the old one first. This step is also important if your chain broke and you want to check for other damage.
- Shift your bike to the smallest chainring (front) and smallest cog (rear). This reduces tension.
- Look for a quick link or master link. It’s a special link that can be undone by hand or with pliers.
- If there’s no quick link, use the chain tool to push a pin out of any link.
- Carefully pull the chain off the drivetrain. Lay it flat for measuring later.
Tip: If your chain broke and is missing a piece, you’ll need to skip the measuring step or use the manufacturer’s guide for chain length.
Choosing The Right Chain
Getting the right chain is critical. The wrong chain can damage your gears or won’t fit at all.
| Bike Speed | Typical Chain Width | Compatibility |
|---|---|---|
| 8-speed | 7.1 mm | 8-speed cassettes only |
| 9-speed | 6.7 mm | 9-speed cassettes only |
| 10-speed | 6.2 mm | 10-speed cassettes only |
| 11-speed | 5.6 mm | 11-speed cassettes only |
| 12-speed | 5.3 mm | 12-speed cassettes only |
Common mistake: People sometimes buy a chain for the wrong speed. Always count the cogs on your rear cassette. If you’re unsure, take your old chain to the shop.

Credit: www.datasmart.com.br
Measuring Chain Length
A chain that’s too short can damage your gears or break. Too long, and it will slap against your frame or skip. Manufacturers like Shimano and SRAM recommend a simple method.
The Big-big Method
- Remove the chain from the bike.
- Place the chain on the largest chainring and the largest rear cog (but do not route it through the derailleur).
- Pull the chain tight. Where the two ends meet, add two full links (one inner and one outer).
- Mark this point and use the chain tool to break the chain to this length.
If you’re using a quick link, include it in your count.
Non-obvious insight: Chains sometimes come with extra links. Don’t assume you need to use the whole chain out of the box.
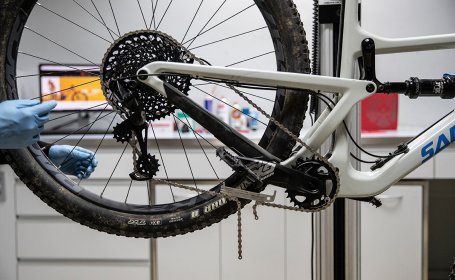
Installing The Chain
Now, you’re ready to put the chain back on.
Step 1: Route The Chain Correctly
This is where many beginners make mistakes.
- Start at the front chainring.
- Guide the chain over the top of the chainring.
- Move toward the rear derailleur.
- Make sure the chain goes through both derailleur pulleys (the small wheels) and follows the right path.
Check your bike’s derailleur diagram if you’re unsure. Routing the chain outside the derailleur cage is a common error and will cause shifting problems.
Step 2: Connect The Chain
There are two main ways to connect a chain: quick links and chain pins.
Quick Link Method
- Bring the two ends of the chain together.
- Insert the quick link pieces into each end.
- Snap them together by hand.
- Place the chain on the chainring and pedal backward until you hear a “click.” This means the link is locked in place.
Chain Pin Method
- Overlap the two chain ends.
- Insert the special chain pin (comes with Shimano chains).
- Use the chain tool to push the pin through.
- Break off the extra part of the pin, leaving the connection flush.
Practical tip: Quick links are reusable for many brands, but some are single-use. Check your chain’s instructions.
Checking Your Installation
A good installation means the chain runs smoothly and shifts well. Here’s how to check:
- Shift through all gears, both front and rear.
- Listen for grinding, skipping, or noise.
- Look at the chain’s path through the derailleur. It should be straight and not twisted.
- Check for stiff links. Pedal backward slowly and watch for links that don’t bend easily.
If you find problems, remove and reinstall the chain. Don’t ride with a faulty chain—it can snap under pressure.
Lubricating The Chain
A new chain is often dry or has factory lube that’s not suitable for riding. After installing, clean and lubricate the chain.
- Use a bike-specific chain lube (wet for muddy conditions, dry for dust).
- Apply one drop to each roller.
- Wipe off excess with a rag.
Well-lubed chains shift better, last longer, and are less likely to rust.
Common Problems And How To Avoid Them
Even with careful work, problems can happen. Here’s how to dodge the top mistakes.
Wrong Chain Length
If your chain is too short, you’ll notice the derailleur stretched tight in the big-big gear. This can lead to a broken derailleur or ripped dropout. Too long, and you’ll get chain slap or shifting issues.
Fix: Re-measure and cut the chain again. Err on the side of slightly longer if in doubt.
Poor Shifting
If the chain skips, hesitates, or won’t move up/down the cassette, check:
- Chain routing through derailleur
- Chain compatibility (speed, width)
- Worn out cassette or chainring
Sometimes, a new chain doesn’t fix shifting if the cassette is too worn. Chains and cassettes wear together.
Stiff Links
After connecting, a stiff link can get stuck and skip under pressure.
Fix: Flex the chain side-to-side at the stiff link or re-connect it.
Quick Link Not Fully Engaged
If the quick link isn’t locked, it could come apart mid-ride.
Fix: Always check for the “click” and visually inspect the link.
How To Put A Chain Back On If It Falls Off During A Ride
Not every chain problem means you need to replace it. Sometimes, the chain just falls off, especially after a hard bump or shift.
- Shift to the smallest chainring and cog.
- Use your fingers to place the chain back on the chainring.
- Pedal slowly forward until the chain catches.
Warning: Watch your fingers and avoid the pedals moving suddenly.
If the chain keeps falling off, check for:
- Bent derailleur hanger
- Worn chainring teeth
- Incorrect chain length
When To Replace Your Chain
Chains wear out over time. Riding with a worn chain damages the cassette and chainrings, leading to costly repairs.
Signs your chain needs replacing:
- Skipping gears
- Measured “stretched” using a chain checker (over 0.5% for 11/12-speed, 0.75% for 9/10-speed)
- Rust or stiff links that cleaning won’t fix
Most mountain bike chains last between 1,500–2,500 miles, depending on riding style and conditions.
Table: Chain Wear Limits
Here’s a quick guide to when to replace your chain, based on stretch.
| Chain Speed | Replace at (stretch %) | Typical Mileage |
|---|---|---|
| 9-speed | 0.75% | 2,000–2,500 miles |
| 10-speed | 0.75% | 1,800–2,200 miles |
| 11/12-speed | 0.5% | 1,500–2,000 miles |
Non-obvious insight: Replacing your chain before it’s fully worn can save your expensive cassette and chainrings.
How To Avoid Chain Problems On The Trail
A little prevention can keep your chain on and working.
- Clean and lubricate the chain every 100 miles or after wet/muddy rides.
- Inspect for bent or stiff links monthly.
- Carry a quick link and small chain tool on every ride.
- Learn to shift smoothly—avoid shifting under heavy load.
Experienced riders often carry a small “emergency kit” with a chain tool, quick links, and a rag. This can turn a long walk home into a 5-minute fix.
Advanced Tips: Upgrading And Customizing Chains
For riders who want to go further, you can upgrade your chain for better performance.
- Coated chains (like those with Teflon or nickel): Offer smoother shifting and resist rust.
- Color chains: Some brands offer colored chains for style, but always pick function over looks.
- Single-speed chains: If your mountain bike is single-speed, use a wider, stronger chain.
Always stick to trusted brands and avoid cheap, unbranded chains—they often wear out fast.
Comparing Popular Mountain Bike Chain Brands
Here’s a look at the most popular brands for mountain bike chains.
| Brand | Typical Cost | Durability | Notes |
|---|---|---|---|
| Shimano | $25–$60 | Very Good | Reliable, common on stock bikes |
| SRAM | $30–$80 | Excellent | Easy to install, strong quick links |
| KMC | $20–$70 | Very Good | Many colors, compatible with most drivetrains |
| YBN | $15–$50 | Good | Budget-friendly, less common |
Pro tip: If you ride in extreme mud or dust, consider a chain with extra rust protection.
What To Do After Installing A New Chain
After you’ve installed and checked your chain, take these final steps before hitting the trail.
- Test ride in a safe area.
- Shift through all gears several times.
- Listen for odd noises or skipping.
- Re-check the quick link after 10 miles to ensure it’s still secure.
If all goes well, you’re ready for your next adventure.
Why Diy Chain Installation Is Worth Learning
Learning to put a chain on your mountain bike gives you more confidence and control over your ride. You won’t have to wait for a shop or pay for a simple fix. You’ll also be able to help friends on the trail.
Even if you’re not “mechanically minded,” this skill is achievable. Most riders say their first successful chain install gave them a real sense of independence. With practice, you’ll do it in under 15 minutes.
Environmental Care: Handling Chains And Lubricants
Chains and lubricants can impact the environment if not handled properly.
- Dispose of old chains at a metal recycling center.
- Use biodegradable chain lubes when possible.
- Wipe off excess lube to avoid it dripping onto trails.
- Don’t throw used rags or lube into nature.
Taking care of your chain is also about caring for the places you ride.
Troubleshooting Guide: Quick Solutions
If something doesn’t feel right after installing your chain, here’s a fast guide:
- Skipping gears: Check chain length and cassette wear.
- Chain drops often: Check chainring teeth and derailleur alignment.
- Stiff link: Flex side-to-side or reattach.
- Noisy chain: Clean and lubricate.
If you’re stuck, consult your bike brand’s website or a trusted mechanic.
When To Visit A Bike Shop
While many chain issues can be fixed at home, sometimes you need expert help.
- If you can’t get the chain to shift smoothly after installation
- If the derailleur or hanger is bent
- If you’re unsure of compatibility for high-end drivetrains
A professional mechanic can spot problems you might miss and save you money in the long run.
Resources For Learning More
If you want to dive deeper, there are excellent online guides and videos. Check out the official Park Tool website for detailed instructions and videos. For more technical info, see the Wikipedia: Bicycle Chain page.
Frequently Asked Questions
How Do I Know What Size Chain My Mountain Bike Needs?
Check the number of gears on your rear cassette (e. g. , 9, 10, 11, 12-speed). Buy a chain that matches this number. If unsure, bring your old chain to the shop for comparison.
Can I Reuse A Quick Link On My Chain?
Some quick links are reusable, but many are designed for single use only. Check the manufacturer’s instructions. If in doubt, replace the quick link to avoid failures.
What Should I Do If My Chain Keeps Slipping After Installing A New One?
Chain slipping often means your cassette or chainrings are worn. New chains don’t always work well with old gears. Inspect for worn teeth and replace if needed.
How Often Should I Replace My Mountain Bike Chain?
Most chains last between 1,500–2,500 miles, depending on riding style and conditions. Use a chain checker tool to measure stretch and replace early to protect other parts.
Is It Okay To Use Wd-40 As Chain Lube?
WD-40 is not a bike chain lubricant—it’s a cleaner and water displacer. Always use a proper bike-specific chain lube for the best performance and chain life.
Putting a chain on your mountain bike is a skill that pays off every time you ride. With the right tools and know-how, you can handle this essential task confidently. Take your time, double-check each step, and enjoy the freedom of a well-maintained bike.
Credit: www.premierwellbeing.ie

Hello Guys! I am John Reese, a professional biker and my hobby is biking! I have been biking for last 12 years and I love using bikes while outing as well. Based on my experiences with the different type of bikes (mountain bikes, road bikes and hybrid bikes); I am sharing my opinion about various bikes so that a beginner can get started right away. Happy reading!