Adjusting your mountain bike’s rear derailleur may seem complicated, but with the right steps, anyone can do it—even if you’re not a bike mechanic. A poorly adjusted derailleur leads to annoying gear skips, slow shifting, and sometimes even chain drops.
This not only ruins your ride but can also damage your bike over time. Learning how to adjust your rear derailleur will save you money, help you understand your bike better, and make your rides smoother and safer. In this guide, you’ll discover how to adjust a mountain bike rear derailleur step by step, including common problems, practical tips, and advanced tricks most beginners miss.
Understanding The Rear Derailleur
The rear derailleur is a key part of your mountain bike’s gear system. It moves the chain between the gears (cogs) on the rear wheel, allowing you to ride efficiently on different terrains. Most mountain bikes use a cable-actuated derailleur, which means shifting is controlled by a cable connected to your shifter.
The main parts of a rear derailleur are:
- Jockey wheels (small wheels guiding the chain)
- Cage (the arm holding the wheels)
- Limit screws (stop the derailleur from moving too far)
- Barrel adjuster (fine-tunes cable tension)
- B-tension screw (sets distance from cassette)
When shifting isn’t working smoothly, the issue is often with the derailleur adjustment. But before you start, it’s important to know what a properly adjusted derailleur looks and sounds like: shifts are quick, the chain sits quietly on the gear you select, and you don’t hear clicking or grinding.
Tools And Preparation
Before adjusting, gather the right tools and set up your bike. Here’s what you’ll need:
- Phillips screwdriver (for limit screws)
- 5mm Allen key (for cable bolt)
- Bike stand (optional but makes things easier)
- Chain checker (for chain wear; optional but useful)
- Clean rag and lube (to clean and lubricate the drivetrain)
A clean and well-lubricated chain makes shifting much smoother. Start by wiping the chain and applying a little bike-specific lubricant.
Safety First
Always make sure your bike is secure, especially if using a bike stand. Wear gloves if you don’t want greasy hands.
Diagnosing Common Shifting Problems
Before adjusting, identify the problem. Not all shifting issues come from the derailleur. Here are a few common symptoms and their likely causes:
- Chain won’t reach the largest or smallest cog: Often a limit screw problem.
- Chain skips gears or shifts slowly: Usually cable tension or a bent derailleur hanger.
- Chain rubs or makes clicking sounds: May be a sign of poor alignment or improper limit setting.
If your derailleur hanger is bent, no amount of adjustment will fix shifting. Check the hanger by sighting along the chain from behind. It should be straight and in line with the cassette. If it’s bent, a bike shop can realign it with a special tool.
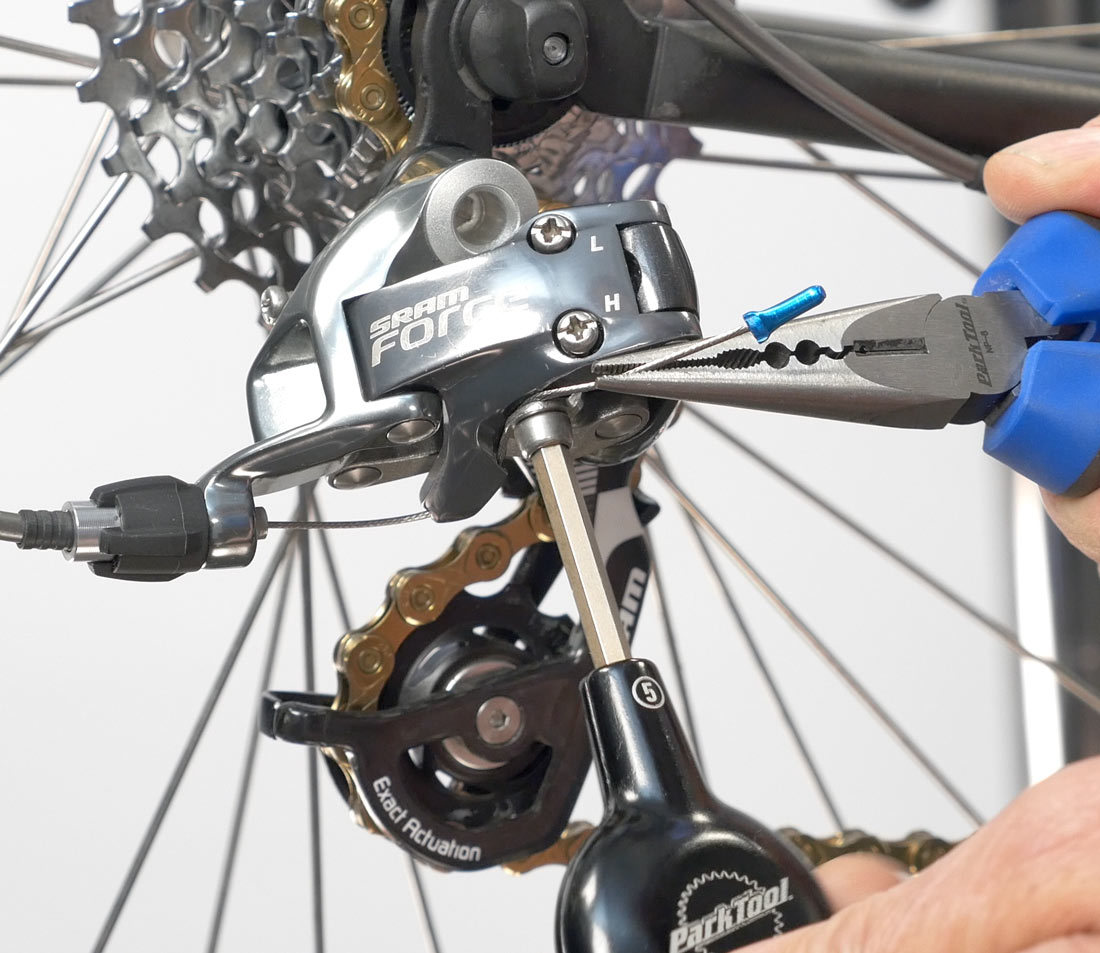
Step 1: Set The High And Low Limit Screws
Limit screws control how far the derailleur can move. If set incorrectly, the chain can fall off the cassette.
High Limit Screw (h)
The high limit screw stops the derailleur from shifting the chain off the smallest cog (highest gear).
- Shift to the smallest cog.
- Look for the two screws on the derailleur marked H and L.
- Turn the H screw so the derailleur’s jockey wheel lines up perfectly with the smallest cog.
If the chain tries to shift past the smallest cog, tighten (clockwise) the H screw. If it won’t reach the smallest cog, loosen (counterclockwise) the H screw.
Low Limit Screw (l)
The low limit screw keeps the chain from moving past the largest cog (lowest gear).
- Shift to the largest cog.
- Adjust the L screw so the jockey wheel aligns with the biggest cog.
- If the chain overshoots the largest cog, tighten the L screw. If it won’t reach, loosen it.
Non-obvious insight: Many new riders turn the wrong screw. Always double-check the H and L marks.
Step 2: Adjust Cable Tension
Cable tension is the most common cause of poor shifting. If the cable is too loose, the chain won’t climb to larger cogs. If too tight, it won’t drop to smaller ones.
Setting The Barrel Adjuster
The barrel adjuster is usually on the derailleur or near the shifter. It changes the cable tension in small steps.
- Shift to the smallest cog.
- Click the shifter once to move to the next larger cog.
- If the chain doesn’t move up, add tension by turning the barrel adjuster counterclockwise.
- If the chain overshoots or hesitates, reduce tension by turning it clockwise.
Pro tip: Make small adjustments, about a quarter-turn at a time. Check shifting after each change.
Step 3: Fine-tune Indexing
Indexing means each click of the shifter moves the derailleur to the next cog. Poor indexing causes missed shifts or noisy gears.
- Shift through all the gears while turning the pedals.
- Listen for clicking or grinding sounds.
- If the chain hesitates or skips, adjust the barrel adjuster as before.
Table: Common Indexing Problems And Solutions
| Problem | Likely Cause | Solution |
|---|---|---|
| Chain won’t climb to bigger cogs | Low cable tension | Turn barrel adjuster counterclockwise |
| Chain won’t drop to smaller cogs | High cable tension | Turn barrel adjuster clockwise |
| Chain skips two gears at once | Improper cable routing or damaged cable | Check cable installation or replace cable |
Non-obvious insight: Sometimes new cables stretch after a few rides. Re-check cable tension after your first ride with a new cable.
Credit: www.parktool.com
Step 4: Set B-tension
The B-tension screw controls the gap between the top jockey wheel and the cassette. Too close, and the chain may rub; too far, and shifting becomes slow.
- Shift to the largest cog.
- Look at the gap between the top jockey wheel and the largest cog—it should be about 5-6mm.
- Turn the B-tension screw to adjust: Clockwise increases the gap, counterclockwise decreases it.
Table: B-tension Gap Recommendations
| Cassette Size | Recommended Gap |
|---|---|
| 11-32T | 5mm |
| 11-36T | 6mm |
| 11-42T or larger | 6–7mm |
Example: If you have a large-range cassette (like 11-50T), you may need an extra-long derailleur or a special B-tension adjustment.
Step 5: Test Ride And Final Checks
After making adjustments, test the bike:
- Shift through all gears while pedaling.
- Try shifting under light load (not full power).
- Listen for quiet, clean shifts and check for chain rub or hesitation.
If problems appear only under heavy pedaling, check the derailleur hanger again. Sometimes, issues that don’t show up on the stand become obvious during a ride.
Table: Troubleshooting On-the-ride Problems
| Symptom | Possible Cause | What To Do |
|---|---|---|
| Chain falls off cassette | Limit screw error | Readjust H or L screw |
| Shifting fine on stand, poor when riding | Bent hanger or worn chain | Check alignment and chain wear |
| Noise in certain gears | Dirty drivetrain or misaligned derailleur | Clean and relubricate; check alignment |
Practical tip: Always bring a multi-tool on rides for quick fixes.

Credit: www.youtube.com
Advanced Tips For Reliable Shifting
Adjusting the derailleur is only part of the story. Here are some advanced tips that make a big difference but are often missed by beginners:
1. Check Chain And Cassette Wear
A worn chain or cassette makes perfect adjustment impossible. Use a chain checker to see if your chain is stretched. If it is, replace it before adjusting the derailleur.
2. Clean And Lubricate Regularly
Dirt and old lube can block smooth shifting. Clean your drivetrain every few rides, especially after wet or muddy conditions.
3. Inspect Cables And Housing
Frayed or corroded cables cause friction and poor shifting. Replace cables and housing if you see rust or damage.
4. Understand Compatibility
Not all derailleurs, cassettes, and shifters work together. For example, a 10-speed shifter needs a 10-speed derailleur and cassette. Mixing brands like Shimano and SRAM can also cause problems unless they’re designed to match.
5. Adjust With The Bike Upright
If you adjust your bike upside down, gravity can affect cable tension and alignment. Make final adjustments with the bike in its normal riding position.
Non-obvious insight: High-end bikes sometimes use electronic shifting, which requires a different process. For regular cable-actuated derailleurs, the steps in this guide work for most brands and models.
When To Seek Professional Help
Most derailleur adjustments can be done at home, but there are times when it’s best to visit a bike shop:
- Derailleur hanger is bent: Requires a special tool for alignment.
- Persistent shifting issues: May indicate hidden frame or component problems.
- Broken or worn parts: Like a bent derailleur cage or stripped bolts.
Bike shops have tools and experience to solve tough problems quickly. Don’t hesitate to ask for help if you’re stuck.
Common Mistakes To Avoid
Beginners often repeat the same errors. Here’s what to watch out for:
- Turning both limit screws at once: Adjust one screw at a time and check the result.
- Ignoring cable condition: Old or frayed cables won’t work well even with perfect adjustment.
- Forgetting the B-tension screw: Many riders overlook this and suffer poor shifting.
- Skipping regular maintenance: Even the best adjustment fails without cleaning and lubrication.
- Adjusting under full load: Always shift gently when fine-tuning to avoid damage.
Why Regular Adjustment Matters
Mountain biking is tough on gear. Rocks, mud, and crashes can knock your derailleur out of alignment. Regular checks and adjustments keep your bike running smoothly and extend the life of your components. Even a small misalignment can lead to expensive repairs if ignored.
Case study: Riders who adjust their derailleurs every few months report fewer breakdowns and enjoy smoother rides, especially on challenging trails.
Quick Reference: Step-by-step Summary
If you need a fast reminder, here’s a brief summary:
- Clean drivetrain and check for wear.
- Check derailleur hanger for bends.
- Set high and low limit screws.
- Adjust cable tension with the barrel adjuster.
- Fine-tune indexing by shifting through gears.
- Set B-tension for correct jockey wheel gap.
- Test ride and make final tweaks.
Remember: Small adjustments make a big difference. Take your time and double-check each step.
Frequently Asked Questions
How Often Should I Adjust My Mountain Bike Rear Derailleur?
You should check your derailleur adjustment every few months, or after any crash or hard ride. Dirt, cable stretch, and minor impacts all affect shifting. Regular checks prevent bigger problems down the road.
What If My Shifting Is Still Poor After Adjustment?
If shifting is still not smooth, check for a bent derailleur hanger, worn chain or cassette, or damaged cables. Sometimes, even a small bend or worn part can ruin your adjustment. If you can’t find the problem, visit a bike shop for a professional check.
Can I Use Any Rear Derailleur With My Bike?
No, not all derailleurs are compatible with every bike. You need to match the speed (number of gears), and it’s best to use the same brand for shifter and derailleur. For more details, see this helpful guide from Sheldon Brown.
What’s The Easiest Way To Tell If My Derailleur Hanger Is Bent?
Stand behind your bike and look straight along the chain and derailleur. The derailleur should be perfectly vertical and in line with the cogs. If it looks twisted or off-center, it’s probably bent. A bike shop can realign it for you.
How Do I Know If My Chain Or Cassette Needs Replacing?
If you notice shifting problems, chain skipping, or the chain slips under pressure, check for wear. Use a chain checker tool; if the chain is stretched beyond 0. 75%, replace it. If the cassette teeth look hooked or worn, it’s time for a new cassette.
Adjusting your mountain bike rear derailleur is a valuable skill that pays off with every ride. With patience, the right tools, and the steps in this guide, you’ll enjoy smoother shifting, less frustration, and more fun on the trails.

Credit: www.bicycling.com

Hello Guys! I am John Reese, a professional biker and my hobby is biking! I have been biking for last 12 years and I love using bikes while outing as well. Based on my experiences with the different type of bikes (mountain bikes, road bikes and hybrid bikes); I am sharing my opinion about various bikes so that a beginner can get started right away. Happy reading!