Learning how to bunny hop a mountain bike opens up a whole new world on the trail. You can jump over roots, rocks, and small gaps without stopping. It’s an essential skill for anyone who wants to ride confidently, whether you’re tackling technical singletrack or urban obstacles.
But mastering the bunny hop takes practice, patience, and the right technique. Many beginners struggle with timing, body position, or simply understanding how both wheels leave the ground. If you’re ready to learn, or want to improve your hop, this guide breaks down everything you need to know in simple, clear steps.
We’ll cover technique, preparation, common mistakes, drills, and advanced tips—so you can hop with control and confidence.
What Is A Bunny Hop?
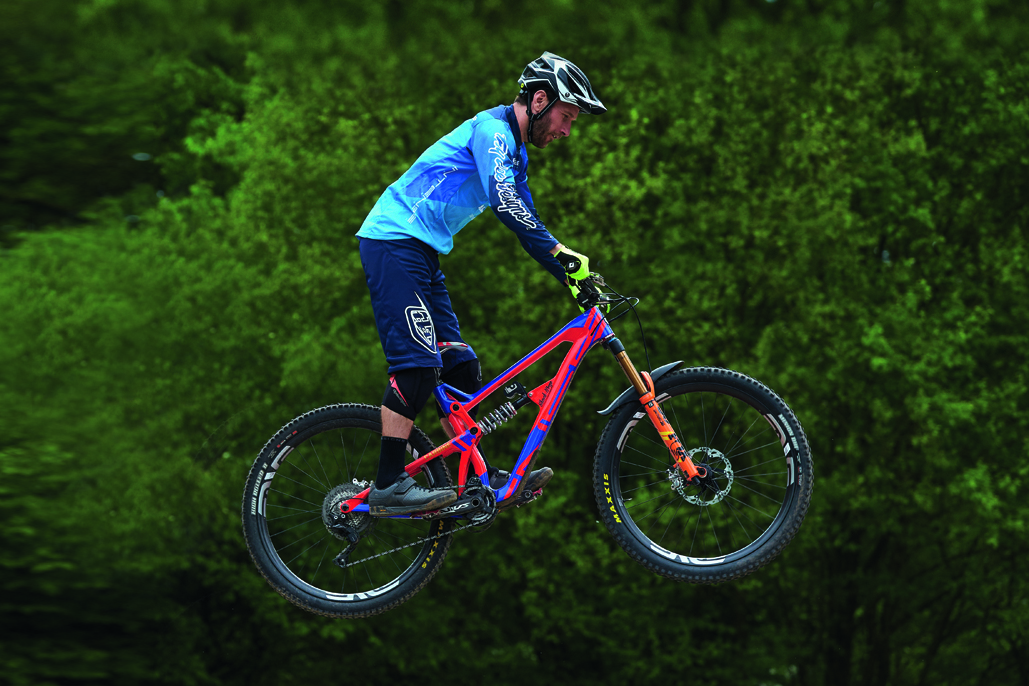
A bunny hop is a technique where you lift both wheels of your mountain bike off the ground without using a ramp. The move lets you jump obstacles like logs, rocks, or curbs while riding. Unlike just lifting the front wheel (a “manual”), bunny hopping requires precise timing to get both wheels airborne.
Why Bunny Hop?
- Clear obstacles without stopping
- Maintain momentum on rough trails
- Improve bike handling and balance
- Essential for jumps, drops, and urban riding
Most mountain bike races and group rides feature natural obstacles. Riders who can bunny hop move faster and safer. The skill also boosts confidence, making technical trails less intimidating.
How Bunny Hop Is Different From Jumping
Jumping uses a ramp or lip to launch the bike. Bunny hopping relies on your body movement and bike control, with no external help. This means you can jump almost anywhere, even on flat ground.
Preparing For Your First Bunny Hop
Before you try bunny hopping, check your bike setup and gear. The right preparation makes learning safer and easier.
Bike Setup
- Flat pedals work best. They let you move your feet easily and reduce injury risk.
- Set your seat height lower than usual—this gives you room to lift the bike.
- Tires should be properly inflated for grip and control. Aim for 25–35 psi, depending on your weight and terrain.
- Check your brakes and chain. A safe bike is essential.
Protective Gear
Always wear a helmet. Gloves, knee pads, and elbow pads are recommended, especially when practicing.
Best Place To Practice
Start on flat, open ground—like a parking lot or grassy field. Avoid busy areas or steep slopes. A painted line or small stick can serve as your first obstacle.
Warm-up
Warm up with a few minutes of gentle riding and stretching. Focus on shoulders, arms, and legs. This reduces injury risk and improves flexibility.
Understanding The Bunny Hop Technique
The bunny hop has two main phases: lifting the front wheel, then the rear wheel. Timing and body position are key.
Step 1: Approach
- Ride at a moderate speed—about 5–10 mph.
- Keep your pedals level (horizontal).
- Stand up on the pedals, with knees and elbows slightly bent.
- Look ahead at your obstacle, not down at your front wheel.
Step 2: Load
- Compress your body and bike downwards.
- Push your weight into the bike, bending arms and legs.
- Imagine “charging” a spring—this gives you energy for the hop.
Step 3: Lift The Front Wheel
- Pull up on the handlebars, using your arms and shoulders.
- Lean back slightly, shifting weight toward the rear wheel.
- The front wheel rises first. This is similar to a manual, but you don’t need to balance long.
Step 4: Lift The Rear Wheel
- As the front wheel peaks, quickly “snap” your legs straight and push down on the pedals.
- Drag your heels backward, then scoop upward—this motion lifts the rear wheel.
- The rear wheel follows the front. Both wheels should clear the obstacle.
Step 5: Land Smoothly
- Let both wheels touch down evenly.
- Absorb the impact by bending your knees and elbows.
- Stay relaxed—stiff arms or legs can cause crashes.
Breaking Down The Bunny Hop: Step-by-step Guide
Let’s detail each phase so you can practice with confidence.
1. Body Position
- Stand tall, centered over the bike.
- Keep your weight balanced between both wheels.
- Eyes forward, not down.
2. Compression (“load”)
- Push down hard, then rebound upward.
- This motion stores energy in your suspension and tires.
3. Manual Motion (front Wheel Lift)
- Pull handlebars up and back.
- Use your body weight—not just arms—to raise the front wheel.
4. Rear Wheel Lift
- Push down and back on the pedals.
- Snap your legs straight, then scoop up with your feet.
- Practice this motion separately—many beginners struggle here.
5. Timing
- The rear wheel should lift just after the front.
- If you lift both at the same time, you won’t get much height.
6. Landing
- Stay loose.
- Bend knees and elbows to absorb impact.
Bunny Hop Vs. Manual Vs. J-hop
Many riders confuse the bunny hop with other techniques. Let’s clarify the differences.
| Technique | Main Purpose | How Wheels Lift | Common Use |
|---|---|---|---|
| Bunny Hop | Jump over obstacles | Front then rear | Trails, urban |
| Manual | Balance on rear wheel | Front only | Downhill, pump tracks |
| J-Hop | Jump with clipped pedals | Both wheels together | Racing, BMX |
A traditional bunny hop is done with flat pedals and relies on technique. The “J-hop” is easier with clipless pedals, but not recommended for learning—flat pedals teach proper movement.
Common Mistakes And How To Fix Them
Many beginners make similar mistakes. Knowing them helps you improve faster.
1. Lifting Both Wheels Together
This reduces height and control. Focus on lifting the front first, then the rear.
2. Stiff Arms Or Legs
If you’re tense, you can’t absorb impact. Stay relaxed and let your body move naturally.
3. Looking Down
Watch the trail ahead. Looking down makes timing harder and causes crashes.
4. Not Compressing Enough
Without a strong load phase, your hop will be weak. Push down hard before jumping.
5. Using Clipless Pedals
Clipless pedals can mask poor technique. Always learn with flat pedals.
6. Forgetting To Land Smoothly
A rough landing can cause injury. Bend knees and elbows to absorb shock.
Practical Drills To Improve Bunny Hop
Improvement comes from focused practice. Try these drills at your next session.
Drill 1: Hop Over A Stick
Place a stick or branch on the ground. Practice hopping over it at slow speed. Start with small sticks and work up.
Drill 2: Line Hops
Draw a chalk line or use tape. Hop over it repeatedly, aiming for clean landings.
Drill 3: Manual Practice
Spend time learning to lift the front wheel (manual). This builds control and confidence.
Drill 4: Rear Wheel Lift
Stand next to your bike and practice the rear wheel lift. Focus on the scoop motion with your feet.
Drill 5: Bunny Hop Progression
Set up a series of obstacles—start small, then increase height. Track your progress and set goals.
Drill 6: Video Yourself
Record your hops and review footage. Look for timing, body position, and landing technique.
Advanced Bunny Hop Tips
Once you master the basics, try these advanced techniques.
Higher Hops
- Compress harder and rebound faster.
- Use stronger legs and core muscles.
Bunny Hop At Speed
- Practice at faster speeds.
- Approach obstacles confidently, but never out of control.
Bunny Hop On Uneven Terrain
- Adjust timing to match the ground.
- Stay relaxed—rough terrain needs more balance.
Bunny Hop To Manual
- After hopping, land on the rear wheel and continue in a manual.
- This is useful for long obstacles or drops.
Bunny Hop Turns
- Twist your handlebars in the air to change direction.
- Useful for tight trails or urban riding.
Credit: www.bikeradar.com
How Bunny Hop Helps Your Riding
The bunny hop isn’t just for jumps—it improves many skills.
- Balance: Learning to bunny hop teaches body control.
- Confidence: You’ll feel safer tackling new trails.
- Speed: Clear obstacles faster, keep momentum.
- Safety: Avoid crashes caused by roots or rocks.
Many top mountain bikers use bunny hops in races and daily rides. It’s a key skill for advanced maneuvers.
Comparing Bunny Hop Heights
How high can you bunny hop? Let’s look at average and advanced heights.
| Rider Level | Average Height (inches) | Obstacle Type |
|---|---|---|
| Beginner | 3–8 | Small sticks, curbs |
| Intermediate | 8–14 | Logs, rocks |
| Advanced | 15–24+ | Large rocks, barriers |
Most beginners start with 3–8 inches. With practice, many reach 12–15 inches. Advanced riders can clear 24 inches or more.
Bunny Hop Training Plan
Learning takes time. Here’s a simple plan you can follow.
Week 1: Basics
- Practice body position and compression.
- Try manual lifts, then rear wheel lifts.
- Hop over lines, then sticks.
Week 2: Progression
- Increase obstacle height.
- Focus on timing and smooth landings.
Week 3: Advanced Moves
- Try bunny hopping at speed.
- Practice on uneven ground.
Week 4: Review And Refine
- Record your hops.
- Analyze and fix mistakes.
- Set new goals for height and control.
Consistency is key. Practice 3–4 times per week for best results.
Key Insights Most Beginners Miss
- Timing Is More Important Than Strength: Many people think they need strong legs, but timing the load and lift is crucial. A well-timed hop clears higher obstacles than brute force.
- Rear Wheel Lift Is a Separate Skill: Most beginners focus on the front wheel. Practicing the rear wheel lift separately builds true bunny hop ability.
- Relaxation Boosts Control: Stiff riders crash more often. Staying loose helps with landing and balance.
- Flat Pedals Are Essential for Learning: Clipless pedals make the movement easier but mask mistakes. Flat pedals teach proper foot motion.
- Video Feedback Accelerates Progress: Recording yourself and reviewing video can reveal mistakes that are hard to feel while riding.
Credit: www.rei.com
Bunny Hop Myths And Facts
Let’s clear up some common misconceptions.
- Myth: You need strong arms to bunny hop.
- Fact: The movement comes from your whole body, especially legs and core.
- Myth: Only advanced riders can bunny hop.
- Fact: Anyone can learn with practice and proper technique.
- Myth: Clipless pedals make bunny hops safer.
- Fact: They can mask poor movement and lead to bad habits.
- Myth: The higher you hop, the better.
- Fact: Control and timing matter more than height.
Real-world Examples
Many mountain bikers use bunny hops daily. For example, Nino Schurter, a world champion, clears rocks and roots on technical trails with bunny hops. Urban riders use the skill to jump curbs and stairs. Trail builders often create features specifically for bunny hopping, like logs and small gaps.
Professional races feature bunny hop contests—top riders clear heights of 24–36 inches. Most recreational riders use hops for safety and speed, not competition.
Bunny Hop And Bike Types
Different mountain bikes affect bunny hop ability. Let’s compare types.
| Bike Type | Bunny Hop Ease | Best For |
|---|---|---|
| Hardtail | Easy | Trail, urban |
| Full Suspension | Moderate | Technical trails |
| BMX | Very Easy | Urban, skate parks |
| Fat Bike | Difficult | Snow, sand |
Hardtail mountain bikes are lighter and easier to bunny hop. Full suspension bikes need more energy, as the rear shock absorbs some movement. BMX bikes are best for urban bunny hops, while fat bikes are harder due to weight.
Bunny Hop Safety Tips
Safety is crucial. Follow these tips for safe practice.
- Always wear a helmet.
- Use flat pedals—avoid clipless when learning.
- Practice on soft ground, like grass, to reduce injury risk.
- Start with small obstacles.
- Check your bike for loose parts before practice.
- Don’t practice when tired—fatigue increases crash risk.
If you crash, check your bike and body before continuing. Small crashes are common during learning. Stay patient and focused.

Credit: www.youtube.com
Bunny Hop And Mountain Bike Racing
Bunny hops are used in cross-country and enduro races. Riders clear obstacles without slowing down. In technical sections, bunny hops save time and reduce risk.
In urban races, bunny hops help with stairs, curbs, and barriers. Some events feature bunny hop contests, where riders compete for height and style.
Improving Bunny Hop: Beyond Practice
To get better, combine practice with strength and flexibility training.
- Leg and core exercises: Squats, lunges, and planks build strength.
- Balance drills: Try riding slow and balancing on the bike.
- Flexibility: Stretch hips, legs, and shoulders to improve movement.
Mental focus matters too. Visualize your bunny hop before you try. Confidence and calm help with timing and control.
Resources For Further Learning
If you want detailed video tutorials, check out Pinkbike. They offer expert tips and demonstrations.
Books and magazines often feature bunny hop guides. Local bike shops sometimes run clinics—ask if they offer skills sessions.
Frequently Asked Questions
How Long Does It Take To Learn To Bunny Hop?
Most riders need 1–2 weeks of practice to clear small obstacles. With regular training, you can improve quickly. Advanced hops may take months.
Can I Bunny Hop With Clipless Pedals?
Yes, but it’s best to learn with flat pedals first. Clipless pedals make the rear wheel lift easier, but don’t teach proper technique.
Is Bunny Hopping Dangerous?
With proper gear and safe practice, risk is low. Crashes can happen, so start small and wear protection.
What’s The Best Mountain Bike For Bunny Hopping?
Hardtail mountain bikes are easiest due to their lighter weight. Full suspension bikes need more effort.
How High Can The Average Rider Bunny Hop?
Beginners clear 3–8 inches. Intermediate riders reach 12–15 inches. Pros can clear 24 inches or more.
Mastering the bunny hop transforms your mountain biking experience. It builds confidence, speed, and control, letting you tackle new trails and challenges. With careful practice, patience, and focus on technique, you’ll soon hop over obstacles with ease—making every ride smoother and more fun.

Hello Guys! I am John Reese, a professional biker and my hobby is biking! I have been biking for last 12 years and I love using bikes while outing as well. Based on my experiences with the different type of bikes (mountain bikes, road bikes and hybrid bikes); I am sharing my opinion about various bikes so that a beginner can get started right away. Happy reading!