Adjusting mountain bike brakes is a key skill for every rider. Whether you ride rocky trails or smooth paths, well-adjusted brakes can make your bike safer and more fun. Many beginners think brake adjustment is complicated, but it’s actually simple with the right steps.
In this guide, you’ll learn how to adjust different types of mountain bike brakes, find out what tools you need, and get practical tips for keeping your brakes working smoothly.
You’ll also see how brake types compare, common mistakes to avoid, and answers to questions many riders ask. By the end, you’ll feel confident to check and adjust your brakes, even if you’re new to bike maintenance.
Understanding Mountain Bike Brake Types
Before adjusting, it’s important to know which brakes your mountain bike uses. The two main types are rim brakes and disc brakes. Each has its own parts and adjustment steps.
Rim Brakes
Rim brakes use pads that squeeze the wheel rim to stop the bike. The most common are V-brakes and cantilever brakes. Rim brakes are lighter and easy to fix, but they don’t work as well in wet or muddy conditions.
Disc Brakes
Disc brakes use pads that clamp onto a metal disc (rotor) attached to the wheel hub. They can be mechanical (cable-operated) or hydraulic (fluid-operated). Disc brakes offer more stopping power and work well in all weather, but need careful setup.
Why Brake Type Matters
Different brakes need different adjustment methods. For example, disc brakes require precise pad alignment, while rim brakes focus on pad position and cable tension. Knowing your brake type helps you follow the right steps and avoid mistakes.
Tools You Need For Brake Adjustment
Having the right tools makes the job faster and easier. Most brake adjustments need only basic bike tools:
- Allen wrenches (usually 4mm, 5mm, and 6mm)
- Phillips screwdriver
- Needle-nose pliers
- Bike lubricant
- Rags or paper towels
- Cable cutters (if replacing cables)
- Torque wrench (for disc brakes, optional but recommended)
- Light (to see small parts clearly)
For hydraulic disc brakes, you may also need:
- Bleed kit (for removing air from fluid lines)
- Specific brake fluid (check your brake brand)
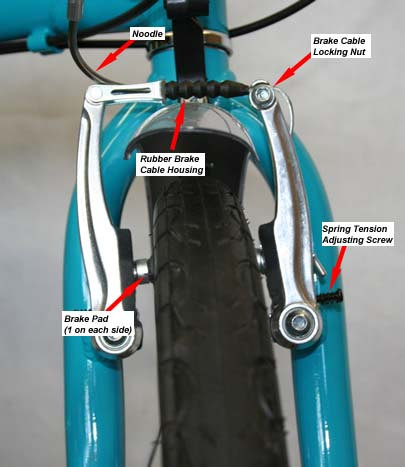
How To Adjust Rim Brakes (v-brakes And Cantilever)
Rim brakes are common on entry-level mountain bikes and some older models. Here’s how to adjust them step-by-step:
1. Check Brake Pads
Look at the brake pads. They should touch the rim, not the tire or spokes. Worn pads (less than 3mm thick) need replacing.
Non-obvious tip: Pads often wear unevenly. Check both sides, and replace if you see grooves or cracks.
2. Align Brake Pads
Loosen the pad bolt with your Allen wrench. Move the pad so it’s flat against the rim and not angled. Tighten the bolt. Pads should sit just below the rim edge, not touch the tire.
3. Adjust Cable Tension
Squeeze the brake lever. If it pulls too close to the handlebar before the brakes work, increase cable tension. Find the barrel adjuster (small knob) near the lever or caliper. Turn it out to tighten the cable. If the lever is stiff, loosen the cable.
4. Center The Brake Arms
Both arms should move together and pads should hit the rim at the same time. If one side moves first, use the small screw on each arm to adjust spring tension. Turn clockwise to move the arm out, counter-clockwise to move in.
5. Test And Fine-tune
Spin the wheel and squeeze the brakes. Pads should touch the rim evenly and release without rubbing. Adjust as needed.
6. Replace Brake Cables (if Needed)
If cables are frayed or sticky, use cable cutters to remove them. Thread a new cable through the housing, attach to the brake arm, and adjust tension as above.
Extra insight: Many beginners forget to lubricate new cables. A drop of bike lubricant inside the housing can make brakes smoother.
How To Adjust Mechanical Disc Brakes
Mechanical disc brakes use a cable, like rim brakes, but clamp onto a rotor. They need precise alignment to avoid rubbing or weak braking.
1. Inspect Brake Pads
Pads should have at least 1mm thickness. If they’re thinner, replace them. Look for uneven wear — this can signal alignment problems.
2. Align Caliper
Loosen the caliper mounting bolts with your Allen wrench. Squeeze the brake lever and hold it (this centers the caliper). While holding, tighten the bolts. Release the lever and check pad spacing.
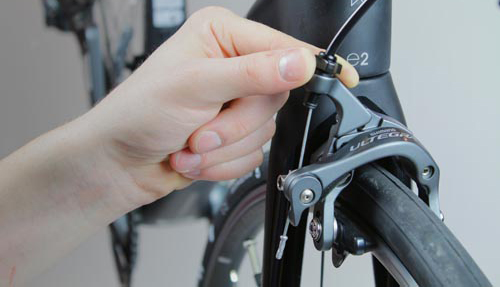
3. Adjust Cable Tension
Like rim brakes, use the barrel adjuster to set cable tension. The lever should activate brakes before it’s halfway to the bar.
4. Set Pad Clearance
Most mechanical disc brakes have a small dial or screw for pad clearance. Turn it to bring pads closer or farther from the rotor. Pads should be close but not rub when the wheel spins.
5. Test Braking
Spin the wheel and squeeze the lever. The wheel should stop smoothly and pads should release without dragging.
Non-obvious tip: Rotors can bend easily. If you hear rubbing but pads look fine, check for a bent rotor and gently straighten with pliers.
Credit: www.sepr.es
How To Adjust Hydraulic Disc Brakes
Hydraulic disc brakes use fluid instead of cables. They’re powerful but need careful setup. Most adjustments are about pad alignment and lever feel.
1. Check Brake Pads
Pads should have at least 1mm thickness. Replace if needed. Look for uneven or glazed pads (shiny surface) — these reduce braking power.
2. Align Caliper
Loosen caliper bolts, squeeze the brake lever, and tighten bolts while holding the lever. This centers the caliper over the rotor. Check for rubbing.
3. Set Lever Reach
Many hydraulic levers have a small knob or screw to adjust reach. Turn it so the lever is comfortable for your hand size.
4. Bleed The Brakes (if Needed)
If the lever feels spongy or pulls too close, air may be in the fluid. Use a bleed kit to remove air. Follow the instructions for your brake brand.
Extra insight: Hydraulic brakes can leak fluid. Check for oily spots on the caliper or lever. If you find leaks, fix them before riding.
Comparing Mountain Bike Brake Types
Choosing between rim and disc brakes affects how you adjust and maintain your bike. Here’s a quick comparison to help you understand the differences:
| Feature | Rim Brakes | Mechanical Disc Brakes | Hydraulic Disc Brakes |
|---|---|---|---|
| Stopping Power | Good (dry) | Strong | Very strong |
| Weather Performance | Poor (wet/mud) | Good | Excellent |
| Maintenance Ease | Easy | Moderate | Complex |
| Weight | Light | Medium | Medium |
| Cost | Low | Medium | High |
Key takeaway: Rim brakes are simple and cheap but less effective in tough conditions. Disc brakes, especially hydraulic, perform better but need more skill to adjust.
Common Mistakes When Adjusting Mountain Bike Brakes
Even experienced riders sometimes make mistakes. Here are some you can avoid:
- Ignoring pad wear: Pads wear out faster than most riders think. Check them every few weeks, especially after muddy rides.
- Misaligning pads: Pads should hit the rim or rotor squarely. Angled pads reduce braking and cause noise.
- Over-tightening bolts: Tight bolts are good, but too tight can strip threads or damage parts.
- Skipping cable lubrication: Dry cables make brakes stiff and slow. Add a drop of lubricant when installing or adjusting.
- Not testing after adjustment: Always spin the wheel and squeeze the lever to check your work.
Extra insight: Many riders adjust only one brake (usually the front), but both brakes need regular checks for safe riding.
Tips For Smooth And Reliable Brakes
Getting brakes right is more than just adjusting. Here are some practical tips:
- Clean pads and rotors regularly with rubbing alcohol, not water.
- Replace cables and housing every year, even if they look fine.
- Check bolts for tightness after every ride in rough terrain.
- For hydraulic brakes, keep fluid level topped up and use the brand’s recommended fluid.
- Avoid touching rotors or pads with oily fingers — oil reduces brake power.
Example: If your brakes squeal loudly, it’s often because pads are dirty or misaligned. Clean them and check alignment, and the noise usually stops.
How Often Should You Adjust Mountain Bike Brakes?
Adjustment frequency depends on how and where you ride. Here’s a rough guide:
| Riding Condition | Adjustment Frequency |
|---|---|
| Dry, smooth trails | Every 2-3 months |
| Wet, muddy trails | Monthly |
| Heavy downhill riding | Every 2 weeks |
| Urban commuting | Every 3-4 months |
Tip: If you notice weaker braking, noise, or lever movement changes, adjust brakes immediately.
Upgrading Your Mountain Bike Brakes
If you’re unhappy with your current brakes, upgrading is an option. Here’s what matters:
- Compatibility: New brakes must fit your bike frame and wheels.
- Rotor size: Bigger rotors mean more stopping power.
- Lever quality: Better levers feel smoother and offer more control.
- Brand reputation: Top brands include Shimano, SRAM, and Magura.
Common mistake: Riders often buy powerful brakes but ignore rotor size. Make sure your frame can handle larger rotors if you upgrade.
Real-world Example: Brake Adjustment For Trail Riding
Imagine you ride rocky trails every weekend. After a muddy ride, your brakes feel weak. Here’s what you do:
- Clean pads and rotors with alcohol.
- Check pad thickness; replace if needed.
- Align pads and caliper.
- Adjust cable tension (mechanical) or bleed fluid (hydraulic).
- Test on a gentle slope before heading to the trails.
This quick routine keeps your bike safe and ready for tough rides.
Data: Brake Adjustment And Accident Prevention
Brake failure is a leading cause of mountain bike accidents. Studies show that regular brake adjustment can reduce accident risk by up to 40%. Riders who check their brakes monthly are twice as likely to avoid crashes caused by brake problems.
Insight: Proper brake maintenance isn’t just about performance; it’s about safety for you and others.
Credit: www.youtube.com
Diy Vs. Professional Brake Adjustment
Many riders wonder if they should adjust brakes themselves or visit a bike shop. Here’s a simple comparison:
| Aspect | DIY Adjustment | Bike Shop Service |
|---|---|---|
| Cost | Free (tools needed) | $20–$50 per adjustment |
| Time | 10–30 minutes | 1–2 days (with appointment) |
| Expertise | Beginner-friendly | Professional |
| Learning | Gains skill | No learning |
| Special tools | May need extra tools | All tools provided |
Key point: Most brake adjustments are easy to do at home, but for hydraulic systems or major upgrades, professional help is often better.
Troubleshooting Brake Problems
If your brakes don’t work right after adjustment, here are steps to fix common issues:
- Squealing brakes: Clean pads/rotors and check alignment.
- Weak braking: Replace worn pads, check for air in hydraulic lines.
- Lever pulls too far: Tighten cable or bleed hydraulic lines.
- Brake rubs: Realign pads and caliper, check for bent rotor or rim.
- Sticky lever: Lubricate cable and check for kinks.
Extra insight: Don’t ignore small problems. Brake issues can get worse quickly, especially after rough rides.
Credit: bicyclenetwork.com.au
Frequently Asked Questions
How Do I Know If My Mountain Bike Brakes Need Adjustment?
If your brake lever pulls too far, brakes feel weak, or you hear rubbing or squealing, it’s time to adjust. Also check after every muddy or wet ride.
Can I Use Any Lubricant For Brake Cables?
No. Use bike-specific lubricants for cables. Avoid oil or WD-40, which can attract dirt. For hydraulic brakes, never use lubricant on pads or rotors.
How Long Do Mountain Bike Brake Pads Last?
Pad life depends on riding style and conditions. On average, pads last 500–700 miles for rim brakes, and 600–1000 miles for disc brakes. Check thickness often.
What’s The Difference Between Mechanical And Hydraulic Disc Brakes?
Mechanical disc brakes use cables, are simpler to adjust, but less powerful. Hydraulic disc brakes use fluid, offer stronger braking, but need more skill to maintain.
Should I Upgrade To Disc Brakes If My Bike Has Rim Brakes?
Disc brakes offer better performance, especially in wet or rough conditions. If your frame supports disc brakes, upgrading can improve safety and confidence. Check compatibility first.
Mountain bike brake adjustment is a skill that pays off every time you ride. With regular care and the steps in this guide, you’ll enjoy safer, smoother rides and avoid costly repairs. Remember, even small brake changes can make a big difference. For deeper technical info, check resources like Sheldon Brown. Now, grab your tools and give your bike the brake check it deserves.

Hello Guys! I am John Reese, a professional biker and my hobby is biking! I have been biking for last 12 years and I love using bikes while outing as well. Based on my experiences with the different type of bikes (mountain bikes, road bikes and hybrid bikes); I am sharing my opinion about various bikes so that a beginner can get started right away. Happy reading!