Mountain biking is all about freedom, speed, and control. But even the best riders struggle if their brakes aren’t working right. If your disc brakes feel spongy, noisy, or weak, you’re not alone. Many mountain bikers, especially beginners, have trouble getting their brakes to perform smoothly. Proper adjustment can turn frustrating rides into confident adventures. In this guide, you’ll learn how to adjust mountain bike disc brakes with clear steps, practical examples, and expert tips. Whether your bike has mechanical or hydraulic disc brakes, you’ll find answers here.
Understanding Mountain Bike Disc Brakes
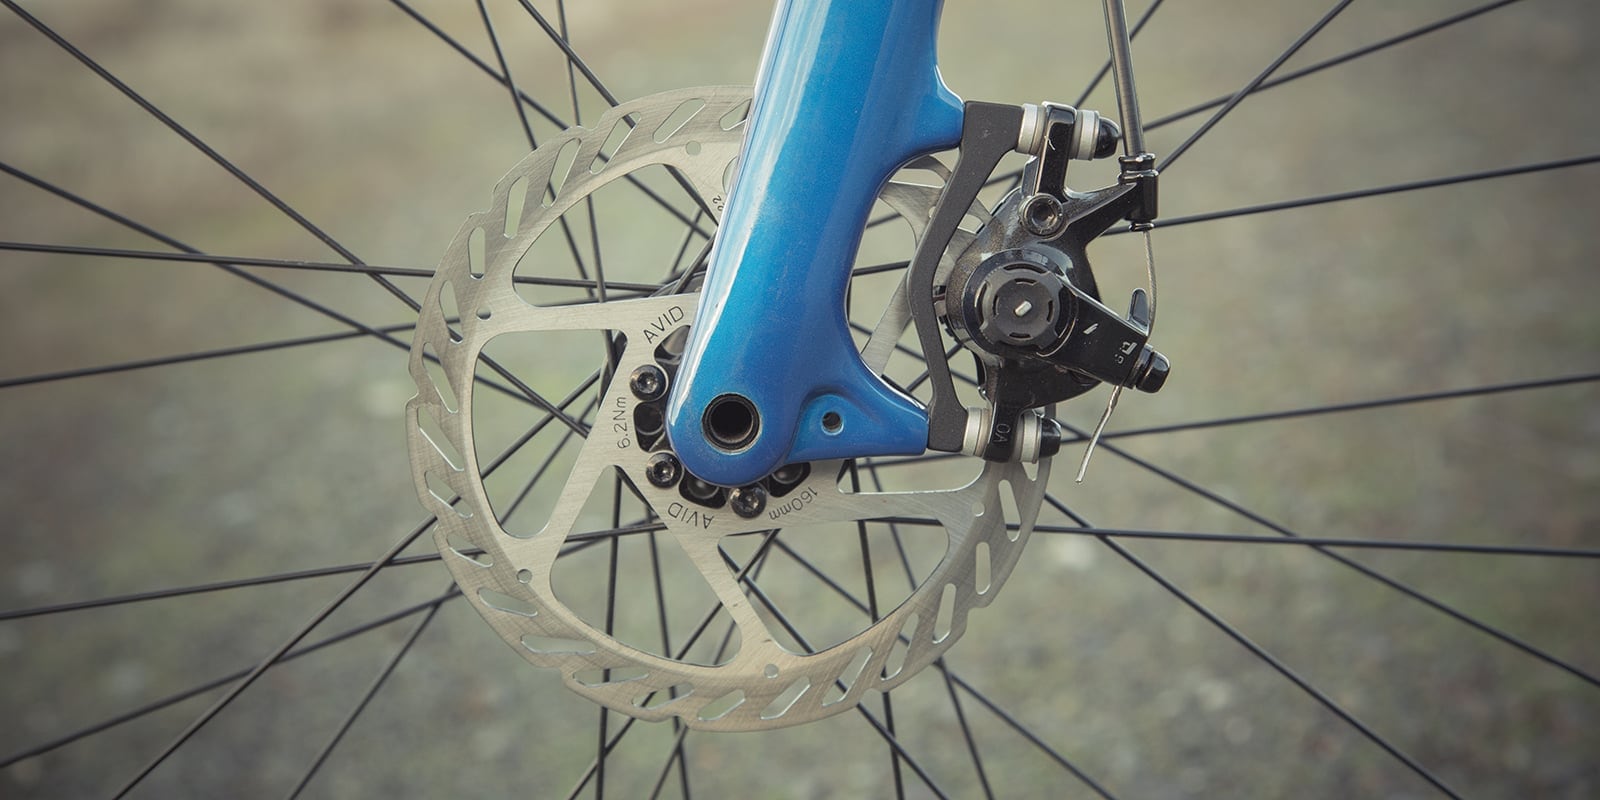
Disc brakes are now standard on most mountain bikes. They use a rotor (a metal disc) mounted to the wheel hub, with a caliper squeezing brake pads against the rotor to create stopping power. This system works well in wet, muddy, and rough conditions.
There are two main types:
- Mechanical disc brakes use a cable to move the caliper.
- Hydraulic disc brakes use fluid pressure for smoother, stronger action.
Most modern mountain bikes use hydraulic brakes, but mechanical brakes are common on entry-level bikes.
Key Benefits
- Consistent braking in all weather
- Better modulation (control over braking force)
- Less maintenance than rim brakes
Common Problems
- Brake rub (pads touching the rotor when not braking)
- Squealing or noise
- Weak stopping power
- Lever feel issues (too loose or too tight)
Understanding these basics will help you diagnose problems and adjust your brakes effectively.
Tools And Materials Needed
Before you start, gather these items:
- Hex (Allen) wrenches (usually 4mm, 5mm, 6mm)
- Torx wrench (often T25 for rotor bolts)
- Bike stand (optional, but makes things easier)
- Clean rags
- Isopropyl alcohol (for cleaning rotors)
- Cable cutters (mechanical brakes only)
- Brake fluid and bleed kit (hydraulic brakes only)
- Rubber gloves (for brake fluid safety)
Having the right tools is key for safety and efficiency. Don’t improvise—using incorrect tools can damage your bike.
Credit: www.reddit.com
How To Inspect Your Brakes Before Adjustment
Start by checking your brakes carefully. This helps you spot problems before making changes.
Step 1: Visual Inspection
Look at the caliper, rotor, and pads:
- Is the rotor bent or dirty?
- Are the pads worn down? (Less than 2mm means replacement)
- Are there leaks (for hydraulic brakes)?
Step 2: Lever Test
Squeeze the brake lever:
- Does it feel firm or soft?
- Does the lever hit the handlebar before stopping?
Step 3: Spin Test
Lift the wheel and spin it:
- Does the wheel spin freely?
- Do you hear rubbing or squealing?
If you find any problems, note them. This makes adjustment easier.
Adjusting Mechanical Disc Brakes
Mechanical disc brakes are cable-driven. They’re simpler to adjust than hydraulic brakes, but require regular tuning.
Step 1: Centering The Caliper
If your brake rubs or squeals, the caliper may be misaligned.
- Loosen the two caliper mounting bolts slightly.
- Squeeze the brake lever hard (this centers the caliper).
- While holding the lever, tighten the mounting bolts evenly.
- Release the lever and spin the wheel. Check for rubbing.
Step 2: Adjusting Pad Clearance
You can fine-tune pad distance.
- Use the pad adjustment dial or screw on the caliper (usually marked).
- Turn clockwise to move the pad closer, counterclockwise to move it away.
- Repeat for both pads if your caliper allows.
Step 3: Cable Tension Adjustment
If the lever feels loose, increase cable tension.
- Find the barrel adjuster (on the lever or caliper).
- Turn it counterclockwise to tighten the cable.
- Check lever feel and braking power.
Step 4: Checking And Replacing Pads
Worn pads reduce braking power.
- Remove the wheel.
- Open the caliper and slide out the pads.
- If pads are less than 2mm thick, replace them.
- Clean the rotor with isopropyl alcohol before reinstalling.
Common Mistakes
- Overtightening bolts (can strip threads)
- Forgetting to clean the rotor (leaves grease, causes noise)
- Not adjusting both pads (some calipers only move one pad)

Credit: www.youtube.com
Adjusting Hydraulic Disc Brakes
Hydraulic brakes are more complex, but offer strong, smooth braking.
Step 1: Centering The Caliper
Hydraulic calipers self-adjust, but centering is still important.
- Loosen caliper mounting bolts slightly.
- Squeeze the brake lever hard.
- Tighten the bolts evenly while holding the lever.
- Release and spin the wheel.
Step 2: Pad Clearance And Lever Reach
Pad clearance is usually automatic, but lever reach can be adjusted.
- Find the reach adjustment screw (often near the lever pivot).
- Turn clockwise to bring the lever closer, counterclockwise for farther reach.
- Test lever feel.
Step 3: Bleeding The Brakes
If the lever feels soft or spongy, air may be trapped in the system.
- Use a bleed kit and follow your brake manufacturer’s instructions.
- Replace old fluid with fresh, high-quality brake fluid.
- Clean up any spills immediately.
Step 4: Replacing Pads
Hydraulic pads wear out just like mechanical pads.
- Remove the wheel and open the caliper.
- Slide out the pads.
- If pads are worn, replace them.
- Clean the rotor before reassembly.
Common Mistakes
- Using the wrong fluid (never mix DOT and mineral oil)
- Touching pad surfaces with greasy hands (reduces friction)
- Not bleeding brakes after pad replacement
Comparing Mechanical Vs Hydraulic Disc Brakes
Here’s a quick comparison of both systems:
| Feature | Mechanical Disc Brakes | Hydraulic Disc Brakes |
|---|---|---|
| Adjustment Difficulty | Easy | Moderate |
| Braking Power | Good | Excellent |
| Maintenance | Frequent | Less frequent |
| Cost | Lower | Higher |
| Weight | Heavier | Lighter |
Most beginners start with mechanical brakes. As skills improve, many riders upgrade to hydraulic for better performance.
Troubleshooting Common Disc Brake Problems
Even after adjustment, issues can happen. Here’s how to solve the most frequent problems.
Brake Rub
If pads rub the rotor, try recentering the caliper. If the rotor is bent, you can gently straighten it with a rotor truing tool.
Brake Noise
Squealing is usually caused by dirty rotors or contaminated pads. Clean both with alcohol. If noise persists, sand lightly with fine sandpaper.
Weak Braking
If brakes feel weak:
- Check pad thickness
- Clean rotors
- Adjust cable tension (mechanical) or bleed fluid (hydraulic)
Lever Feel Issues
If the lever is loose:
- Tighten cable (mechanical)
- Adjust lever reach (hydraulic)
- Check for air in the system (hydraulic)
Rotor Damage
Deep scratches or warping can cause problems. Replace damaged rotors—they’re affordable and easy to find.
Pro Tips For Perfect Disc Brake Adjustment
Here are some expert insights that most beginners overlook:
- Bed-in new pads: After replacing pads, ride and brake gently several times to transfer material from pad to rotor. This improves stopping power.
- Use torque specs: Tighten bolts to the manufacturer’s recommended torque (usually 6–8 Nm for caliper bolts). Over-tightening can cause damage or poor alignment.
- Keep spare pads: On long rides, carry extra pads. They’re small and lightweight.
- Check alignment with a flashlight: Shine a light through the caliper to check pad clearance and rotor position.
- Don’t ignore lever feel changes: If your lever suddenly feels different, inspect for leaks, air bubbles, or cable stretch.
Many riders only adjust caliper position, but ignoring pad wear or lever reach can lead to unsafe braking. Good maintenance is as important as good adjustment.
Safety Precautions
Brake fluid is corrosive and can harm skin and bike paint. Always wear gloves and clean spills quickly. Used pads and rotors should be disposed of properly—don’t throw them in regular trash.
Also, avoid riding immediately after adjusting brakes. Test your bike in a safe area before heading out on trails.
Real-world Examples
Let’s look at two real situations:
Example 1: Mechanical Brake Rub On Beginner Bike
Sarah’s mountain bike had annoying brake rub after a muddy ride. She:
- Loosened caliper bolts
- Squeezed the lever
- Retightened bolts
- Cleaned the rotor
The rub disappeared, and her rides felt smoother.
Example 2: Hydraulic Brake Lever Feel On Advanced Bike
Tom’s hydraulic brakes felt soft after a crash. He:
- Checked for leaks (none found)
- Bled the brakes using a kit
- Adjusted lever reach for comfort
His brakes felt strong again, and he gained confidence.
When To Seek Professional Help
Some issues require expert care:
- Severe leaks in hydraulic systems
- Major rotor damage (deep bends, cracks)
- Cross-contamination (wrong fluid used)
If you’re unsure, visit a trusted bike shop. Safety is more important than DIY pride.
How Often Should You Adjust Disc Brakes?
Adjustment depends on riding style and conditions. For most riders:
- Check brakes every 2–4 weeks
- Clean rotors and pads monthly
- Replace pads when worn below 2mm
- Bleed hydraulic brakes every 6–12 months
Aggressive riders or those in muddy conditions should adjust more often.
Credit: www.rei.com
Upgrading Your Disc Brakes
If you want better performance, consider upgrading:
- Rotor size: Larger rotors give more stopping power.
- Pad material: Sintered pads last longer; organic pads are quieter.
- Brake levers: Ergonomic levers improve comfort.
- Hydraulic systems: Upgrade from mechanical for smoother action.
Here’s a quick look at pad types:
| Pad Type | Durability | Noise | Performance (Wet/Mud) |
|---|---|---|---|
| Organic | Moderate | Low | Good |
| Sintered | High | Moderate | Excellent |
| Semi-Metallic | High | Moderate | Excellent |
Choose the pad that fits your riding style.
Cleaning And Maintaining Disc Brakes
Proper cleaning keeps brakes working and extends lifespan.
How To Clean Rotors
- Use isopropyl alcohol and a clean rag.
- Wipe the rotor thoroughly.
- Avoid touching the surface with bare hands.
How To Clean Pads
- Remove pads and wipe gently.
- If contaminated, sand lightly with fine sandpaper.
Lubrication
Never lubricate brake pads or rotors. Only lubricate pivots and cables (mechanical brakes), never hydraulic components.
Storage Tips
Store your bike in a dry place. Moisture causes corrosion and can degrade braking performance.
Data: How Braking Power Changes With Pad Wear
Pad wear reduces braking power. Here’s a comparison:
| Pad Thickness | Stopping Power (%) | Noise Risk |
|---|---|---|
| New (4mm) | 100 | Low |
| Medium (2mm) | 75 | Moderate |
| Worn (<1mm) | 40 | High |
Replace pads before they reach 1mm for safe riding.
Frequently Asked Questions
How Do I Know If My Disc Brake Pads Need Replacing?
Check pad thickness. If pads are less than 2mm thick, it’s time to replace them. You might also notice weaker stopping power or unusual noise.
Can I Use Any Brake Fluid For Hydraulic Brakes?
No. Always use the fluid type recommended by your brake manufacturer (DOT or mineral oil). Mixing fluids can damage your brakes and void warranties.
Why Do My Brakes Squeal After Adjustment?
Squealing is usually caused by dirty rotors or pads. Clean both with isopropyl alcohol. If noise continues, check for misalignment or pad contamination.
How Often Should I Bleed My Hydraulic Brakes?
Bleed hydraulic brakes every 6–12 months, or if the lever feels soft or spongy. Frequent riders or those in harsh conditions may need to bleed more often.
What Should I Do If My Rotor Is Bent?
If the rotor is slightly bent, use a rotor truing tool to straighten it gently. For major bends or cracks, replace the rotor for safety.
Adjusting mountain bike disc brakes takes practice, but it’s an essential skill for safe, fun rides. With the steps and tips above, you can fix common problems and keep your bike running smoothly. Remember, regular maintenance and careful adjustment make a huge difference in performance and safety. If you ever feel uncertain, don’t hesitate to ask a professional mechanic or check reliable sources like Pinkbike for more guidance. With well-adjusted brakes, every ride becomes more enjoyable and confident—so get out, tune up, and hit the trails with peace of mind.

Hello Guys! I am John Reese, a professional biker and my hobby is biking! I have been biking for last 12 years and I love using bikes while outing as well. Based on my experiences with the different type of bikes (mountain bikes, road bikes and hybrid bikes); I am sharing my opinion about various bikes so that a beginner can get started right away. Happy reading!