Adjusting the rear derailleur on your mountain bike can feel tricky, especially if you’re new to bike maintenance. Still, with a calm approach and some simple tools, you can make your bike shift smoothly again and avoid most common gear problems.
This guide walks you through every step, explains why each adjustment matters, and shares expert tips most beginners miss. Whether you want to fix bad shifting, stop chain noise, or just keep your bike in top condition, understanding your rear derailleur is a skill worth learning.
Let’s break it down so you can get back to riding with confidence.
Why Rear Derailleur Adjustment Matters
The rear derailleur is what moves your chain across the cassette (the set of gears on your back wheel). If it’s not set up right, you’ll hear clicking, skipping, or may not be able to use all your gears. In some cases, a badly adjusted derailleur can even send your chain into the spokes or make you lose control. A well-tuned derailleur gives smooth shifting, better pedaling efficiency, and less wear on expensive bike parts.
Many riders think only professionals can adjust derailleurs, but with the right steps, anyone can do it. Learning this skill also saves money on repairs and keeps your rides safer.
Tools And Setup: What You Need Before Starting
Before adjusting your rear derailleur, gather these basic tools:
- Bike stand (optional, but makes things easier)
- Phillips screwdriver (for limit screws)
- 5mm Allen key (for cable pinch bolt)
- Needle-nose pliers (for handling cables)
- Chain lubricant (for smooth running)
- Clean rag
- New shift cable and housing (if your old one is damaged or sticky)
Check your bike’s condition before you start. The derailleur hanger (the small metal piece that attaches the derailleur to your frame) must be straight. A bent hanger is a common reason for bad shifting and can’t be fixed with adjustment alone. If you suspect the hanger is bent (gears never line up, chain skips on every cog), get it checked at a bike shop or use a hanger alignment tool.

Credit: www.bicycling.com
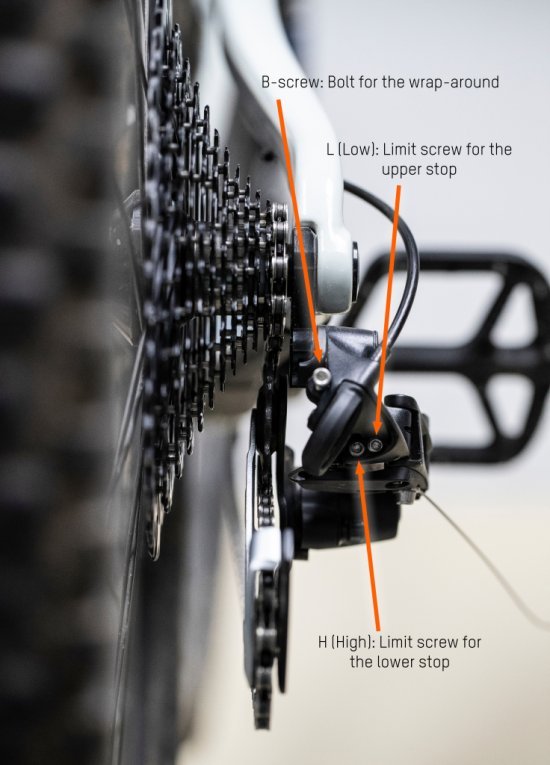
Understanding Rear Derailleur Parts And Function
Knowing the main parts of your derailleur makes adjustments easier:
- Limit screws: Set the movement boundaries, so the chain doesn’t fall off the biggest or smallest cog.
- Barrel adjuster: Fine-tunes cable tension for precise shifting.
- Cable pinch bolt: Secures the shift cable to the derailleur.
- Jockey wheels: The small wheels the chain runs over inside the derailleur.
- B-tension screw: Controls derailleur’s distance from the cassette.
Here’s a quick comparison of their roles:
| Part | Main Function | Adjustment Tool |
|---|---|---|
| Limit Screws | Stop chain from going off cassette ends | Phillips screwdriver |
| Barrel Adjuster | Micro-adjust cable tension | By hand |
| Pinch Bolt | Holds shift cable tight | 5mm Allen key |
| B-tension Screw | Sets derailleur height from cassette | Phillips screwdriver |
Knowing what each does helps you diagnose problems faster. For example, if you can’t shift into the biggest cog, it’s usually the limit screw, not the cable tension.
Step-by-step: Adjusting Your Rear Derailleur
Let’s walk through the process, from preparation to fine-tuning. Take your time with each step—rushing can make things worse.
1. Inspect Before Adjusting
Start by checking:
- Cable condition: Frayed, rusty, or sticky cables make smooth shifting impossible.
- Derailleur hanger: Must be straight for accurate shifting.
- Cassette and chain: Worn teeth or stretched chain can mimic derailleur problems.
Many beginners skip this. Adjusting a bent hanger or rusty cable won’t fix your shifting. Replace any worn parts first.
2. Set The High Limit Screw
This controls the smallest cog (hardest gear). Shift to the smallest rear cog and the largest front chainring (if you have more than one).
- Look at the derailleur from behind. The upper jockey wheel should line up exactly with the smallest cog.
- Turn the H (high) limit screw to adjust:
- Clockwise: Moves the derailleur in, away from the frame.
- Counterclockwise: Moves it out, toward the frame.
If the screw is too loose, the chain can fall between the frame and the cog. If too tight, you can’t shift into the smallest gear.
3. Set The Low Limit Screw
Now shift to the largest cog (easiest gear) and smallest front chainring. The upper jockey wheel should line up with the largest cog.
- Adjust the L (low) limit screw:
- Clockwise: Moves derailleur out, away from spokes.
- Counterclockwise: Moves it in, toward the spokes.
Too loose and the chain falls into the spokes—a serious safety risk. Too tight and you can’t use your easiest gear.
4. Attach And Tension The Cable
If you replaced your cable, thread it through the derailleur and secure it with the pinch bolt. Make sure the barrel adjuster is screwed in almost all the way, then unscrew it one full turn (for adjustment room later).
- Pull the cable tight with pliers and tighten the pinch bolt.
- Shift your shifter to the hardest gear (smallest cog) before clamping the cable.
This ensures the cable is set up correctly for the next steps.
5. Indexing: Fine-tuning Shifting With The Barrel Adjuster
Now shift through all gears while turning the pedals (bike stand helps here). If the chain struggles to move to a larger cog, turn the barrel adjuster counterclockwise (increase tension). If it overshoots or hesitates moving to a smaller cog, turn it clockwise (decrease tension).
Here’s a quick guide:
| Problem | Barrel Adjuster Direction | Result |
|---|---|---|
| Chain hesitates to larger cog | Counterclockwise | More cable tension |
| Chain hesitates to smaller cog | Clockwise | Less cable tension |
| Chain skips gears | Small adjustments each way | Test until smooth |
Shift up and down several times. Most problems are fixed by a quarter or half-turn of the barrel adjuster.
6. Adjust The B-tension Screw
This sets the distance between the top jockey wheel and the biggest cog. Too close, and the chain rubs or skips. Too far, and shifting is slow.
- Shift to the largest cog.
- Look from behind. There should be 5–6 mm (about the width of a pencil) between the upper jockey wheel and the cog.
- Turn the B-tension screw:
- Clockwise: Increases distance.
- Counterclockwise: Decreases distance.
Some modern mountain bikes have large cogs (42T or bigger) and need more gap than older bikes. If your shifting is slow on the biggest cog, try increasing the gap slightly.
7. Test Ride And Final Tweaks
Take your bike for a short ride. Shift through all gears under load. Small noises or hesitation usually mean you need a minor barrel adjuster tweak. Listen for chain rub, skipping, or clicking sounds. If the problem only happens in certain gears, check for bent derailleur hangers or worn parts.
Non-obvious tip: Most beginners forget to check shifting under load (when you’re actually riding). The derailleur can behave differently when you’re pedaling hard compared to turning the pedals by hand.

Credit: www.youtube.com
Common Mistakes And How To Avoid Them
Even with clear steps, a few issues can trip up beginners. Here’s what to watch for:
- Skipping cable check: Old, sticky cables are the most common reason for bad shifting. Always check and replace if needed.
- Ignoring the derailleur hanger: If your derailleur is never lined up, check the hanger. It’s easy to bend in a fall or even by leaning your bike against a wall.
- Over-adjusting: Making big changes to limit screws or barrel adjuster usually makes things worse. Small, careful tweaks work best.
- Mixing up limit screws: The H and L screws are easy to mix up. Always double-check you’re turning the correct one.
- Forgetting about the chain and cassette: Worn chains or cogs can cause poor shifting, even if the derailleur is set up perfectly.
Differences: Mountain Vs. Road Bike Rear Derailleurs
While the basic principles are the same, mountain bike derailleurs face extra stress from dirt, bumps, and wide-range cassettes. Here’s a quick comparison:
| Feature | Mountain Bike | Road Bike |
|---|---|---|
| Chain wrap capacity | Higher, to handle big cogs | Lower, for close ratio cassettes |
| Clutch mechanism | Often present, reduces chain slap | Rare |
| Exposure to dirt | More frequent, needs cleaning | Less frequent |
| Adjustment frequency | More often, due to rough use | Less often |
Non-obvious insight: Mountain bike derailleurs with a clutch can feel “stiffer” when shifting. This is normal and helps stop the chain from bouncing off on rough trails. Don’t try to “loosen” the clutch unless you know what you’re doing.
How To Tell If Your Rear Derailleur Needs Adjustment
Sometimes, shifting problems are caused by other issues, not the derailleur. Here are signs it’s time for adjustment:
- Clicking or skipping gears
- Chain won’t move to certain cogs
- Chain falls off cassette ends
- Shifting is slow or stiff
- Noise in certain gears
If you see these, first check for a bent hanger or worn chain/cassette. If those are fine, follow the adjustment steps above.
Advanced Tips For Perfect Shifting
After you master the basics, these tips can help you get even smoother shifting and longer-lasting components:
- Replace cables and housing yearly: Dirt inside cables is a silent killer for shifting quality.
- Clean your drivetrain often: Grit and mud quickly wear down your cassette and chain.
- Use the right chain lubricant: Thick lube for wet, muddy rides; dry lube for dusty conditions.
- Check for chain stretch: A stretched chain damages cogs and can cause skipping.
- Upgrade to quality shift housing: Some brands offer low-friction housing that noticeably improves shifting feel.
If you regularly ride in mud or rain, consider a full-length outer housing to keep dirt out of your cables.
When To Visit A Bike Shop
Most derailleur adjustments can be done at home, but some problems need a pro:
- Bent derailleur hanger: Needs a special tool to fix.
- Cracked derailleur or hanger: Must be replaced.
- Shifter problems: If your shifter won’t click through all gears, it may be jammed or broken.
- Persistent skipping, even after new parts: Sometimes the problem is deeper, like a worn freehub or incorrect chain length.
If in doubt, a shop mechanic can diagnose and fix issues quickly—and watching them work is a great way to learn.
Frequently Asked Questions
What’s The Difference Between Adjusting Cable Tension And Limit Screws?
Cable tension controls how easily the derailleur moves the chain from one gear to another. Limit screws set the physical boundaries, so the chain can’t fall off the cassette. If your chain won’t reach the end gears, check limit screws. If shifting between gears is noisy or slow, adjust cable tension.
How Often Should I Adjust My Rear Derailleur?
For most riders, check adjustment every few months or after a hard impact. If you ride in muddy or wet conditions, or shift poorly after a crash, check it sooner. Replacing cables or chain also means you should readjust.
My Chain Skips Only On Certain Gears. Is This A Derailleur Problem?
Not always. Skipping on just one or two cogs is often caused by a worn cassette or chain. Check for chain stretch and inspect cassette teeth. If both look good, try adjusting the derailleur as described above.
How Do I Know If My Derailleur Hanger Is Bent?
If your derailleur doesn’t line up with the cogs, or shifting never works smoothly no matter how you adjust it, suspect a bent hanger. You can also see it by looking from behind the bike—the derailleur should be straight, not tilted inward or outward.
Can I Use These Steps For Electronic Derailleurs?
Most steps apply, but electronic derailleurs have auto-trimming and different adjustment procedures. Follow your manufacturer’s manual for electronic systems, but checking hanger alignment and chain condition still matters.
—
Learning to adjust your rear derailleur on a mountain bike is a skill that pays off every ride. It takes patience and careful observation, but following each step will give you smooth, reliable shifting. Don’t be afraid to experiment with small adjustments, and remember: most shifting problems are caused by simple issues like dirty cables or a bent hanger. For more in-depth information on bike maintenance, visit resources like Park Tool. With practice, you’ll feel more connected to your bike and ready to handle trails with confidence.
Credit: www.ccfamct.us

Hello Guys! I am John Reese, a professional biker and my hobby is biking! I have been biking for last 12 years and I love using bikes while outing as well. Based on my experiences with the different type of bikes (mountain bikes, road bikes and hybrid bikes); I am sharing my opinion about various bikes so that a beginner can get started right away. Happy reading!