Setting disc brakes on a mountain bike can transform your riding experience. If your brakes are weak, noisy, or unreliable, every ride feels risky. But with well-set disc brakes, you get strong stopping power, smooth control, and more confidence on tough trails.
Many riders are unsure about adjusting disc brakes, fearing they’ll make things worse. But learning the right steps is easier than you think—and it pays off every time you ride. This guide shows how to set disc brakes on a mountain bike, breaking down each step so anyone can follow, even if English is not your first language.
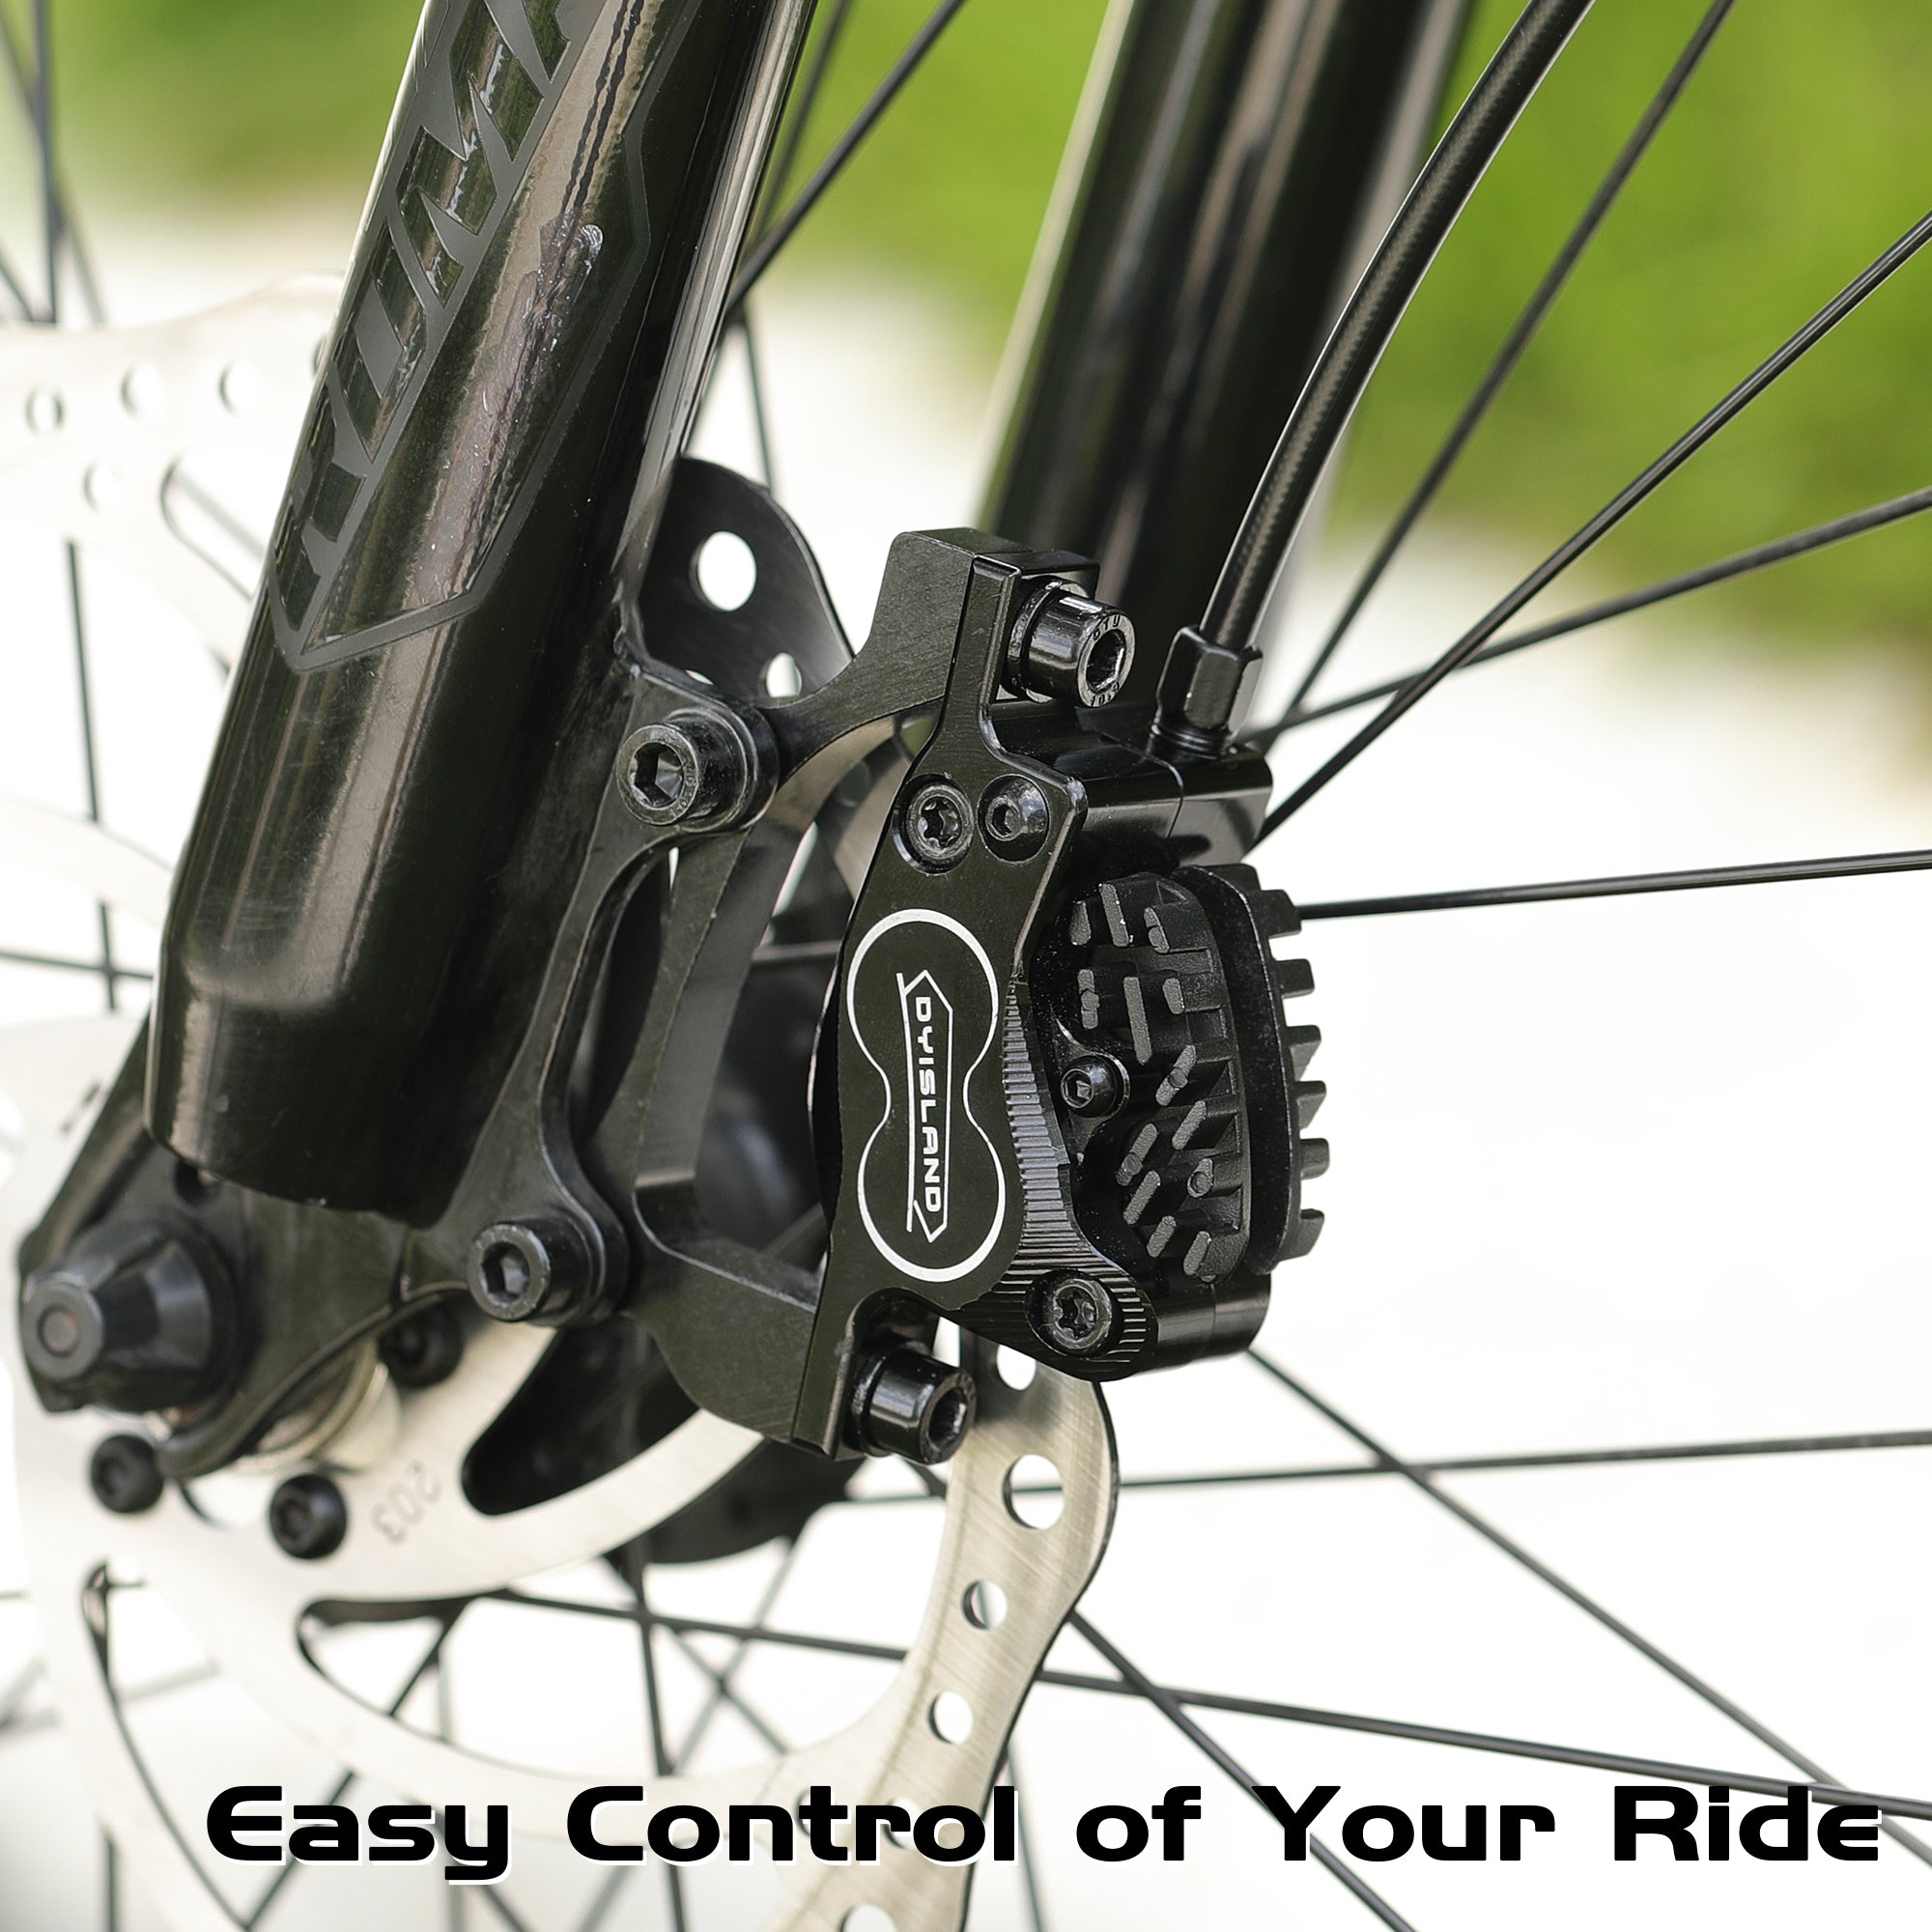
Understanding Disc Brakes
Disc brakes use a rotor (a metal disc) attached to the wheel and a caliper (the part with brake pads) to stop your bike. When you squeeze the brake lever, the caliper pushes pads against the rotor, creating friction. There are two main types:
- Mechanical disc brakes use a cable to pull the caliper.
- Hydraulic disc brakes use fluid to move the caliper.
Hydraulic brakes are smoother and need less force, but mechanical brakes are easier for beginners to adjust. Both types need regular setting to work well.
Why Proper Setting Matters
- Better safety: Good brakes prevent accidents.
- Smooth control: You stop smoothly, not suddenly.
- Longer brake life: Pads and rotors last longer.
- Less noise: Well-set brakes are quiet.
Signs Your Brakes Need Setting
- Brake lever feels loose or soft
- Brakes squeal or rub
- Bike doesn’t stop quickly
- Pads wear unevenly
If you notice these, it’s time to set your disc brakes.
Tools And Materials You Need
Before starting, gather these tools:
- Allen wrenches (usually 4mm, 5mm, or 6mm)
- Torx wrench (for some rotors)
- Bike stand (optional, but helpful)
- Clean rags
- Isopropyl alcohol
- New brake pads (if old ones are worn)
- Rotor truing tool (for bent rotors)
- Cable cutters (for mechanical brakes)
- Bleed kit (for hydraulic brakes)
Having the right tools prevents frustration and mistakes. A bike stand makes everything easier, but you can do this work with your bike upside down or leaning against a wall.
Step-by-step Guide: Setting Mechanical Disc Brakes
Mechanical disc brakes are common on entry-level mountain bikes. Here’s how to set them for reliable stopping power.
1. Check Brake Pads
Look at the brake pads inside the caliper. If they’re less than 2mm thick, replace them. Thin pads don’t work well and can damage the rotor.
- Remove the wheel.
- Use an Allen wrench to take out the pad retention bolt.
- Pull out the pads and insert new ones.
2. Inspect The Rotor
Spin the wheel and watch the rotor. If it wobbles or touches the pads, it needs straightening.
- Use a rotor truing tool to gently bend the rotor.
- Aim for no visible wobble as the wheel spins.
3. Center The Caliper
This step is key for quiet, strong brakes.
- Loosen the caliper mounting bolts (usually 5mm Allen).
- Squeeze the brake lever firmly and hold it.
- While holding the lever, tighten the mounting bolts.
- Release the lever and check if the rotor spins freely.
If you hear rubbing, loosen the bolts and repeat. Sometimes, very small adjustments help.
4. Adjust The Cable Tension
For mechanical brakes, cable tension controls how quickly the pads touch the rotor.
- Locate the barrel adjuster (near the lever or caliper).
- Turn it to increase or decrease tension.
- Test the lever: It should feel firm, not loose.
If needed, loosen the cable clamp bolt, pull the cable tighter, and re-tighten.
5. Fine-tune Pad Clearance
Most mechanical calipers have small screws to move the pads closer or farther from the rotor.
- Turn the inboard pad adjustment screw (often with an Allen wrench) until the pad is close, but not rubbing.
- Adjust the outboard pad the same way.
Aim for a gap of about 0. 5mm between pad and rotor.
6. Test And Repeat
Spin the wheel and squeeze the brake lever. The wheel should stop smoothly, with no rubbing or noise.
If it’s not right, repeat steps above. Sometimes, brakes need several tries to be perfect.
Step-by-step Guide: Setting Hydraulic Disc Brakes
Hydraulic disc brakes are popular on higher-end mountain bikes. They use fluid for power and need careful setting.
1. Check Brake Pads And Rotor
Check pad thickness (at least 2mm) and rotor straightness. Replace pads or straighten rotor if needed.
2. Center The Caliper
Hydraulic calipers self-adjust, but centering helps:
- Loosen caliper mounting bolts.
- Squeeze brake lever and hold.
- Tighten bolts while holding lever.
3. Bleed The Brakes
If the lever feels soft, you may need to bleed the system (remove air and old fluid).
- Use a bleed kit and follow your brake brand’s instructions.
- Usually, you attach a syringe to the caliper and lever, push fluid through, and remove air bubbles.
Bleeding takes practice, but improves brake feel and power.
4. Set Pad Clearance
Hydraulic brakes usually self-adjust pad clearance, but if you have rubbing:
- Remove the wheel.
- Gently push the pads apart with a plastic tool.
- Reinstall the wheel and check for rubbing.
5. Test And Fine-tune
Spin the wheel, squeeze the lever, and check stopping power. No noise, no rubbing means you’re done.
Common Mistakes When Setting Disc Brakes
Many riders make mistakes that lead to poor braking. Avoid these:
- Ignoring pad thickness: Thin pads reduce power and damage rotors.
- Not cleaning rotors: Dirt and oil cause noise and weak braking.
- Over-tightening bolts: This bends the caliper or rotor.
- Wrong pad clearance: Pads too close rub, too far feel weak.
- Skipping bleeding: Hydraulic brakes need air-free fluid.
Cleaning And Maintaining Disc Brakes
Disc brakes work best when clean. Dirt, oil, and water can reduce power.
- Clean rotors with isopropyl alcohol and a clean rag.
- Avoid touching rotors or pads with bare hands; oil from skin affects braking.
- Check pads for contamination (dark, shiny spots mean oil).
If pads are contaminated, replace them. Sometimes, you can sand lightly, but new pads are safer.
Upgrading Disc Brakes: What To Know
Some riders want better brakes for tough trails. Here’s what matters:
- Rotor size: Bigger rotors (180mm, 200mm) give more power. Check if your frame and fork accept larger rotors.
- Pad material: Metal pads last longer, organic pads are quieter.
- Brake lever feel: Higher-end levers give better control.
- Hydraulic vs mechanical: Hydraulic is smoother, but costs more.
Upgrading can improve braking, but always match brakes to your riding style. If you ride fast or in wet conditions, bigger rotors and metal pads help.
Comparison: Mechanical Vs Hydraulic Disc Brakes
Here’s a simple look at how the two types compare:
| Feature | Mechanical Disc Brakes | Hydraulic Disc Brakes |
|---|---|---|
| Power | Moderate | High |
| Maintenance | Easy | Requires bleeding |
| Price | Lower | Higher |
| Adjustment | Cable tension, pad screws | Bleeding, caliper centering |
| Feel | Less smooth | Very smooth |
Troubleshooting Disc Brake Problems
Sometimes, disc brakes don’t work right even after setting. Here are practical fixes for common problems.
Brake Squeal
- Clean the rotor and pads with alcohol.
- Check for pad contamination.
- Center the caliper.
- Try different pads (organic vs metal).
Brake Fade
If brakes lose power after long use:
- Check for overheated pads (glazing).
- Replace pads if needed.
- Use bigger rotors for more cooling.
Soft Lever Feel
- For mechanical brakes, tighten cable.
- For hydraulic brakes, bleed the system.
Rubbing Noise
- Center caliper again.
- Check for bent rotor.
- Adjust pad clearance.
Weak Braking
- Replace worn pads.
- Clean rotor.
- Upgrade to bigger rotors or better pads.
Disc Brake Safety Tips
Mountain biking needs reliable brakes. Follow these safety tips:
- Test brakes before every ride.
- Replace pads at 2mm thickness.
- Clean rotors often.
- Avoid touching braking surfaces.
- Use proper tools for adjustment.
Brake Pad Types: Which Should You Use?
Brake pads come in different materials. Choosing the right one helps your riding style.
| Pad Type | Pros | Cons | Best For |
|---|---|---|---|
| Organic | Quiet, good initial bite | Wear faster, less power in wet | Dry, quiet trails |
| Metal/Sintered | Long lasting, strong power | Noisier, need more bedding-in | Wet, muddy, aggressive riding |
| Semi-metallic | Balanced power and life | Can be noisy | Mixed conditions |
Bedding-in New Disc Brakes
When you install new pads or rotors, you must bed them in. This process creates a smooth layer on the pads and rotor, improving power.
- Find a safe, flat area.
- Ride at medium speed.
- Squeeze brakes gently until you almost stop.
- Repeat 10-20 times, increasing force each time.
Don’t lock the wheels; gradual stopping is best. After bedding-in, brakes work stronger and quieter.
How Often Should You Set Disc Brakes?
Frequency depends on riding style and conditions.
- Casual riding: Every 3-6 months.
- Rough trails or wet weather: Every 1-2 months.
- After pad or rotor replacement: Always set brakes.
If you notice changes in braking, check and set brakes sooner.
When To Seek Professional Help
Some problems need expert help:
- Hydraulic leaks
- Stripped bolts
- Severely bent rotors
- Complex bleeding
A bike shop can fix these quickly. If you feel unsure, it’s better to get help than risk unsafe brakes.
Credit: dy-island.com
Disc Brake Performance: Data And Trends
Disc brakes have improved mountain biking safety and control. Data shows:
- Stopping power: Disc brakes provide up to 20% shorter stopping distance vs rim brakes.
- Adoption rate: Over 80% of new mountain bikes use disc brakes.
- Accident reduction: Bikes with well-set disc brakes have fewer braking-related crashes.
These numbers show why disc brakes—and proper setting—matter for every rider.
Real-world Example: Setting Disc Brakes
Imagine you ride a trail and notice your brakes feel weak and noisy. You check:
- Pads are thin (1mm).
- Rotor is dirty.
- Caliper is off-center.
You replace the pads, clean the rotor, and recenter the caliper. After test rides and bedding-in, your brakes feel strong and quiet. This simple routine prevents accidents and boosts confidence.

Credit: www.amazon.com
Non-obvious Insights For Beginners
- Rotor mounting: Tighten rotor bolts in a star pattern, not in a circle, to avoid warping.
- Pad alignment: Sometimes, pads are not perfectly parallel to the rotor. If you get persistent rubbing, loosen the pad screws and shift pads slightly before tightening.
- Brake lever reach: Adjust the lever so you can reach it easily with one finger. This improves control, especially on steep trails.
These tips are often missed by beginners, but make a big difference in brake feel and safety.
Comparison Of Rotor Sizes And Stopping Power
Rotor size affects braking power. Here’s how common sizes compare:
| Rotor Size (mm) | Stopping Power | Heat Dissipation | Weight |
|---|---|---|---|
| 160 | Moderate | Lower | Light |
| 180 | Strong | Medium | Medium |
| 200 | Very strong | High | Heavy |
Bigger rotors mean more power and cooling, but add weight. Choose based on your riding—fast, steep trails need bigger rotors.

Credit: dy-island.com
Frequently Asked Questions
How Do I Know If My Disc Brakes Need Adjustment?
If your brake lever feels loose, or your bike doesn’t stop quickly, or you hear rubbing/squealing noises, it’s time to set your brakes. Also check pad thickness and rotor condition.
Can I Use Different Brake Pads For Front And Rear?
Yes, you can. Many riders use metal pads in front for power and organic pads in rear for quiet. Match pad type to your riding style and conditions.
How Long Do Disc Brake Pads Last?
Pad life depends on riding conditions. On average, disc brake pads last 500-700 miles. Wet, muddy trails wear pads faster. Always check thickness regularly.
Is It Safe To Ride With Slightly Rubbing Brakes?
No. Rubbing brakes create heat, reduce power, and wear pads/rotors faster. Adjust pad clearance and caliper centering to fix rubbing before riding.
Where Can I Find More Technical Details About Disc Brake Systems?
For deep technical info, visit Wikipedia’s Bicycle Brakes page. It explains brake types, history, and how braking systems work.
Setting disc brakes is not just about safety—it’s about enjoying your ride with full control and confidence. With the right tools, steps, and knowledge, anyone can set disc brakes on a mountain bike. Try these steps, check your brakes often, and you’ll notice the difference on every trail.

Hello Guys! I am John Reese, a professional biker and my hobby is biking! I have been biking for last 12 years and I love using bikes while outing as well. Based on my experiences with the different type of bikes (mountain bikes, road bikes and hybrid bikes); I am sharing my opinion about various bikes so that a beginner can get started right away. Happy reading!