Drawing a realistic mountain bike is a rewarding challenge for anyone who loves art, cycling, or both. Whether you are a beginner or want to improve your skills, learning to capture the details of a mountain bike can help you create drawings that stand out. Mountain bikes have unique shapes, parts, and textures that require careful observation and technique. In this guide, you will discover clear steps, useful tips, and practical examples to help you draw a mountain bike that looks true to life.
Many people struggle with drawing mechanical objects because they are used to sketching organic shapes, like faces or animals. A mountain bike is a mix of straight lines, curves, and complex parts. But once you break the process into smaller steps, it becomes much easier.
This article will show you how to plan your drawing, understand the proportions, and add realistic details. Along the way, you will also learn common mistakes and how to avoid them, so you can build confidence and skill with every drawing.
Understanding Mountain Bike Anatomy
Before you start drawing, it is important to know the basic parts of a mountain bike. This will help you spot key features and avoid missing important details. Mountain bikes are designed for off-road riding, so they have special frames, thick tires, and sturdy parts.
Here are the main parts:
- Frame: The backbone of the bike, usually made from metal or carbon fiber. It connects all other parts.
- Wheels and tires: Wide, knobby tires for grip. The wheels have spokes, hubs, and rims.
- Fork: The front part that holds the front wheel and absorbs shocks.
- Handlebars: Used for steering. They can be flat or riser bars.
- Saddle: The seat, often slim and padded.
- Crankset and pedals: Where you push with your feet to move the bike.
- Derailleurs and chain: These help change gears.
- Brakes: Usually disc brakes for powerful stopping.
- Suspension: Some mountain bikes have shocks on the front (fork) and rear (frame).
Each part has its own shape, texture, and size. Understanding these parts will help you draw a mountain bike that looks accurate and realistic.
Why Anatomy Matters
If you know how each part fits together, you can draw them in the right place and size. Beginners often miss small parts like the chain or brake cables, which make the drawing look unfinished. Study photos or real bikes before you start.
Planning Your Drawing
A realistic drawing starts with good planning. You need to decide the angle, size, and details before you begin. Many artists rush into drawing and end up with mistakes that are hard to fix later.
Choosing Your Reference
Find a clear photo of a mountain bike. Side views are easiest for beginners, but you can try three-quarter angles for more depth. Make sure your reference shows all parts clearly and is well-lit.
Sketching The Outline
Start with a light outline. Use simple shapes to block in the main parts:
- Draw two circles for the wheels.
- Sketch a triangle or diamond for the frame.
- Add straight lines for the fork and handlebars.
Keep your lines light and easy to erase. Don’t worry about details yet—focus on the overall shape.
Proportion And Perspective
Getting the proportions right is key. Mountain bikes have long frames, large wheels, and a low seat. Use your reference to measure:
- The distance between wheels
- The angle of the frame tubes
- The size of the wheels compared to the frame
If you want your bike to look three-dimensional, use perspective. For a side view, both wheels are circles. For an angled view, the wheels become ellipses. The closer wheel is larger; the far wheel is smaller.
Credit: artincontext.org
Drawing The Frame
The frame is the most important part. It sets the shape and style of the bike. Mountain bike frames come in different designs, but most have strong, thick tubes.
Step-by-step Frame Drawing
- Start with the main triangle: Top tube, down tube, seat tube.
- Draw the chainstay and seatstay, which connect the rear wheel to the frame.
- Add the head tube where the fork connects.
Use straight, confident lines. Check your reference for the angles and thickness of each tube.
Frame Details
Mountain bike frames often have welds, bolts, and logos. Add these after the basic shape. For welds, use short, curved lines. For logos, draw simple shapes or letters.
Common beginner mistake: Making the frame too thin. Mountain bikes have thick, strong tubes.
Drawing The Wheels And Tires
The wheels and tires are large and full of detail. They give the bike its tough look.
Drawing The Wheels
- Draw two circles for the wheels.
- Inside each circle, add a smaller circle for the rim.
- Draw the hub in the center.
The spokes are thin lines that go from the hub to the rim. Mountain bikes usually have 32–36 spokes per wheel.
Drawing The Tires
Mountain bike tires are wide and knobby. Use short, zigzag lines to show the tread. Make the tire wider than the rim.
Pro tip: Don’t draw every knob on the tire—suggest the texture with patterns.
Data Comparison: Mountain Vs. Road Bike Wheels
Here’s how mountain bike wheels compare to road bike wheels:
| Feature | Mountain Bike | Road Bike |
|---|---|---|
| Tire Width | 2.0–2.6 inches | 0.9–1.1 inches |
| Tread Pattern | Knobby | Smooth |
| Number of Spokes | 32–36 | 20–24 |
Mountain bike wheels are bigger and stronger, with more spokes and thicker tires.
Drawing The Fork And Suspension
The fork holds the front wheel and absorbs shocks. Many mountain bikes have suspension forks, which are thicker and have special shapes.
Drawing The Fork
- Draw two parallel lines from the head tube to the front wheel.
- Add a bridge between the lines near the wheel.
- If your bike has suspension, draw cylinders or springs near the top.
Suspension Details
Suspension forks have knobs and bolts for adjusting. Use small circles and rectangles to show these. The fork may also have decals or brand names.
Beginner insight: Suspension forks are wider than rigid forks. Make sure your fork looks strong.
Drawing The Handlebars, Stem, And Grips
Handlebars are where the rider steers. They come in different shapes.
Drawing The Handlebars
- Draw a horizontal or slightly angled line for the bar.
- Add short lines at the ends for the grips.
- Draw the stem connecting the bar to the frame.
Mountain bike handlebars are usually flat or riser bars. Add brake levers and shifter levers as small rectangles.
Handlebar Details
The grips are rubber or foam. Show texture with cross-hatching or small dots. The brake and shifter cables run from the handlebars to the frame—draw thin, curved lines.
Drawing The Saddle And Seatpost
The saddle (seat) is slim and often angled up. The seatpost is a tube that connects the saddle to the frame.
Drawing The Saddle
- Draw a narrow oval or rectangle for the seat.
- Add a curved line underneath for the seatpost.
Some mountain bike saddles have a cutout or special padding. Add details for realism.
Practical tip: The saddle should be higher than the handlebars in most mountain bikes.
Drawing The Crankset, Pedals, And Chain
The crankset is where the pedals attach. It drives the bike forward.
Drawing The Crankset
- Draw a circle for the chainring.
- Add straight lines for the crank arms.
- Draw small rectangles at the ends for the pedals.
The pedals have texture and grip. Use dots or lines to show this.
Drawing The Chain
The chain runs from the chainring to the rear cassette. Draw two parallel lines with small links. Make the chain curve around the gears.
Drawing The Derailleurs
Mountain bikes have front and rear derailleurs. Draw small boxes near the gears with thin lines for the guide arms.
Advanced insight: The chain should not be perfectly straight—it curves as it wraps around gears.
Drawing The Brakes And Cables
Mountain bikes usually have disc brakes. These are round metal discs attached to the wheels.
Drawing The Disc Brakes
- Draw a small circle near the wheel hub.
- Add a caliper (small box) next to the disc.
Disc brakes have bolts and cutouts—add these for realism.
Drawing The Cables
Brake and gear cables are thin, curved lines running from the handlebars to the brakes and derailleurs.
Beginner mistake: Forgetting cables makes the bike look unfinished. Always add them.
Adding Realistic Details
Once you have the main parts, add small details to make your drawing look real.
Textures
Mountain bikes have many textures: metal, rubber, plastic, and fabric.
- Use cross-hatching for metal shine.
- Use dots or zigzag lines for rubber tires.
- Add small patterns for grips and saddle.
Shadows And Highlights
Shadows make your drawing look three-dimensional. Decide where your light source is. Shade under the frame, wheels, and fork. Add highlights to the top tube and rims.
Non-obvious insight: Use a kneaded eraser to lift highlights from shaded areas.
Logos And Decals
Mountain bikes often have brand logos and decals. Draw these as simple shapes and letters.
Dirt And Wear
Mountain bikes get dirty. Add splashes of mud or scratches for extra realism.
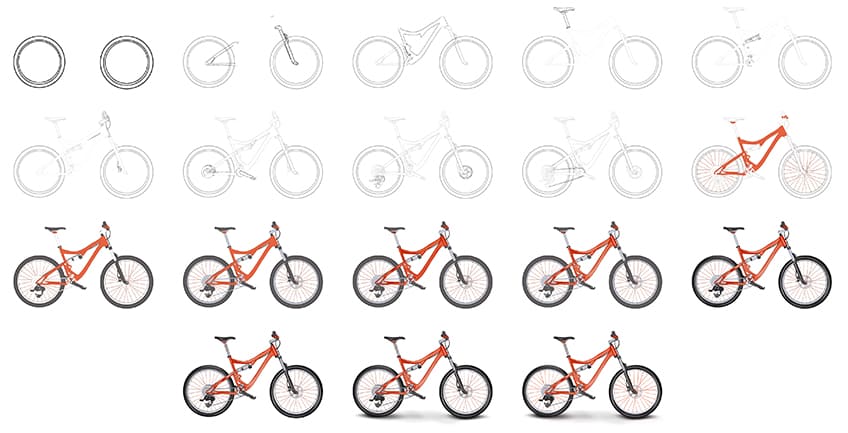
Step-by-step Guide: Drawing A Mountain Bike
Here is a full step-by-step process for drawing a realistic mountain bike:
- Choose a reference photo. Pick a clear, high-quality image.
- Sketch the outline. Draw wheels, frame, and other parts lightly.
- Block in the main shapes. Use simple shapes for each part.
- Draw the frame. Use straight lines and check proportions.
- Add wheels and tires. Draw circles, rims, hubs, and spokes.
- Draw the fork and suspension. Add parallel lines and details.
- Draw handlebars and stem. Add grips, levers, and cables.
- Draw saddle and seatpost. Add texture and shape.
- Draw crankset, pedals, and chain. Add gears and links.
- Draw brakes and cables. Add discs, calipers, and thin lines.
- Add details. Show textures, shadows, highlights, and logos.
- Refine your lines. Go over your best lines with a darker pencil or pen.
- Erase unwanted lines. Clean up the sketch.
- Shade and add highlights. Use shading to show depth.
- Add dirt, wear, and realistic touches. Finish your drawing.
Comparison Table: Realistic Vs. Simple Mountain Bike Drawing
See how a realistic drawing compares to a simple sketch:
| Feature | Realistic Drawing | Simple Sketch |
|---|---|---|
| Frame Shape | Accurate, detailed tubes | Basic lines |
| Wheels | Spokes, hubs, rim depth | Plain circles |
| Tires | Knobby tread pattern | Smooth outline |
| Details | Logos, cables, bolts | None or very few |
| Shading | Shadows and highlights | None |
A realistic drawing includes more details, textures, and depth.
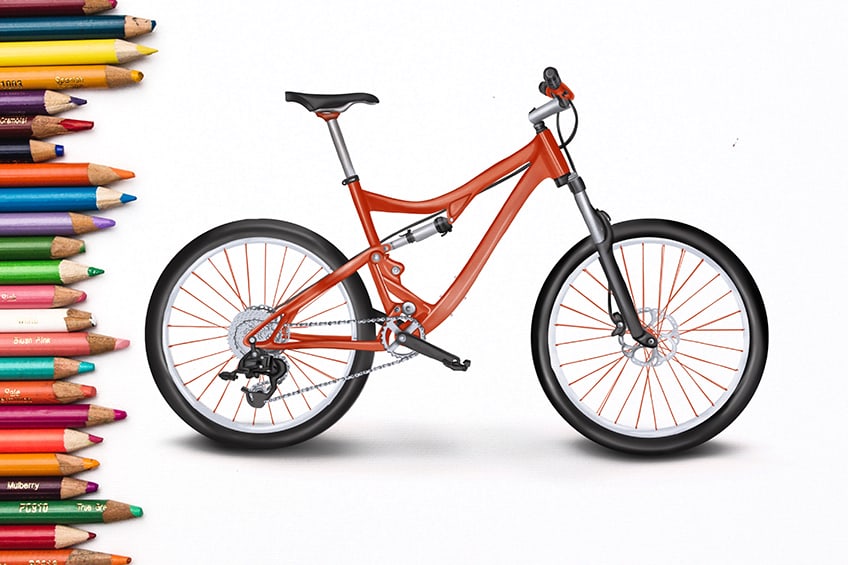
Coloring Your Drawing
Once your pencil drawing is finished, you can add color. This brings your mountain bike to life.
Choosing Colors
Mountain bikes come in many colors—red, blue, black, green, and more. Pick colors that match your reference.
Coloring Tips
- Use colored pencils or markers for smooth color.
- Start with light colors and build up to darker shades.
- Add shadows with darker tones.
- Highlight metal parts with white or light gray.
Non-obvious tip: Use a colorless blender pencil to smooth out colored pencil marks.
Adding The Background
A mountain bike looks more real with a simple background. You can draw a trail, mountain, or just a shadow under the bike.
Drawing The Background
- Keep it simple so it doesn’t distract.
- Add a shadow under the wheels.
- Draw rocks, dirt, or grass if you want a natural scene.
Pro insight: Use lighter shading for the background so the bike stands out.
Common Mistakes And How To Avoid Them
Many beginners make the same mistakes when drawing mountain bikes. Here’s how to avoid them:
- Incorrect proportions: Measure carefully and compare parts.
- Overly thin frame: Check your reference for tube thickness.
- Missing details: Add cables, bolts, and tire tread.
- Flat wheels: Use perspective to show roundness.
- No shading: Add shadows for depth.
- Ignoring texture: Show metal, rubber, and dirt.
- Rushing the outline: Take your time with the initial sketch.
- Using one pencil: Try different pencils for lines and shading.
- Forgetting the chain: Draw it as part of the drivetrain.
- Too dark too soon: Start with light lines, then darken.
Practice Exercises
Improving your skills takes practice. Here are some exercises:
- Draw just the wheels from different angles.
- Sketch the frame in different styles.
- Draw the bike without any details, then add them later.
- Practice shading metal and rubber textures.
- Draw parts separately, like pedals or handlebars.
Real-life Example: Drawing A Mountain Bike
Let’s look at a real-life example. Anna, a beginner artist, wanted to draw her mountain bike. She started with a side photo, sketched the outline lightly, and built up the frame and wheels. She made sure to add the thick tire tread, cables, and suspension fork.
Anna used shading to show the metal shine and added mud splashes for realism. Her finished drawing looked almost like a photo.
She learned that measuring parts, adding cables, and focusing on textures made her drawing much better. Anna also found that drawing parts separately helped her understand the shapes.
Tools And Materials
You don’t need expensive tools to draw a mountain bike. Here’s what you need:
- Pencils: Use HB for sketching, 2B or 4B for shading.
- Eraser: A kneaded eraser is best for highlights.
- Paper: Smooth paper for clean lines.
- Ruler: For straight lines and measuring.
- Colored pencils or markers: For coloring.
- Reference photo: Choose a clear image.
Credit: artincontext.org
Tips For Drawing From Observation
Drawing from observation helps you create a realistic image.
- Spend time looking at the bike or photo.
- Notice small details, like bolts and welds.
- Draw what you see, not what you think you know.
- Take breaks to review your drawing.
Pro tip: Use your phone to take a picture of your drawing and compare it to your reference. This helps spot mistakes.
Faq: Frequently Asked Questions

Credit: mbaction.com
How Long Does It Take To Draw A Realistic Mountain Bike?
Drawing a realistic mountain bike usually takes 2–4 hours for beginners, depending on the detail and shading. Experienced artists may finish faster, but taking time leads to better results.
What Is The Best Angle To Draw A Mountain Bike?
The side view is easiest for beginners because all parts are visible and proportions are clear. Three-quarter angles add depth but are more complex.
Which Pencils Are Best For Realistic Mountain Bike Drawings?
Use HB pencils for sketching and 2B–4B pencils for shading and dark lines. Softer pencils make richer shadows and highlights.
How Do I Make My Mountain Bike Drawing Look Three-dimensional?
Add shadows and highlights. Shade under the frame, wheels, and fork. Use perspective to show depth—wheels become ellipses when viewed from an angle.
Where Can I Find Good Reference Photos Of Mountain Bikes?
You can find high-quality reference photos on bike manufacturer websites, cycling forums, and sites like Wikipedia. Choose clear, well-lit images for best results.
Drawing a mountain bike is a skill anyone can learn with patience and practice. By understanding the parts, planning your drawing, and adding realistic details, you can create artwork that looks professional. Remember, each drawing helps you improve. Take your time, use good references, and don’t be afraid to experiment.
Happy drawing!

Hello Guys! I am John Reese, a professional biker and my hobby is biking! I have been biking for last 12 years and I love using bikes while outing as well. Based on my experiences with the different type of bikes (mountain bikes, road bikes and hybrid bikes); I am sharing my opinion about various bikes so that a beginner can get started right away. Happy reading!