Mountain biking is thrilling, but there is one thing every rider must always trust: brakes. When your brakes do not work well, it is more than just annoying—it is dangerous. Whether you ride through forests, rocky hills, or city parks, knowing how to fix your mountain bike brakes is a skill that can save a ride, and maybe even prevent injury. You do not have to be a professional mechanic to get this right. With some simple tools, careful steps, and a little patience, you can restore your brakes to full power and safety.
This guide will walk you through the most common brake problems on a mountain bike and how to solve them. You will learn about both rim brakes and disc brakes, the tools you need, how to diagnose issues, and the step-by-step process for fixing and adjusting your brakes. If you feel nervous about touching your brakes, do not worry—this article is written with beginners in mind, using simple words, clear explanations, and plenty of practical examples. Let us make sure your next ride is smooth, safe, and full of confidence.
Understanding Mountain Bike Brakes
Before you start fixing, it helps to know what you are working with. Mountain bike brakes come in two main types: rim brakes and disc brakes. Each has its own parts, problems, and solutions.
Rim Brakes
Rim brakes grip the wheel rim to slow you down. There are two common styles:
- V-brakes (linear-pull brakes): Most popular on basic mountain bikes.
- Cantilever brakes: Older style, less common but still found on some bikes.
Key parts: brake levers, cables, brake arms, brake pads, and the rim itself.
Disc Brakes
Disc brakes use a metal rotor attached to the wheel hub, with calipers and pads squeezing the rotor to stop the bike. Two main types:
- Mechanical disc brakes: Use cables, like rim brakes.
- Hydraulic disc brakes: Use fluid in hoses for more power and smoother feel.
Key parts: brake levers, cables/hoses, calipers, pads, and rotors.
Non-obvious insight: Many beginners do not realize that dirt or oil on rims or rotors can make brakes feel weak. Cleaning can fix more problems than you think—sometimes before you need to adjust anything.
Tools And Supplies You Will Need
You do not need a fancy workshop to fix your brakes, but a few basic tools make the job easier and safer.
- Allen wrenches (hex keys): Common sizes are 4mm, 5mm, and 6mm.
- Screwdrivers: Both flathead and Phillips.
- Needle-nose pliers: For pulling brake cables.
- Cable cutters: If you need to replace cables.
- Clean rags and isopropyl alcohol: For cleaning rims, rotors, and pads.
- Sandpaper or emery cloth: For lightly scuffing pads or rotors if glazed.
- Bike-specific grease: For pivot points.
- Replacement brake pads: If yours are worn out.
- New cables or housing: If cables are frayed or sticky.
- Hydraulic brake bleed kit: Only for hydraulic disc brakes.
Tip: If you ride often, a small tool kit is a smart investment. It saves time and lets you fix problems wherever you are.
Credit: www.fanatikbike.com
Diagnosing Brake Problems
Before you start taking things apart, identify exactly what is wrong. Here is how to spot the most common issues:
- Squeaking or squealing: Usually dirty pads, rims, or rotors. Sometimes pads are worn or contaminated.
- Weak braking power: Pads may be worn, cables may be loose, or there could be air in a hydraulic system.
- Brake levers pull to the handlebar: Brake cables are loose, pads are worn, or there is air in hydraulic brakes.
- Brakes rub when not in use: Pads are too close to the rim/rotor, or the wheel/rotor is not straight.
- Sticky or slow release: Cables or housing are dirty, or brake arms/pivots need lubrication.
Non-obvious insight: Sometimes, a new noise or poor braking feels like a big problem, but it can be as simple as a loose wheel or a bent rotor. Always check the basics first.
How To Fix Rim Brakes
Rim brakes are simple and reliable. Here’s how to get them working like new.
1. Clean The Braking Surfaces
Dirt, oil, or brake pad residue on the rim or pads can ruin brake performance.
- Remove the wheel if needed.
- Wipe the rim surface with a clean rag and isopropyl alcohol.
- Clean brake pads with alcohol and lightly sand them if they look shiny (glazed).
- Reinstall the wheel and spin to check for noise.
2. Inspect Brake Pads
- Look for grooves in the pads—if they are worn flat or less than 2 mm thick, replace them.
- Make sure pads hit only the rim, not the tire or below the rim.
3. Adjust Pad Position
- Loosen the pad bolt with an Allen wrench.
- Align the pad so it sits flat on the rim.
- The front of the pad should touch the rim slightly before the rear (“toe-in”) to reduce squeal.
- Hold in place and tighten.
4. Center The Brakes
- Squeeze the brake lever and watch both pads move. If one pad touches the rim first, adjust the spring tension screw on the side of the brake arm.
- Tighten or loosen the screw until both pads move evenly.
5. Adjust Cable Tension
- If the lever feels loose, tighten the barrel adjuster (on the lever or brake) by turning it out.
- For bigger adjustments, loosen the cable anchor bolt, pull the cable tighter, and retighten.
6. Replace Worn Pads Or Cables (if Needed)
- Remove the old pad with an Allen wrench.
- Slide in the new pad, align, and tighten.
- For cables, disconnect from the lever and brake, then thread in the new one.
Example: If your brake lever nearly touches the handlebar before the brakes engage, tightening the cable usually solves the problem.
How To Fix Mechanical Disc Brakes
Mechanical disc brakes use cables, like rim brakes, but squeeze a rotor instead.
1. Clean Rotors And Pads
- Remove the wheel.
- Wipe the rotor with isopropyl alcohol.
- Clean the pads the same way, or lightly sand if glazed.
2. Inspect Pads And Rotors
- Pads should be at least 1 mm thick. Replace if thinner.
- Rotors should be flat and free from deep grooves.
- If rotors are bent, use a rotor truing tool to gently straighten.
3. Adjust Pad Position
- Loosen the caliper mounting bolts.
- Squeeze the brake lever to center the caliper over the rotor.
- Retighten bolts while holding the lever.
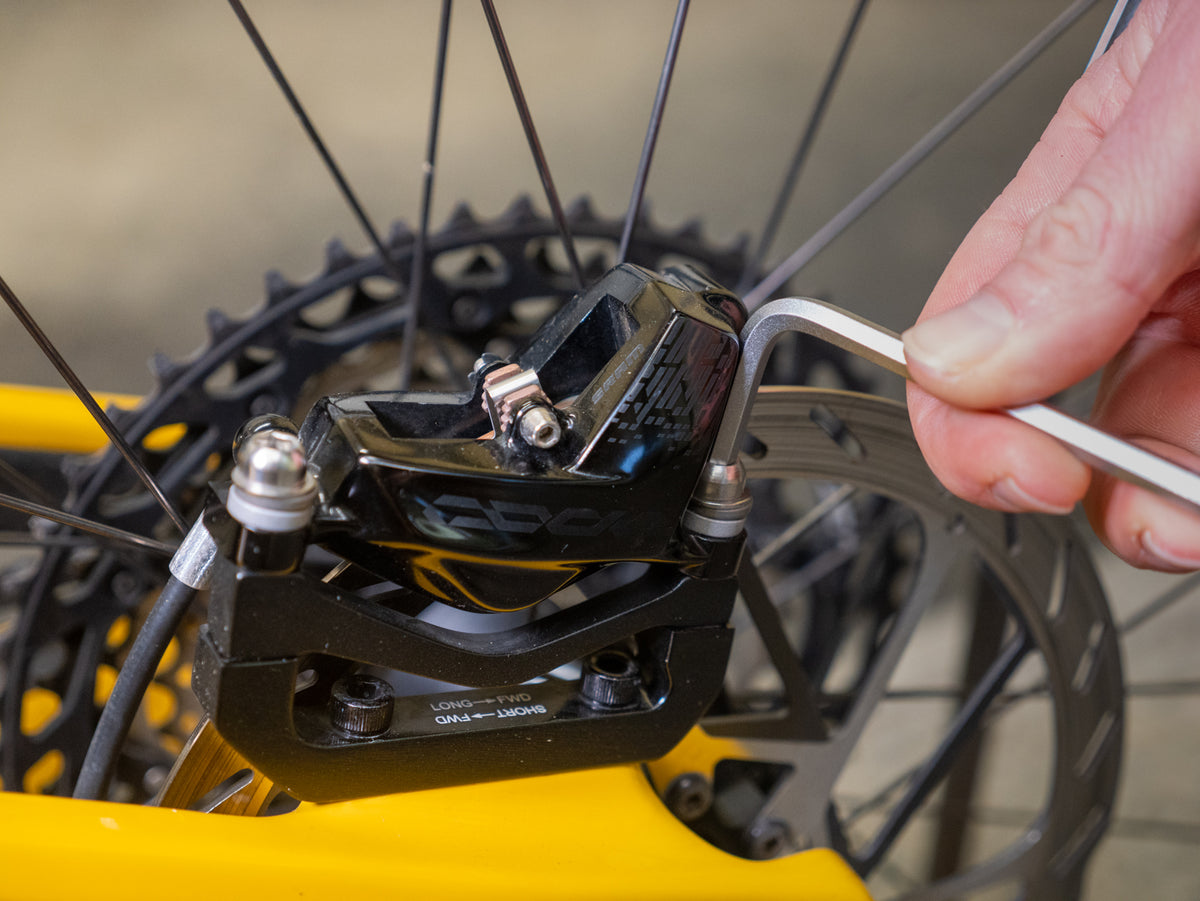
4. Set Cable Tension
- Use the barrel adjuster on the lever or caliper for small tweaks.
- For bigger changes, loosen the anchor bolt, pull cable tight, and retighten.
5. Adjust Pad Clearance
Some mechanical disc brakes have a dial or screw to move the inner pad closer or farther from the rotor. Adjust so both pads are close but do not rub.
6. Replace Pads Or Cables
- Remove the wheel.
- Slide out the old pads.
- Insert new pads, making sure they are correctly oriented.
- Reinstall wheel and test.
Example: If your disc brake feels weak after cleaning, the pads may be worn or contaminated with oil. Cleaning or replacing usually solves it.
How To Fix Hydraulic Disc Brakes
Hydraulic systems are powerful and need careful handling. They use fluid instead of cables.
1. Clean Rotors And Pads
- As with mechanical brakes, use isopropyl alcohol.
- Never touch the rotor or pads with oily hands.
2. Check For Pad Wear
- Look for at least 1 mm of pad material.
- If less, replace pads.
3. Align Calipers
- Loosen the caliper bolts.
- Squeeze the brake lever and keep it squeezed while you retighten the bolts.
- This centers the caliper on the rotor.
4. Check For Air In The System
If the lever feels spongy or goes to the bar:
- You may need to bleed the brakes. This means removing air bubbles from the fluid.
- Use a bleed kit and follow the instructions for your brake model.
5. Replace Fluid (if Needed)
- Use the correct brake fluid—mineral oil or DOT fluid. Never mix them.
- Bleed the system to remove old fluid and air.
6. Replace Pads
- Remove wheel and pads.
- Insert new pads, making sure not to touch them with your fingers.
Warning: Hydraulic systems are sensitive. If you are unsure, ask a bike shop for help. Using the wrong fluid or tools can damage your brakes.

Credit: www.youtube.com
Table: Rim Vs Disc Brakes
To help you understand the main differences, here is a quick comparison.
| Feature | Rim Brakes | Disc Brakes |
|---|---|---|
| Stopping Power | Good (dry), weak (wet) | Excellent in all conditions |
| Maintenance | Simple, easy at home | More complex, some tools needed |
| Weight | Lighter | Heavier |
| Cost | Lower | Higher |
| Pad Replacement | Cheap, quick | More expensive |
Step-by-step Brake Adjustment Example
Here is a real-world example for adjusting V-brakes, which are the most common rim brakes.
- Check pad wear. If pads are worn, replace them.
- Loosen the mounting bolt holding the pad.
- Align the pad so it sits squarely on the rim, not touching the tire or too low.
- Tighten the bolt while holding the pad in place.
- Check cable tension. Squeeze the lever—if it feels loose, turn the barrel adjuster out or pull the cable tighter at the brake arm.
- Center the brake arms. Adjust spring screws until both pads move evenly.
- Test the brake. The lever should stop before touching the handlebar, and the pads should not rub when released.
Practical tip: If pads keep rubbing, check if the wheel is centered in the frame. An off-center wheel makes even perfect brakes rub.
Table: Common Brake Problems And Solutions
Here’s a quick guide to matching problems with fixes.
| Problem | Possible Cause | Solution |
|---|---|---|
| Squeaky brakes | Dirty pads/rotors/rims | Clean with alcohol, sand pads |
| Weak braking | Worn pads, loose cables, air in lines | Replace pads, tighten cables, bleed brakes |
| Levers pull to bar | Loose cables, worn pads, air in system | Tighten cable, replace pads, bleed system |
| Brakes rub | Wheel/rotor not centered, misaligned pads | Re-center wheel, adjust caliper/pad position |
| Sticky brakes | Dirty cables, dry pivots | Clean/lube cables, grease pivots |
When To Replace Parts (and Which Ones)
Brakes are made of wear parts—you will need to change pads, cables, or fluid as they get old.
- Brake pads: Replace when less than 2 mm (rim) or 1 mm (disc) thick, or if contaminated.
- Cables and housing: Replace if frayed, rusty, or sticky. New cables feel much smoother and restore lost power.
- Rotors: Replace if bent, cracked, or worn below maker’s minimum thickness (usually marked on the rotor).
- Brake fluid: For hydraulic brakes, change fluid every 1-2 years, or if brakes feel spongy.
Tip: Keep spare pads in your toolbox or backpack. Pads can wear out fast in wet, muddy conditions.
How To Avoid Brake Problems
Prevention saves time and money. Here is how to keep brakes working well:
- Clean regularly. After muddy or wet rides, wipe down rims, rotors, and pads.
- Check pad wear every few rides.
- Inspect cables for rust or fraying.
- Test brakes before every ride—squeeze levers and check for power.
- Do not touch braking surfaces with greasy hands.
- Store your bike indoors to avoid rust.
Non-obvious tip: Brake pads can glaze if you ride with the brakes half-on. Try to use firm, short braking instead of dragging the brakes downhill.
Real-world Example: Quick Fix For A Squeaky Brake
Imagine you are halfway down a trail and your bike starts making a loud squeak every time you brake. Instead of panicking, stop and do this:
- Check for mud, leaves, or oil on the rim or rotor.
- Use a clean cloth (or even a shirt) to wipe the surface.
- If you have a multitool, loosen and realign the brake pad so it sits flat.
- Spin the wheel and test.
Often, just cleaning and quick alignment fixes squeaks and restores power. No need to end your ride early.
Credit: sajdikovehumence.sk
Table: Basic Brake Maintenance Schedule
A regular routine helps your brakes last longer.
| Task | Frequency |
|---|---|
| Wipe rims/rotors and pads | After every wet/muddy ride |
| Check pad wear | Every 2-4 weeks |
| Inspect cables/hoses | Monthly |
| Bleed hydraulic brakes | Every 1-2 years, or if spongy |
| Replace pads | When worn or noisy |
Safety Tips When Working On Brakes
- Always test your bike in a safe, flat area after any brake work.
- Do not touch braking surfaces with greasy hands.
- Use the right tools—using pliers instead of a proper wrench can strip bolts.
- For hydraulic brakes, avoid getting fluid on your skin or paint.
- If you are unsure, ask a professional mechanic for help.
Extra advice: Never ride with uncertain brakes. If you have doubts about your fix, walk your bike or get help before riding steep trails.
Helpful Resources
If you want to learn more or see video guides, the Park Tool website is a respected source for bike repair tips. You can visit Park Tool’s Repair Help for guides and videos.
Frequently Asked Questions
What Causes Squeaky Brakes On A Mountain Bike?
Squeaky brakes usually happen because of dirt, oil, or water on the pads, rim, or rotor. Sometimes, brake pads are glazed (shiny) from heavy use or heat. Clean all surfaces with isopropyl alcohol and lightly sand the pads. Make sure pads are set with a slight toe-in (front touches first) for rim brakes.
How Do I Know If My Brake Pads Need Replacing?
Check the thickness of the pad material. For rim brakes, replace pads when less than 2 mm thick. For disc brakes, change them at 1 mm or if you see metal. Also, replace if you hear grinding or see grooves.
Why Do My Brakes Feel Weak Even After Adjusting?
Weak brakes can be from worn pads, dirty rims or rotors, loose cables, or air in hydraulic systems. Try cleaning, adjusting, and then replacing pads or bleeding the brakes if needed.
Can I Mix Different Types Of Brake Pads?
No. Always use the correct pads for your brake type and model. Mixing can reduce braking power and wear out rims or rotors. Check your bike’s manual or ask your local bike shop.
How Often Should I Bleed Hydraulic Brakes?
Most brands recommend bleeding every 1-2 years, or anytime the lever feels spongy or pulls close to the handlebar. Riding in wet or muddy conditions may require more frequent bleeding.
With these steps and tips, fixing your mountain bike brakes is a skill you can master. It keeps you safe, saves money, and lets you enjoy every ride with confidence. Remember, start with cleaning and basic checks—often, the simplest solutions work best.
Happy and safe riding!

Hello Guys! I am John Reese, a professional biker and my hobby is biking! I have been biking for last 12 years and I love using bikes while outing as well. Based on my experiences with the different type of bikes (mountain bikes, road bikes and hybrid bikes); I am sharing my opinion about various bikes so that a beginner can get started right away. Happy reading!