Mountain biking is thrilling, but nothing ruins a ride faster than weak or noisy brakes. If your mountain bike’s rear brakes aren’t working well, you risk poor stopping power and even accidents. Adjusting rear brakes may seem tricky, but with the right guidance, you can do it yourself and enjoy safer, smoother rides.
This article will show you how to adjust rear brakes on a mountain bike step by step—using clear language, practical examples, and expert advice. Whether your bike uses disc or rim brakes, you’ll learn everything needed to keep your braking system reliable.
Understanding Mountain Bike Rear Brakes
Before you start adjusting, it’s important to know what kind of brakes your mountain bike has. Most mountain bikes use either disc brakes or rim brakes.
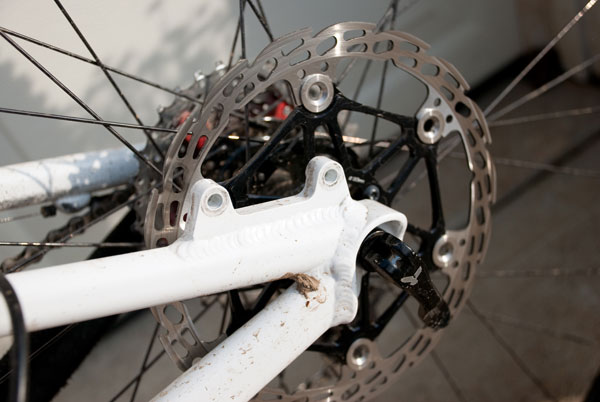
- Disc brakes use a metal rotor attached to the wheel hub and calipers with brake pads. When you pull the brake lever, the pads squeeze the rotor.
- Rim brakes use pads that press against the wheel rim to slow you down.
Disc brakes are more common on modern mountain bikes, especially for trails and rough terrain. Rim brakes are lighter and simpler but can be less powerful, especially in wet conditions.
Key Parts Of Rear Brakes
No matter which type, your rear brakes have several important parts:
- Brake lever: The handlebar control you squeeze.
- Brake cable or hydraulic line: Transfers force to the brake.
- Caliper: Holds the brake pads.
- Brake pads: The material that presses against the rotor or rim.
- Rotor (for disc brakes): The metal disc attached to your wheel.
Knowing these terms will help you follow the adjustment process.
Why Adjust Rear Brakes?
Poorly adjusted brakes affect your safety and riding experience. Signs you need adjustment:
- Brakes feel weak or spongy
- Brake lever pulls too far before engaging
- Pads rub or squeal when not braking
- Braking is uneven or jerky
- Pads wear out quickly
Regular brake adjustment helps you:
- Stop faster and safer
- Avoid damage to wheels or rotors
- Save money on repairs
Many riders focus only on the front brake, but the rear brake is crucial for controlling speed and stability, especially on downhills.
Credit: protrustconsulting.co.uk
Tools Needed For Brake Adjustment
You don’t need a full bike workshop. Most brake adjustments require simple tools:
- Allen wrenches (4mm, 5mm, 6mm)
- Screwdrivers (Phillips and flathead)
- Needle-nose pliers
- Bike lubricant
- Clean rag
- Replacement brake pads (if needed)
For disc brakes, sometimes you’ll need torx keys (for certain rotor bolts). Hydraulic brakes may require a bleed kit if the fluid is low or contaminated.
Having the right tools makes the job faster and safer. Always check your bike’s manual for specific tool sizes.
Preparing Your Mountain Bike
Start with a clean, stable bike. Dirt and grime make adjustment harder and can hide brake problems.
- Clean the brake area: Use a rag and bike-specific cleaner for rotors, pads, and rims.
- Check for damage: Look for worn pads, frayed cables, bent rotors, or cracked calipers.
- Position the bike: Use a bike stand or flip the bike upside-down. Make sure the rear wheel spins freely.
Don’t skip cleaning. Even a small bit of oil or grit can make brakes noisy or weak.
Credit: www.reddit.com
How To Adjust Rear Rim Brakes
Rim brakes are still popular on many mountain bikes. Here’s how to adjust them for better performance.
Step 1: Inspect Brake Pads
Look at the pads. They should be:
- Not too thin (replace if less than 3mm thick)
- Evenly worn (not angled or uneven)
- Lining up with the rim (not hitting the tire)
If pads are worn out, replace them before adjusting.
Step 2: Align Brake Pads
Use an Allen wrench to loosen the brake pad bolt. Move the pad so:
- It touches only the rim, not the tire or spokes
- The whole pad contacts the rim when the brake is squeezed
Tighten the bolt once aligned. Pads should be close to the rim but not rubbing when you release the brake lever.
Step 3: Adjust Cable Tension
Locate the barrel adjuster near the brake lever or caliper. Turning it out (counterclockwise) tightens the cable, making the brake more responsive. If the lever feels loose or pulls too far, tighten the barrel adjuster.
If more adjustment is needed:
- Loosen the cable anchor bolt
- Pull the cable tighter with pliers
- Retighten the anchor bolt
Small changes make a big difference. Test the lever after each adjustment.
Step 4: Center The Brake Arms
Rim brakes have two arms that should move evenly. If one pad stays close to the rim, tighten or loosen the small screws near each arm base.
- Tighten the screw to move the arm away from the rim
- Loosen the screw if the arm is too far
This centers the brake so both pads hit the rim at the same time.
Step 5: Test And Fine-tune
Spin the wheel. The pads should not rub, and the lever should feel firm. Squeeze the brake and check stopping power. If needed, repeat steps until satisfied.
Common Mistakes With Rim Brake Adjustment
- Not checking pad alignment—pads can hit the tire and cause a blowout
- Over-tightening the cable—brakes may rub constantly
- Forgetting to clean rim and pads—dirt reduces braking power
How To Adjust Rear Disc Brakes
Disc brakes need precise adjustment for smooth, powerful stopping.
Step 1: Inspect Pads And Rotor
Check the brake pads:
- Replace if less than 2mm thick
- Make sure both pads wear evenly
Inspect the rotor:
- Look for warping (bends or wobbles)
- Check for deep grooves or dirt
A clean rotor and pads are essential for good braking.
Step 2: Center The Caliper
Disc brake calipers must be centered over the rotor.
- Loosen both caliper mounting bolts with an Allen wrench
- Squeeze the brake lever and hold it (this centers the caliper)
- While holding the lever, tighten the bolts evenly
This method works for both mechanical and hydraulic disc brakes.
Step 3: Adjust Pad Clearance
For mechanical disc brakes:
- Find the adjustment dial or screw on the caliper
- Turn to move pads closer or farther from the rotor
For hydraulic brakes, pad clearance is usually set by the system, but you can adjust lever reach with a small screw or dial on the lever.
Step 4: Adjust Cable (mechanical Disc Brakes Only)
Like rim brakes, mechanical disc brakes use a cable. Adjust tension with the barrel adjuster or anchor bolt as described above.
Hydraulic brakes do not have a cable. If the lever feels soft, you may need to bleed the brake system.
Step 5: Test And Fine-tune
Spin the rear wheel. Pads should not rub unless you squeeze the lever. Squeeze the brake; check for strong, smooth stopping.
Common Mistakes With Disc Brake Adjustment
- Forgetting to center the caliper—causes rubbing and noise
- Using oily hands—contaminates pads and rotor
- Not checking pad thickness—thin pads damage rotors
Troubleshooting Rear Brake Problems
Even after adjusting, you might face issues. Here’s how to fix common problems.
Brake Squeal
Squealing brakes are annoying and can mean trouble. Causes:
- Dirty pads or rotor/rim
- Misaligned pads
- Glazed pads (shiny, hard surface)
Fix by cleaning with alcohol, sanding pads lightly, and realigning.
Brake Fade
If brakes lose power during long descents:
- Pads may be overheated or worn
- Rotor may be too small
Switch to higher-quality pads or a larger rotor if needed.
Lever Feels Spongy
Usually a sign of air in hydraulic lines or a stretched cable. Bleed hydraulic brakes or replace cables.
Pads Rub Constantly
Likely due to a misaligned caliper or brake arms. Re-center caliper or adjust arm screws.
When To Replace Brake Pads
Brake pads don’t last forever. Here’s when to change them:
- Less than 3mm thick (rim) or 2mm (disc)
- Uneven wear
- Glazed or hard surface
- Reduced stopping power even after adjustment
Many riders wait too long—replacing pads early keeps your bike safe.
Comparing Rim Brakes Vs. Disc Brakes
If you’re unsure which system your bike uses or you’re considering an upgrade, here’s a quick comparison.
| Feature | Rim Brakes | Disc Brakes |
|---|---|---|
| Stopping Power | Good (dry) | Excellent (all conditions) |
| Weight | Light | Heavier |
| Maintenance | Easy | Moderate |
| Performance in Wet | Poor | Excellent |
| Cost | Lower | Higher |
Disc brakes offer better performance, especially for aggressive riding or wet conditions, but rim brakes are easier to maintain and lighter for casual riders.
Safety Tips For Adjusting Rear Brakes
Many beginners miss these important safety steps:
- Always use clean hands when touching pads and rotors—oil reduces braking power.
- Test brakes in a safe area before riding downhill.
- Check brake function every few rides—don’t wait for a problem.
- Replace both pads at the same time for balanced braking.
- Never use random lubricants on brake parts—only use bike-approved products.
A simple safety check takes less than a minute but can prevent accidents.
How Often Should You Adjust Rear Brakes?
Adjustment frequency depends on riding style, terrain, and weather. Here are some guidelines:
| Riding Type | Adjustment Frequency |
|---|---|
| Casual / Weekend | Every 2-3 months |
| Trail / Aggressive | Monthly |
| Wet / Muddy Conditions | Every 2-4 weeks |
| After Crash | Immediately |
If you ride often in mud or rain, brakes wear faster. Check and adjust more frequently.
Upgrading Your Rear Brake System
If you’re unhappy with performance or need more stopping power, upgrading is an option. Here’s what matters:
- Type compatibility: Disc brakes need a compatible frame and wheel hub.
- Rotor size: Larger rotors give more power but require matching calipers.
- Pad material: Sintered pads last longer; organic pads are quieter.
- Brake lever ergonomics: Comfortable levers make braking easier.
Compare features before buying. Don’t just look for the cheapest option—quality matters for safety.
Real-world Example: Trail Ride Adjustment
Let’s look at a real example. Chris, a mountain biker, noticed his rear brakes felt weak during a downhill ride. He stopped, checked pad thickness (only 1mm left), and saw the pads were unevenly worn. He replaced the pads, cleaned the rotor, and centered the caliper.
After adjustment, his bike stopped much faster, and he finished the ride safely.
Many riders only adjust brakes at home. If you notice problems on the trail, do a quick check—most adjustments take just a few minutes.
Data: Brake Failure Risks
According to a 2022 cycling safety report, brake failure is linked to 12% of mountain biking accidents. Most failures come from worn pads or misadjusted calipers. Regular maintenance and adjustment reduce your risk.
Expert Insights: What Most Beginners Miss
Two common mistakes beginners make:
- Not cleaning pads or rotor before adjustment—dirt and oil ruin braking.
- Ignoring pad wear—pads may look okay from above but are too thin underneath.
Always check pad thickness from the side, and clean parts before adjusting. These steps are quick but make a big difference.
Rear Brake Adjustment Checklist
To make sure you don’t miss anything, here’s a quick checklist:
- Clean pads, rotor/rim, and caliper
- Check pad thickness and replace if needed
- Align pads correctly
- Center caliper or brake arms
- Adjust cable tension or lever reach
- Test brakes for stopping power and rubbing
- Fine-tune as needed
- Check safety before riding

Credit: www.youtube.com
Frequently Asked Questions
How Can I Tell If My Rear Brake Pads Need Replacing?
Look at the pads from the side. If they’re less than 3mm thick for rim brakes or 2mm thick for disc brakes, it’s time to replace them. Also, replace if they’re unevenly worn or have a shiny, glazed surface.
Why Are My Rear Brakes Squealing Even After Adjustment?
Squealing often means dirty pads or rotor/rim. Clean with rubbing alcohol and lightly sand pads. If squealing continues, pads may be contaminated or misaligned.
Is It Safe To Adjust Rear Brakes Myself?
Yes, most rear brake adjustments are safe for beginners if you follow steps carefully. Use the right tools, check for damage, and test brakes before riding fast or downhill.
How Do I Know If My Caliper Is Centered?
After adjusting, spin the wheel. The rotor should pass through the caliper without rubbing. Squeeze the brake lever—both pads should touch the rotor evenly. If not, loosen mounting bolts, squeeze the lever, and retighten.
Can I Upgrade From Rim Brakes To Disc Brakes?
Upgrading is possible, but your bike must have disc brake mounts on the frame and fork, and compatible wheel hubs. If unsure, check your bike’s manual or ask a professional. For more details, see Wikipedia: Bicycle brake.
Adjusting your mountain bike’s rear brakes improves safety and control. With regular checks and proper technique, you’ll enjoy smoother rides and fewer surprises. Don’t wait for a problem—keep your brakes in top shape and ride with confidence.

Hello Guys! I am John Reese, a professional biker and my hobby is biking! I have been biking for last 12 years and I love using bikes while outing as well. Based on my experiences with the different type of bikes (mountain bikes, road bikes and hybrid bikes); I am sharing my opinion about various bikes so that a beginner can get started right away. Happy reading!