Mountain biking is not just about riding trails—it’s about making your bike fit your body and style. If you own a mountain bike with rear air suspension, learning how to adjust it is one of the best ways to improve your comfort, control, and speed. Many riders don’t realize how much difference a few small tweaks can make. Whether you’re new to mountain biking or looking to master your setup, this guide will help you understand and adjust your rear air suspension step-by-step.
What Is Rear Air Suspension?
Rear air suspension uses an air shock instead of a traditional coil spring. The shock is filled with compressed air, which acts as a spring to absorb bumps and impacts. This type of suspension is popular because it’s lighter, easier to adjust, and can be tuned for different rider weights and riding styles.
Most modern mountain bikes use a rear air shock that lets you change the air pressure, rebound, and compression. Adjusting these settings helps you fine-tune your bike’s performance for rough terrain, jumps, or technical climbs.
Key Benefits
- Lighter weight than coil shocks
- Easy to adjust for different riders and terrains
- Customizable feel for comfort or performance
Popular Brands
Some common brands making air shocks are RockShox, Fox, and Manitou. Each has its own models and adjustment features, but the basic principles are similar.
Why Adjust Your Rear Air Suspension?
If your suspension is not set up correctly, you might feel uncomfortable, lose control, or damage your bike. Proper adjustment helps with:
- Better traction: The shock keeps your rear wheel on the ground.
- Comfort: Absorbs impacts so you feel less fatigue.
- Efficiency: Your energy goes into moving forward, not fighting the bike.
- Safety: Prevents bottoming out and sudden loss of control.
A well-tuned suspension can make a $1,000 bike feel like a $5,000 bike. In fact, a survey by Pinkbike found that 81% of riders felt more confident after adjusting their suspension.
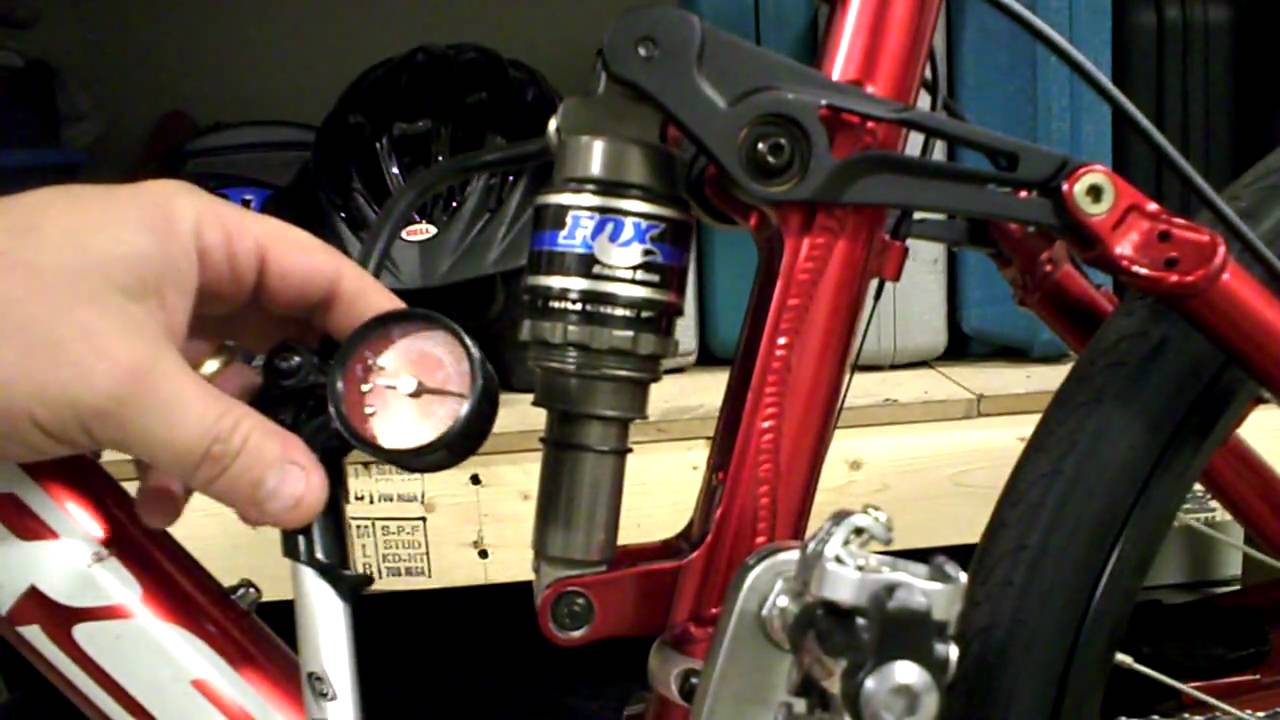
Tools You Need
Before you start, gather these tools:
- Shock pump: A special pump for adding/removing air from your shock.
- Allen wrenches: For adjusting mounting bolts or dials.
- Measuring tape/ruler: To measure sag and shock length.
- Marker or zip-tie: To mark shock position for sag measurement.
- Owner’s manual: For model-specific instructions.
Using the correct tools prevents damage and ensures accuracy.
Understanding Key Suspension Terms
Before adjusting, it helps to know these important terms:
- Sag: How much your shock compresses when you sit on the bike. Usually measured as a percentage of total shock travel.
- Rebound: How quickly the shock returns to its original position after being compressed.
- Compression: How much resistance the shock offers when it compresses.
- Air pressure (PSI): The amount of air in the shock. Higher pressure = stiffer shock.
These settings work together to give you the ride feel you want.

Credit: www.amazon.com
How To Measure And Set Sag
Sag is the starting point for any suspension adjustment. It affects comfort, grip, and handling. Most manufacturers recommend 25-30% sag for rear shocks.
Step-by-step Sag Adjustment
- Find the shock’s total travel: Check your manual or measure from the fully extended shock to fully compressed.
- Calculate target sag: For a 50mm shock, 25% sag is 12.5mm.
- Put on your riding gear: Include helmet, backpack, and what you normally carry.
- Sit on your bike: Lean against a wall or have a friend support you. Stay balanced and centered.
- Mark the shock position: Slide the O-ring on the shock up against the dust seal, or use a zip-tie.
- Carefully dismount: Don’t bounce.
- Measure the sag: Use your ruler to see how much the shock compressed.
- Adjust air pressure: Use your shock pump to add or remove air. More air = less sag. Less air = more sag.
- Repeat steps 4-7: Until you reach your target sag.
Common Mistakes
- Measuring sag without wearing gear
- Bouncing before dismounting, which gives a false reading
- Not rechecking after big changes
Small changes in air pressure can have big effects. For example, changing by just 5 PSI can alter sag by several millimeters.
Setting Rebound
Rebound controls how fast your shock returns after being compressed. If it’s too fast, the bike can bounce. If too slow, the shock won’t recover before the next bump.
Adjusting Rebound
Most shocks have a red dial or knob for rebound. Here’s how to tune it:
- Turn the dial to minimum (fastest): Count the clicks as you turn.
- Start with the manufacturer’s recommended setting: Usually found in the manual.
- Test ride over mixed terrain: Notice how the bike responds after bumps.
- Slow down rebound if the bike feels bouncy: Turn the dial clockwise.
- Speed up rebound if the shock feels sluggish: Turn the dial counterclockwise.
- Fine-tune: Make small adjustments and re-test.
Example
If you ride over roots and the rear wheel “kicks” up, your rebound is too fast. If your shock feels stuck after a bump, it’s too slow.
Practical Tip
Write down your settings so you can return to them later. Many riders forget their “sweet spot” after experimenting.
Compression Adjustment
Compression controls how the shock absorbs big impacts and pedaling forces.
Types Of Compression
- Low-speed compression: Affects shock response to slow movements (pedaling, cornering).
- High-speed compression: Affects shock response to quick impacts (landing jumps, hitting rocks).
Not all shocks have both adjustments. Some only offer low-speed compression.
Adjusting Compression
- Find the blue dial or knob: Usually for compression.
- Set to manufacturer’s baseline.
- Test on trail: If you feel “bob” when pedaling, increase low-speed compression.
- If bottoming out on jumps or drops, increase high-speed compression.
- If the shock feels harsh, reduce compression.
Non-obvious Insight
Beginners often think more compression means better performance. Actually, too much compression makes the bike stiff and uncomfortable. Finding balance is key.
Air Pressure Settings By Weight
Every rider needs a different air pressure. Here’s a simple table with recommended PSI based on rider weight for a typical air shock:
| Rider Weight (lbs) | Recommended PSI |
|---|---|
| 120-140 | 90-110 |
| 140-160 | 110-130 |
| 160-180 | 130-150 |
| 180-200 | 150-170 |
| 200-220 | 170-190 |
Always start with these numbers, then adjust to reach proper sag.
Comparing Air Vs Coil Rear Suspension
Many riders wonder whether air or coil shocks are best. Here’s a quick comparison:
| Feature | Air Shock | Coil Shock |
|---|---|---|
| Weight | Lighter | Heavier |
| Adjustability | Easy (with pump) | Requires spring change |
| Maintenance | Needs regular air checks | Less frequent |
| Performance | Customizable | Consistent feel |
| Price | Usually higher | Varies |
Air shocks suit most riders who want versatility and light weight. Coil shocks are popular for downhill or riders seeking a “plush” feel.
Trail Tuning: Adjusting For Different Terrain
You can adjust your rear air suspension for different types of trails. Here’s how:
Rocky Trails
- Lower air pressure slightly for more comfort
- Increase rebound so the shock recovers quickly
- Reduce compression for softer feel
Flow Trails
- Increase air pressure for a firmer ride
- Tighten compression to prevent “bob”
- Moderate rebound for smooth handling
Technical Climbs
- Increase air pressure and compression
- Reduce rebound to avoid kickback
Downhill/jumps
- Lower air pressure to increase grip
- Increase high-speed compression to prevent bottoming out
- Fine-tune rebound for stability
Non-obvious insight: Many riders adjust only air pressure, but changing rebound and compression for each trail can make a big difference in control.
Step-by-step Rear Air Suspension Adjustment
Now let’s go through the full process from start to finish.
- Check shock condition: Make sure there are no leaks, cracks, or damage.
- Set air pressure: Use the table above or your manual for starting PSI.
- Measure and set sag: Adjust air pressure until you reach 25-30% sag.
- Adjust rebound: Start at the manufacturer’s recommendation, then fine-tune after test rides.
- Adjust compression: Set low-speed and high-speed compression as needed for your riding style.
- Test ride: Try your bike on trails you usually ride.
- Fine-tune: Make small adjustments and keep notes.
- Repeat: Suspension tuning is ongoing. Adjust as your skills and needs change.
Troubleshooting Common Problems
Shock Feels Too Harsh
- Reduce air pressure
- Lower compression
Shock Bottoms Out
- Increase air pressure
- Raise compression
Bike Bounces After Bumps
- Slow down rebound
Shock Feels Stuck
- Speed up rebound
Loss Of Air Pressure
- Check for leaks
- Tighten air valve
Non-obvious tip: If your shock loses pressure often, it may need a seal replacement or service.
Credit: www.youtube.com
Advanced Tuning: Volume Spacers
Some air shocks allow you to add or remove volume spacers. These change how the shock behaves at the end of its travel.
- More spacers: Shock gets firmer as it compresses; good for aggressive riders.
- Fewer spacers: Shock stays softer; good for smoother trails.
Check your manual or ask a bike shop if your shock supports spacers. Beginners often skip this step, but it can transform your ride.
Maintenance Tips For Rear Air Suspension
Keeping your shock in good shape is important. Here’s how:
- Check air pressure every month
- Clean the shock body after every ride
- Inspect seals for wear or leaks
- Service the shock every 50-100 hours of riding (see manual)
- Lubricate moving parts as recommended
Ignoring maintenance can lead to expensive repairs or poor performance.
Real-world Example: Rider Case Study
Let’s look at a rider named Sarah, who weighed 160 lbs and rode mixed terrain.
- Started with 120 PSI (too low), sag was 35%
- Increased to 135 PSI, sag reached 28%
- Set rebound to 5 clicks from minimum, shock felt smooth
- Increased low-speed compression for climbs
- Added one volume spacer to prevent bottoming out
After these adjustments, Sarah reported more comfort and control, and improved speed by 8% on her usual trail.
Comparing Stock Vs Tuned Suspension
| Setting | Stock Setup | After Tuning |
|---|---|---|
| Sag | 35% | 28% |
| Rebound | 10 clicks | 5 clicks |
| Compression | Minimum | Medium |
| Volume Spacers | None | 1 spacer |
| Performance | Harsh, unstable | Smooth, controlled |
This shows how smart adjustments can change your riding experience.
When To Seek Professional Help
If you’re struggling to get the right feel, or your shock has serious issues (like oil leaks or stuck parts), it’s best to visit a bike shop. Technicians can:
- Diagnose complex problems
- Service or rebuild shocks
- Help with advanced tuning
Don’t risk damaging your equipment. For more details, check out Park Tool’s guide.
Frequently Asked Questions
What Is The Ideal Sag Percentage For Rear Air Suspension?
Most riders aim for 25-30% sag. This gives a balance between comfort and control. For aggressive riding, use lower sag; for smoother trails, higher sag is fine.
How Often Should I Check My Rear Shock’s Air Pressure?
Check air pressure every few weeks, or before big rides. Air can escape slowly over time, especially in hot or cold weather.
Can I Use A Regular Tire Pump For My Air Shock?
No. You need a shock pump, which can handle high pressures (up to 300 PSI) and has a fine adjustment valve. Regular tire pumps won’t work and may damage the shock.
What Should I Do If My Rear Shock Loses Air Quickly?
If your shock loses air often, check for leaks at the valve or seals. If you can’t find the problem, take the shock to a bike shop for inspection.
Do All Rear Air Shocks Have Rebound And Compression Adjustments?
Not all shocks have both. Entry-level air shocks often have only air pressure and rebound. Higher-end models add compression and volume spacers for more tuning options.
Getting your rear air suspension right is one of the most rewarding upgrades you can make. With careful setup and regular maintenance, your mountain bike will feel smoother, safer, and more fun. Remember, every rider is different—don’t be afraid to experiment, take notes, and ask for help when needed. Over time, you’ll find the perfect settings for your style and trails.

Credit: epsoluciones.es

Hello Guys! I am John Reese, a professional biker and my hobby is biking! I have been biking for last 12 years and I love using bikes while outing as well. Based on my experiences with the different type of bikes (mountain bikes, road bikes and hybrid bikes); I am sharing my opinion about various bikes so that a beginner can get started right away. Happy reading!