Breaking the bead on a mountain bike tire can seem intimidating, especially if you’re new to bike maintenance. The bead is the edge of the tire that sits tightly inside the rim. When you want to change a tire, fix a flat, or switch to a different tread, you need to break this bead. Sometimes, it feels stuck, almost glued in place. This guide will help you learn how to break the bead on a mountain bike tire safely and efficiently, even if you have never done it before. You’ll find practical advice, step-by-step instructions, comparisons of methods, common mistakes, and expert tips—all designed to make the process clear and manageable.
Many beginners think breaking the bead is only about strength. In reality, it’s more about technique and using the right tools. Knowing how to do this well saves time, avoids damage to your bike, and helps you ride with confidence.
You don’t need expensive equipment, but understanding the process makes a big difference. Let’s dive into everything you need to know to break the bead on a mountain bike tire.
Understanding The Bead And Tire Construction
Before breaking the bead, it helps to know what the bead is and how mountain bike tires are built. The bead is the part of the tire that fits inside the rim’s groove. Most mountain bike tires have either wire beads (made of steel) or foldable beads (made of Kevlar or other flexible materials). The bead keeps the tire secure and helps prevent air leaks.
Tires also come in tubeless and tube-type forms. Tubeless tires create a seal with the rim, often using liquid sealant. Tube-type tires use an inner tube for air. The bead is essential for both, but tubeless beads usually fit tighter for a better seal.
Understanding these parts gives you confidence and helps you choose the best method for breaking the bead. Here’s a simple comparison of bead types:
| Bead Type | Material | Flexibility | Ease of Removal |
|---|---|---|---|
| Wire Bead | Steel | Rigid | Harder |
| Foldable Bead | Kevlar/Fabric | Flexible | Easier |
Knowing whether your tire is wire or foldable bead can help you plan your approach. Wire beads are tougher and often require more force, while foldable beads are easier to manipulate.
Why Breaking The Bead Matters
You might wonder why breaking the bead is important. If you get a flat tire or want to upgrade your tires, you must remove the old tire first. The bead holds the tire tightly to the rim, so breaking it is the first step in removal.
If you don’t break the bead correctly, you can damage the rim, tire, or even hurt yourself.
Also, breaking the bead is crucial for cleaning and inspecting your tire, replacing inner tubes, or switching from tube-type to tubeless setups. Many riders ignore this step and struggle with tire changes. Learning to break the bead efficiently makes maintenance easier and prevents frustration.
A non-obvious insight: Many people try to pull the tire off without breaking the bead, which can damage the rim. Always break the bead before removing the tire.
Tools And Equipment Needed
You don’t need fancy tools to break the bead, but having the right items makes the process smoother. Here are the basic tools and why they matter:
- Tire levers – Essential for prying the tire away from the rim.
- Air pump – Used to deflate the tire completely.
- Rag or towel – Useful for cleaning the rim and tire.
- Gloves – Protect your hands and improve grip.
- Soap and water – Helps with stubborn beads by reducing friction.
- Plastic bag – Optional, helps reduce friction for tough beads.
Some riders use special bead breakers, but for most mountain bikes, basic tire levers work fine. Avoid using metal tools that can scratch or bend the rim.
Here’s a quick comparison of tire lever materials:
| Lever Material | Pros | Cons |
|---|---|---|
| Plastic | Lightweight, rim-friendly | May break under heavy force |
| Metal | Strong, durable | Can damage rim, heavy |
Plastic levers are best for most mountain bike rims.
Preparing The Tire And Rim
Good preparation makes breaking the bead much easier. Follow these steps before you start:
- Remove the wheel – Take the wheel off the bike. This gives you better access and control.
- Deflate the tire completely – Use an air pump or press the valve to remove all air. A flat tire is easier to work with.
- Clean the rim and tire – Wipe away dirt, mud, or debris. This prevents slipping and protects the rim.
- Wear gloves – Gloves improve grip and protect your hands.
- Inspect the tire – Check for damage. If the bead is badly stuck or the rim is bent, extra care is needed.
A practical tip: If the bead is very tight, use a small amount of soap and water around the edge. This reduces friction and helps the bead slide off.

Credit: www.youtube.com
Step-by-step: Breaking The Bead By Hand
Most mountain bike tires can be broken by hand with a little patience and the right technique. Here’s how to do it:
- Lay the wheel flat – Place the wheel on the ground or a table.
- Push down on the tire – Use your thumbs to press the tire sidewall away from the rim. Start near the valve and work your way around.
- Find a loose spot – The bead usually loosens first near the valve or opposite it.
- Use tire levers – If the bead won’t budge, insert a tire lever between the tire and rim. Gently pry the tire away, moving the lever along the rim.
- Work around the rim – Move your hands or levers slowly around the rim. Don’t rush; forcing the bead can bend the rim.
- Repeat on both sides – Once one side is loose, flip the wheel and break the bead on the other side.
Most beginners miss that the bead can be much tighter on new or tubeless tires. Patience and gentle force are key.
Using Tools For Tough Beads
Some mountain bike tires, especially tubeless or new tires, have very tight beads. If breaking the bead by hand doesn’t work, try these methods:
Using Two Tire Levers
- Insert the first lever – Place it under the bead and gently lift.
- Insert the second lever nearby – About 2-3 inches from the first.
- Alternate prying – Move each lever a bit at a time, working around the rim.
Soap And Water Method
- Apply soap and water – Use a small brush or rag to spread soapy water around the bead.
- Let it soak for 2 minutes – This reduces friction and helps the bead slide.
- Try breaking the bead again – Repeat the hand or lever method.
Plastic Bag Trick
- Place a thin plastic bag – Slide it between the bead and rim, if possible.
- Push down on the tire – The bag reduces friction and helps the bead move.
These methods are effective for stubborn beads. Don’t use sharp metal objects; they can damage your rim or tire.
Breaking The Bead On Tubeless Tires
Tubeless tires are popular for mountain bikes because they resist flats and offer better grip. But their beads are often tighter. Here’s how to break a tubeless bead:
- Deflate completely – Remove all air, even using a valve core remover if possible.
- Push sidewalls inward – Use your thumbs and palms to push both sides of the tire toward the center.
- Use tire levers – Insert levers as needed. With tubeless, you may need more force.
- Add soap and water – For extra help, use soapy water as described earlier.
- Work slowly – Tubeless tires can be tough, but patience pays off.
A common mistake: Many riders forget to remove the valve core, leaving trapped air that keeps the bead tight. Always remove the core for easier bead breaking.
Breaking The Bead On Tubed Tires
Tube-type mountain bike tires are usually easier to break. Here’s the process:
- Deflate the tire – Press the valve to remove all air.
- Pinch the tire – Use your hands to squeeze the sidewalls together.
- Push bead away from rim – Work your hands around the tire, pressing the bead toward the center.
- Use tire levers if needed – If the bead is stubborn, gently use levers.
One insight: If the tube is punctured, air might still be trapped. Squeeze and massage the tire to release all air before breaking the bead.
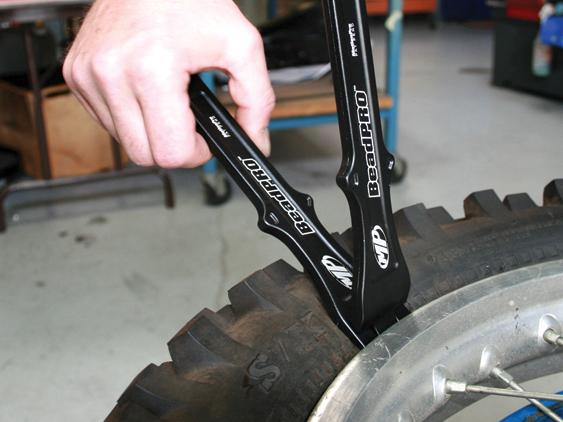
Alternative Methods: Using A Bead Breaker
Bike shops and some riders use special bead breakers for stubborn tires. These tools squeeze the bead away from the rim with controlled force.
Benefits of bead breakers:
- Save time on tough tires
- Reduce risk of rim damage
- Useful for frequent maintenance
Drawbacks:
- Cost ($20–$50 for basic models)
- Not needed for most mountain bike tires
If you ride often and change tires regularly, a bead breaker might be a good investment. For most riders, hand methods and levers work fine.
Comparing Bead Breaking Methods
Let’s compare the most common methods for breaking the bead, so you can decide what’s best for your bike and skill level.
| Method | Tools Needed | Skill Level | Risk of Damage | Effectiveness |
|---|---|---|---|---|
| Hand Pressure | None | Beginner | Low | Good for most tires |
| Tire Levers | Plastic levers | Beginner/Intermediate | Medium (if used wrong) | Good for tight beads |
| Soap & Water | Soap, water | Beginner | Low | Very effective for stubborn beads |
| Bead Breaker Tool | Special tool | Intermediate/Expert | Low | Best for tough tires |
Hand pressure and tire levers cover most situations. Soap and water help with difficult beads. Bead breakers are best for frequent or professional use.
Common Mistakes And How To Avoid Them
Breaking the bead is simple once you know the process, but beginners often make mistakes. Here are the most common issues and how to avoid them:
- Not deflating the tire fully – Always remove all air, including the valve core if possible.
- Using sharp metal tools – Never use screwdrivers or knives; these can damage the rim and tire.
- Forcing the bead too quickly – Rushing can bend the rim or tear the tire. Work slowly and gently.
- Ignoring cleaning – Dirt and debris make the bead stickier. Clean before breaking the bead.
- Not protecting hands – Use gloves for safety and better grip.
- Skipping lubrication – Soap and water help with tough beads; don’t ignore this step.
- Overusing levers – Too many levers at once can crack the rim. Use one or two, and move them carefully.
A non-obvious insight: If your tire is old or has been exposed to heat, the bead may be extra tight due to rubber hardening. Lubricate well and work the bead gently.
Tips For Success
Breaking the bead is easier with these practical tips:
- Warm up the tire – If possible, leave your wheel in the sun for 10–15 minutes. Warm rubber is more flexible.
- Work in small sections – Don’t try to break the bead all at once. Move along the rim in sections.
- Use proper tire levers – Invest in quality plastic levers. Cheap ones break easily.
- Check for rim tape – If your rim tape is loose, it can make bead breaking harder. Inspect and adjust as needed.
- Practice on old tires – If you’re new, try breaking the bead on an old tire before working on your main bike.

Credit: www.youtube.com
When To Seek Professional Help
Most riders can break the bead at home, but sometimes expert help is needed. Consider visiting a bike shop if:
- The bead is stuck and won’t move with any method.
- The rim is bent or damaged.
- You’re unsure about the tire type or rim compatibility.
- You have a high-end carbon rim and want to avoid risk.
Bike shops have bead breakers and skilled mechanics. They can solve tough problems and help with tire changes quickly.
Reinstalling The Tire After Breaking The Bead
Once you’ve broken the bead and finished your maintenance, you need to reinstall the tire. Here’s a quick guide:
- Clean the rim and tire – Remove any old sealant or dirt.
- Check the bead – Make sure it’s not damaged.
- Install the tire – Place one bead inside the rim, then the other.
- Inflate the tire – Use a pump to reseat the bead. Listen for popping sounds as the bead snaps into place.
- Inspect for leaks – For tubeless, check for air leaks. For tube-type, make sure the tube sits flat.
If the bead doesn’t seat properly, deflate and try again. Use soap and water if needed.
Safety Considerations
Safety is important when breaking the bead. Here are a few points to keep in mind:
- Wear gloves – Protect your hands from sharp edges.
- Work in a well-lit area – Good light helps you see what you’re doing.
- Avoid force – Don’t use excessive strength; technique matters more.
- Check tire and rim condition – Damaged parts can cause accidents.
If you feel resistance or something doesn’t look right, stop and inspect the wheel. Never force a bead if the rim is bent or cracked.
Maintaining Your Mountain Bike Tires
Breaking the bead is only part of tire maintenance. Regular checks help you avoid problems and extend tire life:
- Inspect tires after every ride – Look for cuts, punctures, or worn tread.
- Check air pressure – Low pressure can cause bead slippage.
- Clean rims and tires – Dirt can make beads stickier and harder to break.
- Replace old tires – Tires older than 2–3 years may become hard and difficult to remove.
A non-obvious insight: Store your bike in a cool, dry place. Heat and humidity harden rubber and make bead breaking harder.
Credit: slavensracing.com
Advanced Techniques For Experienced Riders
If you’re comfortable with basic methods and want to speed up the process, try these advanced techniques:
- Use a floor pump with high-pressure burst – For tubeless tires, a quick burst can help reseat the bead.
- Rotate the tire – If one section is tight, rotate the wheel and try another spot.
- Pre-lubricate before installation – When installing new tires, use a small amount of soap on the bead for easier future removal.
These methods work well for frequent riders and those who switch tires often.
Real-world Example: Breaking The Bead In The Field
Imagine you’re on a trail and get a flat. Here’s how to break the bead without a workshop:
- Lay the bike down – Remove the wheel if possible.
- Deflate the tire – Press the valve to release air.
- Use your hands or lever – Most mountain bike tires can be broken by hand, especially if they’re not tubeless.
- Use a plastic bag or water bottle – If you have a plastic bag, use it to reduce friction.
- Work slowly – Even in the field, patience prevents rim damage.
This field method is useful for emergencies and shows the importance of knowing how to break the bead anywhere.
Comparing Mountain Bike Tire Removal To Other Bikes
Breaking the bead on a mountain bike is usually easier than on road bikes or motorbikes. Here’s a quick comparison:
| Bike Type | Bead Tightness | Tools Needed | Skill Level |
|---|---|---|---|
| Mountain Bike | Medium | Tire levers, hands | Beginner |
| Road Bike | Tight | Tire levers | Intermediate |
| Motorbike | Very tight | Bead breaker, heavy levers | Expert |
Mountain bike tires are designed for easy trail repairs. Road and motorbike beads are tighter for performance and safety.
Environmental Impact And Recycling
When you break the bead and change a tire, consider the environment. Old tires can be recycled. Many bike shops accept used tires, or you can find recycling centers in your area.
- Recycle old tires – Don’t throw them in the trash.
- Reuse tires for projects – Some riders use old tires for art, mats, or straps.
- Check local regulations – Some cities have special recycling programs.
This small step helps reduce waste and supports sustainable riding.
Frequently Asked Questions
What Is The Bead On A Mountain Bike Tire?
The bead is the edge of the tire that fits tightly into the rim’s groove. It’s usually made of steel (wire bead) or Kevlar (foldable bead) and keeps the tire secure.
Can I Break The Bead Without Tire Levers?
Yes, you can often break the bead by hand, especially with foldable beads. However, tire levers make the process easier and reduce risk of damage.
Why Is My Mountain Bike Tire Bead So Tight?
Tight beads are common with new tires, tubeless setups, or tires exposed to heat. Using soap and water, patience, and proper technique helps loosen them.
Is It Safe To Use Metal Tools For Breaking The Bead?
It’s not recommended. Metal tools can damage the rim or tire. Use plastic tire levers for safety and effectiveness.
How Often Should I Break The Bead And Check My Tires?
Check your tires after every ride for damage, and break the bead when changing tires, fixing flats, or switching to tubeless. Regular maintenance keeps your bike safe and reliable.
Breaking the bead on a mountain bike tire is a skill every rider should learn. It saves time, prevents damage, and helps you handle emergencies with confidence. Whether you’re in the workshop or on the trail, these methods and tips make bead breaking easier. With practice, you’ll find the process simple and quick, and your mountain bike rides will be smoother and safer. For more technical details and advanced tire maintenance, you can refer to this Wikipedia article.
Remember, patience and proper technique matter more than strength. With the right tools, clear steps, and a little practice, breaking the bead will become second nature. Happy riding!

Hello Guys! I am John Reese, a professional biker and my hobby is biking! I have been biking for last 12 years and I love using bikes while outing as well. Based on my experiences with the different type of bikes (mountain bikes, road bikes and hybrid bikes); I am sharing my opinion about various bikes so that a beginner can get started right away. Happy reading!