Changing a bottom bracket on a mountain bike can seem intimidating if you’re new to bike maintenance. But with the right tools, patience, and a clear guide, it’s something many riders can learn to do at home. Doing this job yourself not only saves money but also helps you understand your bike better.
This article walks you through the process step by step, explains different bottom bracket types, and shares practical advice to avoid common mistakes. Whether your bottom bracket is making noises, feels rough, or just needs an upgrade, you’ll find everything you need right here.
What Is A Bottom Bracket?
The bottom bracket is a set of bearings and spindle that connects your bike’s crankset to the frame. It lets the crank arms turn smoothly, allowing you to pedal efficiently. On mountain bikes, bottom brackets take a lot of abuse—mud, water, and impacts can wear them out faster than on road bikes.
There are several types of bottom brackets. Each has its own way of fitting into the bike frame and works with different cranks. Knowing your bottom bracket type is key to replacing it correctly.
A bottom bracket sits inside the frame’s lowest tube, known as the bottom bracket shell. The crank spindle passes through the bracket, and the two crank arms attach to each side. When you pedal, the spindle and bearings let the cranks turn.
If these bearings wear out, you’ll feel resistance or hear noises.
Many riders don’t realize how central the bottom bracket is to the bike’s performance. A worn bracket can make your pedaling less efficient and even lead to further damage on the frame or crankset. For mountain bikes, this area is exposed to water, grit, and impacts, so regular checks are smart.
Types Of Bottom Brackets
Mountain bikes use various bottom bracket designs. Here are the main types you’ll encounter:
- Threaded (BSA) Bottom Brackets
- The most common for older and mid-range bikes.
- Screws into the frame’s bottom bracket shell.
- Uses two cups, often with cartridge bearings inside.
- Known for easy maintenance and reliability.
- Press Fit (PF30, BB86, BB92, etc.)
- Cups are pressed into the frame, not screwed.
- Found on many modern carbon and aluminum bikes.
- Can be trickier to remove and install.
- Sometimes prone to creaking if not installed perfectly.
- External Bottom Brackets
- Bearings are outside the frame shell.
- Shimano Hollowtech II, SRAM GXP, and others.
- Usually threaded, but bearings sit externally.
- Allows bigger bearings for smoother operation.
- BB30 and PF30
- Larger spindle size (30mm).
- Cups or bearings pressed directly into the frame.
- Offers lower weight and better stiffness, but needs precise installation.
Here’s a comparison of the most common types:
| Type | Installation | Spindle Diameter | Common Brands |
|---|---|---|---|
| Threaded (BSA) | Screwed into shell | 24mm | Shimano, SRAM |
| Press Fit (PF30/BB86) | Pressed in | 24mm/30mm | SRAM, FSA |
| External | Screwed, bearings outside | 24mm | Shimano, SRAM |
| BB30 | Pressed, no cups | 30mm | Cannondale, FSA |
Many beginners overlook the importance of spindle diameter and shell width. These details decide which bottom bracket fits your frame.
Another detail often missed: Some mountain bike frames use oversized shells (like 92mm or 100mm) for extra strength or for fat bikes. Double-check your frame measurements, especially if you ride a newer bike or a custom build.

Credit: www.youtube.com
Signs Your Bottom Bracket Needs Changing
Mountain bike bottom brackets rarely last forever. Here’s how to tell if yours needs replacement:
- Grinding or rough feeling when you pedal.
- Clicking, creaking, or knocking noises from the crank area.
- Visible play or movement in the crank arms.
- Water or mud contamination inside the shell.
- Difficulty turning cranks even after cleaning.
Sometimes, bottom brackets can be serviced (cleaned and re-greased). But if the bearings are damaged or the noise doesn’t go away, changing it is the best solution.
Another sign beginners miss: If your chain drops frequently or shifting becomes inconsistent, a worn bottom bracket might be the cause. The extra play can affect chainline and shifting.
If you notice any of these symptoms, inspect the area carefully. Try spinning the cranks by hand and feeling for resistance or looseness. If the cranks wobble side-to-side, it’s likely time for a new bracket.
Tools And Supplies You’ll Need
Before you start, gather the necessary tools. Using the right tool saves time and prevents damage.
- Bottom bracket removal tool (specific to your bracket type)
- Crank puller (if your cranks require one)
- Allen keys (usually 5mm, 8mm)
- Torque wrench (optional, but recommended)
- Grease (bike-specific)
- Cleaning brushes and rags
- New bottom bracket (make sure it matches your frame and crank)
Here’s a quick comparison of tools needed for different bracket types:
| Bracket Type | Essential Tools | Optional Tools |
|---|---|---|
| Threaded (BSA) | Bottom bracket tool, Allen keys | Torque wrench |
| Press Fit | Press, removal tool | Bearing puller |
| External | External cup tool, Allen keys | Torque wrench |
| BB30 | Bearing press, puller | Grease syringe |
Beginners often forget to check if their crankset matches the new bottom bracket. Always double-check compatibility before buying.
If you’re unsure about your tools, visit a local bike shop or check online guides. Investing in proper tools will help with future repairs and keep your bike running smoothly. Some brands even sell bottom bracket tool kits for home mechanics.
Preparing Your Bike
Preparation makes the process smoother and prevents mistakes. Here are practical steps:
- Clean your bike thoroughly. Dirt can hide bolts and damage tools.
- Shift to the smallest chainring and cog. This gives more space to work.
- Remove pedals. Use a pedal wrench or Allen key.
- Set up your workspace. Use a bike stand if possible.
Non-obvious tip: Place a towel or tray under the bike to catch small parts and grease.
Another helpful step: Keep a magnetic dish nearby for bolts and washers. Small parts can roll away easily during repairs.
If you don’t have a bike stand, work on a flat surface and use blocks or pillows to stabilize the bike. Good lighting also helps you spot dirt and worn parts.
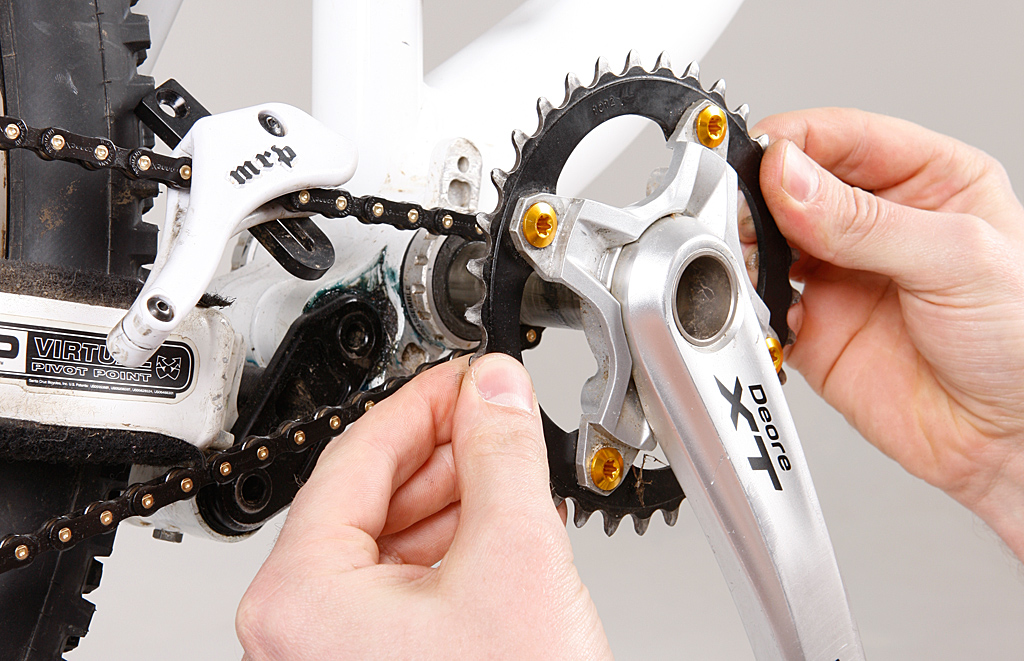
Removing The Crankset
You must remove the crankset to access the bottom bracket. The method depends on your crank type, but most mountain bikes use similar steps.
- Loosen crank bolts. Use the correct Allen key.
- Remove crank arms. Some need a crank puller, others slide off after unbolting.
- Inspect for washers or spacers. Keep them safe—they’re easy to lose.
Some cranks have self-extracting bolts (like Shimano Hollowtech II). If so, just unscrew the fixing bolt and slide the arm off.
Non-obvious insight: Take a photo of the crank assembly before removing it. This helps with reassembly.
If your crankset uses a pinch bolt system (common on Shimano), loosen both bolts evenly. For older square taper cranks, a crank puller is necessary. Be gentle when pulling off the arms—they can get stuck from years of use.
Label the spacers or washers with sticky notes or tape, so you don’t mix up their order during reinstallation. Many riders skip this, then struggle to fit the cranks back properly.
Credit: oiseauduparadis.ch
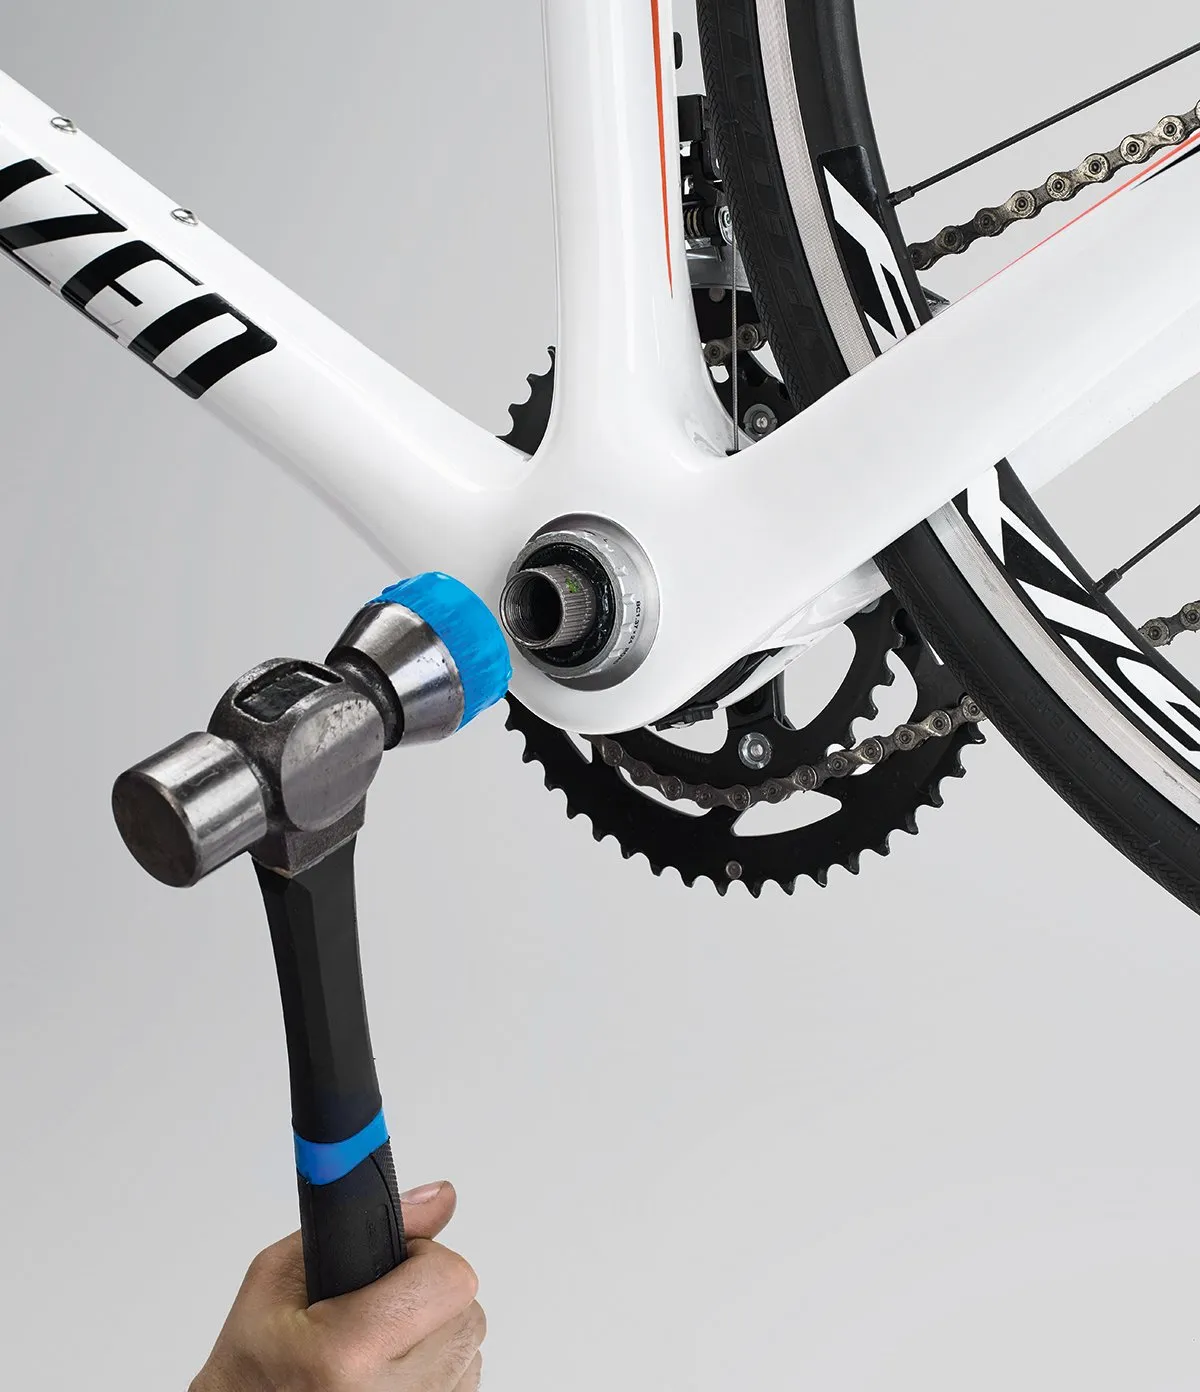
Removing The Old Bottom Bracket
Now you can access the bottom bracket. The removal process differs by bracket type.
Threaded (bsa) Bottom Bracket
- Insert the bottom bracket tool into the cup.
- Turn counterclockwise to loosen (drive side is often reverse-threaded).
- Remove both cups.
Press Fit Bottom Bracket
- Use a removal tool or bearing puller.
- Tap gently but firmly to push the cups or bearings out.
- Avoid using screwdrivers or random objects—they can damage the frame.
External Bottom Bracket
- Use an external cup tool to unscrew both sides.
- Remove any spacers and note their position.
Bb30
- Use a bearing puller or drift.
- Tap out the bearings carefully, avoiding frame damage.
Non-obvious tip: Many bottom brackets have plastic or metal sleeves inside the shell. Remove and keep these if your new bracket needs them.
If the cups or bearings are very tight, spray a bit of penetrating oil and wait a few minutes. This can make removal easier and reduce the risk of damage.
Cleaning The Bottom Bracket Shell
Once the old bracket is out, clean the shell before installing the new one. This prevents contamination and ensures a good fit.
- Wipe out all grease, dirt, and old thread locker.
- Inspect for wear or damage (cracks, corrosion).
- For threaded shells, check that the threads are clean.
- For press fit, look for burrs or dents.
If you see any damage, get advice from a bike shop before installing the new bracket.
Use a small brush to clean inside the shell. For stubborn grime, a little rubbing alcohol on a rag helps. If the threads look worn or stripped, don’t force the new cups—ask for help.
Some shells, especially on older bikes, might have rust or corrosion. Lightly sanding the area with fine sandpaper can help, but don’t overdo it.
Choosing The Right Replacement Bottom Bracket
It’s easy to buy the wrong bottom bracket if you don’t check the details. Here’s what matters:
- Shell width and diameter (e.g., 68mm, 73mm, 92mm)
- Spindle diameter (24mm, 30mm)
- Crankset compatibility (Shimano, SRAM, FSA)
- Material (steel, ceramic, alloy)
- Weather sealing (important for mountain bikes)
Here’s a data table comparing popular bottom bracket brands:
| Brand | Material | Shell Widths | Bearing Type | Approx. Price (USD) |
|---|---|---|---|---|
| Shimano | Steel/Alloy | 68/73mm | Cartridge | 25-45 |
| SRAM | Steel | 68/73mm | Cartridge | 40-60 |
| FSA | Alloy | 68/73/92mm | Ceramic/Steel | 55-120 |
| Race Face | Alloy | 68/73mm | Cartridge | 45-90 |
Always check your bike’s specs and measure the shell if unsure. Some mountain bikes use wider shells for extra strength.
If you ride in wet or muddy areas, choose a bottom bracket with better seals. Ceramic bearings are smoother but need more care. Steel bearings are tougher for rough mountain conditions.
Installing The New Bottom Bracket
Now comes the main step: fitting the new bottom bracket. Each type has its own process.
Threaded (bsa) Bottom Bracket
- Apply grease to the threads (both frame and cups).
- Insert the drive-side cup first. Usually reverse-threaded (turn clockwise to tighten).
- Insert the non-drive side cup. Turn counterclockwise to tighten.
- Tighten both cups securely. Use a torque wrench if possible (around 35-50 Nm).
Press Fit Bottom Bracket
- Apply grease to the shell and bearing surfaces.
- Align the cups carefully. Start them straight to avoid damaging the frame.
- Use a bottom bracket press to push cups into the shell evenly.
- Check for smooth fit. No gaps or unevenness.
External Bottom Bracket
- Grease the shell and cup threads.
- Insert the drive-side cup. Tighten with an external cup tool.
- Repeat for the non-drive side.
- Check for correct bearing alignment.
Bb30
- Grease the shell and bearings.
- Press bearings into the shell with a bearing press.
- Install any spacers or sleeves as needed.
Non-obvious insight: For mountain bikes, use waterproof grease for extra protection. Some riders also add a thin layer of anti-seize compound to prevent corrosion.
If your bracket uses a sleeve between the cups, make sure it is properly seated. This helps keep water and dirt out. Don’t force the cups if they feel tight—double-check alignment and shell cleanliness.
Reinstalling The Crankset
Once the bottom bracket is in place, reinstall your crankset:
- Clean crank arms and spindle.
- Grease spindle lightly.
- Slide crank arms onto spindle.
- Add spacers/washers in the same order as before.
- Tighten crank bolts to the recommended torque.
Check for smooth rotation and no play. If you feel resistance or hear noise, check the alignment.
If your crankset has preload adjusters, set them before tightening the bolts. This removes any play and keeps the cranks spinning freely.
Testing And Final Checks
Before riding, always test your work:
- Spin the cranks. They should turn smoothly, with no wobble.
- Check for noises. Creaks or clicks may mean something is loose.
- Ride the bike slowly and shift gears. Listen for any unusual sounds.
- Re-torque bolts after a short ride.
Many riders skip this step, but it’s essential for safety and performance.
After your test ride, inspect the area for leaks or loose bolts. If you notice any new noises, check if spacers or washers are missing or if the cranks are misaligned.
Common Mistakes To Avoid
Changing a bottom bracket is straightforward, but mistakes can lead to problems:
- Forgetting to grease threads or surfaces. This causes squeaks and makes removal harder next time.
- Cross-threading cups. Always start cups by hand to avoid damaging threads.
- Using incorrect tools. Improvised tools can damage parts and void warranties.
- Missing spacers or washers. This leads to poor crank alignment.
- Ignoring torque settings. Too loose or tight can cause premature wear.
One non-obvious mistake: Not cleaning the shell after removing the old bracket. Dirt can cause poor fit and extra wear.
Another issue: Not checking for wear on crank arms. If your cranks are worn, the new bracket won’t fix all problems. Inspect everything before reassembly.
Practical Tips For Mountain Bike Riders
Mountain bikes face tougher conditions than road bikes. Here’s some advice for better durability:
- Use waterproof grease or anti-seize for all parts.
- Check bottom bracket every 6-12 months for wear and contamination.
- Avoid power-washing directly at the crank area. Water can enter the bearings.
- Replace bottom bracket sooner if you ride in wet or muddy conditions.
- Keep a record of the bottom bracket type and installation date. This helps with future maintenance.
If your bike gets submerged or exposed to lots of mud, inspect the bottom bracket shell more often.
If you often ride in winter, consider a bottom bracket with extra sealing or rubber boots. Some brands offer mountain-specific models for harsh conditions.
When To Seek Professional Help
Some jobs need a bike shop’s experience:
- Frame damage or stripped threads.
- Press fit removal/install if you don’t have the right tools.
- Unusual crank or bottom bracket combinations (rare brands or custom setups).
Shops have special tools and can check for alignment issues. If you’re unsure, it’s better to ask for help.
If you have a carbon frame, extra care is needed. Improper pressing or removal can crack the shell. Experienced mechanics can handle these jobs safely.
How Often Should You Change Your Bottom Bracket?
The lifespan of a bottom bracket varies by type, conditions, and quality. Here are some averages:
- Threaded brackets: 2-3 years with regular use.
- Press fit brackets: 1-2 years (often less in muddy conditions).
- External brackets: 1.5-2.5 years.
- Ceramic bearings: Longer life, but more expensive.
Heavy mountain riding, mud, and water reduce lifespan. If you ride in dry conditions, you might get more years from your bottom bracket.
For riders in wet climates, changing the bottom bracket every year is smart. Listen for noises and check for play—early signs mean you can prevent bigger repairs.
Credit: www.mbr.co.uk
Real-world Example: A Rider’s Experience
Jake, a mountain biker from Colorado, noticed his crank started clicking after a muddy race. After cleaning and lubricating, the problem persisted. He decided to change the bottom bracket himself:
- He bought a Shimano BSA threaded bracket for $35.
- Used a proper removal tool and waterproof grease.
- Took 45 minutes from start to finish.
- Cranks spun smoothly, and the noise disappeared.
Jake’s tip: “Don’t rush. Double-check the type and take photos before you start. It’s easier than you think if you have the right tools.”
Other riders report similar stories. Many say their bikes feel smoother and quieter after a fresh bottom bracket. Some even notice better shifting and less fatigue during long rides.
More Resources For Bottom Bracket Maintenance
Want to go deeper? Check out this guide from Park Tool, the authority in bike repair tools and techniques.
You can also find video tutorials online, but make sure the guide matches your bike’s bracket type. Reading your bike’s manual can help, especially for newer models.
Frequently Asked Questions
How Do I Know Which Bottom Bracket Type My Mountain Bike Has?
Check your bike’s specs online or look at the bottom bracket shell. Threaded brackets have visible threads; press fit brackets have smooth shells. You can also measure the shell width and diameter or check the crank spindle size.
If you’re unsure, remove the crankset and inspect the shell. Many bikes have the type printed on the frame or in the manual.
Can I Change A Bottom Bracket Without Special Tools?
It’s possible but not recommended. Using the correct tool prevents damage and makes the job easier. Improvised methods can ruin your frame or bracket.
How Much Does It Cost To Change A Bottom Bracket?
If you do it yourself, expect to spend $25–$120 for the bracket and $20–$40 for tools. A bike shop will charge $40–$80 for labor plus parts.
What’s The Most Durable Bottom Bracket For Mountain Bikes?
Threaded brackets with sealed cartridge bearings last longest, especially from brands like Shimano and SRAM. Ceramic bearings offer better performance but are more expensive.
Why Does My New Bottom Bracket Still Make Noise?
Noise can come from loose crank bolts, missing spacers, or poorly greased threads. Double-check all connections and use waterproof grease. If the noise persists, consult a bike shop.
Changing a bottom bracket on a mountain bike is a practical skill that improves your riding experience and bike knowledge. With patience, the right tools, and careful steps, you can handle this repair at home. Remember to check compatibility, use proper grease, and test your work.
Over time, you’ll gain confidence and maybe help your friends with their bikes, too.

Hello Guys! I am John Reese, a professional biker and my hobby is biking! I have been biking for last 12 years and I love using bikes while outing as well. Based on my experiences with the different type of bikes (mountain bikes, road bikes and hybrid bikes); I am sharing my opinion about various bikes so that a beginner can get started right away. Happy reading!