If you ride a mountain bike, you’ve probably faced problems shifting gears. Sometimes, your chain jumps between gears, won’t move smoothly, or skips when you pedal hard uphill. This usually means your derailleur needs adjustment. Learning to tune your derailleur isn’t just for bike mechanics. With the right steps, anyone can do it and enjoy smoother rides, better control, and safer cycling.
This guide will help you understand how a derailleur works, what tools you need, and how to adjust it step by step. You’ll also learn common mistakes and how to avoid them. By the end, you’ll feel confident to handle derailleur problems on your own—no matter if you’re a beginner or experienced rider.
What Is A Derailleur And How Does It Work?
A derailleur is a device that moves your bike’s chain from one gear to another. Mountain bikes usually have two derailleurs: a front derailleur (moves chain between front chainrings) and a rear derailleur (moves chain across rear sprockets or cassette). Most shifting problems happen with the rear derailleur, so this article will focus mainly on that.
The derailleur is controlled by a cable linked to your shifter. When you push the shifter, the cable pulls or releases, moving the derailleur sideways. The derailleur’s cage guides the chain to a different sprocket. Springs inside help return the derailleur to its starting position.
If your derailleur is not set up right, you can get:
- Slow shifting
- Chain skipping
- Gear ghost shifting (changes on its own)
- Chain falling off
Understanding these basics is key before you start adjusting.
Tools You Need
Adjusting your mountain bike derailleur requires some basic tools. Having them ready will make the job easier and safer. Here’s what you need:
- Phillips or flathead screwdriver (for limit screws)
- 5mm Allen key (for cable and derailleur bolts)
- Bike stand (optional, but makes adjustment easier)
- Needle-nose pliers (for cable handling)
- Chain lubricant (for smooth operation)
Some mountain bikes use special screws or bolts, so check your bike’s manual if you’re unsure.
Quick Check: Is Your Derailleur Really The Problem?
Before you start adjusting, check if the derailleur is the cause of your shifting issues. Sometimes, other problems look similar. Here’s a simple checklist:
- Is your chain clean and well lubricated?
- Are your cables and housing frayed, rusted, or sticky?
- Is the rear derailleur hanger straight?
- Is the cassette worn out?
If you notice damaged cables, bent hangers, or worn-out parts, fix or replace those first. Adjusting a derailleur won’t help if the problem is somewhere else.
Understanding Limit Screws And Barrel Adjusters
Two important parts help you set the derailleur: limit screws and barrel adjusters.
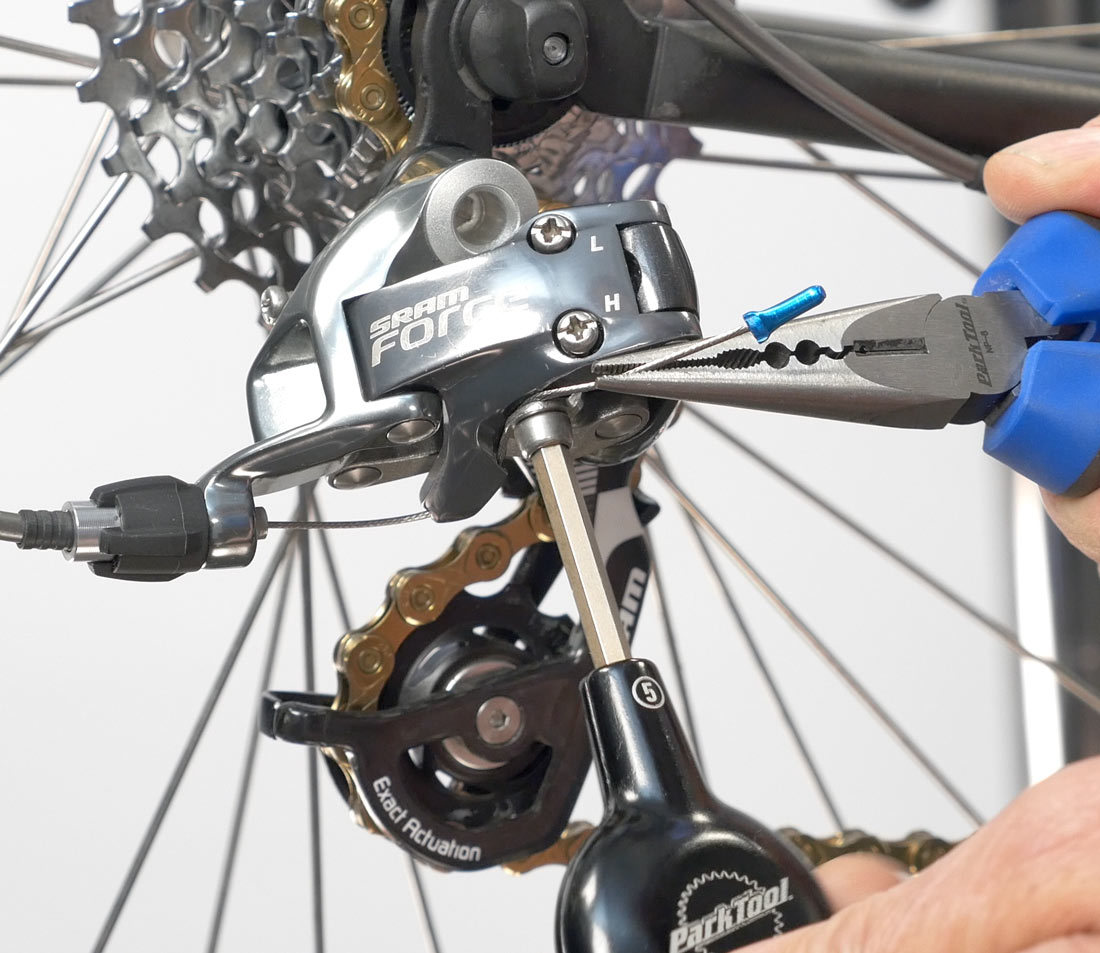
- Limit screws (marked H and L) control how far the derailleur moves left and right. The H screw stops the derailleur from moving too far toward the smallest sprocket. The L screw stops it from moving too far toward the largest sprocket.
- Barrel adjuster is a small knob where the cable enters the derailleur or shifter. Turning it changes cable tension—important for smooth shifting.
Knowing what these do will help you make accurate adjustments.
Step-by-step Guide To Adjusting Your Rear Derailleur
Step 1: Shift Into The Smallest Rear Sprocket
Start by shifting your bike into the smallest rear sprocket and the smallest front chainring. This creates slack in the cable and makes adjustments easier.
Step 2: Inspect The Derailleur Hanger
A bent derailleur hanger causes poor shifting. Look from behind the bike and check if the derailleur lines up with the sprockets. If it’s bent, use a hanger alignment tool or visit a bike shop to straighten it.
Step 3: Set The High Limit Screw
Find the H screw on the derailleur. It’s usually marked. Turn it so the derailleur’s jockey wheel (the small wheel) lines up exactly under the smallest sprocket.
- If the wheel is too far out, turn the screw clockwise.
- If it’s too far in, turn counterclockwise.
This prevents the chain from falling off the smallest sprocket.
Step 4: Set The Low Limit Screw
Shift the chain into the largest rear sprocket. Find the L screw. Adjust it so the jockey wheel lines up directly under the largest sprocket.
- If the wheel is too far in, turn the screw clockwise.
- If it’s too far out, turn counterclockwise.
This stops the chain from falling into the wheel spokes.
Step 5: Adjust Cable Tension
Shift the chain back to the smallest sprocket. Check the cable is tight but not too tight.
- If shifting is slow moving up to larger sprockets, turn the barrel adjuster counterclockwise (increases tension).
- If shifting is slow moving down to smaller sprockets, turn the barrel adjuster clockwise (reduces tension).
Make small adjustments (quarter turns) and test after each change.
Step 6: Fine-tune Indexing
Indexing means the derailleur moves the chain exactly from one gear to the next. Shift through all gears and listen for noise or hesitation. If the chain skips or hesitates, adjust the barrel until shifting is crisp.
Step 7: Check B-screw Adjustment
The B-screw controls the distance between the derailleur’s top jockey wheel and the cassette sprockets. If it’s too close, shifting gets rough. If too far, shifting is slow.
- Shift to the largest sprocket.
- The gap should be about 5-6mm.
- Turn the B-screw to adjust the gap.
Step 8: Lubricate And Test
Apply chain lubricant to keep shifting smooth. Test your bike on a short ride. Shift through all gears and check for problems.
Step 9: Final Check
Look for these signs:
- No chain noise in any gear
- No skipping or ghost shifting
- Quick, accurate gear changes
If you notice any issues, repeat steps as needed.
Common Mistakes When Adjusting Derailleurs
Many beginners make mistakes that cause more problems. Here are some to avoid:
- Over-tightening limit screws: This stops the derailleur from reaching all gears.
- Ignoring cable tension: Wrong tension makes shifting slow or noisy.
- Skipping hanger alignment: A bent hanger makes adjustment impossible.
- Not cleaning the chain: Dirt stops smooth shifting.
- Adjusting without testing: Always shift through all gears after each change.
Avoiding these mistakes will save time and frustration.

Credit: www.bicycling.com
Comparing Mountain Bike Derailleurs: Key Factors
Different bikes use different derailleurs. Here’s a comparison of three common types:
| Type | Best Use | Features | Price Range |
|---|---|---|---|
| Shimano Deore | Trail, XC | Reliable, easy to adjust | $40–$90 |
| Sram GX | Enduro, All-Mountain | Strong, fast shifting | $70–$120 |
| Shimano XT | Racing, high-end | Precise, lightweight | $90–$180 |
Choosing the right derailleur depends on your riding style and budget. For basic trail riding, Shimano Deore offers good value and easy adjustment.
How Front Derailleur Adjustment Differs
While most mountain bikes now use single chainrings, some still have a front derailleur. Adjusting it is similar but has a few differences:
- Two limit screws: One controls movement toward the frame (L), the other toward the outside (H).
- Cable tension: Works the same way as rear derailleur.
- Position: The cage should sit 2-3mm above the largest chainring.
If the chain drops or rubs, adjust the limit screws and cable tension. Always check the cage is parallel to the chainrings.
Why Derailleur Adjustment Matters For Mountain Bikers
Mountain biking demands quick gear changes, especially on steep climbs or fast descents. Poor shifting can make you lose speed, miss a climb, or even cause accidents.
- Safety: A poorly adjusted derailleur can make the chain fall off, causing crashes.
- Performance: Smooth shifting helps keep momentum.
- Bike life: Proper adjustment reduces wear on chain and cassette.
Professional riders tune their derailleurs before every race. For everyday riders, regular adjustment makes rides more enjoyable and safe.
Real-world Example: Trail Ride Shifting Troubles
Imagine you’re riding a rocky trail. Suddenly, your chain skips when you shift to a lower gear. You struggle to climb. Later, the chain jumps off the cassette, forcing you to stop.
This is a common story for mountain bikers. Most often, the cause is poor derailleur adjustment. By following the steps above, you can prevent these problems and enjoy your ride.

Credit: www.youtube.com
Data: How Often Should You Adjust Your Derailleur?
How often you need to adjust depends on riding conditions and usage. Here’s what studies and mechanics recommend:
| Riding Frequency | Adjustment Needed | Reason |
|---|---|---|
| Weekly rides | Every 2–3 months | Cable stretch, dirt buildup |
| Daily rides | Monthly | More wear, frequent shifting |
| After crash | Immediately | Bent hanger or derailleur |
| After replacing cables | Immediately | Cable stretch |
Regular checks help spot problems early, saving time and money.
Advanced Tips: Getting Pro-level Shifting
Most guides stop at basic adjustment, but a few extra steps can make shifting even smoother:
- Micro-adjust barrel tension: Sometimes, tiny changes (even 1/8 turn) make a big difference.
- Replace old housing: Dirty or crushed cable housing blocks smooth movement.
- Check for chain wear: A stretched chain makes shifting rough.
- Upgrade to coated cables: These slide easier and last longer.
- Use a torque wrench: Ensures bolts are tight but not over-tightened.
These tips come from professional bike mechanics. Beginners often miss them but they can greatly improve shifting.
Credit: www.chanteclers.com
Comparison: Mechanical Vs Electronic Derailleur Adjustment
Some mountain bikes now use electronic derailleurs. Here’s how they compare to mechanical ones:
| Feature | Mechanical | Electronic |
|---|---|---|
| Adjustment | Manual, uses screws/cable | Automatic, uses buttons |
| Reliability | Depends on cable condition | Depends on battery |
| Price | Cheaper | More expensive |
| Maintenance | Regular cable checks | Battery charging |
Mechanical derailleurs are still more common for mountain bikes, but electronic models are growing in popularity.
When Should You Visit A Bike Shop?
Some problems are hard to fix at home. Visit a bike shop if:
- The derailleur or hanger is badly bent
- Limit screws are stripped or won’t move
- Shifting problems persist after adjustment
- You feel unsure about your skills
Bike shops have tools and experience to handle tough cases. Still, most regular adjustments can be done at home.
What Beginners Usually Miss
Two things many new riders overlook:
- Cable stretch: New cables stretch after a few rides, causing shifting issues. Always re-adjust after cable replacement.
- Derailleur hanger alignment: Even a small bend affects shifting. Check the hanger after crashes or falls.
Recognizing these issues early keeps your bike running smoothly.
Frequently Asked Questions
How Do I Know If My Derailleur Hanger Is Bent?
Look at the derailleur from behind the bike. If it doesn’t line up with the cassette sprockets, it’s likely bent. You can also use a hanger alignment tool for accuracy.
Why Does My Chain Skip When I Shift Gears?
Chain skipping is usually caused by poor cable tension, a bent hanger, or a worn-out chain. Check each part and adjust as needed. Lubrication can also help.
Can I Adjust My Derailleur Without A Bike Stand?
Yes, but a bike stand makes the job easier. You can flip your bike upside down or use a helper to hold the rear wheel off the ground while you shift.
How Often Should I Lubricate My Chain?
Lubricate your chain every 100–150 miles, or after riding in wet/muddy conditions. A dry, noisy chain needs immediate attention.
Is Electronic Shifting Better Than Mechanical?
Electronic shifting offers quick, precise gear changes and is easier to adjust. However, it’s more expensive and depends on battery power. Mechanical derailleurs are reliable and easier to fix on the trail.
Adjusting a mountain bike derailleur is a skill that rewards you with smoother rides, more confidence, and better control. With the right tools and steps, you can solve most shifting problems yourself. Remember to check your derailleur regularly, keep your chain clean, and pay attention to small details like cable stretch and hanger alignment.
Over time, you’ll notice your bike feels faster and safer, letting you focus on enjoying the trail.
For more detailed technical explanations and diagrams, you can visit Park Tool’s official website.

Hello Guys! I am John Reese, a professional biker and my hobby is biking! I have been biking for last 12 years and I love using bikes while outing as well. Based on my experiences with the different type of bikes (mountain bikes, road bikes and hybrid bikes); I am sharing my opinion about various bikes so that a beginner can get started right away. Happy reading!