Changing a derailleur on a mountain bike might seem like a job for professionals, but with the right guidance, any rider can do it. In fact, learning this skill can save you money, help you maintain your bike’s performance, and give you confidence on the trail. Whether your derailleur is damaged, worn out, or you simply want to upgrade, this article will walk you through each step. You’ll learn not just how to swap the component, but how to troubleshoot, set it up, and avoid common mistakes. If you’re new to bike maintenance, don’t worry—this guide is written with simple language, clear examples, and practical advice. Let’s get your mountain bike shifting smoothly again.
Understanding Your Mountain Bike Derailleur
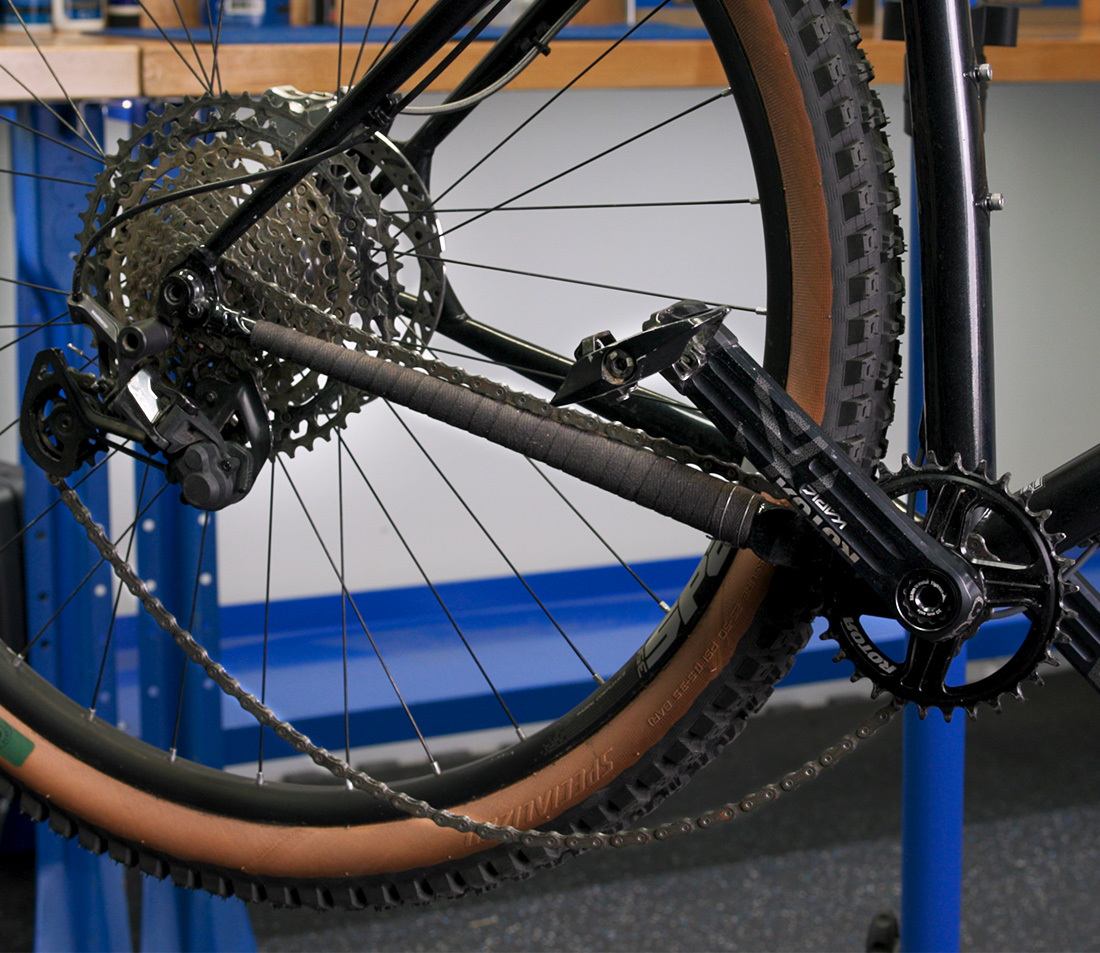
Before you start, it helps to know what a derailleur is and how it works. The derailleur is the device that moves your bike chain between gears. On mountain bikes, you have a rear derailleur (most common for gear changes) and sometimes a front derailleur (if you have more than one chainring).
Rear Vs. Front Derailleur
- Rear derailleur: Controls shifting on the cassette (the set of gears on your back wheel).
- Front derailleur: Moves the chain between the front chainrings (less common on modern mountain bikes, as many now use “1x” drivetrains with only one front ring).
Most riders need to replace the rear derailleur—it’s exposed, gets hit by rocks, and does the most work.
Types Of Rear Derailleurs
There are two main types:
- Short cage: For smaller gear ranges and less chain movement.
- Long cage: Handles bigger gear spreads, common on mountain bikes.
You’ll also find clutch derailleurs, which help keep the chain from slapping and dropping on rough trails.
When Should You Replace A Derailleur?
- Physical damage: Bent, cracked, or broken parts after a crash.
- Worn pivots: The moving joints feel loose or “wiggly.”
- Shifting problems: If you’ve tried adjusting and cleaning, but the bike still won’t shift right.
- Upgrading components: Wanting lighter weight, better performance, or compatibility with new shifters/cassettes.
A surprising fact: many shifting problems are not actually caused by the derailleur but by a bent derailleur hanger (the part that attaches the derailleur to the frame) or worn cables. Always check these first before buying new parts.
Tools And Parts You’ll Need
A successful derailleur swap starts with the right tools. Here’s what you’ll need for most mountain bikes:
- New derailleur (make sure it matches your shifter and cassette speed: 9, 10, 11, or 12-speed)
- 5mm Allen key (hex wrench, for most mounting bolts)
- Chain tool (for breaking and reconnecting the chain)
- Needle-nose pliers (for cables and housing)
- Phillips screwdriver (for adjusting limit screws)
- Bike stand (optional, but makes life easier)
- Chain quick link pliers (if your chain uses a master link)
- Lubricant/cleaner (to clean parts as you go)
- Rag or shop towel
- Derailleur hanger alignment tool (optional, but very helpful)
Extra parts you might need:
- New derailleur cable and housing (if yours are frayed or sticky)
- Quick link or chain pin (if you must break the chain)
Here’s a comparison of the most common derailleur types and their uses:
| Type | Best For | Cassette Compatibility | Main Benefit |
|---|---|---|---|
| Short Cage | Racing, smooth trails | Up to 32T | Lighter, tighter shifts |
| Long Cage | All-mountain, big gear ranges | Up to 52T | Wide range, chain stability |
| Clutch | Rough, technical trails | Varies | Reduces chain slap |
Credit: www.parktool.com
Step-by-step Guide: How To Change A Rear Derailleur
Changing the derailleur involves removing the old one, installing the new one, and adjusting it. Let’s break it down.
1. Remove The Old Derailleur
Start by shifting your bike into the smallest cog (hardest gear) on the rear cassette. This takes tension off the chain and makes removal easier.
- Disconnect the chain: If your chain has a master link, use quick link pliers to open it. If not, use a chain tool to push out a pin.
- Remove the derailleur cable: Loosen the bolt that clamps the cable to the derailleur, then pull the cable free using needle-nose pliers.
- Unscrew the derailleur: Use a 5mm Allen key to remove the mounting bolt that holds the derailleur to the hanger. Some derailleurs have a B-tension screw that hooks onto the hanger—make sure to unhook it.
Tip: Take a photo before removing anything. This can help you remember how it all fits together.
2. Check And Align The Derailleur Hanger
Many shifting problems come from a bent hanger. Even a small bend can ruin your shifts. Hold a straight edge against the hanger, or use a derailleur hanger alignment tool. If it’s bent, straighten it gently with the tool or replace it.
Non-obvious insight: If your hanger is bent, a new derailleur won’t fix your shifting—always check this first.
3. Install The New Derailleur
- Thread the derailleur onto the hanger: Line up the mounting bolt with the threads on the hanger. Tighten by hand at first, then finish snugly with the Allen key (do not overtighten).
- Attach the B-tension screw hook (if your derailleur has one): This helps control how close the derailleur sits to the cassette.
- Check for smooth movement: The derailleur should move freely by hand. If it feels stiff or wobbly, check alignment and bolts.
4. Reconnect The Chain
- Thread the chain through the derailleur pulleys (the small wheels) in the same path as before. Make sure the chain goes over and under the correct guides.
- If you removed the chain completely, now is a good time to clean it or check for wear.
- Reconnect the chain using your quick link or chain tool. Make sure it is not twisted.
5. Reattach The Shifter Cable
- Insert the cable into the derailleur’s anchor point.
- Pull it tight with pliers and tighten the cable clamp bolt.
- If your cable is frayed or sticky, replace it now for best results.
6. Adjust The Limit Screws
Limit screws control how far the derailleur can move. There are two:
- H screw: Sets the outer (high) limit—the smallest cog.
- L screw: Sets the inner (low) limit—the biggest cog.
Adjust these so the derailleur lines up perfectly with the first and last cogs. This prevents the chain from dropping off the cassette.
7. Set Cable Tension
Shift through the gears using your shifter. If the chain struggles to move up the cassette, add tension by turning the barrel adjuster (where the cable enters the derailleur) counterclockwise. If it hesitates to move down, reduce tension by turning it clockwise.
Pro tip: Make small adjustments, one quarter turn at a time, and test after each.
8. Fine-tune The B-tension Screw
This screw sets how close the top derailleur pulley sits to the cassette. Too close, and the chain may rub or skip. Too far, and shifting will be slow. Adjust until there’s about a 5mm gap between the pulley and the largest cog.
9. Test Your Shifting
Run through all the gears. The chain should move smoothly with no hesitation or noise. Listen for grinding or clicking—this means further adjustment is needed.
If you’re struggling to get it perfect, don’t worry—many bike mechanics spend years perfecting their touch. With practice, you’ll get faster and more confident.
Common Mistakes And How To Avoid Them
Changing a derailleur isn’t hard, but small errors can cause big problems. Here are mistakes beginners often make:
- Buying the wrong derailleur: Not all derailleurs fit all bikes. Match the “speed” (number of gears) and cage length to your shifter and cassette.
- Ignoring a bent hanger: If your hanger is not perfectly straight, shifting will always be bad—even with a new derailleur.
- Routing the chain incorrectly: Make sure it passes through both derailleur pulleys, not outside them.
- Skipping cable replacement: Old, sticky cables cause poor shifting. If in doubt, replace.
- Over-tightening bolts: This can strip threads or damage the hanger. Snug is enough.
- Missing limit screw adjustment: Failing to set these can cause the chain to fall off the cassette.
Here’s a quick comparison of correct vs. incorrect chain routing:
| Routing Type | Description | Result |
|---|---|---|
| Correct | Chain passes through both pulleys | Smooth shifting |
| Incorrect | Chain skips a pulley or goes around the cage | Chain drops, bad shifting |
Non-obvious insight: Always check the B-tension adjustment after installing a new derailleur. Many people forget this step and wonder why shifting is slow onto the biggest cog.

Credit: www.youtube.com
Upgrading Or Changing Derailleur Brands
Sometimes you want to upgrade or switch brands (for example, from Shimano to SRAM). Here’s what to know:
- Shifters and derailleurs must match. A Shimano shifter usually won’t work well with a SRAM derailleur (and vice versa), even if they have the same number of gears.
- Cable pull and actuation: Different brands use different amounts of cable movement per shift. Mixing brands often leads to poor shifting.
- Cage length and max cassette size: Check the maximum cassette tooth count your new derailleur can handle. Not all derailleurs can shift onto the biggest cogs.
Here’s a summary table of brand compatibility:
| Shifter Brand | Derailleur Brand | Works Together? | Notes |
|---|---|---|---|
| Shimano | Shimano | Yes | Full compatibility |
| SRAM | SRAM | Yes | Full compatibility |
| Shimano | SRAM | No | Different cable pull |
| SRAM | Shimano | No | Different cable pull |
| MicroSHIFT | Shimano | Sometimes | Check model specs |
When To Replace The Chain And Cassette Too
A worn chain or cassette can ruin your shifting, even with a new derailleur. Here’s how to know when to replace them:
- Chain checker tool: Measures stretch. If it shows 0.5% or more (for 11/12 speed chains), replace the chain. For 9/10 speed, 0.75% is the limit.
- Visual inspection: Look for bent teeth, shark fin shapes, or skipping under load.
Pro tip: If your chain is very worn, it can damage a new cassette quickly. Always check all three parts—derailleur, chain, cassette—when troubleshooting shifting problems.
Advanced Tips For Smooth Shifting
Once you’ve changed your derailleur a few times, consider these expert tips for even better performance:
- Use a torque wrench for precise bolt tightness—especially on carbon frames.
- Lube the pivot points on your new derailleur for smoother movement.
- Replace housing ends if they’re crushed or dirty.
- Shorten your chain if you switch to a smaller cassette or single chainring setup.
- Indexing: If your shifts are off by one gear, reset the cable tension with the barrel adjuster.
A little extra time spent on setup pays off with quieter, more reliable shifting. Many riders are surprised how much a small tweak can improve their ride.
What To Do If Shifting Still Isn’t Perfect
If you’ve followed every step and your shifting is still not right, here’s a troubleshooting checklist:
- Is the hanger straight? Even a tiny bend ruins shifting.
- Are the cables new and smooth? Old cables stick inside the housing.
- Is the chain the right length? Too long or too short can cause skipping.
- Is the derailleur the correct model? Wrong speed or cage length causes problems.
- Are the limit screws set correctly? Chain falling off means they need adjustment.
- Is the cassette worn? Old cogs can “hook” the chain and cause noise.
If you’re still stuck, consider visiting your local bike shop. Sometimes a second set of eyes—or a professional mechanic’s experience—can spot a problem you’ve missed.

Credit: www.bicycling.com
Safety Checks Before Your Next Ride
After changing your derailleur, always perform these checks before hitting the trail:
- Shift through all gears: Make sure there are no jumps, skips, or noises.
- Spin the cranks backward: Ensure the chain does not fall off or catch.
- Check bolt tightness: Especially the mounting and cable clamp bolts.
- Inspect the hanger: If you crash, re-check for bends before your next ride.
It’s smart to carry a small multi-tool on rides, so you can make quick adjustments if needed.
How Often Should You Change A Derailleur?
There’s no set time to change a derailleur. The average mountain biker replaces their rear derailleur every 2-3 years, or after a bad crash. Frequent racers or aggressive riders may change it more often. Signs you need a new one include:
- Visible damage
- Loose, wobbly pivots
- Persistent shifting trouble
- Upgrading drivetrain components
If you ride in muddy, wet, or dusty conditions, check your derailleur more often—it wears out faster in tough environments.
Environmental And Cost Considerations
Bike parts, including derailleurs, are made from metals and plastics. If you replace a derailleur, consider recycling the old one. Some bike shops or recycling centers accept metal parts.
Cost varies widely. Entry-level derailleurs start around $25, while top models for racing can cost over $200. Labor at a bike shop adds $25–$60 for installation.
DIY saves money, but don’t be afraid to ask for help if you get stuck. Learning to do it yourself also means you’ll be able to fix your bike on the trail.
Where To Find Reliable Replacement Parts
- Local bike shops: Offer advice and help you choose the right part.
- Online retailers: Sites like Jenson USA, Chain Reaction Cycles, or the manufacturer’s site.
- Secondhand: Local marketplaces can have good deals, but check for wear.
Tip: Always double-check compatibility before buying. Bring your old derailleur with you or take clear photos to compare.
If you want more in-depth technical details, check out the Wikipedia page on derailleur gears.
Frequently Asked Questions
What Is The Difference Between A Short Cage And A Long Cage Derailleur?
A short cage derailleur is designed for bikes with a small gear range—fewer teeth difference between the smallest and largest cogs. It’s lighter and shifts quickly, best for racing or smooth trails. A long cage derailleur handles a wide range of gears, which is common on mountain bikes with large cassettes. It keeps the chain tight over rough terrain and prevents dropping.
Can I Replace A Shimano Derailleur With A Sram One?
Usually, no. Shimano and SRAM use different cable pull ratios and actuation systems. Mixing them often results in poor shifting, unless you use a special adapter. Always match your shifter and derailleur brands for best performance.
How Do I Know If My Derailleur Hanger Is Bent?
The most obvious sign is poor shifting even after adjustment. You can check by eye (the derailleur should be parallel to the cassette cogs) or use a hanger alignment tool for accuracy. Even a small bend can cause big problems, so check carefully.
Do I Need To Replace My Chain When Changing The Derailleur?
Not always, but it’s a good idea if your chain is stretched or worn. A new derailleur with an old, stretched chain can cause skipping and wear out new parts faster. Use a chain checker tool to measure stretch before deciding.
What Should I Do If My Shifting Is Still Rough After Changing The Derailleur?
Start by checking the derailleur hanger alignment, cable condition, limit screws, and chain length. If these are all correct and shifting is still rough, the cassette may be worn or there may be a compatibility issue with your new derailleur. Sometimes, a visit to a professional mechanic is the fastest solution.
Changing a derailleur on a mountain bike takes patience and attention to detail, but it’s a skill every rider can learn. With the right approach, you’ll enjoy smoother, more reliable rides and more confidence on every trail.

Hello Guys! I am John Reese, a professional biker and my hobby is biking! I have been biking for last 12 years and I love using bikes while outing as well. Based on my experiences with the different type of bikes (mountain bikes, road bikes and hybrid bikes); I am sharing my opinion about various bikes so that a beginner can get started right away. Happy reading!