Changing the pedals on your mountain bike might seem intimidating, especially if you are new to bike maintenance. But learning how to replace your pedals can save you money, improve your ride, and help you customize your bike for comfort and performance.
Whether you want to switch to clipless pedals for better efficiency, try new flat pedals for more grip, or simply replace worn-out ones, knowing this process is a must for any mountain biker. With the right tools and clear steps, anyone can do it at home.
This guide will walk you through everything you need to know, including practical tips, common mistakes, and a comparison of pedal types, so you can confidently change your mountain bike pedals and enjoy your next adventure.
Why Changing Mountain Bike Pedals Matters
Many riders overlook the importance of pedals. However, they are the direct connection between your body and your bike. The right pedals can enhance your control, safety, and comfort. If your pedals are damaged, worn, or simply not suited for your riding style, replacing them can make a noticeable difference.
There are several reasons you might want to change your pedals:
- Upgrading to a better grip or more durable model
- Switching between clipless and flat pedals for different terrain
- Replacing damaged or worn-out pedals
- Adapting your bike for different shoes or riding styles
Most mountain bikers switch pedals at least once. According to a survey by BikeRadar, over 60% of riders reported changing pedals within the first year of owning their bike. This shows how common and beneficial this process is.
Tools And Preparation: What You Need Before You Start
Before you begin, it’s important to gather the right tools and understand your bike’s pedal system. Using the wrong tool or technique can damage the crank arms or threads.
Essential Tools
- Pedal wrench: Specially designed for bike pedals, usually 15mm. Some pedals also accept a standard wrench.
- Hex (Allen) wrench: Most modern pedals use a 6mm or 8mm hex key from the back side.
- Grease: Prevents pedal threads from seizing and makes future removal easier.
- Cloth or rag: For cleaning the crank arm threads.
- Replacement pedals: Choose pedals suitable for your riding style.
Optional Tools
- Torque wrench: Ensures pedals are tightened to the recommended torque.
- Thread locker: Prevents pedals from loosening (only if recommended by manufacturer).
Types Of Pedal Attachment
Mountain bike pedals attach in two main ways:
- Wrench flats: Older and some flat pedals have flat surfaces for a pedal wrench.
- Hex fitting: Many modern pedals have a hex key socket at the end of the axle.
Check your pedals to see which attachment type you have. The tool needed depends on this.
Safety Preparation
- Work in a stable, well-lit area.
- Use a bike stand if possible. If not, lean your bike against a wall.
- Wear gloves to protect your hands.
Step-by-step Guide: Removing Old Mountain Bike Pedals
Removing pedals is simple, but many beginners make mistakes. Follow these steps to avoid damaging your bike.
Step 1: Position Your Bike
Place your bike on a stable surface. If you have a bike repair stand, use it to hold the bike upright and steady.
Step 2: Identify Pedal Sides
Pedals are threaded differently:
- Right pedal: Standard thread, turns counterclockwise to remove.
- Left pedal: Reverse thread, turns clockwise to remove.
This prevents pedals from loosening while riding. Look for “L” or “R” markings on the pedal or axle.
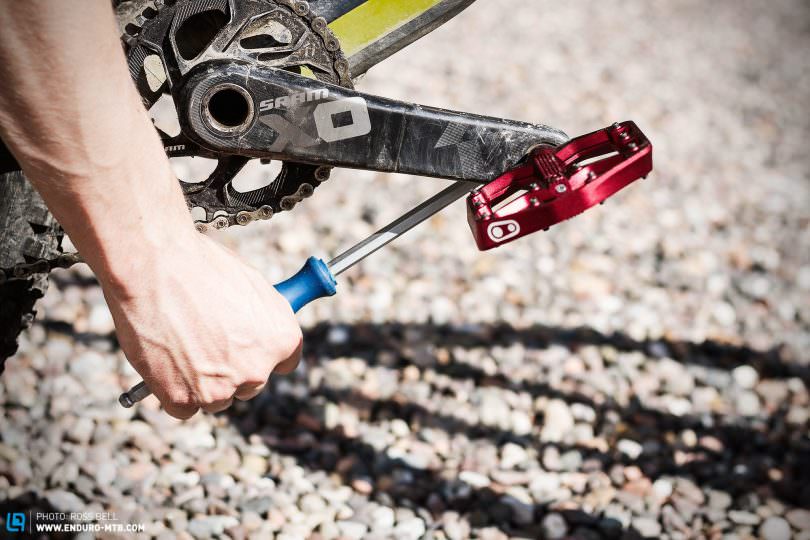
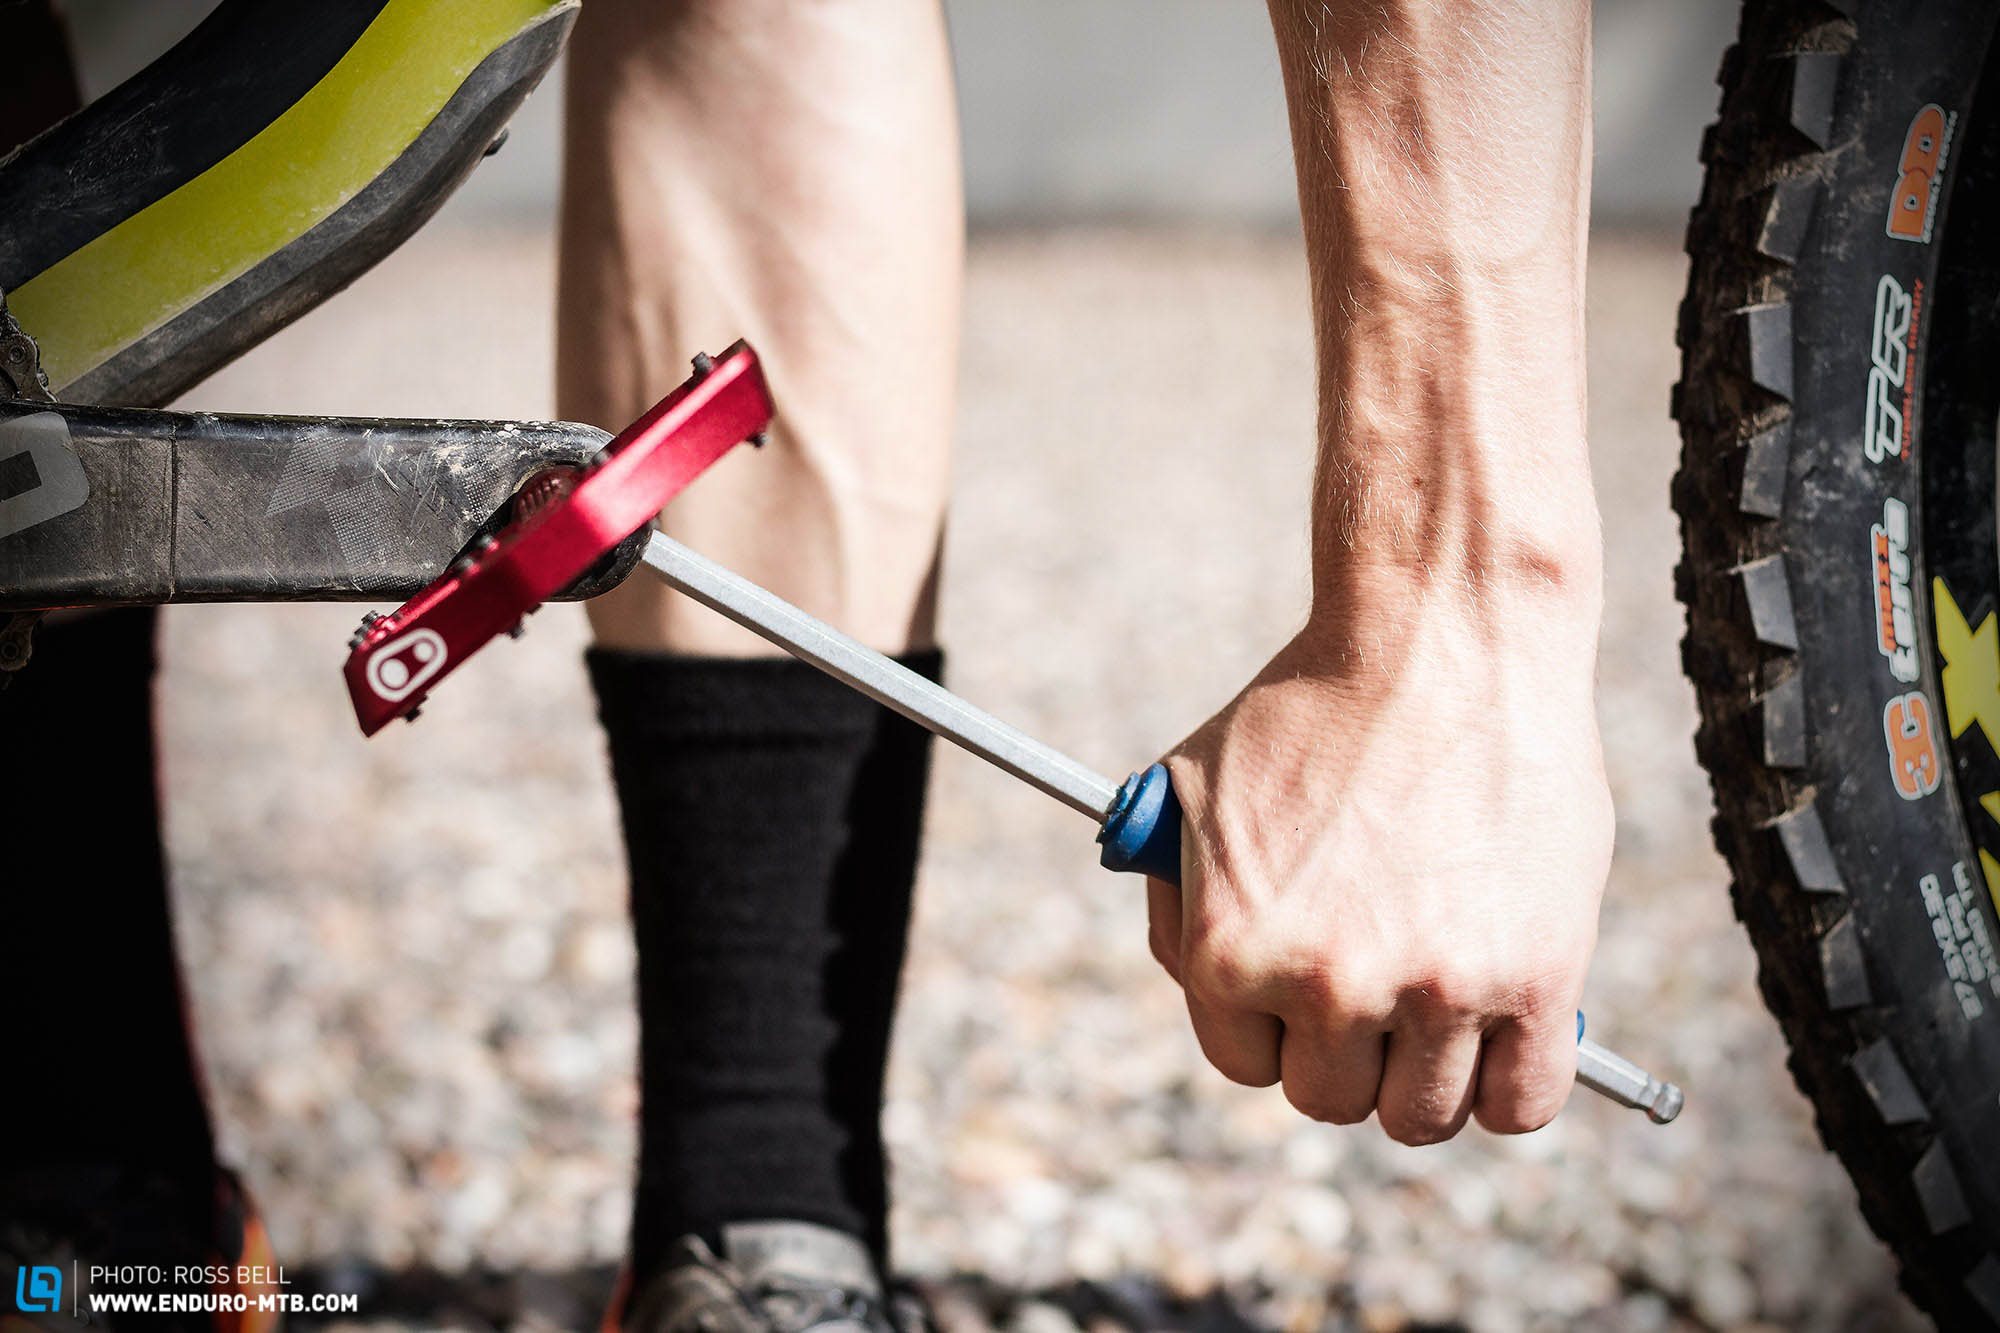
Step 3: Attach The Tool
- For wrench flats, slide the pedal wrench onto the flat surfaces.
- For hex fitting, insert the hex key into the back of the pedal axle.
Step 4: Loosen The Pedals
- Right pedal: Turn counterclockwise.
- Left pedal: Turn clockwise.
Apply steady force. If stuck, try short, sharp pushes rather than constant force. Do not use excessive force, as this can damage threads.
Step 5: Remove The Pedals
Once loosened, unscrew by hand. Carefully pull the pedal away from the crank arm. Clean the threads with a cloth.
Non-obvious Insight
Many beginners forget that pedal threads are different on each side. Always check the direction before applying force. Stripping the threads is a costly mistake.
Step-by-step Guide: Installing New Mountain Bike Pedals
Now you’re ready to install your new pedals. The process is almost the reverse of removal, but there are important details.
Step 1: Apply Grease
Put a thin layer of grease on the pedal threads. This prevents corrosion and makes future removal easier.
Step 2: Identify Pedal Sides
Match the right pedal to the right crank arm and left to left. Most pedals are marked “L” (left) and “R” (right). Double-check to avoid cross-threading.
Step 3: Thread In The Pedals
- Right pedal: Screw in clockwise.
- Left pedal: Screw in counterclockwise.
Start by hand to avoid cross-threading. The pedal should spin smoothly into place.
Step 4: Tighten The Pedals
Use the pedal or hex wrench to tighten. If you have a torque wrench, check the manufacturer’s recommended torque (usually 30–40 Nm). Do not overtighten.
Step 5: Check For Secure Fit
Spin the pedals and check for smooth rotation. Wiggle gently to make sure there’s no play.
Practical Example
If you are switching from flat pedals to clipless, you will need to install cleats on your shoes. Follow the manufacturer’s instructions for cleat placement. Test engagement and release before riding.
Credit: ambassadoradvertising.com
Types Of Mountain Bike Pedals: Which Should You Choose?
Choosing the right pedal is crucial for your riding style. Let’s compare the main types.
| Pedal Type | Best For | Pros | Cons |
|---|---|---|---|
| Flat Pedals | Beginner, technical trails | Easy to use, quick foot removal, cheap | Less efficient, can slip |
| Clipless Pedals | Advanced, XC, enduro | Secure, efficient power transfer | Requires special shoes, harder to learn |
| Hybrid Pedals | Commuting, mixed terrain | Versatile, dual use | Heavier, not specialized |
Flat Pedals
Flat pedals are simple and popular for technical trails or beginners. They allow quick foot removal for sudden stops or tricky sections. Most offer grippy pins for traction.
Clipless Pedals
Clipless pedals require special shoes with cleats. They lock your feet in place, improving power transfer and control. They’re favored by racers and experienced riders.
Hybrid Pedals
Hybrid pedals combine both systems—one side flat, one side clipless. They are good for riders who switch between casual and performance riding.
Comparing Pedal Materials And Durability
Pedal quality varies by material. This affects weight, durability, and price.
| Material | Weight | Durability | Cost |
|---|---|---|---|
| Plastic/Resin | Light | Low | Cheap |
| Aluminum | Medium | High | Moderate |
| Titanium | Very Light | Very High | Expensive |
| Steel | Heavy | Very High | Low to Moderate |
Aluminum pedals are the most common for mountain bikes, offering a good balance of weight and strength. Titanium pedals are lighter but expensive, used mostly in racing. Plastic pedals are cheap but wear quickly, suitable for casual riders or children.
Common Mistakes When Changing Bike Pedals
Avoid these errors to keep your bike safe and functional:
- Wrong thread direction: Many people damage the crank arm by forcing the wrong way.
- No grease: Pedals can seize and become impossible to remove later.
- Overtightening: Strips the threads or damages the crank.
- Cross-threading: Not starting the pedal straight can ruin the crank arm.
- Mixing pedal sides: Installing left pedal on the right side leads to quick failure.
- Ignoring torque specs: Some modern bikes require precise torque for safety.
Non-obvious Insight
Pedal threads can accumulate dirt and rust, especially after wet rides. Clean and grease threads every time you change pedals—even if they look clean.
Tips For Easier Pedal Changes
Changing pedals doesn’t have to be hard. With practice, you can do it quickly and safely.
- Use short, controlled force instead of long, hard pushes.
- Warm up stuck pedals with a hair dryer to loosen metal expansion.
- Place the wrench or hex key at the correct angle to avoid slipping.
- If threads are damaged, use a thread repair kit before installing new pedals.
- Store old pedals for emergencies or loaning to friends.

Credit: www.youtube.com
How Often Should You Change Mountain Bike Pedals?
There’s no fixed schedule, but most riders change pedals every 1–3 years depending on use. Signs you need new pedals:
- Excessive play or wobble
- Broken or worn pins (on flat pedals)
- Difficulty clipping in or out (clipless)
- Visible cracks or bending
Frequent pedal changes are common among active riders. In a 2026 study, the average mountain biker changed pedals after 2,000–4,000 miles.
How To Maintain Your Pedals For Longevity
Proper maintenance extends pedal life and keeps your ride safe.
- Clean regularly: After muddy or wet rides, wipe pedals and threads.
- Lubricate: Apply grease to threads during installation and after cleaning.
- Inspect pins: For flat pedals, check pins for wear and replace if needed.
- Check bearings: Some pedals have serviceable bearings. Lubricate or replace as needed.
- Tighten periodically: Check pedal tightness every few months, especially after rough rides.
Pedal Upgrades: When Is It Worth It?
Upgrading pedals can improve your ride, but not all upgrades are necessary.
When To Upgrade
- If your current pedals are damaged or uncomfortable
- When you want better grip or efficiency
- For specific riding styles (downhill, enduro, cross-country)
When Not To Upgrade
- If your current pedals are working well and comfortable
- If you ride mostly casual or short distances
Pedal upgrades are more noticeable than many other bike components. Riders often report improved confidence and control after switching to better pedals.
Environmental Impact: Choosing Sustainable Pedals
Bike pedal production affects the environment. Choosing sustainable materials and brands can help reduce your impact.
- Look for recyclable materials like aluminum and steel
- Avoid disposable plastic pedals for adult bikes
- Choose brands with environmental certifications
- Repair rather than replace when possible
Some manufacturers now offer recycled aluminum or carbon-neutral production. Supporting these brands helps reduce waste.
Troubleshooting: What To Do If Pedals Won’t Come Off
Sometimes pedals are stuck or seized. Here’s what to try:
- Apply penetrating oil to the threads and wait 10–15 minutes
- Use a longer wrench for more leverage
- Tap gently with a rubber mallet to loosen
- Heat the crank arm with a hair dryer to expand the metal
- If all else fails, visit a bike shop for professional help
Do not use excessive force or tools that can damage the crank arm. Professional mechanics have special tools for seized pedals.
Real-world Example: Upgrading Pedals For Trail Performance
Mike, a mountain biker from Colorado, switched his basic flat pedals for high-end aluminum flats with replaceable pins. He noticed:
- Improved grip on rocky trails
- Less foot fatigue on long rides
- Easier control during jumps and descents
After 6 months, the pedals showed minimal wear, and Mike felt more confident tackling technical terrain. This is a common experience for riders who invest in quality pedals.
Pedals For Different Mountain Bike Disciplines
Mountain biking includes several styles, each with pedal preferences.
| Discipline | Preferred Pedal Type | Reason |
|---|---|---|
| Downhill | Flat Pedals | Quick foot removal, control |
| Cross-country | Clipless Pedals | Efficiency, power transfer |
| Enduro | Clipless or Hybrid | Balance of grip and efficiency |
| Trail | Flat or Clipless | Depends on rider preference |
Understanding Pedal Thread Standards
Most mountain bikes use 9/16-inch threads. Older bikes may use 1/2-inch. Always check your bike and pedal specs. Installing the wrong size can damage the crank arm.
If unsure, measure or ask a bike shop. Some brands include adapters for compatibility.
Credit: enduro-mtb.com
Important Safety Considerations
Pedals are a critical safety item. Loose or damaged pedals can cause crashes. Always:
- Check tightness before every ride
- Inspect for cracks and play
- Test engagement for clipless pedals
If you notice any issues, stop riding and fix them before continuing.
Frequently Asked Questions
How Do I Know Which Pedal Goes On Which Side?
Look for “L” and “R” markings on the pedals or axle. The left pedal goes on the left crank arm (reverse thread), and the right pedal goes on the right crank arm (standard thread).
Can I Use Any Pedal On My Mountain Bike?
Most mountain bikes use 9/16-inch threads. Check your crank arm and pedal specifications. Using the wrong size can damage your bike.
What Should I Do If My Pedals Are Stuck?
Apply penetrating oil, use a longer wrench, or heat the crank arm. If they still won’t budge, visit a bike shop for professional removal.
Do I Need Special Shoes For Clipless Pedals?
Yes, clipless pedals require shoes with compatible cleats. Flat pedals do not require special shoes.
How Tight Should I Install My Pedals?
Follow the manufacturer’s torque specification (usually 30–40 Nm). Use a torque wrench if possible. Overtightening can strip threads; undertightening can cause pedals to loosen.
Changing your mountain bike pedals is a simple but important skill. With the right tools and knowledge, you can upgrade your ride, fix common problems, and enjoy more comfortable and efficient cycling. Remember to use proper technique, match your pedals to your riding style, and check safety before every ride. For more detailed maintenance guides and bike component advice, visit BikeRadar. Start changing your pedals today and experience a better mountain biking adventure.

Hello Guys! I am John Reese, a professional biker and my hobby is biking! I have been biking for last 12 years and I love using bikes while outing as well. Based on my experiences with the different type of bikes (mountain bikes, road bikes and hybrid bikes); I am sharing my opinion about various bikes so that a beginner can get started right away. Happy reading!