Changing the back wheel on a mountain bike may sound difficult, but with the right steps and a bit of patience, anyone can do it. Whether you are fixing a flat tire, upgrading your wheel, or replacing a damaged rim, knowing how to change the back wheel saves time and money.
This guide breaks down the process into clear steps, gives helpful tips, and explains common mistakes, so even beginners can feel confident. You will also find answers to frequent questions, useful tables comparing wheel types, and advice that goes beyond simple instructions.
Let’s get started and make your bike repair experience smoother.
Why Changing The Back Wheel Matters
The back wheel is important for both power transfer and stability. It carries much of your weight, connects to the chain and gears, and handles rough terrain. If the wheel is damaged or worn, your ride becomes unsafe and less enjoyable. Quick fixes may work for minor problems, but a proper wheel change ensures long-term performance.
Statistics show that nearly 60% of mountain bike repairs involve the rear wheel—punctures, bent rims, or gear issues. Knowing how to change it yourself can save you up to $50 per visit to a bike shop. Plus, learning this skill lets you keep riding even when you’re far from help.
Tools And Materials Needed
Before starting, gather these essential tools:
- Bike repair stand (optional, but useful for stability)
- 15mm or 17mm wrench (for axle nuts, if not quick release)
- Quick release lever (if your bike uses it)
- Tire levers
- Pump or CO2 inflator
- New rear wheel (or replacement rim)
- Replacement tire (if needed)
- Chain tool (for some gear systems)
- Gloves (to keep hands clean)
- Clean rag
Most mountain bikes use either quick release or thru-axle systems. Check your bike’s manual or look at the axle type.
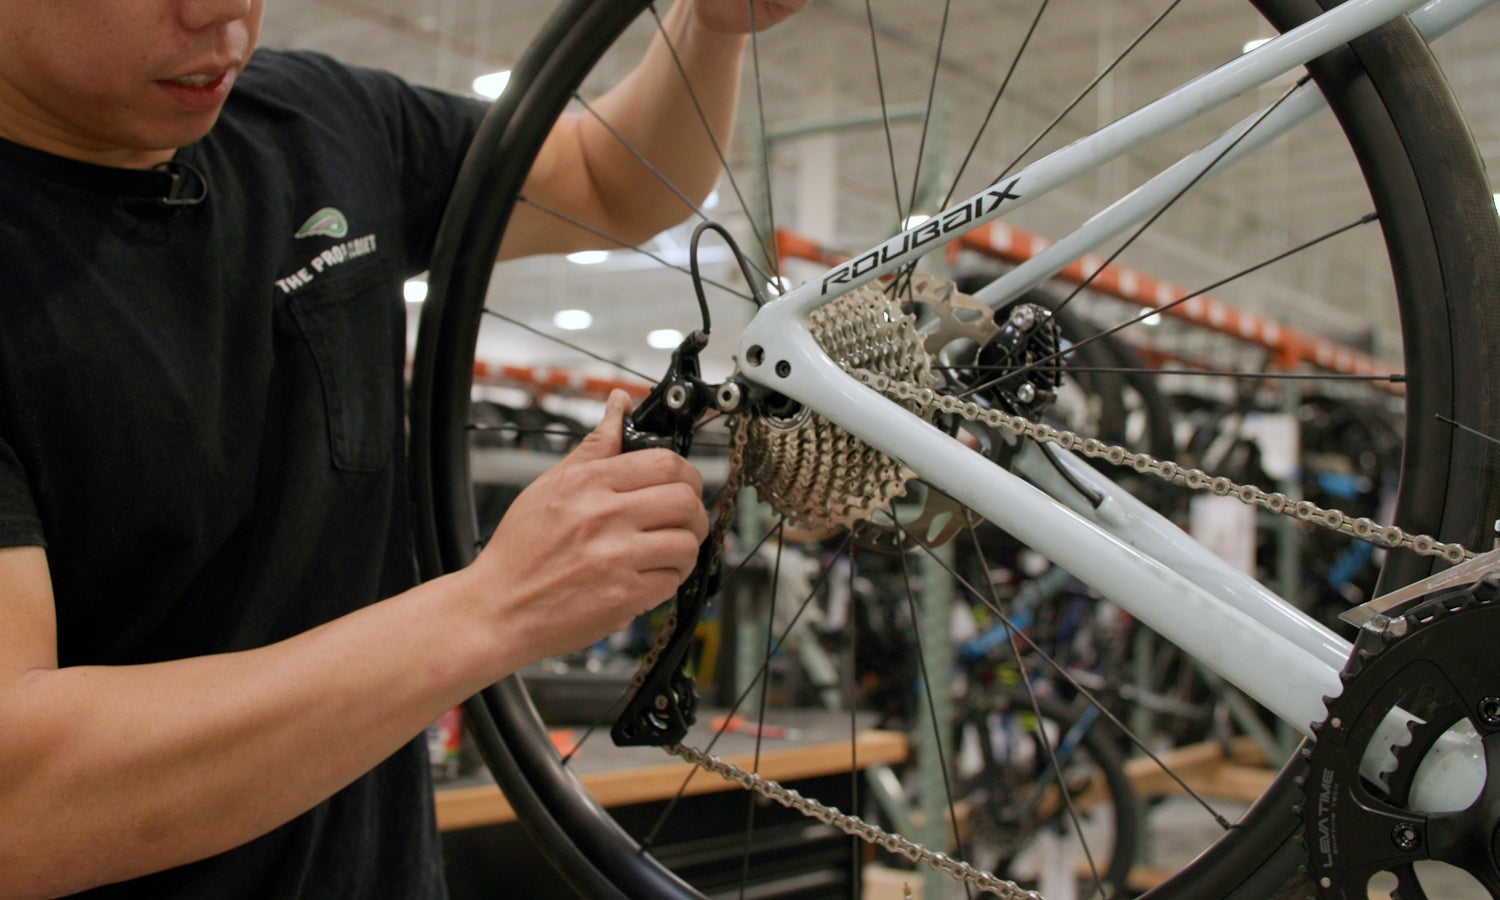
Credit: www.theproscloset.com
Preparation: Safety And Setup
Working safely is the first step. Place your bike in a well-lit area, ideally on a repair stand. If you don’t have a stand, turn your bike upside down or lean it against a wall. Remove any loose items from your bike (water bottles, bags) and put on gloves.
Check the gear shifter—shift to the smallest rear cog. This reduces chain tension and makes the wheel easier to remove. Some beginners skip this step, but it prevents chain tangling and makes reinstallation smoother.
Step-by-step Guide To Removing The Back Wheel
Follow these steps carefully:
1. Release The Brake
Most mountain bikes use disc brakes or rim brakes. For rim brakes, squeeze the brake arms and disconnect the cable. For disc brakes, no action is needed unless your caliper is tight.
2. Shift Gears
Shift to the smallest rear cog. This makes chain handling easier during removal.
3. Open The Quick Release Or Unscrew Axle Nuts
For quick release: Flip the lever open and unscrew slightly.
For axle nuts: Use a wrench to loosen both sides.
For thru-axle: Unscrew and pull out the axle.
4. Lift The Bike Slightly And Pull The Wheel Out
Hold the derailleur back gently to clear the cassette from the chain.
5. Remove The Wheel Completely
If stuck, check for hidden washers or tight chain loops. Don’t force the wheel—wiggle gently.
6. Lay The Wheel Flat
Inspect the rim and tire for damage.
Non-obvious tip: Many beginners forget to support the derailleur. If you let it snap, it can damage the hanger—a small but costly mistake. Always handle it gently.
Replacing The Wheel: Choosing The Right Rear Wheel
Not all wheels fit every mountain bike. Here are the main factors to consider:
- Wheel size: Common sizes are 26″, 27.5″, and 29″.
- Axle type: Quick release, thru-axle, or bolt-on.
- Cassette compatibility: Check if the gear system matches the wheel’s hub.
- Brake type: Disc or rim brake mounts.
- Spoke count: More spokes mean stronger wheels for rough terrain.
Here’s a quick comparison of popular mountain bike wheel sizes:
| Wheel Size | Terrain Suitability | Common Uses | Pros | Cons |
|---|---|---|---|---|
| 26″ | Technical, rocky | Older bikes, trick riding | Agile, light | Less stable, outdated |
| 27.5″ | Mixed terrain | Modern trail bikes | Smoother, balanced | Less common parts |
| 29″ | Fast, open trails | XC, enduro | Stable, rolls over obstacles | Heavier, slower turns |
Check your bike’s specifications before buying a new wheel. If unsure, measure your old rim or visit your local bike shop for advice.
How To Install The New Rear Wheel
Once you have the right wheel, follow these installation steps:
1. Align The Wheel With The Frame
Hold the wheel so the cassette faces the derailleur side.
2. Guide The Wheel Between The Chain And Derailleur
The chain should sit on the smallest cog.
3. Insert The Axle
Push the axle through the dropout holes. If using quick release, tighten the nut before closing the lever. For thru-axle, screw it in until snug.
4. Check Alignment
Make sure the wheel is centered and not rubbing against the frame or brake pads.
5. Reconnect The Brake
For rim brakes, reattach the cable. For disc brakes, check that the rotor fits between the pads.
6. Spin The Wheel
Check for wobble or noise. If you see uneven spinning, you may need to adjust the wheel or check the hub.
Expert tip: Before tightening the axle, wiggle the wheel gently to seat it fully in the dropouts. Many people skip this, which can cause the wheel to sit crooked.
Tire And Tube Installation
If you’re changing the tire or tube along with the wheel, follow these steps:
1. Fit The Tire Onto The Rim
Start with one side, then insert the tube.
2. Pump A Little Air Into The Tube
This helps avoid pinching.
3. Fit The Second Side Of The Tire
Use tire levers if needed.
4. Check For Tube Pinches
Run your fingers around the rim.
5. Inflate Fully
Use a pump or CO2 inflator. Check recommended PSI on the tire sidewall.
6. Inspect For Leaks
Spray soapy water around the valve and bead if unsure.
Many new riders overinflate their tires, thinking higher pressure is safer. Actually, mountain bikes work best with moderate PSI—usually 30-45 PSI for most tires. Too much air reduces grip.
Testing And Adjustments
Before riding, check these points:
- Wheel alignment: Spin the wheel and look for wobbles.
- Brake function: Squeeze the lever and check stopping power.
- Gear shifting: Shift up and down the cassette to ensure smooth movement.
- Axle tightness: Ensure the quick release or axle is tight but not overtightened.
If you notice rubbing, loosen the axle slightly and re-seat the wheel. If the gears skip, adjust the derailleur or check the chain position. A common mistake is forgetting to check brake clearance after a wheel change—always test before heading out.

Credit: www.wikihow.com
When To Change The Back Wheel
Not every issue means you need a new wheel. Here’s when replacement is necessary:
- Cracked or bent rim
- Broken spokes
- Hub damage or grinding
- Severe wobble (cannot be trued)
- Old, worn out rim (brake track or spoke holes enlarged)
For minor issues like flat tires or loose spokes, repair is possible. Changing the wheel is best if repairs are frequent or the wheel is unreliable.
Mountain Bike Wheel Types Compared
You may wonder how different wheel types affect performance. Here’s a comparison of mountain bike wheels based on material:
| Wheel Material | Weight (average) | Durability | Cost | Performance |
|---|---|---|---|---|
| Aluminum | 1.8 kg | High | $$ | Good for most riders |
| Carbon | 1.4 kg | Medium | $$$$ | Lighter, stiffer |
| Steel | 2.2 kg | Very high | $ | Heavy, rare today |
Aluminum wheels are the most common for mountain bikes, balancing weight and strength. Carbon wheels are lighter and stiffer but expensive and less durable for aggressive riding. Steel wheels are heavy and found mostly on older bikes.

Credit: www.youtube.com
Common Mistakes And How To Avoid Them
Changing a back wheel is simple, but mistakes can make it frustrating. Here are the most frequent errors:
- Forgetting to shift to smallest cog: Makes chain handling harder.
- Not supporting the derailleur: Can bend or break the hanger.
- Overtightening the axle: Can damage bearings or make removal difficult.
- Incorrect brake reattachment: Causes rubbing or poor stopping.
- Wrong wheel size: Leads to poor handling or unsafe fit.
- Ignoring wheel alignment: Results in wobble or unsafe riding.
Non-obvious insight: Many riders ignore hub compatibility. If the new wheel’s hub does not match your cassette or axle, installation becomes impossible. Always check hub specs before buying.
Practical Tips For Smooth Wheel Changes
- Keep your workspace clean: Dirt can damage parts.
- Have spare parts ready: Tubes, levers, and extra nuts.
- Mark your old wheel: If you plan to reuse it, label for easy identification.
- Practice at home: Try removing and reinstalling before hitting the trail.
- Learn basic gear adjustments: Knowing how to fine-tune the derailleur saves trouble.
If you want extra guidance, detailed tutorials and videos are available at Park Tool, a trusted source for bike repair.
Mountain Bike Rear Wheel Brands Compared
Choosing a replacement wheel can feel overwhelming. Here’s a comparison of popular brands for mountain bike rear wheels:
| Brand | Typical Price Range | Warranty | Reputation | Best For |
|---|---|---|---|---|
| Shimano | $50-$350 | 1 year | Reliable, affordable | General use |
| DT Swiss | $150-$800 | 2 years | High performance | Racing, serious riders |
| Stan’s NoTubes | $120-$600 | 2 years | Light, tubeless ready | Trail, XC |
| Race Face | $110-$650 | 1 year | Strong, aggressive riding | Enduro, downhill |
If you ride rough trails, a brand like Race Face may suit you best. For smoother riding, Shimano offers affordable, reliable wheels.
Maintenance After Changing The Back Wheel
Once you’ve changed the wheel, proper maintenance keeps it running smoothly:
- Clean the cassette and derailleur: Use a rag and mild cleaner.
- Check spoke tension: Loose spokes can cause wobble.
- Inspect hub bearings: Spin the wheel; listen for grinding or roughness.
- Lubricate moving parts: Light oil on the chain and cassette.
- Check tire pressure regularly: Proper PSI reduces flats and improves handling.
Every 500 miles, check the wheel for signs of wear—loose spokes, cracks, or rim damage. Routine maintenance prevents bigger repairs.
Advanced Considerations: Tubeless Setup And Upgrades
If you want to upgrade your mountain bike, consider a tubeless wheel setup. Tubeless wheels reduce flats, offer better grip, and lower weight. Here’s how they differ:
- Tubeless wheels require special rims and tires.
- Sealant inside the tire prevents punctures.
- Lower PSI improves traction.
Switching to tubeless is more complex, but many experienced riders prefer it. If you change wheels, ask if your new rim supports tubeless.
Another upgrade is carbon rims. These are lighter and stiffer, but more expensive. For most riders, aluminum rims are best. Carbon is ideal for racing or weight savings.
Troubleshooting: What If The Wheel Won’t Fit?
Sometimes, even after following the steps, the wheel won’t fit. Here’s what to check:
- Axle size: Is it the right diameter for your frame?
- Dropout spacing: Mountain bikes use 135mm, 142mm, or 148mm (Boost) spacing.
- Brake compatibility: Does the rotor line up with the caliper?
- Cassette type: Is it Shimano, SRAM, or another brand?
- Frame damage: Check for bent dropouts or obstructions.
If the wheel still doesn’t fit, measure all parts carefully and consult your bike manual or a professional mechanic.
Frequently Asked Questions
How Do I Know If My Wheel Needs Replacing?
Look for cracks, bent rims, broken spokes, or severe wobbles. If repairs are frequent or your wheel feels unsafe, replacement is better.
What Is The Difference Between Quick Release And Thru-axle?
Quick release uses a lever for fast removal. Thru-axle screws directly through the frame and hub, offering more strength and stiffness. Thru-axles are common on modern mountain bikes.
Can I Use A Road Bike Wheel On My Mountain Bike?
Usually no. Mountain bike wheels are wider and stronger. Road bike wheels are thinner and not built for rough terrain. Always match wheel type to your bike.
How Much Does A New Mountain Bike Rear Wheel Cost?
Prices range from $50 to $800 depending on material, brand, and features. Aluminum wheels are affordable; carbon wheels are expensive.
What’s The Best Way To Keep My New Wheel In Good Condition?
Clean regularly, check spoke tension, keep the hub lubricated, and maintain proper tire pressure. Inspect for damage after every ride.
Changing the back wheel on your mountain bike is a skill worth learning. It saves money, builds confidence, and keeps you riding longer. With careful steps, the right tools, and a bit of practice, you can handle wheel changes anywhere—from your garage to the trails.
Remember to check compatibility, avoid common mistakes, and maintain your new wheel for the best performance. Whether you’re fixing a flat or upgrading your ride, these tips help you get back on the trail quickly and safely.

Hello Guys! I am John Reese, a professional biker and my hobby is biking! I have been biking for last 12 years and I love using bikes while outing as well. Based on my experiences with the different type of bikes (mountain bikes, road bikes and hybrid bikes); I am sharing my opinion about various bikes so that a beginner can get started right away. Happy reading!