Adjusting a mountain bike derailleur can feel intimidating if you’ve never tried it. But with the right guidance, you can make your gears run smoothly and enjoy a better ride. Many riders struggle with shifting issues, noisy gears, or chain skipping.
These problems often come from poor derailleur adjustment. Learning to fix them yourself saves money, prevents breakdowns, and keeps your bike performing at its best. In this guide, you’ll find practical steps, common mistakes to avoid, and tips to make your mountain bike derailleur work flawlessly.
Whether you’re a beginner or just want clearer instructions, you’ll discover everything needed to master derailleur adjustment.
Understanding The Mountain Bike Derailleur
The derailleur is a key part of your bike’s shifting system. It moves the chain from one gear to another, letting you ride efficiently on different terrains. Mountain bikes usually have two types of derailleurs:
- Front derailleur: Moves the chain between chainrings.
- Rear derailleur: Shifts the chain across the cassette at the back.
Most shifting issues come from the rear derailleur, so this article will focus on adjusting it. A well-adjusted derailleur means smooth, reliable shifting and less chain wear. If your gears are noisy, slow to shift, or skip, the derailleur likely needs attention.
How Does A Derailleur Work?
The derailleur uses a cable (connected to your shifter) and spring tension to guide the chain. When you move the shifter, the cable pulls or releases, moving the derailleur sideways. The derailleur also has limit screws and a B-tension screw to control movement. Each part needs proper setup for the gears to work correctly.
Signs Your Derailleur Needs Adjustment
- Chain won’t shift smoothly between gears
- Chain skips or jumps under load
- Noisy shifting or rattling
- Gear lever feels loose or stiff
- Chain drops off the cassette
If you notice these, it’s time to check your derailleur.
Tools And Preparation
Before you start, gather the right tools and set up your workspace. This makes the job faster and avoids mistakes.
Essential Tools:
- Bike stand (optional): Helps keep the bike steady.
- Phillips screwdriver: For adjusting limit screws.
- 5mm Allen wrench: For cable and derailleur bolts.
- Needle-nose pliers: For pulling cables tight.
- Lubricant: For chain and moving parts.
- Clean rag: To wipe off dirt and grease.
Preparation Steps:
- Shift the chain to the smallest rear cog and smallest front chainring.
- Clean the derailleur and cassette with a rag. Dirt can hide problems.
- Check the derailleur hanger for bends. A bent hanger causes shifting issues. If it’s bent, straighten it or replace it.
- Inspect the cable and housing. Frayed or rusty cables must be replaced.
Pro Tip: Beginners often overlook cable condition. A sticky or old cable causes poor shifting, even if your derailleur is adjusted correctly.

Credit: www.youtube.com
Step-by-step Derailleur Adjustment
Adjusting a rear derailleur follows a clear sequence. Each step builds on the last, so don’t skip around. Here’s how to do it:
Step 1: Set The Limit Screws
Limit screws control how far the derailleur moves. If set wrong, the chain can fall off the cassette or won’t reach all gears.
How to Identify Limit Screws:
- Usually marked “H” (high) and “L” (low) on the derailleur body.
High Limit Screw (H):
- Controls the derailleur position on the smallest cog.
- Shift to the smallest cog.
- Turn the H screw so the jockey wheel lines up exactly with the smallest cog. If the derailleur is too far out, the chain can drop off the cassette.
Low Limit Screw (L):
- Controls the derailleur position on the largest cog.
- Shift to the largest cog.
- Turn the L screw so the jockey wheel lines up with the largest cog. If it’s too far in, the chain can fall into the spokes.
| Limit Screw | Controls | Common Issue if Misadjusted |
|---|---|---|
| High (H) | Smallest cog | Chain drops off cassette |
| Low (L) | Largest cog | Chain falls into spokes |
Mistake to Avoid: Many beginners confuse H and L screws. Double-check which screw you are adjusting.
Step 2: Set The Cable Tension
Cable tension affects how the derailleur responds to your shifter. If too loose, the chain won’t shift up. If too tight, it won’t shift down.
How to Adjust:
- Shift to the smallest cog.
- Loosen the cable anchor bolt (using a 5mm Allen wrench).
- Pull the cable tight (but not stretched) and retighten the bolt.
- Use the barrel adjuster (on the derailleur or shifter) to fine-tune tension. Turn counterclockwise to increase tension, clockwise to decrease.
Test Shifting:
- Shift one gear at a time. If the chain hesitates or skips, adjust the barrel until shifting is smooth.
Non-obvious Tip: Beginners often forget to check barrel adjuster position before starting. If it’s already turned out, you’ll have less range for fine-tuning.
Step 3: Set The B-tension Screw
The B-tension screw controls how close the derailleur sits to the cassette. Too close, and the chain rubs or gets noisy; too far, and shifting is slow.
How to Adjust:
- Shift to the largest cog.
- Locate the B-tension screw (usually near the derailleur mounting bolt).
- Adjust so the upper jockey wheel sits 5–7mm below the largest cog.
- Use a ruler or eyeball the gap.
| B-Tension Position | Effect | Adjustment |
|---|---|---|
| Too close | Chain rubs, noisy | Turn screw in (clockwise) |
| Too far | Slow shifting | Turn screw out (counterclockwise) |
Common Mistake: Riders often skip B-tension adjustment, leading to shifting problems on large cogs.
Step 4: Fine-tune Gear Indexing
Gear indexing means each shifter click moves the chain exactly one gear. If indexing is off, shifting feels imprecise.
How to Test:
- Shift through all gears, from smallest to largest and back.
- Listen for noise or hesitation.
- If the chain doesn’t move cleanly, use the barrel adjuster to fine-tune cable tension.
Troubleshooting:
- If the chain skips two gears, cable tension is too high.
- If the chain doesn’t move, tension is too low.
Practical Insight: Sometimes, a dirty cassette or chain can mimic indexing problems. Clean these before adjusting.
Step 5: Check And Adjust The Hanger Alignment
The derailleur hanger is a small metal piece connecting the derailleur to the frame. If bent, even perfect adjustment won’t fix shifting.
How to Check:
- Stand behind the bike and look at the derailleur.
- The jockey wheels should line up vertically with the cassette.
- If not, the hanger may be bent. Use a hanger alignment tool if available, or visit a bike shop.
Real-World Example: After a crash or tip-over, hanger bends are common. Always check after a fall.
Step 6: Inspect And Replace Worn Parts
A well-adjusted derailleur can’t fix worn-out parts. If you’ve tried everything and shifting is still poor, check for:
- Stretched chain
- Worn cassette teeth
- Damaged derailleur pulleys
- Frayed cables
If any part is worn, replace it. You can check chain stretch with a chain checker tool.
Comparison: Adjusting Vs. Replacing Derailleur
Sometimes, adjustment isn’t enough. Here’s how adjustment and replacement compare:
| Adjustment | Replacement |
|---|---|
| Fixes most shifting problems | Needed if derailleur is broken or worn out |
| Quick, costs nothing | Costs $30–$100 for parts |
| Improves performance | Restores shifting, but requires adjustment after |
| Easy for beginners | May need tools or professional help |
Pro Tip: Adjust first. Replace only if adjustment fails and parts are damaged.
Tips For Smooth Derailleur Adjustment
Making your derailleur work perfectly is about more than just following steps. Here are extra tips to help:
- Work in good light: Poor lighting hides problems and makes it hard to see alignment.
- Go slow: Rushing leads to mistakes. Move one step at a time.
- Check after each adjustment: Test shifting after every change.
- Use quality tools: Cheap tools can strip bolts or slip.
- Keep the bike clean: Dirt interferes with movement and makes adjustment harder.
- Don’t over-tighten bolts: Too much force can damage threads.
- Practice regularly: The more you adjust, the easier it gets.
Hidden Insight: Sometimes, shifting problems are caused by the shifter itself, not the derailleur. If adjustments don’t work, check the shifter for wear or damage.
Common Mistakes And How To Avoid Them
Even experienced riders make mistakes when adjusting their derailleurs. Here’s what to watch for:
- Confusing limit screws: Always check which is H and which is L before adjusting.
- Skipping cable tension: Proper cable tension is key. Don’t rely only on limit screws.
- Ignoring hanger alignment: If the derailleur is not vertical, shifting will never be perfect.
- Overlooking cable wear: Old cables cause sticky shifting. Replace if needed.
- Neglecting cleanliness: Dirt makes adjustment harder. Clean before you start.
- Adjusting too many things at once: Change one thing, test, then move to the next.
- Forgetting B-tension: This screw is often ignored, but important for shifting on large cogs.
Non-obvious Mistake: Some riders set the barrel adjuster at its extreme end before adjusting. Always start with it near the middle for best results.
Practical Example: Adjusting A Shimano Deore Derailleur
Let’s walk through a real-world example using a Shimano Deore derailleur, which is common on mountain bikes.
- Shift the chain to the smallest cog.
- Check the H limit screw. Adjust so the jockey wheel lines up with the cog.
- Loosen the cable anchor, pull the cable tight, and retighten.
- Use the barrel adjuster to fine-tune tension until shifting is smooth.
- Shift to the largest cog. Adjust the L screw so the derailleur aligns with the cog.
- Adjust the B-tension screw to create a 5mm gap between the jockey wheel and largest cog.
- Test shifting through all gears. Make small adjustments as needed.
After these steps, your Shimano Deore derailleur should shift cleanly. If not, check for bent hanger or worn parts.
How Often Should You Adjust Your Derailleur?
Adjustment frequency depends on riding style and conditions. Here’s a rough guide:
- Regular trail riding: Check every 2–3 months.
- After crashes or falls: Inspect immediately.
- After cable or chain replacement: Adjust right away.
- If shifting problems appear: Adjust as soon as possible.
Mountain biking exposes your bike to mud, impacts, and rough terrain. These factors mean derailleurs need more regular care than road bikes.

Credit: www.bicycling.com
When To Seek Professional Help
Some problems need expert attention. Visit a bike shop if:
- The derailleur hanger is badly bent
- The derailleur is broken or missing parts
- Shifting issues persist after adjustment and replacement
- You lack the right tools for repair
Bike shops have alignment tools and experience to solve tough problems. If you’re unsure, it’s better to ask than risk damage.
Table: Derailleur Types And Adjustment Difficulty
Different derailleur brands and models vary in how easy they are to adjust. Here’s a quick comparison:
| Brand | Common Model | Adjustment Difficulty (1=Easy, 5=Hard) | Notes |
|---|---|---|---|
| Shimano | Deore | 2 | Clear markings, reliable |
| SRAM | X5 | 3 | More sensitive to cable tension |
| MicroShift | Advent | 2 | Simple design, easy for beginners |
| Shimano | XT | 3 | Extra features, needs careful setup |
| SRAM | GX | 4 | Precise adjustment, best for experienced users |
Insight: Don’t be afraid to practice on entry-level derailleurs. They’re more forgiving and help you build confidence.
Frequently Asked Questions
How Do I Know If My Derailleur Is Bent?
Look from behind the bike at the derailleur. If the jockey wheels aren’t lined up with the cassette, the hanger may be bent. You can check with a hanger alignment tool or ask a bike shop for help.
Can I Adjust The Derailleur Without A Bike Stand?
Yes, you can. Use a wall or have someone hold the bike steady. A bike stand just makes the job easier, but it’s not required.
What If My Gears Still Skip After Adjustment?
If gears skip after adjustment, check for worn chain, cassette, or cables. Also, make sure the derailleur hanger isn’t bent. Sometimes, a dirty drivetrain causes skipping.
How Tight Should I Pull The Cable?
Pull the cable tight enough to remove slack, but not so tight that it stretches. The barrel adjuster lets you fine-tune tension. Don’t use force—just firm tension.
What Is The B-tension Screw For?
The B-tension screw controls the gap between the derailleur’s upper pulley and the largest cog. Proper adjustment improves shifting, especially in low gears.
Final Thoughts
Adjusting a mountain bike derailleur is a skill every rider should learn. It brings smoother rides, saves money, and helps you solve shifting issues quickly. Start with clean tools, follow each step carefully, and don’t rush. Remember to check cable condition, hanger alignment, and B-tension—these are often missed by beginners. With practice, you’ll gain confidence and keep your bike running perfectly. If in doubt, ask for help or visit a bike shop. For more details on bike maintenance, you can check Bicycling Magazine. Now you’re ready to tackle derailleur adjustments and enjoy every ride!
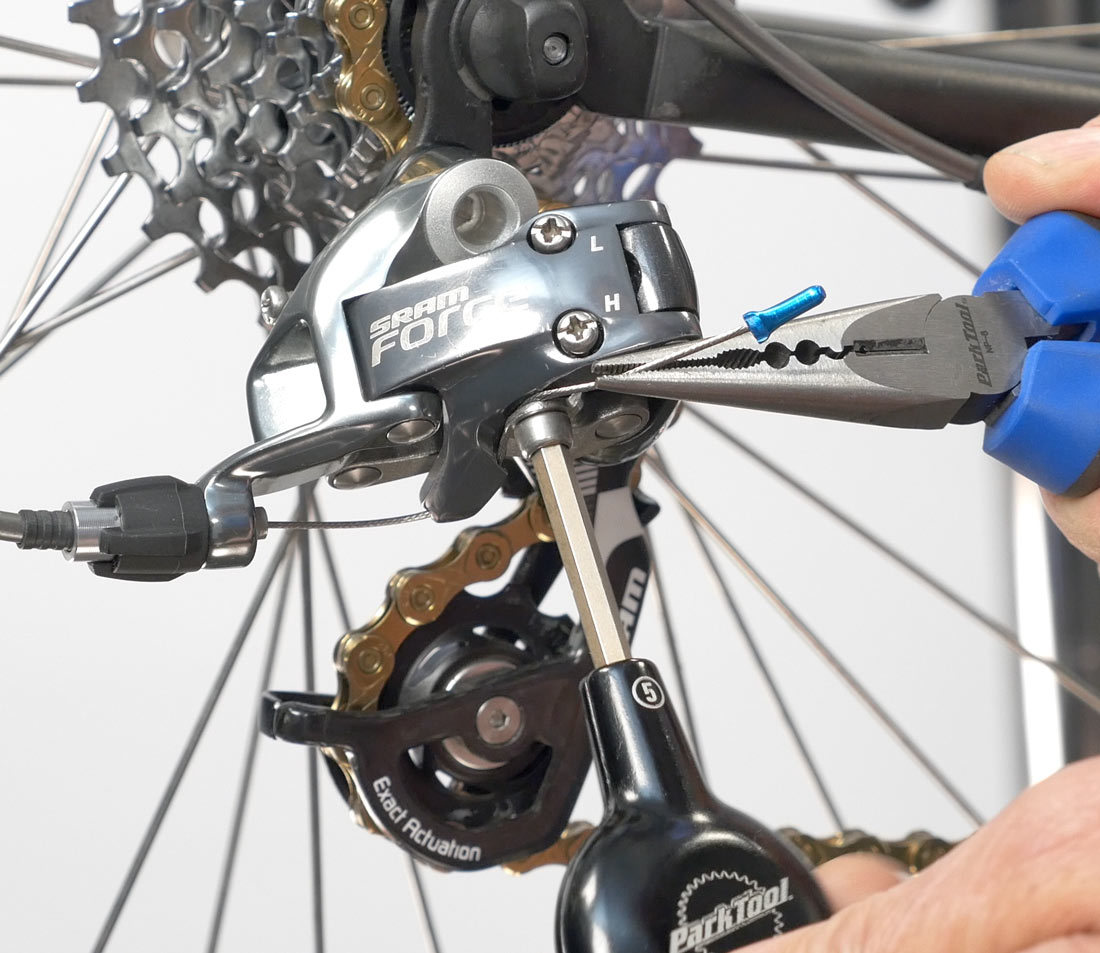
Credit: www.parktool.com

Hello Guys! I am John Reese, a professional biker and my hobby is biking! I have been biking for last 12 years and I love using bikes while outing as well. Based on my experiences with the different type of bikes (mountain bikes, road bikes and hybrid bikes); I am sharing my opinion about various bikes so that a beginner can get started right away. Happy reading!