Adjusting mountain bike brakes is a skill every rider should learn. Whether you hit rugged trails, cycle daily, or just want a safer ride, proper brake setup makes a big difference. Many bikes come with brakes that aren’t set up perfectly, and over time, cables stretch, pads wear out, and rotors bend.
These problems can make your bike less safe and harder to control. It’s common for beginners to feel nervous about fixing brakes, but with a bit of guidance, anyone can do it. This article will walk you through each step, explain key concepts, and give practical examples.
You’ll learn how to identify problems, adjust both disc and rim brakes, and make your bike safer and more enjoyable to ride.
Why Adjusting Mountain Bike Brakes Matters
Mountain biking is all about control, especially when you ride on steep hills or rough terrain. If your brakes don’t work well, you risk accidents. Badly adjusted brakes can squeal, rub, or fail to stop you quickly. Over time, even new bikes need brake maintenance because parts shift, pads wear, and cables stretch.
According to the Bicycle Product Suppliers Association, nearly 70% of mechanical failures in mountain bikes are related to brake issues.
When you adjust your brakes correctly:
- You stop faster and more safely
- You avoid annoying noises like squealing or rubbing
- You reduce wear on wheels and brake parts
- You feel more confident on trails
Many riders ignore brake adjustments until something goes wrong. But regular checks can prevent big problems and keep you safe. Learning to adjust brakes also saves money on repairs. You can fix most issues at home with simple tools.
Types Of Mountain Bike Brakes
Before adjusting your brakes, you need to know what type you have. Mountain bikes use two main brake types: rim brakes and disc brakes. Each type has unique parts and adjustment methods.
Rim Brakes
These brakes squeeze the wheel rim with pads. The most common types are V-brakes and cantilever brakes. They are easy to adjust and repair, but can be less effective in mud or wet conditions.
Disc Brakes
Disc brakes use a metal rotor attached to the wheel hub. Brake pads squeeze the rotor, not the rim. There are two main types:
- Mechanical disc brakes: Operated by cables like rim brakes.
- Hydraulic disc brakes: Use fluid to move the pads. They offer more power and smoother action but are harder to adjust.
Most modern mountain bikes use disc brakes. They work well in all weather and provide strong stopping power.
| Brake Type | Common Features | Adjustment Difficulty |
|---|---|---|
| V-Brakes | Simple, cable-driven, easy to find parts | Easy |
| Mechanical Disc Brakes | Strong power, cable-driven, good for all weather | Moderate |
| Hydraulic Disc Brakes | Very strong, fluid-driven, smooth action | Hard |
Tools You Need For Brake Adjustment
You don’t need many tools to adjust your mountain bike brakes. Most jobs can be done with basic bike tools found in a home toolkit.
- Allen wrenches (usually 4mm, 5mm, and 6mm)
- Phillips screwdriver
- Needle-nose pliers
- Cable cutters
- Bike grease
- Rag or paper towel
- Bike stand (optional, but makes the job easier)
For hydraulic brakes, you might need:
- Bleed kit
- Brake fluid
- Rubber gloves
Always make sure you have the right size tools for your bike. Using the wrong tools can strip bolts and damage parts.
How To Inspect Your Mountain Bike Brakes
Before adjusting, inspect your brakes carefully. This helps you spot problems and plan what needs fixing.
- Check brake pads: Look for wear. Pads should be at least 3mm thick. If they’re thinner, replace them.
- Inspect rotors or rims: For disc brakes, look for warping or deep grooves. For rim brakes, check for dents or rough spots.
- Look at brake cables and housing: Cables should move smoothly. If they’re rusty or frayed, replace them.
- Test brake levers: Squeeze the lever. It should feel firm, not spongy. If it pulls all the way to the handlebar, adjustment is needed.
- Check for rubbing or noise: Spin the wheel. If you hear rubbing or squealing, the pads may be misaligned.
Many beginners overlook cable wear. A stretched or dirty cable can make brakes feel weak even if pads are good. Also, inspect for loose bolts at the caliper and lever.
Adjusting Rim Brakes
Rim brakes are simple, but need regular tweaking. Here’s how to adjust them step by step:
Step 1: Align The Brake Pads
Brake pads must hit the rim squarely, not the tire or spokes.
- Loosen the pad mounting bolt with an Allen wrench.
- Position the pad so it lines up with the rim, not touching the tire.
- Tighten the bolt while holding the pad in place.
- Repeat for the other pad.
Tip: For best results, the pad should be slightly “toed-in.” This means the front of the pad touches the rim before the back. It reduces squealing.
Step 2: Adjust Cable Tension
Cable tension controls how quickly the pads move.
- Locate the barrel adjuster near the lever or caliper.
- Turn it counterclockwise to tighten the cable and make the brakes more responsive.
- If needed, loosen the cable clamp bolt, pull the cable tighter, and retighten.
Many riders forget the barrel adjuster. It’s a quick way to fine-tune brake feel.
Step 3: Center The Brake Arms
Both arms should move equally when you squeeze the lever.
- Find the centering screw on each brake arm.
- Turn the screw to balance the movement. If one arm moves more, tighten its screw.
Step 4: Test Brakes
After adjustments, squeeze the lever and spin the wheel. The pads should grab the rim evenly and stop the wheel quickly. If not, repeat the steps.
Common Rim Brake Problems
- Squealing: Usually caused by dirty rims or pads, or poor toe-in.
- Weak braking: Often from worn pads or loose cables.
- Pad rubbing: Adjust centering screws or realign pads.
| Problem | Cause | Fix |
|---|---|---|
| Squealing | Poor pad alignment, dirty rim | Clean rim, adjust toe-in |
| Weak braking | Loose cable, worn pads | Increase tension, replace pads |
| Pad rubbing | Misaligned arms | Center brake arms |
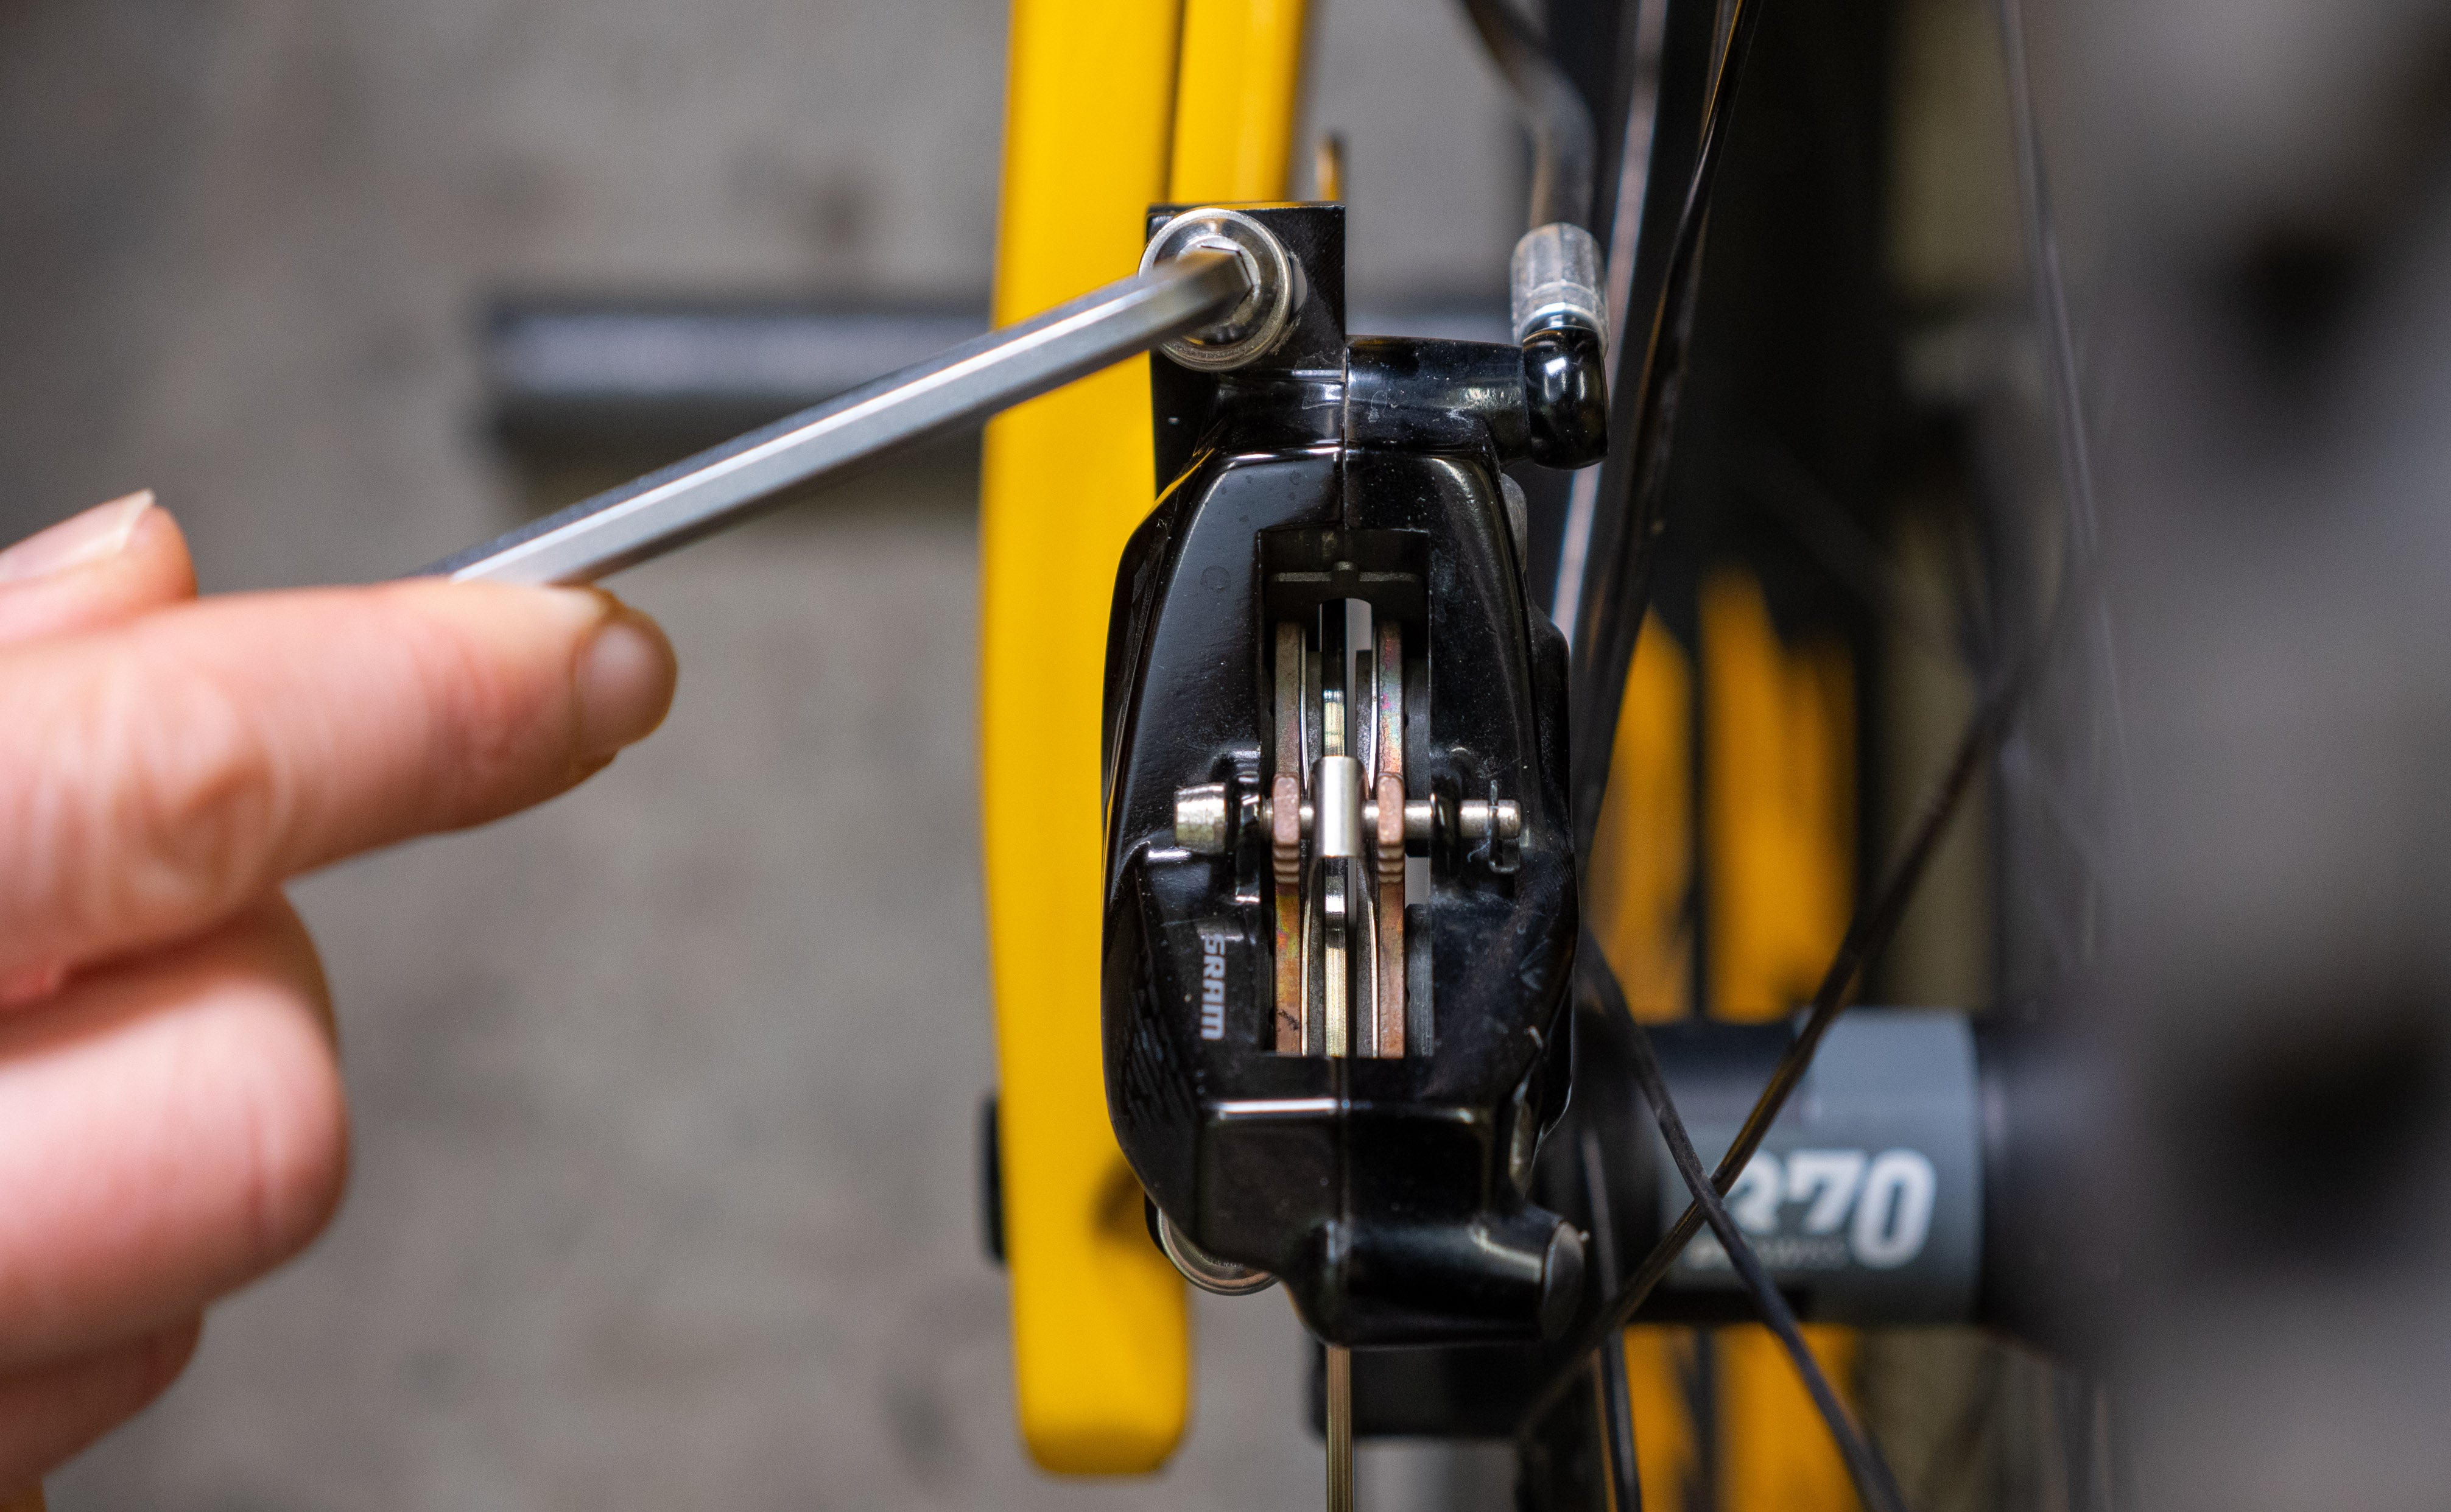
Adjusting Mechanical Disc Brakes
Mechanical disc brakes are stronger than rim brakes and need different steps.
Step 1: Center The Caliper
The caliper must be centered over the rotor.
- Loosen the caliper mounting bolts.
- Squeeze the brake lever hard to center the caliper.
- While holding the lever, tighten the mounting bolts.
This method works for most mechanical brakes. It’s a simple way to fix rubbing.
Step 2: Adjust Pad Clearance
Pad clearance affects how far the lever needs to be pulled.
- Locate the pad adjustment dial or screw on the caliper.
- Turn it to move the pads closer or farther from the rotor.
- Aim for 1–2mm clearance on each side.
Tip: If the rotor rubs, adjust each pad individually. Some calipers have only one moving pad; others move both.
Step 3: Set Cable Tension
Like rim brakes, cable tension matters.
- Use the barrel adjuster near the lever or caliper.
- Turn it to fine-tune brake feel. If the lever is too loose, tighten the cable.
Step 4: Test And Fine-tune
Spin the wheel and squeeze the lever. The pads should grab the rotor evenly without rubbing. Make small adjustments as needed.
Common Mechanical Disc Brake Problems
- Pad rubbing: Usually from a misaligned caliper or bent rotor.
- Weak braking: Often from stretched cables or worn pads.
- Lever feels spongy: Check for cable stretch or air in cable housing.
Many beginners miss rotor alignment. A slightly bent rotor can cause constant rubbing. Use a rotor truing tool or gently bend it back with an adjustable wrench.
Credit: griffindentalclinic.com
Adjusting Hydraulic Disc Brakes
Hydraulic brakes are powerful and smooth, but need careful setup. Beginners often avoid hydraulic systems because they seem complex. With patience, you can adjust them safely.
Step 1: Center The Caliper
Hydraulic calipers need to be centered just like mechanical ones.
- Loosen the caliper bolts.
- Squeeze the brake lever tightly.
- While holding the lever, tighten the bolts.
Step 2: Check Pad Wear And Clearance
Pads wear out faster on hydraulic systems due to stronger force.
- Look for the pad wear indicator. Pads should be at least 1mm thick.
- If pads are thin, replace them.
- Some brakes have a small dial to adjust pad clearance. Turn it gently if needed.
Step 3: Bleed The Brakes (if Needed)
Hydraulic brakes sometimes feel spongy due to air in the lines.
- Use a brake bleed kit and follow the manufacturer’s instructions.
- Remove the old fluid and pump new fluid through the system.
- Clean up any spills and test the lever.
Tip: Always use the correct fluid for your brake brand (DOT fluid or mineral oil). Mixing fluids can damage the system.
Step 4: Inspect For Leaks
Look for fluid leaks at the caliper and lever. Leaks cause brake failure and need immediate attention.
Step 5: Test Brakes
After adjustments and bleeding, squeeze the lever. It should feel firm and stop the wheel quickly.
Common Hydraulic Brake Problems
- Spongy feel: Usually caused by air in the system. Bleed the brakes.
- Weak braking: Could be worn pads or contaminated fluid.
- Pad rubbing: Often a misaligned caliper.
Most riders miss the importance of regular bleeding. Even small air bubbles can reduce brake power. Bleed hydraulic brakes once a year or after hard rides.
How To Replace Mountain Bike Brake Pads
Brake pads wear out over time. Replacing them is easy if you follow the steps.
- Remove the wheel for better access.
- For disc brakes, remove the retaining pin or clip.
- Slide out the old pads.
- Insert new pads and secure with the pin or clip.
- For rim brakes, remove the pad mounting bolt, swap pads, and reinstall.
Always check pad compatibility with your brake model. Use only quality pads for best performance.
How To Fix Brake Squeal And Rubbing
Brake squeal is annoying but common. Here’s how to fix it:
- Clean pads and rims/rotors: Use rubbing alcohol and a rag.
- Check pad alignment: Make sure pads hit the rim or rotor squarely.
- Toe-in rim brake pads: Slightly angle the front of the pad toward the rim.
- True the rotor: Use a rotor truing tool if needed.
Rubbing usually means the caliper or pads are misaligned. Adjust pad clearance or recenter the caliper.
How To Adjust Brake Levers
Brake levers should be comfortable and easy to reach.
- Loosen the lever clamp bolt.
- Rotate the lever to a natural angle for your hand.
- Tighten the bolt.
- Adjust the reach (distance from handlebar) with the small screw on the lever.
Proper lever position reduces hand fatigue and improves control.

Credit: www.youtube.com
How To Check Brake Performance
After adjustments, test your brakes:
- Squeeze the lever and check for smooth, firm action.
- Spin the wheel and listen for rubbing.
- Go for a short ride and test stopping power.
- Try braking on a hill or rough terrain.
If your brakes aren’t strong enough, double-check cable tension, pad alignment, and pad thickness.
Troubleshooting Unusual Brake Problems
Sometimes brakes have strange issues. Here are solutions for common but less obvious problems:
- Brake lever returns slowly: Lubricate the cable or replace cable housing.
- Brake pads stick: Clean the caliper and check for debris.
- Lever feels stiff: Check for bent lever or damaged cable.
If you can’t solve a problem, visit a bike shop. Some issues need professional tools or parts.
How Often Should You Adjust Mountain Bike Brakes?
Adjustment frequency depends on riding style and conditions. If you ride daily or on tough trails, check brakes monthly. For casual riders, every 3–6 months is enough. Always check brakes before big rides or races.
Pad replacement is needed every 500–1000 miles for disc brakes, or when pads are less than 1mm thick. Rim brake pads last longer but need regular cleaning.
Comparing Brake Adjustment Methods
Different brake systems need different adjustment steps. Here’s a quick comparison:
| System | Adjustment Steps | Typical Issues | Tools Needed |
|---|---|---|---|
| Rim Brakes | Pad alignment, cable tension, centering arms | Squealing, weak braking, pad rubbing | Allen wrench, screwdriver, pliers |
| Mechanical Disc Brakes | Caliper centering, pad clearance, cable tension | Pad rubbing, weak braking | Allen wrench, rotor tool |
| Hydraulic Disc Brakes | Caliper centering, bleeding, pad replacement | Spongy feel, weak braking, leaks | Bleed kit, brake fluid, Allen wrench |
Tips For Safe And Effective Brake Adjustment
- Always use quality tools. Cheap tools can damage bolts.
- Clean pads and rotors regularly for best performance.
- Replace cables and pads before they fail.
- Test brakes after every adjustment.
- Don’t ignore odd noises; they often signal bigger problems.
- Read your bike’s manual for specific instructions.
Many riders forget to clean brake surfaces. Dirt and oil reduce stopping power. Clean your brakes after every muddy ride.
Non-obvious Insights About Mountain Bike Brake Adjustment
- Pad material matters: Organic pads are quieter but wear faster. Metallic pads last longer but can be noisy. Choose based on your riding style.
- Rotor size affects stopping power: Larger rotors give stronger braking but are heavier. If you ride steep trails, consider upgrading to a bigger rotor.
- Cable routing influences performance: Sharp bends in cable housing can cause friction and weak brakes. Keep cable lines smooth and free of kinks.
Beginners usually miss the effect of pad and rotor choice on brake feel. Experiment with different combinations to find your ideal setup.
When To Visit A Professional Bike Shop
You can fix most brake issues at home, but some problems need expert help.
- Hydraulic leaks
- Severely bent rotors
- Damaged levers or calipers
- Brake systems that won’t adjust correctly
Professional mechanics have tools and experience. If you’re unsure, don’t risk your safety.
For more advanced brake maintenance and details, see the Park Tool Repair Help resource.
Frequently Asked Questions
How Do I Know If My Mountain Bike Brakes Need Adjustment?
If your brakes feel weak, squeal, rub, or the lever pulls all the way to the handlebar, adjustment is needed. Check pads, cables, and alignment regularly.
Can I Adjust Hydraulic Disc Brakes Myself?
Yes, basic adjustments like centering the caliper and replacing pads are simple. Bleeding brakes requires a kit and patience. If you see leaks or severe issues, visit a bike shop.
How Often Should I Replace Brake Pads?
Replace pads when they’re less than 1mm thick, or every 500–1000 miles for disc brakes. Rim brake pads last longer but should be replaced if worn or uneven.
Why Do My Brakes Squeal Even After Adjustment?
Brake squeal is usually caused by dirty pads, poor pad alignment, or contaminated rotors/rims. Clean the braking surfaces and check toe-in for rim brakes.
What’s The Difference Between Mechanical And Hydraulic Disc Brakes?
Mechanical disc brakes use cables for actuation, while hydraulic brakes use fluid. Hydraulic brakes are stronger and smoother but harder to adjust and repair.
Adjusting your mountain bike brakes is not only about safety; it’s about getting the most from your riding experience. With a little practice and care, you’ll enjoy smoother, quieter, and more powerful brakes every time you hit the trail.

Credit: www.sepr.es

Hello Guys! I am John Reese, a professional biker and my hobby is biking! I have been biking for last 12 years and I love using bikes while outing as well. Based on my experiences with the different type of bikes (mountain bikes, road bikes and hybrid bikes); I am sharing my opinion about various bikes so that a beginner can get started right away. Happy reading!