Building single track mountain bike trails is a unique mix of art and science. These narrow paths, usually 18–36 inches wide, snake through forests, hills, and valleys, offering riders a thrilling experience. But creating a trail that is fun, safe, and sustainable takes much more than simply clearing a path through the woods.
You need a deep understanding of terrain, user needs, environmental impact, and practical construction techniques. Whether you are a land manager, a volunteer, or a mountain biking enthusiast, learning how to build single track trails opens up opportunities for adventure and community.
In this guide, you’ll discover the essential steps, smart planning, and the common mistakes to avoid. You’ll learn about tools, materials, design strategies, and how to work with nature rather than against it. With clear explanations and practical examples, you’ll gain the confidence to start your trail project and ensure it stands the test of time.
What Is A Single Track Trail?
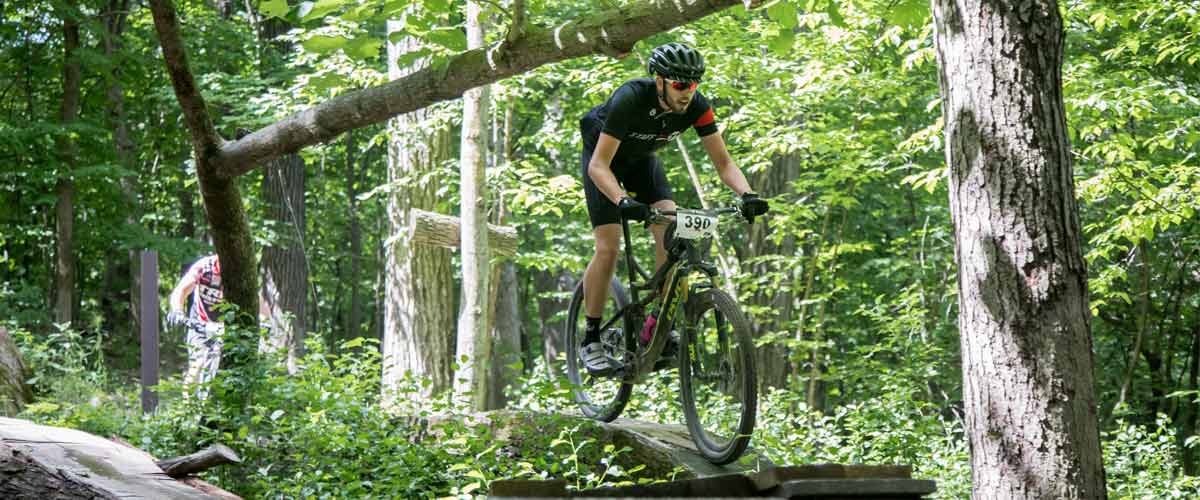
A single track mountain bike trail is a narrow path designed for one bike at a time. Unlike double track or wider trails, single track offers a more technical riding experience. Riders navigate turns, climbs, drops, and obstacles. These trails demand skill and focus, which is why they are loved by mountain bikers.
Single track trails can be built in forests, hills, deserts, or even urban parks. The best ones blend into the landscape, use natural features, and offer a range of challenges. They are usually 18–36 inches wide, allowing for smooth flow and tight corners.
Single track is not only for expert riders. Beginners can enjoy easier routes, while advanced bikers seek steeper, rockier, or more technical lines. A well-designed single track trail is both accessible and exciting.
Single track also offers a feeling of “immersion” in nature. Riders are closer to trees, rocks, and streams, experiencing the environment directly. Because the trail is narrow, it disturbs less land, which is better for wildlife and plants. This “light footprint” is one reason single track is popular with land managers.
Another unique aspect is that single track often evolves as riders use it. Over time, sections may become more challenging or easier, depending on maintenance and rider behavior. Trail builders need to plan for this natural change and adapt the design if needed.
Planning Your Trail Project
Building a trail starts with careful planning. Rushing the design can lead to erosion, safety issues, or trails that no one wants to ride. Good planning means thinking about the land, users, environment, and long-term maintenance.
Identifying The Right Location
Location is everything. Look for land that:
- Has natural features like hills, rocks, or trees
- Offers variety in terrain
- Is legally available for trail building (public land, private land with permission)
- Is not sensitive habitat or protected area
Avoid wetlands, steep slopes above 45°, or areas prone to flooding. Use maps and GPS tools to study the terrain. Walk the area before you plan.
Another key point: consider sun and wind exposure. South-facing slopes dry faster after rain, reducing muddy spots. North-facing slopes may stay wet and need more drainage. Listen for sounds—like traffic or water—which can affect the trail experience. If possible, choose quiet locations for a more peaceful ride.
Also, check for existing trails, old roads, or animal paths. Sometimes, these can be reused or connected, saving effort and reducing new disturbance.
Understanding The User Base
Who will use the trail? Beginners, families, advanced riders, or a mix? Tailor your design to the skill level and needs of your audience. For example, a family-friendly trail avoids big drops and sharp turns, while an advanced trail can include technical features.
Think about the volume of riders. A busy trail needs wider passing zones and tougher tread surfaces. If hikers or runners also use the trail, plan for shared use and make rules clear.
Talk to local riders or clubs to understand what the community wants. Ask about favorite trail types or features. Involving users from the start creates trails people will love and helps avoid conflicts later.
Environmental Impact And Regulations
Building a trail affects the environment. You must consider:
- Erosion control
- Wildlife habitat
- Water flow and drainage
- Local regulations and permits
Get permits from land managers or government agencies. Some areas require environmental assessments. Ignoring these steps can lead to fines or forced removal of your trail.
Study the plants and animals in the area. Some birds, for example, nest on the ground and are easily disturbed. Rare plants may grow in certain soils. If you find sensitive spots, adjust your route to avoid them.
Also, consider how trail building will affect water. Trails near streams or springs can change water flow, causing erosion or harming aquatic life. Build at least 50 feet away from water bodies when possible, and use bridges where crossing is needed.
Trail Design And Routing
Trail design is the blueprint for your project. Here’s what matters most:
- Sustainable routing: Avoid straight lines. Use curves and switchbacks to reduce erosion.
- Flow: Trails should have rhythm, with a mix of climbs, descents, and turns.
- Safety: Keep sightlines clear, avoid blind corners, and place warning signs near hazards.
- Variety: Use natural features like rocks, roots, and logs for technical interest.
Example: In Colorado, the “Horse Gulch” trail network uses natural contours, avoids steep grades, and incorporates rock gardens for advanced riders. This mix keeps the trail fun and reduces maintenance.
A good practice is “pin-flagging” your route—marking it with flags or tape before construction. This lets you adjust the line easily if you find problems, like large rocks or animal dens.
Remember, trails should be fun both uphill and downhill. If possible, design loops or stacked trails, so riders can choose short or long rides.
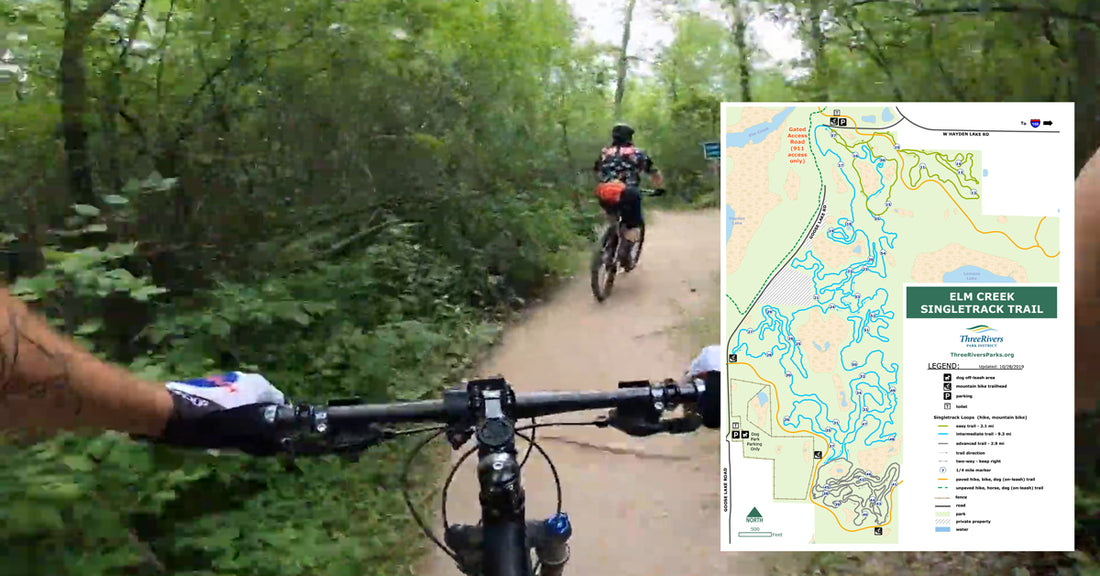
Mapping Your Trail
Use GPS devices or mapping software to mark the planned route. Walk the line to check for obstacles, drainage, and sightlines. Adjust the plan based on real-world conditions.
Take photos or notes at tricky spots. These reminders help when you bring in tools and workers. Share your map with other builders, landowners, or volunteers for feedback before digging begins.
Credit: ambassadoradvertising.com
Essential Tools And Materials
Building a single track trail needs the right tools. Using poor equipment slows progress and can cause injury.
Common Tools:
- McLeod: A combination rake and hoe for shaping and smoothing.
- Pulaski: An axe and hoe combo for cutting roots and digging.
- Shovel: For digging and moving soil.
- Pickaxe: Breaks hard ground or rocks.
- Rake: Clears debris and smooths surfaces.
- Chainsaw: Cuts fallen trees and branches.
- Loppers/Pruning shears: Trim small branches.
- Wheelbarrow: Moves dirt and rocks.
- Flagging tape: Marks route for volunteers.
Materials:
- Native soil: Best for tread surface if available.
- Gravel/crushed stone: Used in wet or high-traffic areas.
- Wood: For bridges or boardwalks.
- Geotextile fabric: Prevents erosion under gravel.
Having enough tools for all volunteers speeds up work. Safety gear is crucial: gloves, eye protection, and sturdy boots.
If you’re building in rocky terrain, a rock bar or pry bar helps move large stones. In wet areas, a mattock is good for digging drains. For longer trails, consider renting a mini-excavator, but only if the land allows machine access.
Carrying water and snacks is important for crews, especially in hot weather. First aid kits and a communication plan (cell phones or radios) keep everyone safe.
| Tool | Purpose | Cost Range (USD) |
|---|---|---|
| McLeod | Shaping/smoothing | $40–$70 |
| Pulaski | Digging/cutting | $35–$60 |
| Chainsaw | Clearing trees | $150–$400 |
| Geotextile | Erosion control | $0.50–$1.00/sq ft |
Step-by-step Trail Construction
The actual building process is where your plan turns into reality. Each step matters for safety, sustainability, and fun.
1. Clearing The Corridor
Start by clearing a corridor for your trail. Remove brush, logs, and rocks. Leave larger trees unless they block the route. Aim for a corridor width of 3–5 feet, but keep the tread (riding surface) narrow.
Tip: Avoid removing too many trees. Shade keeps trails cooler and reduces erosion.
Stack removed branches and debris away from the trail, but not in streams or sensitive areas. Some builders use brush piles for wildlife habitat—another way to help the environment.
For long trails, clear only a short section ahead of the building crew. This keeps the land looking natural and prevents erosion before the tread is finished.
2. Establishing The Trail Tread
The tread is the part riders use. Dig down to mineral soil, removing roots, leaves, and loose material. Shape the tread so water runs off, not down, the trail. A slight out-slope (3–5%) helps water drain away.
Beginner mistake: Leaving organic material on the tread leads to mud and erosion.
Use a line level or simple water bottle to check the slope. In rocky areas, fill gaps with small stones for stability. If the soil is sandy, add clay or gravel to improve firmness.
Make the tread 18–36 inches wide, but add “pull-outs” in busy areas for passing. Avoid digging deep trenches, which collect water and become muddy.
3. Shaping Turns And Switchbacks
Turns should be gentle, not sharp. For switchbacks (tight turns on steep hills), build a wide platform. Use rocks or logs to support the edge. Bank the turn (“berm”) for smoother riding.
Advanced tip: Use natural terrain to create flowing turns. Avoid forced angles.
A good berm is packed with soil and shaped so water drains off the outside edge. For steep switchbacks, place large rocks (armoring) to prevent riders from cutting corners and causing erosion.
Flag tricky turns so volunteers know where to focus extra care. Sometimes, a small bench cut (flat area) helps riders make the turn safely.
4. Managing Drainage
Water is the enemy of trails. Poor drainage causes erosion and damage.
- Install drain dips or rolling grade dips: Small channels that divert water.
- Avoid building in low spots or along the fall line (straight down slope).
- Use rocks or logs to reinforce wet areas.
Non-obvious insight: It’s better to divert water above the trail than to fix drainage problems after they appear.
Add “water bars” (angled logs or rocks) in problem spots to force water off the trail. Monitor these features after rain and repair as needed.
If you must cross a small stream, use flat rocks or a simple boardwalk to keep riders above the water. Never dump soil into streams—it damages wildlife and can get you fined.
5. Adding Technical Features
Features like rocks, roots, logs, and jumps make trails exciting.
- Place features naturally, not as obstacles.
- For jumps, use dirt and shape carefully for safe landings.
- Build bridges or boardwalks over streams or wetlands.
Mistake to avoid: Overusing features. Too many technical spots can overwhelm beginners and require frequent repairs.
Test each feature with different bikes before opening the trail. Make sure there’s a “ride-around” (easy line) for less experienced riders. If you build drops or jumps, add clear signs warning riders in advance.
To keep features low-maintenance, use durable materials. For example, use rot-resistant wood for bridges and anchor rocks deeply in the soil so they don’t move.
6. Finishing Touches
After shaping, pack the tread with hand tools or a mechanical compactor. Remove loose rocks and debris. Install signs, markers, and safety warnings where needed.
Example: The “Flow Trail” in Santa Cruz uses compacted tread and clear signage to guide riders and prevent accidents.
Walk the trail one last time before opening. Look for sharp roots, hidden rocks, or low branches that could cause injury. Invite a few experienced riders to test the trail and give feedback.
If you plan a grand opening, organize a “trail day” with volunteers, snacks, and a group ride. This builds excitement and community support.
Sustainable Trail Building
A good single track trail lasts years. A poorly built trail washes out, erodes, or becomes unsafe within months. Sustainability is the key.
Building For Minimal Maintenance
- Use natural contours: Follow the land, not against it.
- Avoid steep grades: Keep slopes under 10%.
- Place drainage features every 50–100 feet.
- Compact soil to resist erosion.
Another tip: “Armoring” (lining with rocks) is great for wet spots or high-traffic areas. It costs more up front but saves hours of repairs later.
Also, design trails to “rest” during wet seasons. Some areas rotate open/closed trails to spread out wear and protect the land.
Native Materials Vs. Imports
Whenever possible, use native soil, rocks, and wood. Imported materials cost more and may not fit the environment.
Example: In Vermont, trails use local stone for armoring wet sections, reducing transport and blending into nature.
If you need to import gravel or wood, choose local suppliers and sustainable products. For bridges, rot-resistant wood (like cedar) lasts longer and requires less chemical treatment.
Volunteer And Community Involvement
Sustainable trails rely on community. Organize volunteer days, educate riders, and build a culture of respect.
- Engage local mountain bike clubs
- Involve landowners in planning
- Create trail stewards to monitor conditions
Non-obvious insight: Trails that are “owned” by the community last longer and get better care.
Offer training for volunteers so everyone learns best practices. Recognize their efforts with thank-you events or trail signs. Good relationships keep volunteers coming back.
| Trail Feature | Short-term Cost | Long-term Maintenance |
|---|---|---|
| Native soil tread | Low | Low |
| Gravel tread | Medium | Medium |
| Wood boardwalk | High | High (rot/repair) |
| Rock armoring | Medium | Low |
Trail Design Best Practices
Successful trail building combines creativity and proven methods. Here are key strategies:
Keep Grades Gentle
Steep trails erode quickly. Use gentle grades (under 10%) for climbs and descents. Switchbacks help manage steeper terrain.
On long climbs, add short flat sections (“grade reversals”) to give riders a break and slow water flow. Try to avoid long, straight uphills, as they tire riders and erode faster.
Use Natural Features
Let rocks, roots, and trees shape your trail. Avoid removing features unless they cause safety issues.
Experienced builders “read the land” to find fun lines. For example, a large boulder can become a roll-over or a rest spot. Roots can add challenge, but remove any that stick up sharply or point along the trail (which catch wheels).
Design For Flow
Flow means riders can move smoothly, without constant braking or pedaling. Use curves, rollers, and gentle transitions.
Example: The “Rogue Valley” trail system in Oregon uses flow design to attract both beginners and experts.
Test your design by walking or riding it at different speeds. If a turn feels awkward, adjust the berm or entry angle. Add optional lines for advanced riders—a small jump beside the main trail, for example.
Protect Sensitive Areas
Avoid wetlands, rare plant habitats, and animal nesting sites. If you must cross, use bridges or boardwalks.
Before building, mark sensitive spots on your map. If riders cut corners near these areas, add signs or rocks to keep them on the right line.
Plan For Future Expansion
Leave space for connecting loops or new features. Trails often grow as the community does.
Think about parking, rest areas, or beginner loops near the trailhead. Plan now so you don’t block future options.
Common Mistakes And How To Avoid Them
Even experienced builders make mistakes. Here are some frequent errors and tips to avoid them:
- Ignoring drainage: Never let water flow down the trail. Always divert it away.
- Building too wide: Keep single track narrow. Wide trails lose their challenge and natural feel.
- Straight lines: Straight trails encourage speed and erosion. Use curves for safety.
- Removing all obstacles: Leave some roots and rocks for challenge and character.
- Poor signage: Riders need clear direction, especially at junctions or hazards.
- Neglecting maintenance: Check trails often, fix problems early.
- Skipping permits: Always get legal approval before building.
- Overbuilding features: Too many jumps or drops can limit who uses the trail.
A less obvious mistake is ignoring the community. If neighbors or hikers feel left out, they may oppose your trail. Communicate clearly and involve them early to avoid conflicts.
Safety Considerations
Safety is essential for both builders and riders.
Construction Safety
- Wear gloves, eye protection, and sturdy boots.
- Use tools properly; get training if needed.
- Work in teams for heavy tasks.
Always check tools before use. Broken handles or dull blades can cause accidents. Take breaks for water and food, especially in hot weather.
Rider Safety
- Mark hazards with signs or paint.
- Clear sightlines on fast sections.
- Place warning signs at entrances and exits.
For night riding, encourage the use of lights and reflectors. Post emergency contacts at the trailhead.
Emergency Planning
Always have a first aid kit nearby. Know the location of the nearest hospital and emergency contacts.
Non-obvious insight: Share your trail location with local authorities and rescue teams. This speeds up help if accidents occur.
Practice calling for help so everyone knows the process. If cell service is poor, carry a whistle or two-way radio.

Credit: www.mprnews.org
Trail Maintenance
Maintenance keeps your trail safe and enjoyable. Even sustainable trails need regular care.
Routine Tasks
- Clear fallen branches and debris
- Check drainage features and repair as needed
- Compact tread after heavy rain
- Fix erosion quickly
Keep a simple logbook of trail work. This helps spot patterns, like which sections need the most repair.
Seasonal Issues
- Spring: Repair winter damage, clear mud
- Summer: Trim overgrowth, check for dry spots
- Fall: Remove leaves, prepare for winter
- Winter: Close trails if conditions are unsafe
Example: The “Pisgah” trails in North Carolina have scheduled maintenance days and volunteer teams.
After big storms, walk the trail to check for fallen trees or slides. In icy areas, close the trail to prevent rutting.
Advanced Trail Features
Once your basic single track is built, you can add advanced features.
Berms And Rollers
Berms are banked turns that let riders corner faster. Rollers are small hills for pumping or jumping.
- Build with compacted soil
- Shape carefully for safety
Add drainage beside berms so water doesn’t pool inside. Test rollers with different riders to ensure they’re safe for all skill levels.
Technical Obstacles
- Rock gardens: Place rocks for challenge
- Log rides: Install logs parallel to the trail
- Drops: Shape safe landings
Use non-slip surfaces on bridges and logs, especially in wet climates. For big features, add a bypass line for less skilled riders.
Trail Signs And Maps
Install signs for:
- Direction and navigation
- Skill level warnings
- Emergency info
Place trail maps at entry points for new riders.
Regularly check signs for damage or vandalism. Clear, simple signs prevent confusion and accidents.
Trail Building Costs
Building a single track trail can be affordable or expensive, depending on location, features, and materials.
Average costs (per mile):
- Basic hand-built single track: $5,000–$12,000
- Machine-built with advanced features: $15,000–$30,000
- Bridges or boardwalks: $2,500–$6,000 each
Volunteer labor reduces costs. Grants or sponsorships can help fund materials and equipment.
Remember hidden costs, like tool repairs, insurance, or trash removal. Plan a small budget for signs and emergency supplies.
| Trail Type | Cost per Mile | Maintenance Cost per Year |
|---|---|---|
| Hand-built single track | $5,000–$12,000 | $500–$1,500 |
| Machine-built single track | $15,000–$30,000 | $1,000–$2,500 |
| Boardwalk/bridge section | $2,500–$6,000 | $300–$800 |
Getting Community Support
A successful trail project is built on community support. Here’s how to build strong relationships:
- Host public meetings to share plans and get feedback.
- Partner with local mountain bike clubs and hiking groups.
- Work with landowners and managers.
- Offer volunteer opportunities.
- Share progress on social media.
Example: The “Cuyuna Lakes” trail in Minnesota was built with help from local businesses, volunteers, and city officials. The trail boosted tourism and local economy.
Offer “trail work days” where anyone can join, learn, and contribute. Celebrate milestones—like completing a bridge—with community events. Thank donors and volunteers publicly to build long-term support.
Ask for feedback after the trail opens. Listen to suggestions for improvements and keep communication open.
Credit: ambassadoradvertising.com
Evaluating Trail Success
Once your trail is open, measure its success:
- User numbers: Count riders or use trail counters.
- Rider feedback: Collect surveys or online reviews.
- Maintenance needs: Track repairs and costs.
- Environmental impact: Monitor erosion, wildlife, and plant health.
Use this data to improve future trails and report success to sponsors.
Invite local media to cover the opening. Positive news helps attract more volunteers and funding. Share updates and photos online so riders stay engaged.
Legal And Insurance Issues
Trail building involves legal risks. Protect your project with smart planning.
- Get written permission from landowners
- Secure permits from local agencies
- Consider liability insurance for volunteers and users
- Post signs about trail rules and risks
Check state and local laws. Some areas require formal agreements or insurance.
For more details on trail building standards, visit the IMBA Trail Building Guide.
Frequently Asked Questions
How Wide Should A Single Track Mountain Bike Trail Be?
A single track trail is usually 18–36 inches wide. This width allows one rider at a time and creates a technical experience. Wider trails lose the “single track” feel and may encourage erosion.
What Is The Best Soil Type For Trail Building?
Well-drained mineral soil is ideal. Avoid clay or sand, which can become slippery or loose. Compact the soil to resist erosion. If local soil is poor, use gravel or crushed stone in problem areas.
How Do I Get Permission To Build A Trail?
Contact the landowner or manager. For public land, reach out to government agencies or park departments. Provide a detailed plan and explain your benefits. Some areas require environmental reviews or permits.
What Is The Best Way To Prevent Erosion?
Use out-sloped tread, proper drainage features, and gentle grades. Divert water away from the trail. Avoid building straight up or down slopes. Maintain features regularly to fix small problems early.
Can I Build A Trail Alone, Or Do I Need A Team?
Small projects can be done solo, but larger trails require a team. Volunteers speed up work and help with heavy tasks. Teams also improve safety. Local mountain bike clubs are a great place to find helpers.
Building single track mountain bike trails is a rewarding challenge. You create spaces for adventure, connect people with nature, and leave a lasting impact. With careful planning, the right tools, and a focus on sustainability, your trail will become a favorite for years to come.
Remember to respect the environment, involve your community, and keep safety first. Each trail you build helps grow the sport and strengthens connections between riders, land, and local culture.

Hello Guys! I am John Reese, a professional biker and my hobby is biking! I have been biking for last 12 years and I love using bikes while outing as well. Based on my experiences with the different type of bikes (mountain bikes, road bikes and hybrid bikes); I am sharing my opinion about various bikes so that a beginner can get started right away. Happy reading!