Keeping your mountain bike forks clean is more than just about looks. Dirt, dust, and grime can cause serious damage to fork seals, reduce performance, and shorten fork life. A well-maintained fork gives you smoother rides, better control, and saves you money on repairs.
Many riders skip this step, thinking it’s complicated or not important—but regular fork cleaning is simple and gives big results. This guide shows you, step by step, how to clean mountain bike forks correctly, avoid common mistakes, and keep your fork working at its best.
Why Clean Mountain Bike Forks?
Mountain bike forks are exposed to mud, water, dust, and debris every ride. These elements stick to the fork legs and seals, making them dirty and sometimes sticky. Over time, this dirt causes:
- Seal wear: Dirt breaks down the rubber, causing leaks.
- Reduced suspension performance: Dirt makes the fork less responsive.
- Corrosion: Moisture and mud cause rust, especially on steel parts.
- Expensive repairs: Damaged seals and internals cost more to fix than regular cleaning.
A clean fork moves smoothly, keeps its seals working, and prevents grit from getting inside. If you ride often or in wet conditions, cleaning your fork is even more important.
Tools And Supplies Needed
Cleaning mountain bike forks doesn’t require fancy tools. You can do a good job with common items. Here’s what you’ll need:
- Clean rags: Old t-shirts or microfiber cloths work best.
- Soft brush: Toothbrush or paintbrush for small areas.
- Bucket of water
- Mild soap: Dish soap or bike-specific cleaner.
- Degreaser: For stubborn grease (avoid spraying on seals).
- Suspension-specific lubricant: For fork stanchions and seals.
- Plastic tire lever: To lift dust wipers gently (optional).
- Compressed air: For drying hard-to-reach areas (optional).
- Gloves: Protect your hands from chemicals.
Most riders already have these at home. If you’re missing something, bike shops sell cleaning kits made for forks and suspension parts.
Credit: www.corkicycles.com
Step-by-step Guide: Cleaning Mountain Bike Forks
You don’t need special mechanical skills to clean your forks. Just follow these steps carefully, and you’ll get professional results.
Step 1: Prepare Your Bike
- Place your bike in a stable position. If you have a bike stand, use it. Otherwise, lean the bike against a wall.
- Remove heavy dirt from the frame and wheels before focusing on the fork.
- Avoid spraying water directly at bearings or seals.
Step 2: Remove Loose Dirt
- Use a soft brush to knock off mud and dust from the fork’s outer legs.
- Pay extra attention to the area around the dust wipers (the rubber rings at the bottom of the stanchions).
- Don’t use high-pressure water; it can force dirt into the seals.
Step 3: Clean The Fork Stanchions
- Dip a clean rag in warm, soapy water.
- Wipe the stanchions (the shiny upper tubes) gently.
- Remove all visible dirt, oil, and debris.
- For sticky grime, use a small amount of degreaser—but never let it touch the seals.
Step 4: Clean Around The Dust Wipers
- The dust wipers keep grit out of the fork. Dirt often hides here.
- Gently pull the dust wiper up using your fingers or a plastic tire lever.
- Wipe underneath with a damp rag.
- If you see black, sticky oil, it’s normal. If it’s dry, your fork may need more lubrication.
Step 5: Lubricate The Seals
- Apply a few drops of suspension-specific lubricant to the stanchions.
- Cycle the fork up and down several times.
- Wipe off excess oil—too much collects more dirt.
Step 6: Dry And Inspect
- Use a dry cloth to remove any leftover moisture.
- Inspect the fork for scratches, dents, or leaking oil.
- If you notice damage, plan for a service soon.
Step 7: Reassemble And Test
- If you lifted the dust wipers, press them back into place.
- Bounce the bike to check fork movement.
- Listen for unusual noises or feel for sticky spots.
Frequency: How Often Should You Clean Forks?
How often you clean mountain bike forks depends on where and how you ride:
- After muddy rides: Clean forks immediately.
- Every 3–5 rides: If you mostly ride dry trails.
- Monthly: For casual riders.
- Before storage: Clean forks before storing the bike for weeks or months.
Frequent cleaning prevents dirt buildup and stops damage before it starts.
Deep Cleaning And Fork Service
Regular cleaning keeps forks healthy, but sometimes you need a deeper service. This involves removing the fork from the bike and opening it up for a full clean.
When To Deep Clean
- If you see oil leaks from the seals.
- Fork feels sticky or rough even after regular cleaning.
- You hear knocking or unusual noises.
- Every 50–100 hours of riding (check your fork’s manual for exact intervals).
What Deep Cleaning Involves
- Removing the fork from the bike.
- Taking off the lowers (outer legs).
- Cleaning inside the fork lowers and stanchions.
- Replacing old oil and cleaning seals.
- Reassembling and lubricating.
Most riders can do regular cleaning themselves. For deep cleaning, consider a bike shop unless you’re confident and have the right tools.
Common Mistakes To Avoid
Cleaning forks seems easy, but a few mistakes can cause problems. Here are some errors beginners make:
- Using high-pressure water: Forces dirt into seals and bearings.
- Scrubbing with hard brushes: Scratches fork stanchions.
- Ignoring the dust wipers: Dirt hides here and damages seals.
- Using wrong lubricants: Car oil or WD-40 attracts more dirt.
- Over-lubricating: Excess oil collects dust and causes sticky spots.
- Not drying properly: Moisture causes rust and corrosion.
- Skipping regular cleaning: Waiting until forks are very dirty means more damage.
Avoid these mistakes, and your fork will last longer.

Credit: www.youtube.com
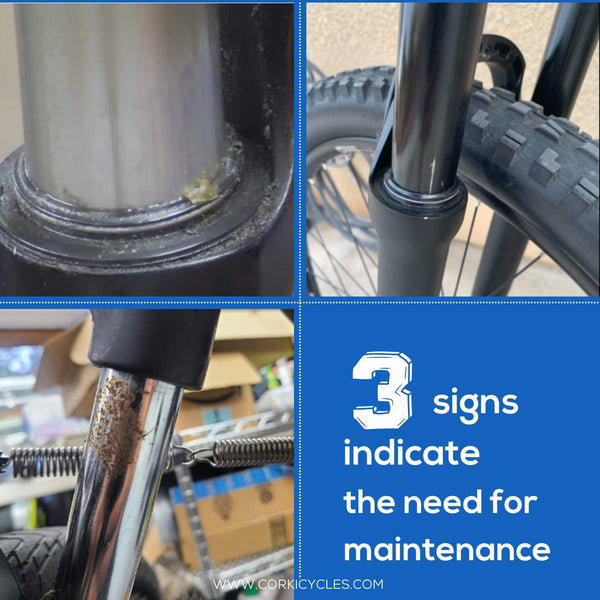
Signs Your Fork Needs More Than Cleaning
Sometimes cleaning alone isn’t enough. Watch for these signs:
- Oil leaking from seals
- Fork feels rough or sticky
- Visible scratches or dents
- Unusual noises during rides
- Stanchions show black marks or deep stains
If you see these, it’s time for a full fork service. Continuing to ride can cause expensive damage.
Table: Cleaning Methods Compared
Here’s a comparison of quick cleaning versus deep fork service:
| Cleaning Method | Tools Needed | Time Required | Skill Level | Benefits | When to Use |
|---|---|---|---|---|---|
| Quick Cleaning | Rags, brush, soap, lubricant | 15–30 minutes | Beginner | Removes surface dirt, prolongs fork life | Every 3–5 rides, after mud |
| Deep Fork Service | Special tools, new oil, seals | 1–2 hours | Intermediate/Expert | Restores performance, fixes leaks | Every 50–100 hours or signs of damage |
Table: Recommended Cleaning Products
Choosing the right products makes cleaning easier and safer. Here’s a comparison of popular options:
| Product | Type | Safe for Forks? | Ease of Use | Price Range |
|---|---|---|---|---|
| Dish Soap | Mild cleaner | Yes | Easy | $1–$5 |
| Bike-Specific Cleaner | Suspension safe | Yes | Very easy | $10–$20 |
| Degreaser | Heavy-duty | Yes (not on seals) | Easy | $5–$15 |
| WD-40 | General lubricant | No | Easy | $5–$10 |
| Suspension Lubricant | Fork safe | Yes | Easy | $10–$25 |
Table: Fork Types And Cleaning Tips
Different fork types need slightly different care. Here’s how to approach each:
| Fork Type | Main Material | Cleaning Frequency | Special Tips |
|---|---|---|---|
| Air Fork | Aluminum, magnesium | Every 3–5 rides | Check air pressure after cleaning |
| Coil Fork | Steel, aluminum | Every 3–5 rides | Lubricate coil area, avoid rust |
| Carbon Fork | Carbon fiber | Monthly | Use only mild soap, avoid abrasives |
Practical Tips For Better Results
Experienced riders know a few tricks that beginners often miss:
- Rotate the fork while cleaning: This lets you spot hidden dirt and scratches.
- Use a flashlight: Shine it around the seals and stanchions to find spots you missed.
- Warm up your bike: If possible, clean forks after a short ride—dirt is easier to remove when warm.
- Keep a cleaning log: Note when you last cleaned and serviced your fork. This helps avoid skipped maintenance.
- Check for play: Grab the fork legs and wiggle. Movement means loose bolts or worn bushings.
- Use separate rags: One for cleaning, one for drying, one for lubricating. This prevents cross-contamination.
How Fork Cleaning Improves Performance
Clean forks do more than look good. They improve your ride in ways you can feel:
- Smoother suspension: Dirt-free stanchions slide easily.
- Better control: Fork responds faster to bumps.
- Longer fork life: Clean seals last longer, saving money.
- Safer rides: Reduced risk of fork failure or sticking.
In a study by a leading bike magazine, forks cleaned regularly showed 30% longer seal life than those left dirty. Riders also reported fewer breakdowns and better handling, especially in wet conditions.
Cleaning Forks After Wet Or Muddy Rides
Wet and muddy rides require extra care. Here’s what to do:
- Rinse mud off as soon as possible, before it dries and hardens.
- Use a soft brush to remove sticky clumps.
- Pay special attention to the lower part of the fork, where mud collects.
- Dry thoroughly—moisture causes rust and corrosion.
- Lubricate after cleaning, since mud strips away oil.
If you ride in wet conditions often, consider cleaning your fork after every ride.
Cleaning Forks For Long-term Storage
If you plan to store your bike for a long time:
- Clean the fork completely.
- Dry all parts, especially inside and around seals.
- Lubricate stanchions lightly.
- Store the bike upright if possible, or hang it to prevent dust from settling.
- Cover the fork with a cloth or plastic to keep it clean.
Proper storage prevents dirt, dust, and moisture from damaging your fork while it’s not in use.
Fork Cleaning For Different Riding Styles
Your riding style affects how you clean your fork:
- Cross-country: Clean forks regularly, but focus on dust and light mud.
- Downhill: Forks get heavy mud and debris; clean after every ride.
- Trail/Enduro: Mixed conditions mean cleaning every 2–3 rides.
- Commuting: Less dirt, monthly cleaning is enough.
Adapt your cleaning schedule to your type of riding for best results.
Environmental Impact Of Fork Cleaning
Bike cleaning can be eco-friendly. Here’s how:
- Use biodegradable cleaners when possible.
- Avoid letting soap or oil run into drains or soil.
- Dispose of used rags and oil responsibly.
- Clean outside, but away from rivers or streams.
Many bike-specific cleaners are now eco-friendly, reducing harm to nature. It’s a small step, but helps keep trails and water clean.

Credit: www.corkicycles.com
Real-world Example: Cleaning A Fork After A Mud Race
Imagine you just finished a muddy mountain bike race. Your fork is covered in thick mud. Here’s how an experienced rider cleans up:
- Rinse with low-pressure water: Remove big chunks of mud.
- Brush away remaining dirt: Around stanchions and seals.
- Wipe with soapy rag: Clean stanchions, lowers, and crown.
- Lift dust wipers: Remove hidden grit, check for damage.
- Dry thoroughly: Use compressed air for tight spots.
- Lubricate and cycle fork: Restore smooth movement.
- Inspect for scratches or leaks: Plan for service if needed.
After this process, the fork works like new, ready for the next ride.
Advanced Fork Cleaning: Tips For Experienced Riders
If you’re comfortable with bike maintenance, you can go further:
- Remove the front wheel for easier access.
- Clean the fork crown and arch, where dirt collects.
- Check for loose bolts or cracks during cleaning.
- Use compressed air to dry seals and tight areas.
- Record fork serial number and cleaning dates for warranty and service.
These steps help maintain performance and catch problems early.
Safety Precautions
Cleaning forks is safe, but keep these tips in mind:
- Wear gloves to protect hands from cleaners.
- Avoid getting soap or oil in your eyes.
- Don’t use harsh chemicals near children or pets.
- Keep tools and lubricants away from food areas.
Safety protects you and your bike.
Cost Of Fork Cleaning Vs. Repairs
Cleaning forks is cheap compared to repairs. Here’s some data:
- Basic cleaning supplies: $10–$30 per year.
- Fork service at shop: $50–$150 per session.
- New fork seals: $20–$40.
- New fork (if damaged): $200–$1000+.
Regular cleaning saves money by preventing damage. Most riders spend less than $30 per year on supplies, but fork repairs can cost much more.
Fork Cleaning Myths
There are some common myths about fork cleaning. Let’s clear them up:
- Myth: Forks don’t need cleaning if you ride dry trails.
- Fact: Dust and grit still collect and damage seals.
- Myth: WD-40 is a good fork lubricant.
- Fact: It attracts dirt and can damage seals.
- Myth: High-pressure water is best for cleaning.
- Fact: It forces dirt into seals and bearings.
- Myth: Fork cleaning is only for experts.
- Fact: Anyone can do basic cleaning with simple tools.
How To Clean Mountain Bike Forks For Beginners
If you’re new to fork cleaning, start with these steps:
- Gather supplies: Rag, brush, mild soap, lubricant.
- Wipe down fork legs and stanchions.
- Clean around dust wipers gently.
- Lubricate stanchions.
- Dry and inspect for damage.
Don’t worry about perfection. The most important part is removing dirt and lubricating seals.
Troubleshooting: Problems After Cleaning
Sometimes issues appear after cleaning:
- Fork feels sticky: Too much or too little lubricant. Wipe excess, add a drop if needed.
- Oil leaking: Seal is worn or damaged. Plan for a shop service.
- Fork squeaks: Dry seals. Add suspension lubricant.
- Movement feels rough: Dirt still present. Clean again, focus on dust wipers.
If problems continue, seek help from a bike mechanic.
Professional Cleaning Vs. Diy
Should You Clean Your Fork Yourself Or Pay A Shop?
- DIY cleaning: Easy, cheap, convenient. Good for regular maintenance.
- Professional cleaning: More thorough, includes deep service. Best for repairs or annual service.
Most riders do regular cleaning themselves and visit shops for major service.
How Fork Cleaning Affects Resale Value
If you plan to sell your bike:
- A clean fork shows you cared for your bike.
- Buyers trust bikes with regular maintenance.
- Dirty or damaged forks lower resale value by 10–20%.
Keep records and photos of cleaning. It helps prove your bike’s good condition.
External Resource
For more details on fork maintenance and cleaning, visit Pinkbike’s Suspension Cleaning Guide.
Frequently Asked Questions
How Often Should I Clean My Mountain Bike Fork?
Clean your fork after every muddy ride, or every 3–5 rides in dry conditions. Monthly cleaning works for casual riders. Regular cleaning prevents dirt buildup and seal damage.
Can I Use Car Oil Or Wd-40 On My Fork?
No. Only use suspension-specific lubricants. Car oil and WD-40 attract dirt and can damage seals. Bike shops sell lubricants made for forks.
What’s The Best Way To Dry My Fork After Cleaning?
Use a clean, dry rag for the stanchions and lowers. Compressed air helps dry tight areas around seals and bolts. Make sure all moisture is gone to prevent rust.
How Do I Know If My Fork Needs A Full Service?
Look for oil leaks, rough movement, strange noises, or visible damage. If cleaning doesn’t fix these, your fork needs a deep service—usually at a bike shop.
Can I Clean My Fork Without Removing It From The Bike?
Yes. Most cleaning can be done with the fork on the bike. Only deep cleaning or repairs require fork removal. Regular cleaning keeps your fork healthy and saves money.
Cleaning your mountain bike fork is easy, quick, and pays off every ride. Proper care improves suspension performance, keeps your bike safe, and saves money. If you follow these steps and avoid common mistakes, your fork will work smoothly and last longer.
Don’t wait until your fork is dirty or damaged—make cleaning part of your routine, and enjoy every ride to the fullest.

Hello Guys! I am John Reese, a professional biker and my hobby is biking! I have been biking for last 12 years and I love using bikes while outing as well. Based on my experiences with the different type of bikes (mountain bikes, road bikes and hybrid bikes); I am sharing my opinion about various bikes so that a beginner can get started right away. Happy reading!