Removing mountain bike pedals may seem simple, but many riders struggle with it, especially the first time. Getting stuck, rounding bolts, or even damaging the crank arm is common. If you want to change pedals, upgrade, or service your bike, learning the right way to remove mountain bike pedals is essential.
This guide will walk you through every step, explain why pedals can be tricky, and give you practical tips to make the process smooth and safe.
Mountain bike pedals are built tough. They’re designed to withstand mud, water, and heavy use, but that also means they can get stuck or seize over time. With the right tools, a clear understanding of pedal threads, and a few expert tricks, you can remove even stubborn pedals without frustration.
Whether you’re a beginner or have some experience, this article will help you avoid mistakes and work confidently.
Why Removing Mountain Bike Pedals Can Be Difficult
Many riders underestimate pedal removal. At first glance, it looks like you just need to unscrew them. But pedals have unique threads, and they’re often installed tightly. Here are some reasons why it’s not always easy:
- Thread direction: One pedal turns clockwise to loosen; the other turns counter-clockwise. This is opposite from most bolts.
- Corrosion: Exposure to water and mud can cause pedals to rust or seize.
- Tight installation: Pedals are often installed firmly to prevent loosening during rides.
- Wrong tools: Using a regular wrench or the wrong size can damage the pedal or crank.
Pedals are attached with either a 15mm pedal wrench or a 6/8mm Allen key. Understanding which tool to use, and why, is a key step. Most mountain bikes have pedals with Allen key access from the back of the crank, but some still use flats for a pedal wrench.
Tools Needed For Pedal Removal
Before starting, gather the right tools. Having everything ready makes the job easier and prevents mistakes.
- 15mm pedal wrench (thin, designed for pedal flats)
- 6mm or 8mm Allen key (for pedals with hex fitting at the crank)
- Bike grease (for reinstallation)
- Rag or paper towel (for cleaning threads)
- Penetrating oil (optional, for stuck or rusty pedals)
- Gloves (optional, for grip and to keep hands clean)
Pedal wrenches are thinner than standard wrenches. This helps them fit between the pedal and crank arm. Using a regular adjustable wrench can slip and damage the pedal.
Understanding Pedal Thread Directions
One of the most important things to know: pedal threads are not the same on both sides.
- Right pedal (drive side): Unscrews counterclockwise (left to loosen)
- Left pedal (non-drive side): Unscrews clockwise (right to loosen)
This design prevents pedals from loosening during riding. Many beginners get confused and try to loosen the wrong way, which only tightens the pedal further.
A simple trick to remember: When standing next to your bike, both pedals loosen by turning toward the rear wheel.
| Pedal Side | Thread Direction | To Loosen |
|---|---|---|
| Right (Drive) | Right-hand (normal) | Counterclockwise |
| Left (Non-drive) | Left-hand (reverse) | Clockwise |
Step-by-step Guide: How To Remove Mountain Bike Pedals
Follow these steps carefully to remove pedals without damaging your bike.
1. Prepare Your Bike
Place your bike on a stable surface. A bike stand works best, but leaning against a wall is fine if you’re careful.
- Shift the chain to the largest chainring. This protects the crank arm and prevents accidental scratches.
- Clean the area around the pedals with a rag.
2. Identify Your Pedal Type
Look at the pedal axles. Do you see flats for a wrench, or an Allen key fitting at the end of the axle (inside the crank)?
- Use a pedal wrench for flat-sided pedals.
- Use a 6mm or 8mm Allen key for hex-fitting pedals.
3. Apply Penetrating Oil (if Needed)
If your pedals are old, rusty, or hard to turn, spray a small amount of penetrating oil at the pedal threads. Let it sit for 5–10 minutes. This can make removal much easier.
4. Position Yourself Correctly
Stand on the side of the bike you’re working on. Place the crank arm so it’s parallel to the ground. This gives you better leverage.
5. Remove The Right Pedal
- Insert your pedal wrench or Allen key.
- Turn counterclockwise (left) to loosen.
- If using an Allen key, insert it from the back of the crank and push down toward the rear wheel.
- Use steady, firm force. Don’t jerk or bang the tool.
6. Remove The Left Pedal
- Insert your tool.
- Turn clockwise (right) to loosen.
- Again, push toward the rear wheel.
- Once loose, continue unscrewing by hand.
7. Inspect Pedal Threads
When the pedal comes off, check the threads on both the pedal and crank. Look for signs of wear, rust, or damage. Clean with a rag.
8. Clean And Grease Threads
Before reinstalling pedals (or storing them), apply a thin layer of bike grease to the threads. This prevents future seizing and makes installation easier.
9. Store Or Replace Pedals
If you’re swapping pedals, align the threads carefully when installing new ones. Never force a pedal; cross-threading can ruin the crank arm.

Credit: www.youtube.com
Common Mistakes When Removing Pedals
Many riders make errors that can cause damage or injury. Here are the most frequent mistakes to avoid:
- Forgetting thread direction: Trying to loosen the wrong way can strip threads or tighten the pedal further.
- Using wrong tools: Standard wrenches are often too thick and slip off, damaging the flats.
- Applying too much force: Jerking or hitting the tool may damage the crank or pedal.
- Not using grease: Reinstalling pedals dry leads to seizing and makes removal hard next time.
- Cross-threading: Installing pedals at an angle can ruin threads permanently.
- Ignoring rust/corrosion: Removing pedals without cleaning can leave debris inside the threads.
If you make a mistake, stop and reassess. Forcing a stuck pedal can lead to expensive repairs.
Tips For Stuck Or Seized Pedals
If your pedals won’t budge, don’t panic. There are ways to loosen them safely:
- Penetrating oil: Apply generously and wait longer—overnight if needed.
- Extra leverage: Use a longer wrench or Allen key for more torque.
- Tap gently: Use a rubber mallet to tap the end of the tool (not the pedal itself).
- Heat: Warm the crank arm with a hair dryer to expand the metal and loosen threads.
- Professional help: If all else fails, visit a bike shop. They have specialized tools.
Never use a hammer directly on the pedal or crank. This can cause cracks or breakages.
Pedal Removal For Different Mountain Bike Pedals
Mountain bike pedals come in various styles. The removal process is similar, but there are small differences.
Flat Pedals
Most flat pedals have wrench flats and Allen key fittings. Removal is straightforward, but mud and debris can hide the flats.
- Clean around the pedal before removal.
- Use a pedal wrench, as Allen keys may not provide enough leverage.
Clipless Pedals
Clipless pedals (SPD, Crankbrothers, etc. ) Often require an Allen key. Their threads can seize up faster due to water exposure.
- Check for covers or dust caps.
- Use a 6mm or 8mm Allen key, inserted from the inside.
Hybrid Pedals
Hybrid pedals combine flat and clipless features. They may have both wrench flats and hex fittings.
- Choose the tool that gives best access.
- Clean both sides before starting.
How To Install Pedals After Removal
Installing pedals is as important as removal. Here’s a quick guide:
- Identify left and right pedals: They are marked “L” and “R.”
- Grease threads: Apply a thin layer.
- Align threads: Start slowly by hand. If it doesn’t turn easily, stop and realign.
- Tighten: Use your tool to snug the pedal. Don’t overtighten; about 30–40 Newton meters is standard.
- Check movement: Spin the pedal to ensure it turns freely.
A helpful tip: Thread pedals in by turning them toward the front wheel.
How To Maintain Pedals For Easy Removal
Regular maintenance prevents stuck pedals and makes future removal simple.
- Grease threads: Every time you install pedals.
- Inspect regularly: Look for rust or wear.
- Clean after muddy rides: Mud can trap moisture and cause corrosion.
- Check tightness: Pedals should be firm, but not overtightened.
- Replace washers: If your pedal uses washers, change them when worn.
With regular care, pedal removal becomes a quick, easy job.
Comparing Pedal Types And Removal Difficulty
Different pedals present unique challenges. Here’s a comparison:
| Pedal Type | Removal Tool | Difficulty | Common Issues |
|---|---|---|---|
| Flat Pedals | Pedal Wrench/Allen Key | Easy | Mud, hidden flats |
| Clipless Pedals | Allen Key | Medium | Corrosion, seized threads |
| Hybrid Pedals | Wrench/Allen Key | Medium | Access, mud |
Real-world Example: Removing Pedals On A Trail Ride
Imagine you’re out on a trail, and your pedal becomes loose or damaged. You need to remove it quickly.
- Carry a mini tool with a 6mm Allen key and a small pedal wrench.
- Find a flat spot to work.
- Follow the thread direction rule: Always loosen toward the rear wheel.
- If the pedal is muddy, clean as best as you can.
- If the pedal is stuck, don’t force it. Ride carefully until you can fix it with proper tools.
Many riders don’t carry the right tool. Having a small pedal wrench or Allen key in your bike kit can save the day.
Safety Precautions When Removing Pedals
Safety matters. Here are precautions to protect yourself and your bike:
- Wear gloves: Prevents slipping and protects hands from sharp edges.
- Secure the bike: Use a stand or stable wall.
- Use proper tools: Avoid improvising with pliers or adjustable wrenches.
- Apply force steadily: Sudden movements can cause injury.
- Check tool fit: Make sure your wrench or Allen key fits snugly.
If you’re unsure, ask an experienced mechanic or check reliable resources like Park Tool.
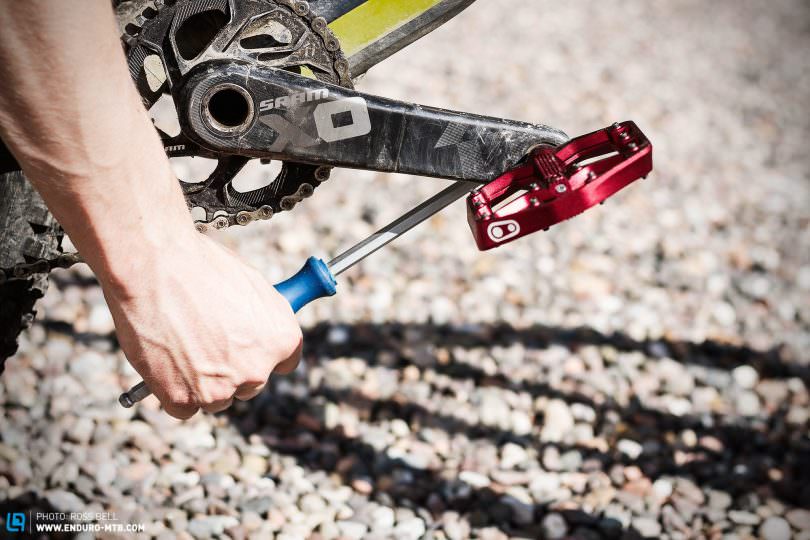
Credit: enduro-mtb.com
How Pedal Removal Affects Bike Performance
Removing and reinstalling pedals has a direct impact on your bike’s performance. Poor installation can cause:
- Pedal play: Loose pedals wobble and affect power transfer.
- Noise: Improperly greased or tightened pedals creak.
- Thread damage: Cross-threading can ruin crank arms, leading to costly repairs.
- Safety issues: A pedal falling off during a ride is dangerous.
Proper removal and installation keep your bike running smoothly.
Pedal Removal Data: How Often Should Pedals Be Removed?
Many riders ask how often they should remove pedals for maintenance. Here’s some data:
| Riding Type | Recommended Removal Interval | Reason |
|---|---|---|
| Casual Riding | Yearly | Prevent seizing |
| Muddy/Trail Riding | Every 3–6 months | Check for rust/corrosion |
| Bike Packing/Travel | Before every trip | Easy packing/shipping |
Removing pedals regularly keeps threads clean and makes future removals easier.
Non-obvious Insights For Easier Pedal Removal
Some tricks aren’t widely known but can make pedal removal much simpler:
- Use two tools: For stubborn pedals, use a wrench and Allen key together for extra grip.
- Rotate the crank: Position the crank arm so you can push down, using body weight rather than pulling up.
- Check for washers: Some pedals have washers between the pedal and crank. Remove these for easier access.
- Thread marking: Mark the threads with a colored marker before removal. This helps with alignment during installation.
- Avoid lubricants on plastic pedals: Some lubricants can degrade plastic, so use bike-specific grease.
These tips can save time and prevent frustration.
Environmental Impact: Why Grease Matters
Bike grease does more than prevent seizing. It also stops water and dirt from entering the threads, reducing corrosion. Greased threads make removal easier and protect your bike’s crank arms. For eco-friendly options, look for biodegradable bike grease.
When To Replace Pedals Instead Of Removing
Sometimes, removing pedals reveals damage or wear. Here’s how to know if you should replace pedals:
- Thread damage: If threads are stripped, pedals won’t install securely.
- Bearing play: Loose or rough pedal bearings affect performance.
- Cracked pedal body: Structural damage can cause accidents.
- Rust: Severe rust can weaken the pedal.
If you notice these issues, it’s safer to replace the pedals.
Frequently Asked Questions
How Do I Know Which Pedal Is Left Or Right?
Look for markings on the pedal axles: “L” for left, “R” for right. The left pedal threads are reversed, so always check before installing or removing.
What Should I Do If My Pedal Is Rusted And Won’t Move?
Apply penetrating oil and let it sit overnight. Use the correct tool and extra leverage. If it still won’t budge, visit a bike shop for professional help.
Can I Use A Regular Wrench Instead Of A Pedal Wrench?
A regular wrench is usually too thick and can damage the pedal or crank arm. Always use a pedal wrench or Allen key that fits your pedal properly.
How Tight Should Pedals Be When Installing?
Pedals should be snug, but not overtightened. About 30–40 Newton meters is standard. Over-tightening can damage threads or make removal difficult later.
Is It Safe To Ride With A Loose Pedal?
No, riding with a loose pedal is dangerous. It can cause falls, damage the crank arm, and lead to injury. Always fix or replace a loose pedal before riding.
Removing mountain bike pedals is a simple skill that can save time, money, and frustration. With the right tools, careful technique, and regular maintenance, you’ll find the process quick and easy. Remember to check thread direction, use proper tools, and apply grease each time.
This not only protects your bike but also keeps rides safe and enjoyable. Whether you’re upgrading pedals, traveling, or just maintaining your bike, knowing how to remove mountain bike pedals is a skill every rider should master.

Credit: www.youtube.com

Hello Guys! I am John Reese, a professional biker and my hobby is biking! I have been biking for last 12 years and I love using bikes while outing as well. Based on my experiences with the different type of bikes (mountain bikes, road bikes and hybrid bikes); I am sharing my opinion about various bikes so that a beginner can get started right away. Happy reading!