When you ride a mountain bike, tire sealant is your secret weapon against flats. It fills holes and keeps you rolling, even when sharp rocks or thorns try to stop you. But one big question always comes up: how much sealant do you need for mountain bike tires? The answer is not as simple as “just a little” or “as much as possible.” Getting the right amount means fewer flats, better performance, and less wasted money. Let’s break down everything you need to know, with clear advice and practical tips.
Why Tire Sealant Matters For Mountain Bikes
Mountain biking is tough on tires. Trails have sharp stones, sticks, and thorns that can cause punctures. Tubeless tire systems use sealant to close these holes quickly. Without enough sealant, you risk slow leaks or sudden flats. Too much sealant can cause messy build-up, add unnecessary weight, and even affect tire balance.
Sealant works by flowing to the puncture, mixing with air, and forming a rubber plug. This happens fast, usually in seconds. Most modern sealants are latex-based, but there are also fiber-based and foam-based options. The type you use can affect how much you need.
Key Factors That Decide Sealant Quantity
Choosing the right sealant amount isn’t just about following a chart. Several factors play a role:
- Tire volume: Larger tires need more sealant.
- Rim width: Wider rims can increase tire volume.
- Riding style: Aggressive riders may need extra protection.
- Trail conditions: Rocky or thorny trails require more sealant.
- Sealant type: Some brands are thicker or thinner.
- Climate: Hot, dry weather makes sealant dry faster.
Let’s look closer at these factors so you can decide what’s right for your bike.
Tire Size And Width
Mountain bikes have many tire sizes—common ones are 27.5”, 29”, and sometimes 26”. Tire width ranges from skinny 1.9” up to fat 2.6” or even 3” (plus tires). The bigger the tire, the more sealant you’ll need.
Rim Width
Wider rims stretch the tire, increasing its internal volume. This means you need more sealant than for the same tire on a narrow rim.
Riding Style
If you ride fast, jump, or hit rough trails, you’re more likely to puncture. You may want extra sealant for peace of mind.
Trail Conditions
Thorny, rocky, or root-filled trails are harder on tires. Riders in these areas often use more sealant.
Sealant Type
Some sealants are very fluid, others are thick with fibers or foam. Thicker sealants sometimes require a bit more to cover the tire fully.
Climate
In hot, dry climates, sealant dries out faster. You may need to check and top up more often.
How Much Sealant Do You Actually Need?
Most sealant brands give recommended amounts. These are a starting point, not a strict rule. Let’s look at typical recommendations:
| Tire Size | Recommended Sealant (per tire) | Notes |
|---|---|---|
| 26″ x 1.9–2.2″ | 60–80 ml (2–2.7 oz) | Older MTB tires, smaller volume |
| 27.5″ x 2.2–2.4″ | 70–100 ml (2.4–3.4 oz) | Modern trail tires |
| 29″ x 2.2–2.4″ | 90–120 ml (3–4 oz) | Larger volume tires |
| Plus/3.0″ | 120–150 ml (4–5 oz) | Fat and plus tires |
These numbers are from popular brands like Stan’s, Orange Seal, and Muc-Off. They fit most situations. For wider tires, or if you ride in extreme conditions, you may want to use the higher end of the range.
How To Measure And Add Sealant
Adding sealant is easy, but small mistakes can cause big problems. Here’s a step-by-step guide:
- Deflate tire: Let all air out.
- Break tire bead: Push tire away from rim to create a gap.
- Pour sealant: Use a syringe or squeeze bottle. Measure carefully.
- Re-seat tire: Fit tire back onto rim.
- Inflate: Pump to recommended pressure.
- Spin and shake: Rotate tire and shake to spread sealant.
For tubeless setups, it’s best to use a sealant injector. This tool helps you measure and add the exact amount, avoiding spills. If your valve has a removable core, you can inject sealant directly.
Practical Tip
Always check tire pressure after adding sealant. If it drops overnight, there may be a leak or not enough sealant.

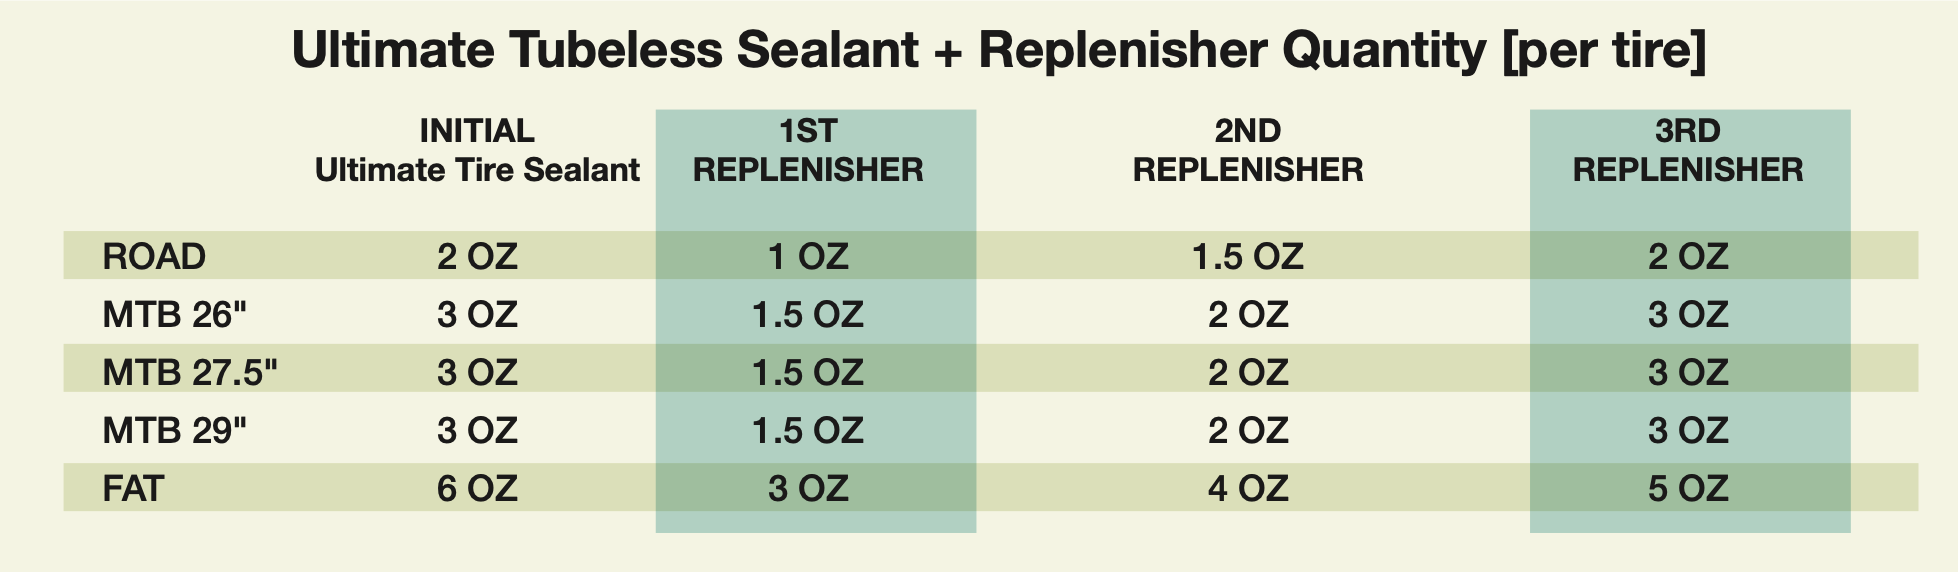
Credit: stans.com
Common Mistakes When Using Sealant
Even experienced riders make mistakes. Here are some to avoid:
- Too little sealant: Won’t seal punctures; leads to flats.
- Too much sealant: Makes tire heavy and messy.
- Wrong type of sealant: Some sealants dry fast, others can clog valves.
- Not checking regularly: Sealant dries out over time; check every 2–3 months.
- Using old sealant: Sealant can separate or lose effectiveness.
One insight many beginners miss: sealant doesn’t last forever. It dries out, especially in hot climates or after many rides. Always check and top up.
How Often Should You Check And Refill Sealant?
Sealant isn’t a “set and forget” solution. It needs maintenance. Most brands recommend checking every 2–4 months. In dry or hot areas, check every month.
If you ride daily or on rough trails, check more often. Signs your sealant is low:
- Tire won’t seal after a puncture.
- You hear liquid sloshing less than before.
- Tire loses air overnight.
Refilling Sealant
To refill, repeat the steps above. It’s best to remove old, dried sealant if you can. This keeps your tire clean and avoids clumps.
Does Tire Sealant Add Weight?
Yes, but it’s small compared to the benefits. A typical dose adds 60–150 grams (2–5 oz) per tire. For most riders, this is not noticeable. If you race, you might aim for the lowest effective amount.
| Sealant Amount | Approximate Weight | Effect on Ride |
|---|---|---|
| 60 ml (2 oz) | 60 g (2 oz) | Light, minimal effect |
| 120 ml (4 oz) | 120 g (4 oz) | Better protection, slightly heavier |
| 150 ml (5 oz) | 150 g (5 oz) | Maximum protection, noticeable for racers |
One non-obvious insight: too much sealant can affect tire balance. If you feel a wobble, check for clumps or excess sealant.
Choosing The Right Sealant Brand And Type
Different brands and types matter. Here’s what to look for:
- Latex-based: Most common, seals fast, dries in 2–6 months.
- Fiber-based: Contains tiny fibers, seals bigger holes, lasts longer.
- Foam-based: Newer, fills holes quickly, but can be harder to clean.
Some brands offer “race” versions that seal faster but may dry out sooner. Others have formulas for extreme temperatures.
Popular Brands
- Stan’s NoTubes: Reliable, works well for most riders.
- Orange Seal: Seals large holes, lasts longer.
- Muc-Off: Good for cold climates, easy to clean.
- Effetto Mariposa: Fiber-rich, seals wide punctures.
| Brand | Sealant Type | Recommended Use | Longevity |
|---|---|---|---|
| Stan’s NoTubes | Latex | General MTB, racing | 2–6 months |
| Orange Seal | Fiber/Latex | Rough trails, large holes | 3–6 months |
| Muc-Off | Latex | Cold climates | 2–4 months |
| Effetto Mariposa | Fiber | Wide tires, big punctures | 4–8 months |
Choose based on your riding style, climate, and tire size. If you ride in extreme heat or cold, pick a formula that suits the conditions.
Special Considerations For Plus And Fat Tires
Plus tires (2. 8”–3. 0”) and fat tires (3. 8”+) have much higher volume. They need more sealant, sometimes up to 150 ml (5 oz) per tire. This extra volume helps seal large punctures that are more likely with wider tires.
Tip: For fat bikes, check sealant every 2 months, as the larger volume can dry out faster.
How To Clean Up Old Sealant
Old sealant turns into rubbery clumps. To clean:
- Remove tire from rim.
- Scrape out dry sealant with a plastic tool.
- Wash with water and mild soap.
- Dry before adding new sealant.
Avoid metal tools—they can damage the tire or rim.
Signs You Need More Sealant
Sometimes, you don’t realize sealant is low until you get a flat. Look for these signs:
- Tire loses air quickly after a puncture.
- No liquid sloshing sound when you spin the wheel.
- Visible dry spots inside the tire.
If you see these, add more sealant right away.
How To Extend Sealant Life
Sealant dries out, but you can slow this down:
- Store bike out of extreme heat.
- Keep tires inflated to recommended pressure.
- Use sealant designed for long life.
- Shake wheels every few weeks if bike is stored.
One beginner mistake: forgetting to check tires for months. Set a reminder to check every 2–3 months.

Credit: www.youtube.com
What Happens If You Use Too Much Sealant?
It’s tempting to add extra “just in case.” But too much sealant can:
- Make tire heavy and sluggish.
- Cause messy leaks inside the rim.
- Affect tire balance and handling.
- Lead to clumping, making future cleaning harder.
Always stick to the recommended range. If you’re unsure, start with the lower end and add more if needed.
How To Tell If Sealant Is Working
After adding sealant, you want to know it’s doing its job. Here’s how:
- Ride for a few miles. If you get a small puncture, sealant should close it fast.
- Check tire pressure daily for a week. If it holds steady, sealant is sealing small leaks.
- Spin the wheel and listen. A sloshing sound means there’s enough liquid inside.
If you get a large puncture and sealant doesn’t seal it, you may need more, or your sealant is old.
Sealant For Tubeless Vs. Tube Systems
Most mountain bikers use tubeless tires, but you can add sealant to inner tubes too. For tubes, use about half the amount recommended for tubeless—usually 30–50 ml (1–1.7 oz). Tube sealant is a quick fix but not as reliable as tubeless.
Using Sealant With Tire Inserts
Some riders use tire inserts for extra protection. Inserts take up space, so you need less sealant—usually 20–30% less than standard. Always check the insert brand’s guidelines.
How To Store And Handle Sealant
Sealant lasts longer if you store it right:
- Keep bottles in cool, dry place.
- Shake before use.
- Don’t use expired sealant (check dates).
Avoid freezing or leaving in hot cars.
Real-world Examples
Let’s see how real riders handle sealant:
- Sarah, 29” x 2.4” tires: Uses 100 ml per tire, checks every 3 months.
- Mike, fat bike: Uses 150 ml, checks monthly. Switched to fiber-based sealant for bigger holes.
- Jenny, 27.5” x 2.2” tires: Uses 80 ml, rides in dry climate, tops up every 2 months.
Many riders learn the hard way that not enough sealant means more punctures. Checking regularly saves time and money.
Credit: bikerumor.com
Environmental Impact And Disposal
Sealant is mostly latex and water, but some have chemicals. When disposing old sealant, avoid pouring it into drains. Instead:
- Scrape out clumps and throw in trash.
- Rinse tires with water, let dry.
- Recycle bottles if possible.
Newer sealants are more eco-friendly, but always follow local guidelines.
Frequently Asked Questions
How Do I Know If My Tire Has Enough Sealant?
Spin your tire and listen for liquid sloshing. If you don’t hear it, or tire loses air after a puncture, add more sealant. For exact amounts, remove the tire and check inside.
Can I Mix Different Sealant Brands?
It’s best not to mix brands. Formulas can react and become less effective. If switching brands, clean out old sealant first.
How Long Does Tire Sealant Last?
Most sealants last 2–6 months. In hot climates, it can dry out faster. Check every 2–3 months and add more if needed.
What’s The Best Sealant For Extreme Conditions?
For rocky or thorny trails, use fiber-based sealants like Orange Seal or Effetto Mariposa. For cold weather, Muc-Off works well.
Will Adding More Sealant Prevent All Flats?
No sealant stops every flat. It works for small to medium punctures. Large cuts or sidewall damage may require a patch or new tire.
Mountain bike tire sealant is a simple tool that offers big protection. Getting the right amount is key—too little won’t seal, too much causes problems. For most riders, 70–120 ml per tire is enough. Check your tires often, and choose a sealant that matches your trails and climate. A little planning keeps you rolling longer, with fewer flats and more fun. For more technical details on tubeless systems, visit Wikipedia. With these tips, you’re ready to ride with confidence.

Hello Guys! I am John Reese, a professional biker and my hobby is biking! I have been biking for last 12 years and I love using bikes while outing as well. Based on my experiences with the different type of bikes (mountain bikes, road bikes and hybrid bikes); I am sharing my opinion about various bikes so that a beginner can get started right away. Happy reading!