Whipping a mountain bike is more than just a flashy move you see in videos. It’s a skill that adds style, control, and even safety when you’re in the air. Many riders want to learn it because it looks cool, but they don’t realize how much it can help with balance and landing on jumps.
If you’re curious about how to whip a mountain bike, or you’ve tried but can’t get your bike sideways, this guide will walk you through everything—step by step, with real tips, common mistakes, and clear explanations.
Whipping isn’t just for professionals. Riders at any skill level can start learning. Understanding the technique will also help you feel more confident in the air, and make jumps safer. Let’s break down what whipping is, why it matters, and how you can master it—even if you’re new to jumping.
What Is A Whip In Mountain Biking?
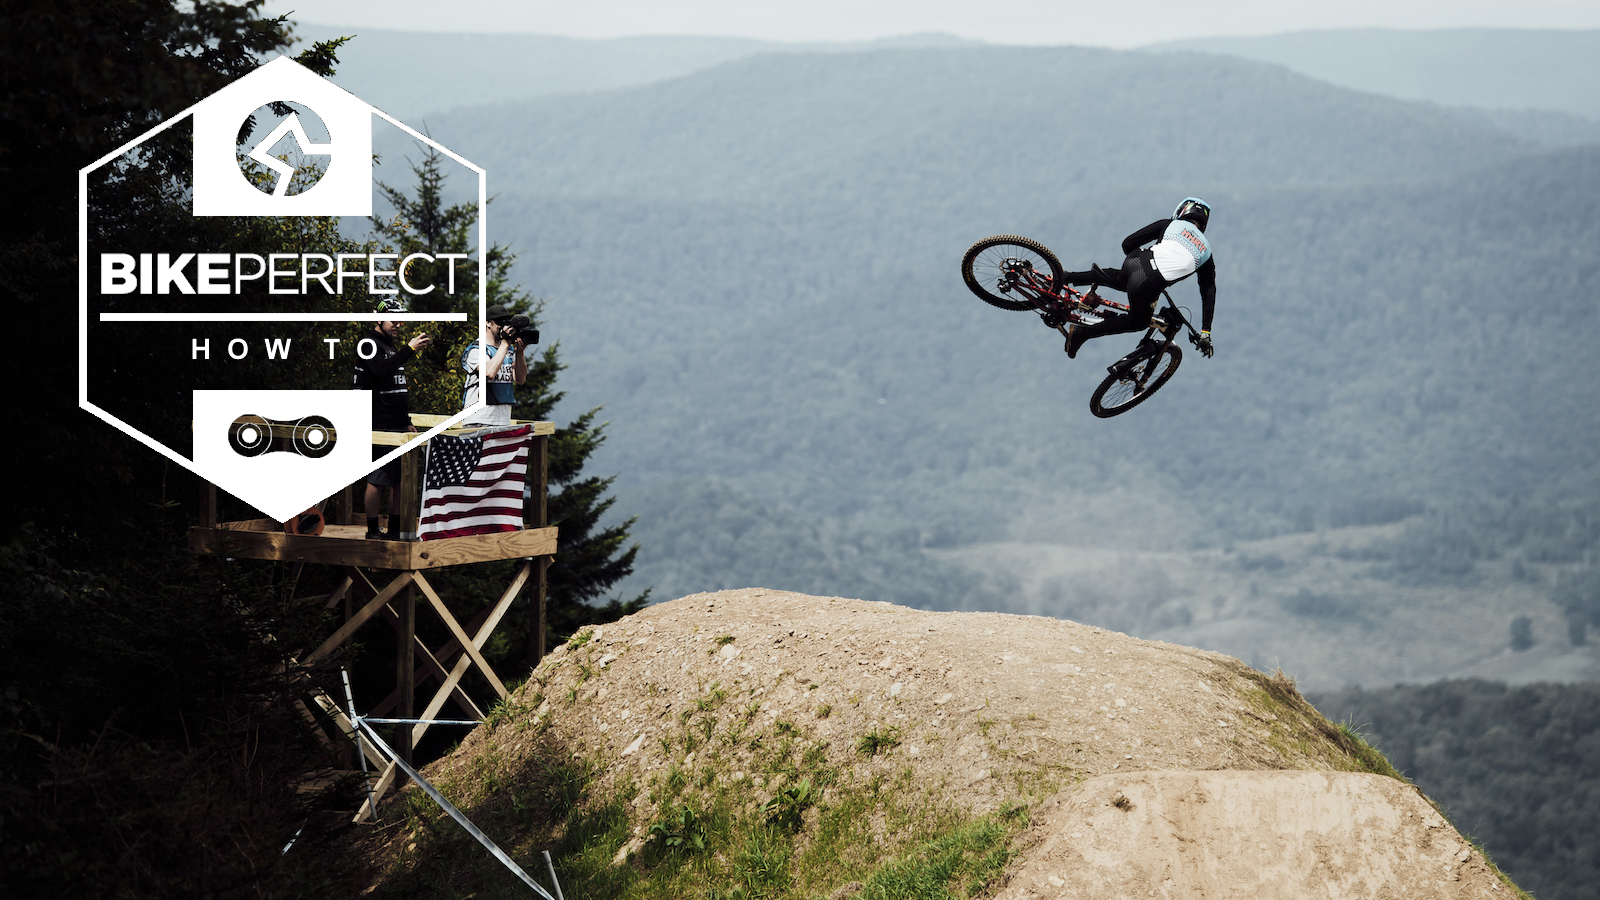
A whip is when you turn your bike sideways in the air, often on a jump, then bring it back straight before landing. It’s a stylish move, but also a practical one. Whips aren’t just for show—they help you adjust your line, avoid obstacles, and control your landing. Some riders whip just a little, while others twist their bikes almost sideways.
There are different styles of whips:
- Moto whip: The rear wheel swings out, and the front follows.
- Tabletop whip: The bike turns sideways and tilts flat, almost like a table.
- Euro whip: A combination of a whip and a tabletop.
Whipping is popular in downhill, enduro, freeride, and dirt jumping. It shows skill and confidence, but it starts with understanding the basics.
Why Learn To Whip?
Many riders want to whip just because it looks good, but there’s more to it. Here’s why learning to whip is valuable:
- Better air control: Whipping helps you line up with the trail and adjust your landing angle.
- Avoiding obstacles: You can steer your bike away from rocks or ruts as you land.
- Building confidence: Mastering whips means you’re comfortable in the air, making all jumps easier.
- Style points: Whips are a way to express your own style and progress as a rider.
- Safer landings: Bringing the bike back straight helps you land smoother and with less risk.
Many pros use whips not just for fun, but because they make riding more controlled and adaptive.
Essential Skills Before You Start
Before you try to whip, you need to be comfortable with some basic bike skills. If you skip these, whipping will feel awkward or even dangerous.
- Jumping: You should be able to clear small to medium jumps and land smoothly.
- Bunny hopping: This helps you understand how to move your bike in the air.
- Body positioning: Knowing how to move your weight forward and backward is key.
- Bike handling: You should feel in control when turning and shifting your bike.
If you’re not confident with these, work on them first. Trying to whip too early is a common mistake that leads to crashes or frustration.
Choosing The Right Jump
Not every jump is good for practicing whips. Picking the right one will make learning much easier and safer.
What To Look For
- Tabletop jumps: These are best for learning, because they’re wide and flat on top. If you mess up, you land on flat, not a steep gap.
- Smooth takeoff: A clean, even lip helps you control the whip.
- Safe landing: Pick a jump with a gentle downslope.
What To Avoid
- Steep lips: These can send you too high, making it hard to control your bike.
- Gaps: Don’t practice whips on gap jumps until you’re confident.
- Crowded trails: You need space in case you fall or swerve.
Most bike parks have table jumps perfect for learning. Start small, and only move to bigger jumps as you get better.

Credit: www.youtube.com
The Mechanics Of A Whip
Understanding what happens during a whip helps you learn faster and safer. Here’s what’s going on, step by step.
The Three Phases Of A Whip
- Takeoff: You leave the jump and start turning the bike sideways.
- Mid-air: You hold the sideways position, controlling the angle.
- Return and landing: You bring the bike back straight, ready to land.
Timing and body movement are everything. Most mistakes happen because the whip is started too late, or the rider can’t bring the bike back in time.
Let’s look at each phase more closely.
Step-by-step: How To Whip A Mountain Bike
Learning to whip takes practice and patience. Here’s a clear, step-by-step process to help you get started.
1. Set Up Your Approach
- Ride at a comfortable speed. Too slow and you won’t get enough air; too fast and you’ll be out of control.
- Stay relaxed. Keep your knees and elbows slightly bent.
- Look ahead, not at your front wheel.
2. Take Off From The Jump
- As you reach the lip, compress your bike (push down), then extend your legs and arms as you pop off.
- Pick a direction for your whip (most riders whip to their left or right, but start with your preferred side).
- As you leave the lip, shift your hips slightly toward your chosen side.
3. Initiate The Whip
- As your front wheel leaves the jump, push your bars sideways (left or right).
- At the same time, use your hips to twist the rear of your bike in the same direction.
- Your arms guide the front wheel, your hips and legs control the rear.
4. Hold And Control The Whip
- In mid-air, keep your body relaxed.
- Don’t force the bike—let it follow the motion you started.
- Spot your landing as soon as you can.
5. Bring The Bike Back
- As you reach the peak of your jump, pull the bars back toward straight.
- Use your hips to bring the rear wheel in line.
- Get the bike straight before the tires touch down.
6. Land Smoothly
- Absorb the landing with your arms and legs.
- Keep your weight centered.
- Stay loose—don’t stiffen up.
Pro tip: The key is to start small. At first, your whips will be tiny, just a few inches of movement. That’s good! As you get better, you can whip further.

Credit: www.youtube.com
Common Mistakes And How To Fix Them
Many riders struggle with whips because of these errors. Here’s what to watch for, and how to correct them.
1. Over-rotating
- Problem: The bike gets too sideways and you can’t bring it back.
- Fix: Start with small whips. Focus on bringing the bike back before you land.
2. Not Using Hips
- Problem: Only the handlebars move, but the rear stays straight.
- Fix: Use your hips and legs to twist the bike—not just your arms.
3. Too Late Or Early
- Problem: Whip is started too late (after you’re already in the air) or too early (before you leave the jump).
- Fix: Time the whip so you start as your front wheel leaves the lip.
4. Stiff Body
- Problem: Tension in arms and legs makes it hard to move the bike.
- Fix: Stay relaxed. Practice loose, controlled movements.
5. Not Spotting Landing
- Problem: Focusing only on the whip, not where you’ll land.
- Fix: Always look ahead to your landing spot.
Most beginners make at least one of these mistakes. Don’t get discouraged—each session you’ll improve.
Progression: How To Get Better At Whipping
You can speed up your progress with smart practice. Here’s how:
Start Small, Build Up
Begin with tiny whips on small table jumps. As you get comfortable, increase the angle bit by bit. Don’t rush to big jumps.
Use Video Feedback
Have a friend film your attempts. Watching the replay helps you spot what you’re doing right or wrong.
Practice On Flat Ground
You can practice the twisting motion on flat ground. Stand still, lift your front wheel, and twist the bars and hips. This builds muscle memory.
Try Pump Tracks
Pump tracks teach you how to move your bike side-to-side safely. This helps with the whip motion.
Set Goals
Set a clear goal for each session, like “today I’ll whip a little further” or “I’ll focus on bringing the bike back straight. ”
Rest And Recover
Whipping is hard on your body. Don’t do too many jumps in one session—quality is better than quantity.
Credit: www.bikeperfect.com
Equipment Tips: Setting Up Your Bike For Whipping
Your bike setup can make whipping easier. Here’s what to consider:
Tire Pressure
- Lower pressure (within safe limits) gives more grip on the takeoff and landing.
Handlebar Width
- Wider bars give more leverage for the whip motion.
Suspension
- Slightly firmer suspension helps the bike pop off the lip, making it easier to control in the air.
Pedals
- Flat pedals are best for learning, as you can move your feet if needed.
Frame Size
- A shorter bike is easier to whip, but you can whip any modern mountain bike with practice.
Here’s a quick comparison of how bike setup can affect whipping:
| Bike Setup | Easy to Whip? | Notes |
|---|---|---|
| Short frame | Yes | More agile in the air |
| Long frame | Harder | Stable, but slower to rotate |
| Flat pedals | Yes | Easy to move feet |
| Clipless pedals | Challenging | Hard to adjust foot position |
You don’t need a special bike to whip, but small adjustments can help.
Safety Tips For Practicing Whips
Whipping is fun, but like any jump, it carries risks. Stay safe with these tips:
- Always wear a helmet. Full-face for bigger jumps.
- Use gloves and pads (knee and elbow).
- Check the jump for rocks or wet spots.
- Ride with a friend, especially when trying new tricks.
- Warm up with easier jumps before trying whips.
- If you crash, stop and check yourself and your bike before continuing.
Most injuries happen when riders push too far, too fast. Take your time.
How Whipping Improves Your Riding
Whipping is more than a style move. It teaches you important mountain bike skills:
- Bike-body separation: You learn to move the bike under you, not just ride stiffly.
- Air awareness: You’ll feel comfortable in the air, not just “hanging on.”
- Line correction: If you’re off-line, a whip can bring you back to the safe landing.
- Quick reactions: The whip-and-return motion trains your reflexes for other tricks.
Many pros say learning to whip made them better riders overall—not just better jumpers.
Advanced Whip Techniques
Once you master the basic whip, you can try more advanced versions:
Opposite Whip
Try whipping to your non-dominant side. This builds control and balance.
Tabletop Whip
Add a tilt to your whip, flattening the bike in the air. This is harder, but looks stylish.
Full Moto Whip
Go for a big, rear-wheel-out whip—this takes time and confidence. Start small.
Combo Tricks
Combine a whip with other tricks, like a bar turn or a small tabletop.
Here’s a quick comparison of whip styles:
| Whip Style | Difficulty | Best For |
|---|---|---|
| Basic Whip | Easy | All riders |
| Tabletop Whip | Medium | Freeride, style points |
| Moto Whip | Hard | Downhill, advanced jumps |
| Opposite Whip | Challenging | Advanced control |
Don’t rush to advanced whips. Master the basics first.
Non-obvious Insights For Better Whips
Most guides cover the basics, but here are two things beginners often miss:
- Foot Position Matters: If your lead foot is slightly forward on the pedal, it can help you twist the bike more easily. Experiment with foot placement to find what feels best.
- Eyes Lead the Whip: Your head and eyes guide your body. If you look in the direction of your whip (sideways, not just forward), your body follows naturally. Many beginners keep looking straight, which makes the motion stiff.
Remember, style comes from comfort. Watch videos of pro riders and notice how relaxed they look—even on big jumps. That’s what you’re aiming for.
How Long Does It Take To Learn To Whip?
Learning to whip is different for everyone. Most riders see progress in a few weeks if they practice regularly. Here’s a rough timeline:
- First session: Tiny whips, just a few inches.
- After 5–10 sessions: Confident, smooth small whips on table jumps.
- After 20+ sessions: Medium whips, starting to try on bigger jumps.
Some riders learn faster, others need more time. Don’t compare your progress—focus on your own journey.
When To Move To Bigger Jumps
Stay on small jumps until you can whip and bring the bike back every time. Signs you’re ready:
- You land straight, not sideways, every time.
- You feel in control, not just “lucky.”
- You can adjust the whip angle on purpose.
Only then should you try bigger jumps or gaps. Rushing to big jumps before you’re ready is dangerous.
Where To Watch And Learn
Watching skilled riders can help you learn faster. Here are some good sources:
- Bike parks and local trails: Watch local riders and ask questions—they often share tips.
- YouTube: Search for “how to whip a mountain bike” for slow-motion guides.
- Pro events: Watch competitions like Red Bull Rampage for top-level whips.
Analyzing videos frame by frame shows you timing, body position, and return motions. If you want more, check out Pinkbike for tutorials and rider forums.
Frequently Asked Questions
How Do I Know If I’m Ready To Try Whips?
If you can jump and land safely, and you’re comfortable moving your bike in the air (bunny hops, turning), you’re ready to try small whips. Don’t rush—start small.
Can I Whip Any Mountain Bike?
Yes, you can whip most mountain bikes—hardtails, full suspension, and even dirt jumpers. Shorter bikes are easier, but with practice, you can whip any modern trail or enduro bike.
Is Whipping Dangerous?
Whipping carries risks, like any jump. If you practice on safe table jumps, wear pads, and don’t push too far too fast, it’s low risk. Always ride within your limits.
Does Bike Setup Really Matter For Whips?
Bike setup helps, but it’s not everything. Flat pedals and a short frame help, but skill is more important. Focus on your technique first, then fine-tune your bike if needed.
Why Can’t I Get My Rear Wheel Out?
Usually, the problem is not twisting your hips enough, or being too stiff. Practice on flat ground, work on relaxing, and focus on moving your hips—not just your arms.
Learning to whip a mountain bike is a journey, not a race. Every session builds your skill, confidence, and style. Start small, stay patient, and enjoy the process—soon, you’ll be whipping with confidence and adding your own flair to every jump.

Hello Guys! I am John Reese, a professional biker and my hobby is biking! I have been biking for last 12 years and I love using bikes while outing as well. Based on my experiences with the different type of bikes (mountain bikes, road bikes and hybrid bikes); I am sharing my opinion about various bikes so that a beginner can get started right away. Happy reading!