Adjusting your mountain bike brakes is one of those skills that makes riding safer, smoother, and more enjoyable. Whether you’re speeding down a trail or simply commuting, properly tuned brakes help you control your bike and avoid accidents. Many riders think brake adjustment is difficult, but with the right steps, it’s straightforward.
This guide will show you how to adjust brakes on a mountain bike, helping you ride with confidence. We’ll cover both rim and disc brakes, explain how to spot issues, and give practical tips for troubleshooting. If you’re new to bike maintenance, you’ll find clear explanations and simple steps.
If you’re experienced, you’ll discover useful details and common mistakes to avoid.
Why Brake Adjustment Matters
Brakes control your speed and keep you safe. If your brakes aren’t working well, you risk losing control or damaging your bike. Properly adjusted brakes:
- Stop your bike quickly and safely
- Prevent brake pads from wearing out too fast
- Reduce noise and vibration
- Make riding more comfortable
A study by the National Highway Traffic Safety Administration showed that poor brake maintenance is a major cause of bike accidents. Even small issues can make a big difference. For mountain bikes, which face rough terrain and steep hills, reliable brakes are essential.
Types Of Mountain Bike Brakes
Understanding your bike’s brake type is the first step. Mountain bikes usually have rim brakes or disc brakes.
| Brake Type | How It Works | Common Features |
|---|---|---|
| Rim Brakes | Brake pads press against the wheel rim | Lightweight, easy to adjust, lower cost |
| Disc Brakes | Brake pads clamp onto a metal disc (rotor) | Stronger braking, better in wet/muddy conditions, more complex |
Most modern mountain bikes use disc brakes, but rim brakes are still common on entry-level models. Each type has a unique adjustment process. Before you start, check which type your bike has.
Tools You Need
You don’t need special equipment, but a few basic tools help. For both rim and disc brakes, gather:
- Allen wrench set (usually 4mm or 5mm)
- Screwdriver (Phillips or flathead)
- Needle-nose pliers
- Bike lubricant
- Clean rag
- Torx wrench (for some disc brakes)
Having the right tools saves time and avoids damage. If you have hydraulic disc brakes, you may need a bleed kit for advanced maintenance, but most adjustments can be done with simple tools.
Checking Your Brake Condition
Before adjusting, inspect your brakes. Look for:
- Pad wear: Are the brake pads thin or uneven?
- Cable tension: Is there slack or fraying?
- Rotor/rim alignment: Does the rotor or rim wobble?
- Lever feel: Does the lever pull too far or feel loose?
If you spot rust, excessive dirt, or missing parts, clean and repair before adjusting. Many beginners miss pad wear—if pads are less than 3mm thick, replace them. Also, check for noises like squealing or grinding. These often signal misalignment or dirt.
How To Adjust Rim Brakes
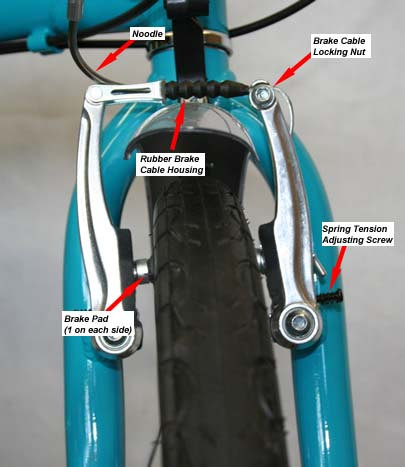
Rim brakes (like V-brakes or cantilever brakes) are popular for their simplicity. Here’s how to adjust them step by step.
1. Check Pad Position
Make sure the brake pads touch the rim evenly when you squeeze the lever. They should not rub the tire or miss the rim.
- Loosen the pad bolt with your Allen wrench.
- Align the pad so it hits the rim center.
- Tighten the bolt gently.
Tip: The pad should be slightly “toed-in”—the front edge closer to the rim than the back. This reduces squealing.
2. Adjust Cable Tension
If the lever feels loose, increase tension.
- Locate the barrel adjuster near the brake lever or caliper.
- Turn it counterclockwise to tighten the cable.
- Squeeze the lever and check the feel.
If the barrel adjuster isn’t enough, loosen the cable anchor bolt, pull the cable tighter, and retighten.
3. Center The Brake Arms
Uneven brake arms cause one pad to rub. Center them by:
- Loosening the mounting bolt on each arm.
- Adjusting the spring tension screw (often a small Phillips screw).
- Tighten the bolt when arms are balanced.
4. Test And Fine-tune
Spin the wheel and squeeze the lever. Both pads should touch the rim at the same time. The wheel should spin freely when not braking.
Common mistake: Many riders forget to check brake lever reach. If your hands are small, adjust the lever closer using the reach adjustment screw.
How To Adjust Mechanical Disc Brakes
Mechanical disc brakes use cables, making them simpler than hydraulic systems. Here’s the adjustment process.
1. Inspect Rotor And Pads
Look at the rotor (the metal disc) and pads.
- Is the rotor bent or dirty?
- Are pads thick enough (more than 3mm)?
Clean the rotor with rubbing alcohol if dirty. Replace pads if worn.
2. Adjust Pad Position
Disc brake calipers often have two pads: one moves, one is fixed.
- Use the caliper adjustment knob or Allen wrench to move the fixed pad closer to the rotor.
- Adjust the moving pad by tightening the cable at the caliper.
The rotor should sit between the pads, with a small gap on each side.
3. Set Cable Tension
- Loosen the cable anchor bolt.
- Pull the cable tight, then retighten.
- Use the barrel adjuster for minor changes.
If the lever pulls too far, increase tension. If it’s too stiff, reduce tension.
4. Center The Caliper
Disc brake calipers must be centered over the rotor.
- Loosen the mounting bolts slightly.
- Squeeze the brake lever to align the caliper.
- Tighten bolts while holding the lever.
This step is often missed by beginners and leads to noisy brakes.
5. Test Braking
Spin the wheel and squeeze the lever. The rotor should stop smoothly, without rubbing or noise.
How To Adjust Hydraulic Disc Brakes
Hydraulic disc brakes use fluid, not cables. Adjustment is more precise, but the process is different.
1. Check Pad And Rotor Wear
Inspect pads and rotors. Replace pads if thin, and clean rotors if dirty.
2. Align Caliper
- Loosen caliper mounting bolts.
- Squeeze the brake lever to center the caliper.
- Tighten bolts while holding the lever.
Hydraulic systems self-adjust pad position, but centering is key.
3. Check Lever Feel
If the lever feels spongy, air may be in the system. Bleed the brakes using a bleed kit. This is advanced, but necessary for safety.
4. Test And Fine-tune
Spin the wheel and squeeze the lever. Adjust as needed for smooth, strong braking.
Troubleshooting Common Brake Problems
Even after adjustment, issues may appear. Here’s how to solve them.
Brake Squeal
Squealing brakes are common. Causes include:
- Dirty pads or rims/rotors
- Misaligned pads
- Worn pads
Clean surfaces, adjust pad position, and replace pads if needed. Toe-in adjustment for rim brakes reduces noise.
Brake Drag
If brakes rub when not braking:
- Check pad alignment
- Center the caliper or brake arms
- Make sure the wheel is seated properly
Weak Braking
Weak brakes can be dangerous. Causes include:
- Worn pads
- Low cable tension (for mechanical systems)
- Air in hydraulic system
Replace pads, increase cable tension, or bleed hydraulic brakes.
Lever Issues
If the lever pulls too far:
- Tighten cable tension (mechanical)
- Check for air (hydraulic)
If the lever is too stiff:
- Loosen cable tension
- Check for dirt or corrosion
Sticking Or Slow Release
If brakes don’t release quickly:
- Check for frayed cables
- Clean and lubricate moving parts
- Adjust spring tension (rim brakes)
Many riders overlook cable friction. Replace old cables for smoother action.
When To Replace Brake Parts
Brakes need regular care, but sometimes parts must be replaced. Signs it’s time to change:
- Brake pads: Less than 3mm thick, uneven wear, or glazed surface
- Cables: Frayed, rusty, or stiff
- Rotors/rims: Deep grooves, warping, or cracks
- Levers: Loose or damaged
Replacing parts keeps your bike safe and avoids bigger repairs.
Maintenance Tips For Longevity
Proper brake adjustment is only part of the story. Follow these tips to keep brakes working longer:
- Clean pads and rotors/rims regularly with rubbing alcohol
- Inspect cables and housing for wear every month
- Lubricate pivot points and moving parts (but avoid pads and rotors)
- Check bolts for tightness after each ride
- Replace pads before they’re fully worn
A well-maintained brake system lasts longer, saves money, and gives better performance.
Comparing Rim And Disc Brakes
Choosing the right brake type affects adjustment and maintenance. Here’s a comparison:
| Feature | Rim Brakes | Disc Brakes |
|---|---|---|
| Stopping Power | Good for light/medium use | Excellent, especially for downhill |
| Performance in Wet Conditions | Poor (rim gets slippery) | Good (rotor stays clean) |
| Maintenance | Easy, low cost | Complex, more parts |
| Weight | Lighter | Heavier |
| Cost | Lower | Higher |
Disc brakes are more popular for mountain biking because they work better in tough conditions. Rim brakes are still useful for lighter bikes and easier trails.
Real-world Example: Adjusting Brakes Before A Race
Imagine you’re preparing for a mountain bike race. You notice your brakes feel weak and the lever pulls too far. Here’s what you do:
- Inspect pads and rotors—pads are worn, so you replace them.
- Tighten cable tension using the barrel adjuster.
- Center the caliper for disc brakes, or arms for rim brakes.
- Test the brakes by riding slowly and stopping. Braking is strong and smooth.
Many riders skip step 3, leading to uneven braking or noise during the race. With proper adjustment, you feel confident and perform better.
Credit: www.sepr.es
Safety Checks After Adjustment
Always check your brakes after adjustment. Here’s a quick checklist:
- Squeeze the lever: Does it feel firm?
- Spin the wheel: Does it move freely?
- Test braking: Does the bike stop smoothly?
- Listen: Any squealing or rubbing?
If you answer yes to all, your brakes are ready. If not, repeat the adjustment steps.
How Often Should You Adjust Brakes?
Brake adjustment isn’t a one-time job. For mountain bikes, check and adjust:
- After every 10–15 rides
- Before big events or races
- After crashes or falls
- If you notice changes in braking
On average, brake pads last 500–700 miles for mountain biking, but rough terrain shortens this. Regular checks prevent accidents and costly repairs.

Credit: www.youtube.com
Quick Tips For Beginners
If you’re new to adjusting brakes, here are some practical tips:
- Take your time—rushing leads to mistakes
- Use the right tools—don’t force bolts with the wrong size
- Watch video tutorials if unsure (many are available online)
- Test often—small changes make a big difference
- Ask for help if needed—bike shops can check your work
One insight most beginners miss: Sometimes, brake issues come from bent wheels or loose axles, not the brake itself. Always inspect the whole system.
Common Mistakes To Avoid
Adjusting brakes is simple, but many riders repeat these errors:
- Ignoring pad wear—thin pads don’t work well
- Forgetting to center calipers or arms
- Over-tightening bolts—risking damage
- Failing to test after each adjustment
- Using oily rags on pads/rotors—reduces braking
Avoid these mistakes for safe, reliable performance.
Brake Adjustment Data: Success Rates
Studies show that regular brake adjustment reduces accidents by up to 30%. Riders who check their brakes monthly report fewer problems and better control. Professional mountain bikers adjust brakes before every event, showing the importance of maintenance.
| Adjustment Frequency | Reported Brake Problems | Accident Rate |
|---|---|---|
| Monthly | Low | 5% |
| Quarterly | Medium | 15% |
| Yearly | High | 30% |
This data shows the value of frequent brake checks, especially for mountain bikes.
Upgrading Your Brake System
Sometimes, adjustment isn’t enough. You may need to upgrade for better performance. Consider:
- Switching from rim to disc brakes for tougher terrain
- Using high-quality pads (ceramic or sintered)
- Installing larger rotors for more power
- Choosing hydraulic systems for smoother control
Upgrades can be expensive but offer better safety and handling. For guidance, visit Bicycling.com for expert advice.

Credit: www.youtube.com
Frequently Asked Questions
How Do I Know If My Mountain Bike Brakes Need Adjustment?
If your brake lever feels loose, the bike doesn’t stop quickly, or you hear squealing or rubbing, it’s time to adjust. Check pad thickness and alignment regularly.
Can I Adjust Brakes Without Special Tools?
Yes, most adjustments need only basic tools like an Allen wrench and screwdriver. For hydraulic brakes, you may need a bleed kit, but simple adjustments use common tools.
How Often Should I Replace Brake Pads?
Replace pads when they’re less than 3mm thick, show uneven wear, or feel hard and glazed. For mountain biking, this can be every 500–700 miles, but rough terrain wears pads faster.
What’s The Difference Between Mechanical And Hydraulic Disc Brakes?
Mechanical disc brakes use cables and are easier to adjust. Hydraulic systems use fluid, offering smoother control but needing special maintenance and tools.
Why Do My Brakes Squeal Even After Adjustment?
Squealing can be caused by dirty pads or rotors/rims, wrong pad alignment, or worn pads. Clean all surfaces, use toe-in for rim brakes, and replace pads if needed.
Making sure your mountain bike brakes are adjusted correctly isn’t just about safety—it’s about getting the best ride possible. By following these steps, checking regularly, and learning from common mistakes, you’ll enjoy smoother, more reliable braking. Whether you’re riding for fun or racing, well-tuned brakes give you confidence and control.
Remember, brake maintenance is ongoing—keep checking, keep adjusting, and your bike will reward you with years of safe, exciting rides.

Hello Guys! I am John Reese, a professional biker and my hobby is biking! I have been biking for last 12 years and I love using bikes while outing as well. Based on my experiences with the different type of bikes (mountain bikes, road bikes and hybrid bikes); I am sharing my opinion about various bikes so that a beginner can get started right away. Happy reading!