Mountain biking is all about control, comfort, and confidence—especially when riding rough trails. One key part that makes these possible is the rear coil suspension. Adjusting it right can turn a bumpy, tiring ride into a smooth and enjoyable one. But for many riders, tuning the rear coil suspension seems confusing or even risky. If you set it wrong, you might lose comfort, handling, or even safety. The good news? With the right steps and a bit of patience, you can adjust your rear coil suspension like a pro.
This guide will walk you through the entire process—from understanding how coil suspensions work, to making practical adjustments for your weight, riding style, and terrain. Whether you’re new to mountain bikes or just want your bike to feel perfect, you’ll find clear advice here.
Plus, there are real-world examples, tables to help you compare settings, and answers to common questions. Let’s dive in and get your bike riding better than ever.
Understanding Rear Coil Suspension
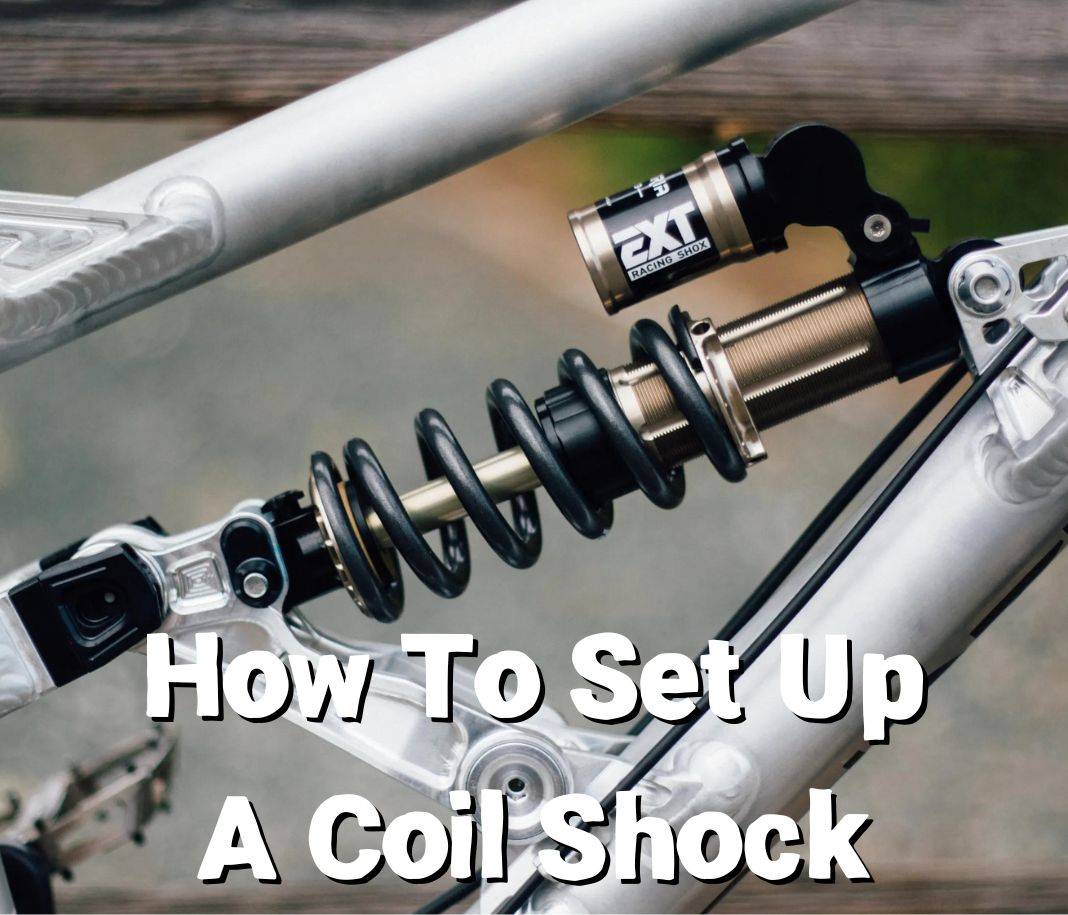
The rear coil suspension is a vital part of many mountain bikes, especially those built for downhill or aggressive trail riding. It uses a metal coil spring and a damper to absorb shocks from the terrain. Unlike air shocks, coil shocks offer a more linear and predictable feel, making them popular for riders who want consistent performance.
The main components include:
- Coil spring: Provides resistance and returns the bike to its original position after a bump.
- Damper: Controls the speed at which the suspension compresses and rebounds.
- Preload adjuster: Allows you to compress the spring slightly to suit your body weight.
- Rebound and compression knobs: Fine-tune how fast the shock returns (rebound) or compresses (compression) after hitting a bump.
Getting these settings right matters. Too stiff, and your bike feels harsh. Too soft, and you lose control, especially at speed. Small changes can make a big difference in how your bike feels and handles.
Why Adjust Your Rear Coil Suspension?
There are several reasons to adjust your rear coil suspension:
- Rider weight changes: If you gain or lose weight, the suspension needs retuning.
- Different terrains: Rocky trails need different settings than smooth singletrack.
- Riding style: Aggressive riders often need firmer suspension.
- Bike upgrades: New wheels or tires can affect how the suspension works.
A properly adjusted suspension improves traction, comfort, and safety. It also helps you ride longer and reduces fatigue. Many beginners miss the fact that suspension settings can change over time—even weather and temperature can affect performance slightly.
Credit: thelostco.com
Tools And Preparation
Before you start, gather these tools:
- Shock pump (for air shocks, but handy for checking pressure in mixed systems)
- Allen wrenches (usually 4mm, 5mm, or 6mm)
- Adjustable wrench
- Ruler or tape measure
- Bike stand (optional, but helps keep things stable)
- Notepad or phone (to record your settings)
Check your bike’s manual for specific instructions or torque values. If you don’t have one, look for information on the manufacturer’s website. Always clean the shock and linkage before adjusting—dirt can hide problems or give inaccurate results.
Key Terms: Sag, Preload, Rebound, And Compression
It’s easy to get lost in suspension jargon. Here’s what you need to know:
- Sag: The amount your shock compresses under your body weight, usually measured as a percentage of total travel (typically 25-35% for trail bikes).
- Preload: The initial compression applied to the spring via a collar or knob. More preload = stiffer feel.
- Rebound: Controls how fast the shock returns after being compressed.
- Compression: Controls how easily the shock compresses when hitting a bump.
Understanding these terms will help you follow the adjustment steps and diagnose issues later on.
Step-by-step: Adjusting Rear Coil Suspension
Getting your rear coil suspension dialed is a process. Follow these steps for the best results.
1. Measure And Set Sag
Sag is the starting point for all other adjustments. It ensures the shock is working in the optimal range.
- Get dressed in your riding gear (helmet, backpack, water, etc. ).
- Find a wall or ask a friend to help keep you balanced on the bike.
- Stand on the pedals in your usual riding position.
- Bounce gently to let the suspension settle, then stay still.
- Measure the exposed stanchion (the shiny part of the shock) from the seal to the o-ring or a zip tie placed around the shaft.
- Step off carefully, so you don’t move the o-ring or zip tie.
- Measure again—the difference between full extension and loaded position is your sag.
Most bikes need 25-35% sag. For example, if your shock has 60mm of travel, 15mm–21mm of sag is ideal.
2. Adjust Preload
If your sag is not in the correct range, adjust the preload collar:
- Too much sag (bike feels soft and sinks too far): Turn the preload collar clockwise (tighten) to compress the spring more.
- Too little sag (bike feels stiff and doesn’t compress): Turn the collar counterclockwise (loosen) to reduce spring preload.
Important: Never tighten the collar more than 2–3 full turns beyond the spring just touching. More than this can damage the shock or affect performance.
If you can’t achieve the right sag, you may need a different spring rate. This is a common beginner mistake—using preload to fix a too-soft or too-hard spring. It’s better to swap the coil for one that matches your weight.
Spring Rate Comparison Table
Understanding which spring suits your weight is crucial. Here’s a helpful comparison:
| Rider Weight (lbs) | Recommended Spring Rate (lbs/in) | Typical Sag (mm, 60mm travel shock) |
|---|---|---|
| 120–140 | 300–350 | 15–18 |
| 141–160 | 350–400 | 16–19 |
| 161–180 | 400–450 | 17–20 |
| 181–200 | 450–500 | 18–21 |
| 201–220 | 500–550 | 19–21 |
If your weight falls between two rates, choose the lighter one for more comfort or the heavier for aggressive riding.
3. Set Rebound
Rebound affects how quickly your suspension returns after a bump. Too fast, and the bike will bounce and feel uncontrolled. Too slow, and it won’t recover in time for the next hit.
- Start at the middle setting (count the clicks from full slow to full fast, and set it halfway).
- Ride over a curb or small bump at moderate speed.
- Watch and feel how the bike reacts:
- If it “bucks” you upward after a bump, the rebound is too fast—add more (turn knob toward “slower”).
- If it feels sluggish or “packs down” (doesn’t return in time), it’s too slow—reduce rebound (turn toward “faster”).
A good test: Hop off a curb and see how the rear end reacts. It should absorb the impact and recover smoothly without bouncing.
4. Set Compression
Many coil shocks offer low-speed compression adjustment (for pedal input and small bumps) and sometimes high-speed compression (for big hits).
- Start with low-speed compression in the middle.
- Ride a mix of trails (smooth, rocky, technical).
- Adjust as needed:
- If the bike sinks too much on climbs or sprints, add more low-speed compression.
- If it feels harsh on small bumps, reduce compression.
Not all shocks have high-speed compression. If yours does, adjust it only if you ride aggressive, technical terrain with lots of big hits.
5. Fine-tune For Terrain And Style
No two riders are the same. Once you have the basics, tweak the settings for your favorite trails:
- For rocky, technical descents: Use more sag and slower rebound for grip.
- For smooth, flowy trails: A bit less sag and faster rebound for efficiency.
- For jumps and drops: More compression and less sag for support.
Write down your settings and adjust one thing at a time—this helps you feel the difference and avoid confusion.
Common Mistakes To Avoid
Many riders, especially beginners, make these mistakes:
- Using preload to fix the wrong spring rate: This can cause poor performance and damage.
- Ignoring regular checks: Suspension settings change with wear and weather.
- Over-tightening adjustment knobs: Can strip threads or break the shock.
- Not wearing full gear when measuring sag: Leads to incorrect settings.
- Changing multiple settings at once: Makes it hard to know what helped or hurt.
One insight beginners often miss: suspension settings are not “set and forget.” Trail conditions, riding style, and even how tired you are can affect what feels best.
Real-world Example: Tuning For Different Trails
Let’s take a rider who weighs 170 lbs and rides both smooth singletrack and rocky descents.
- Singletrack day: Sets sag at 25% (15mm on a 60mm shock), rebound in the middle, compression low. Bike feels efficient and lively.
- Rocky descent day: Increases sag to 30% (18mm), slows rebound by 2 clicks, adds a bit more compression. Bike feels grippy and controlled over rocks.
This flexibility is why coil shocks are loved by serious riders—they handle almost any condition with the right setup.
How Suspension Settings Affect Performance
To show the difference good setup makes, here’s a comparison:
| Setting | Too Soft | Just Right | Too Hard |
|---|---|---|---|
| Sag | Bike “wallows”, poor pedaling | Balanced, responsive ride | Harsh, little grip |
| Rebound | Bouncy, hard to control | Stable, tracks ground | Slow to recover, “packs down” |
| Compression | Sinks on climbs, less support | Good support, comfort | Uncomfortable, loses small bump absorption |
Small changes can move your ride from “okay” to “amazing. ” Always test adjustments on the trail—not just in your garage.
When To Replace Your Coil Spring
Sometimes no adjustment can make your suspension feel right. You may need a new spring if:
- You can’t achieve the right sag even with minimal or maximal preload.
- You feel bottoming out or harshness on normal trails.
- The spring is damaged or corroded.
Springs come in different rates, often marked on the coil (e. g. , “400 lbs/in”). Choose one based on your weight, riding style, and bike recommendations.
Maintenance Tips For Coil Suspension
A well-maintained shock lasts longer and performs better. Here are key tips:
- Clean the shock after every ride: Dirt can cause wear or hide leaks.
- Check for oil leaks: Damaged seals reduce performance.
- Lubricate moving parts: Use suspension-safe products.
- Inspect for damage: Look for bent hardware or cracked springs.
- Service the shock regularly: Most need a full service every 50–100 hours of riding.
Never ignore strange noises, harshness, or changes in feel. These can signal maintenance is needed.
Credit: thelostco.com
How To Record And Track Your Settings
Keeping a suspension log helps you find your perfect setup faster. Record:
- Sag measurement
- Spring rate
- Rebound and compression settings (number of clicks from full open)
- Tire pressure
- Trail and weather conditions
You can use a notebook, phone app, or even a photo of the shock with a sticky note. Over time, you’ll spot patterns in what works best for you.
Upgrading Your Rear Coil Suspension
If you outgrow your current setup, consider upgrading:
- Higher quality shocks: Offer more adjustment and better damping.
- Titanium springs: Lighter and more responsive but more expensive.
- Custom tuning services: Some companies will tune your shock for your weight and style.
Always check compatibility with your bike frame and linkage. Not all shocks fit all bikes.

Credit: www.youtube.com
Advanced Tuning: Bottom-out Control And Volume Spacers
Some coil shocks offer bottom-out control (a separate adjustment or rubber bumper inside the shock). This helps prevent harsh impacts on big hits.
Other shocks allow volume spacers—inserts that change how the shock ramps up near the end of its travel. This can give a more progressive feel, similar to air shocks.
These features are more common on high-end models. If you’re often bottoming out, check if your shock supports these upgrades.
Troubleshooting: When Things Don’t Feel Right
Even with careful setup, things can go wrong. Here’s how to diagnose common issues:
- Bike feels harsh: Check for too little sag, too much compression, or a spring that’s too hard.
- Bike bottoms out easily: Too much sag, not enough compression, or too soft a spring.
- Bike “bounces” after bumps: Rebound too fast.
- Bike feels stuck or slow to recover: Rebound too slow, or shock needs service.
If you’re unsure, ask an experienced mechanic or visit your local bike shop. Suspension can be tricky, and expert eyes can spot problems you might miss.
Comparing Coil Vs Air Suspension
If you’re wondering why choose a coil over air, here’s a quick comparison:
| Feature | Coil Suspension | Air Suspension |
|---|---|---|
| Weight | Heavier | Lighter |
| Feel | Linear, consistent | Progressive, can be tuned with volume spacers |
| Maintenance | Lower (less frequent) | Higher (needs regular checks) |
| Cost | Often cheaper | Usually more expensive |
| Best for | Downhill, aggressive trail | Cross-country, all-mountain |
Coil shocks are not just for pros—many everyday riders love their feel and reliability.
Where To Find More Help
If you want to dive deeper, visit the manufacturer’s site or trusted sources like Pinkbike Suspension Setup Guide for advanced tips.
Frequently Asked Questions
How Often Should I Check My Rear Coil Suspension Settings?
You should check your settings every few rides or when you notice changes in handling, noise, or comfort. Always check after changing your gear, tires, or if you ride on different terrain.
Can I Use An Air Shock Spring On My Coil Shock?
No, air shock springs and coil springs are not interchangeable. Air shocks use pressurized air chambers, while coil shocks use metal springs. Always use the correct type for your shock.
How Do I Know If My Coil Spring Is Worn Out?
A coil spring is worn out if you see cracks, corrosion, or deformation. If the spring feels “dead” or makes unusual noises, it’s time to replace it.
Is It Safe To Adjust My Coil Shock At Home?
Yes, basic adjustments are safe if you follow the manufacturer’s instructions and use the right tools. For complex repairs or if you’re unsure, visit a professional bike mechanic.
What Spring Rate Should I Choose For My Weight?
Choose a spring rate that lets you achieve 25-35% sag when fully geared up. Refer to the spring rate chart above, or check your shock’s manual for recommendations. Always round up for aggressive riding, down for comfort.
Getting your rear coil suspension dialed isn’t just for experts—it’s for anyone who wants a better ride. With patience and careful tweaks, you’ll enjoy smoother, safer, and more confident mountain biking. So get out there, test your settings, and let the trails be your guide.

Hello Guys! I am John Reese, a professional biker and my hobby is biking! I have been biking for last 12 years and I love using bikes while outing as well. Based on my experiences with the different type of bikes (mountain bikes, road bikes and hybrid bikes); I am sharing my opinion about various bikes so that a beginner can get started right away. Happy reading!