Riding a mountain bike should feel exciting and controlled, but sometimes it feels harsh or too soft—especially over rocks, roots, or drops. This is where preload suspension adjustment comes in. Many riders buy a bike with adjustable suspension but never touch the settings, missing out on smoother rides and better control. Adjusting preload is one of the easiest and most effective ways to improve your bike’s performance and comfort, no matter your skill level.
This guide walks you through everything you need to know about how to adjust preload suspension on a mountain bike. You’ll learn what preload does, why it matters, and step-by-step instructions for different types of suspension. We’ll also cover common mistakes, advanced tips, and answer questions that many new riders have but are afraid to ask. By the end, you’ll be ready to make your bike feel perfect for your weight, riding style, and terrain.
What Is Preload Suspension?
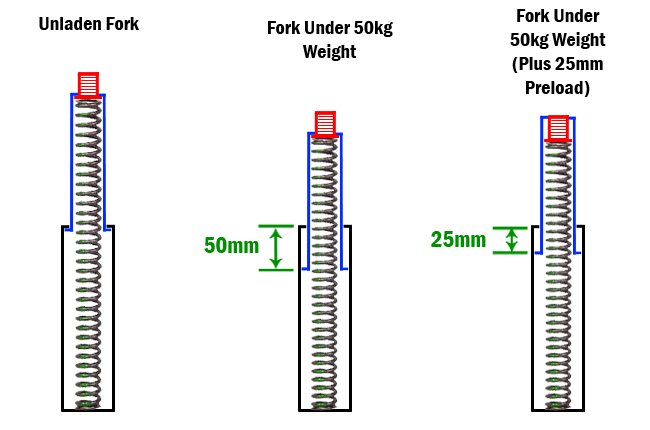
Preload is the initial tension applied to the suspension spring before you even sit on the bike. It determines how much the suspension compresses under your body weight, also known as sag. On most mountain bikes, you can adjust preload on the front fork, the rear shock, or both, depending on the design.
When preload is set correctly:
- The bike feels balanced and comfortable.
- The wheels stay in better contact with the ground.
- You get more control, especially on rough trails.
If preload is too high, the suspension feels stiff and doesn’t absorb bumps well. If it’s too low, you might “bottom out” (use all the travel) too easily, or the bike feels unstable.
Key Terms To Know
- Sag: How much the suspension compresses under your weight, usually measured as a percentage of total travel.
- Travel: The maximum distance the suspension can compress.
- Coil spring: Uses a physical metal spring; preload is usually adjusted with a threaded collar.
- Air spring: Uses air pressure; preload is adjusted by adding or releasing air.
Understanding these terms will make adjusting preload easier and help you communicate with bike shop staff or other riders.
Why Preload Adjustment Matters
Many riders skip preload adjustment because they don’t realize how much it affects their ride. Small changes can make a huge difference in both comfort and performance.
Improved Comfort
A properly adjusted preload absorbs bumps and vibrations before they reach your body. This means less fatigue on long rides, less risk of arm pump, and a smoother feeling over rocks, roots, and drops.
Better Traction
When the wheels stay in contact with the ground, you get more grip. This is important for both climbing and descending. If your suspension is too stiff, the bike will bounce and lose traction. If it’s too soft, the suspension will compress too much and the bike will handle poorly.
Increased Safety
Incorrect preload can make your bike unpredictable. You might lose control on technical descents, or the bike could bottom out unexpectedly. A well-adjusted preload helps you ride safely at higher speeds and on more challenging trails.
Protects Your Bike
Over-compressed or under-compressed suspension puts stress on other components, leading to faster wear and possible damage. Setting preload correctly helps your bike last longer.
Credit: bicycles.stackexchange.com
Types Of Suspension And How Preload Works
Before you adjust anything, it’s important to know what kind of suspension your bike has. This affects how you adjust the preload.
| Suspension Type | Preload Adjustment Method | Common on |
|---|---|---|
| Coil Spring Fork | Threaded collar or dial | Entry-level bikes, Downhill bikes |
| Air Spring Fork | Air pressure (using a shock pump) | Most modern hardtails, XC, Trail, Enduro bikes |
| Coil Rear Shock | Threaded collar | Downhill, Freeride bikes |
| Air Rear Shock | Air pressure | Trail, XC, Enduro bikes |
Most budget bikes use a coil fork with a simple adjustment collar. Mid- to high-end bikes use air suspension, which is lighter and more adjustable. Some bikes have both front and rear suspension (“full suspension”); others have only a suspension fork in front (“hardtail”).
Tools You Need For Preload Adjustment
Adjusting preload doesn’t require many tools, but the right ones make the job easier and more accurate.
- Shock pump (for air suspension): A small, high-pressure pump designed for bike shocks. Never use a regular tire pump.
- Allen wrenches: Usually 4mm or 5mm, to remove caps or covers if needed.
- Measuring tape or ruler: To measure sag (how much the suspension compresses).
- Zip tie or rubber O-ring: Helps measure sag accurately.
- Gloves: Keeps hands clean and improves grip on collars or dials.
- Owner’s manual: Each suspension model can be slightly different; check for recommendations.

Credit: www.youtube.com
How To Adjust Preload Suspension: Step-by-step
There are two main processes, depending on whether your bike uses a coil spring or an air spring.
Adjusting Preload On A Coil Spring Suspension
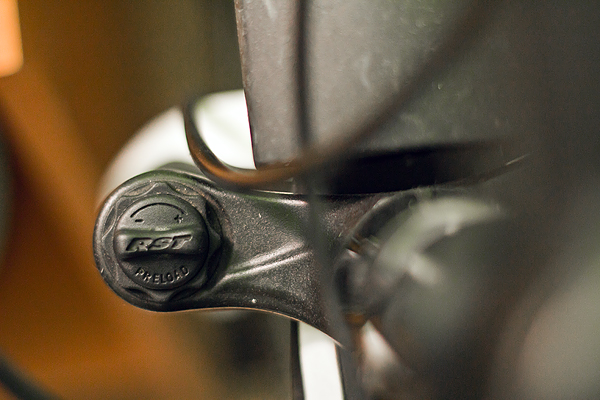
- Find the Preload Collar: Look for a large, knurled ring or dial at the top or bottom of the fork leg (front) or on the rear shock. It’s usually labeled “Preload.”
- Lift the Front or Rear Wheel: Make sure the suspension is fully extended (no weight on the bike).
- Set Up for Sag Measurement:
- Put a zip tie or rubber O-ring around the fork stanchion (front) or rear shock shaft.
- Sit on the bike in your normal riding position with all your gear (helmet, backpack, etc. ).
- Have a friend hold the handlebars, or balance near a wall.
- Measure Sag:
- Carefully get off the bike, being sure not to compress the suspension further.
- Measure the distance the zip tie/O-ring has moved.
- Calculate Sag Percentage:
- Divide the sag distance by the total suspension travel, then multiply by 100.
- Example: If your fork has 100 mm of travel, and the sag is 25 mm: (25 ÷ 100) × 100 = 25% sag.
- Adjust the Preload:
- Turn the collar clockwise to increase preload (makes the spring stiffer, less sag).
- Turn counterclockwise to decrease preload (makes the spring softer, more sag).
- Make small adjustments, about half a turn at a time.
- Repeat and Fine-Tune:
- After each adjustment, reset the zip tie/O-ring and re-measure.
- Aim for the recommended sag (see next section).
Adjusting Preload On An Air Spring Suspension
- Locate the Air Valve: Usually covered by a small cap on the top of the fork leg or rear shock.
- Use a Shock Pump: Attach the pump securely to avoid losing air.
- Set Initial Air Pressure:
- Most forks/shocks have a chart showing recommended pressure for rider weight.
- Start with the suggested pressure for your weight.
- Measure Sag:
- Put the zip tie/O-ring in place.
- Sit on the bike in full gear.
- Carefully get off and measure sag as above.
- Adjust Air Pressure:
- Too much sag: Add air in small increments (5–10 psi at a time).
- Too little sag: Release air in small amounts.
- Each time, reset the zip tie/O-ring and repeat the measurement.
- Fine-Tune for Feel:
- Once you’re close to the target sag, ride a short section of trail to see how it feels.
- Adjust air pressure by 2–3 psi as needed.
Rear Suspension Adjustment
The rear shock works the same way: coil models use a threaded collar, air models use a shock pump. Sag is usually measured by how much the shock shaft is exposed.
How Much Sag Should You Aim For?
Different riding styles and terrains require different sag settings. Too much sag makes the bike sluggish; too little makes it harsh and bouncy.
| Riding Style | Recommended Sag (Front) | Recommended Sag (Rear) |
|---|---|---|
| Cross-country (XC) | 15–20% | 20–25% |
| Trail | 20–25% | 25–30% |
| Enduro/All-Mountain | 25–30% | 30–35% |
| Downhill | 30–35% | 35–40% |
Pro tip: If you ride mostly smooth trails, use less sag for efficiency. For technical or steep descents, more sag gives extra traction and comfort.
Common Preload Adjustment Mistakes
Even experienced riders make preload mistakes. Avoid these for the best results.
- Skipping Full Gear: Always wear your usual riding gear (helmet, shoes, backpack) when measuring sag. Even water bottles make a difference.
- Not Resetting the Zip Tie/O-Ring: Each time you check sag, move the marker back to the starting point.
- Using a Regular Tire Pump on Air Suspension: This can damage the shock or give inaccurate readings. Use a dedicated shock pump.
- Adjusting Both Ends the Same: Front and rear sag don’t always match—follow the recommended settings for each.
- Forgetting to Check After a Few Rides: Suspension can settle or lose pressure. Recheck after your first few rides and every couple of months.
Advanced Tips For Preload Adjustment
Getting your sag right is a great first step, but you can fine-tune even more for maximum performance.
Fine-tuning For Different Terrains
- Rocky/Technical Trails: Use more sag for comfort and grip.
- Smooth/Flowy Trails: Use less sag for better speed and pedaling efficiency.
- Jumping or Drops: Slightly less sag helps avoid bottoming out.
Adjusting For Weight Changes
If you add a heavier backpack, water, or change your gear, recheck your sag. Even a few pounds can make a difference in how the suspension feels.
Mix With Other Adjustments
Preload is just one part of suspension tuning. For the best ride, you may also need to adjust:
- Rebound: How fast the suspension returns after compressing.
- Compression: How easily the suspension compresses when you hit a bump.
Always adjust preload (sag) first, then fine-tune other settings.
Record Your Settings
Keep a small notebook or phone note of your best settings for different trails, weather, and conditions. This makes it easy to get your bike dialed in next time.
Know When To Change Springs
If you can’t get the correct sag even with the preload collar at its minimum or maximum, your spring may be too soft or too stiff for your weight. Consider changing to a different spring rate if you use a coil shock.
Real-world Example: Trail Rider’s Experience
Let’s take a typical rider, 170 lbs (77 kg), who rides trail and enduro. He buys a new bike with air fork and shock. Following the manufacturer’s chart, he sets the air pressure but finds the fork feels harsh over roots.
He measures his sag and discovers it’s only 10%—far too little. He releases air until he reaches 25% sag. On his next ride, the bike feels much smoother, and he’s able to keep the front wheel on the ground in corners.
Over time, he adds 2 psi for smoother trails and removes 3 psi for rougher descents.
This simple adjustment makes him more confident and less tired. It also prevents damage to his bike by avoiding harsh bottom-outs.
Signs Your Preload Needs Adjustment
Sometimes, your bike tells you what it needs. Watch for these signs:
- Bike feels harsh and “chattery”: Too little sag, too much preload.
- Bike dives quickly on braking or drops: Too much sag, too little preload.
- Front or rear end “packs down” or stays compressed: Preload or rebound may need changing.
- Loss of traction or control in corners: Preload may be too high or low.
If you notice any of these, recheck your sag and preload settings.
How Preload Affects Different Riding Styles
Preload isn’t “set and forget. ” Different styles and conditions benefit from different settings.
- Cross-country (XC) racers use less sag for efficient pedaling.
- Trail and enduro riders use more sag for rough terrain.
- Downhill riders use the most sag for maximum grip and control.
Riders who travel for races or vacations often carry a shock pump and adjust preload for each new trail.
Coil Vs. Air Suspension: Which Is Easier To Adjust?
Both systems have advantages:
| Feature | Coil Suspension | Air Suspension |
|---|---|---|
| Ease of Adjustment | Simple dial/collar, but limited range | Fine-tuned with air pressure, wide range |
| Weight | Heavier | Lighter |
| Consistency | Very consistent feel | Can change with temperature/altitude |
| Custom Tuning | Change spring for big changes | Change air pressure for any rider |
Air suspension is more popular for most riders because you can adjust it exactly for your weight. Coil suspension is preferred for downhill or riders who want a very consistent feel.
Credit: lifeatlean.com
When To Seek Professional Help
Most preload adjustments are easy to do at home, but sometimes it’s smart to ask a bike shop for help:
- If you can’t get the right sag with your current setup.
- If the preload collar is stuck or won’t turn.
- If you’re not sure how to use a shock pump.
- If your suspension makes strange noises or leaks oil.
A professional suspension tune-up can also include changing oil, seals, and checking for wear. This is usually needed once a year for riders who ride often.
Non-obvious Insights Beginners Miss
- Preload changes ride height: Small preload adjustments can change your bike’s handling and geometry, like making the front higher or lower. This affects cornering and stability.
- Temperature affects air suspension: On cold days, air pressure drops, so you may need to add a few psi. On hot days, pressure increases. Always check your suspension before a ride if the weather changes a lot.
- Suspension settles over time: A new bike’s suspension will “break in” and may need adjustment after a few rides. Don’t assume your first setting is final.
Useful Resources
Many suspension brands provide online calculators or guides. For more in-depth setup tips, check out Park Tool’s Suspension Setup Guide.
Frequently Asked Questions
How Often Should I Adjust My Mountain Bike’s Preload?
You should check your preload (sag) when you get a new bike, after a few rides, and every few months. Also, recheck preload if you gain or lose weight, change gear, or notice your bike feels different.
Is Preload The Same As Air Pressure In My Fork Or Shock?
No. Preload means the initial force applied to the spring (coil or air). For air suspension, preload is adjusted by air pressure, but for coil suspension, it’s adjusted by turning the preload collar. Both achieve the same goal: setting sag.
What Happens If I Set My Preload Too High?
Too much preload makes the suspension stiff. You’ll lose comfort, traction, and may bounce or skid on rough terrain. It also increases wear on other bike parts.
Can I Adjust Preload Without Any Tools?
For air suspension, you need a shock pump. For coil suspension, you usually need your hands, but sometimes a special wrench helps. Always use the proper tool to avoid damage.
What Is “bottoming Out” And How Do I Prevent It?
Bottoming out means the suspension uses all its travel and hits the end stop, often with a loud “clunk. ” Prevent it by setting the correct preload (sag) and, for aggressive riding, adding a bit more preload or air pressure.
Fine-tuning your mountain bike’s preload suspension transforms how your bike feels and performs. It’s one of the most important—and overlooked—ways to make your rides safer, smoother, and more fun. Take the time to set it right, and you’ll ride with more confidence on any trail.

Hello Guys! I am John Reese, a professional biker and my hobby is biking! I have been biking for last 12 years and I love using bikes while outing as well. Based on my experiences with the different type of bikes (mountain bikes, road bikes and hybrid bikes); I am sharing my opinion about various bikes so that a beginner can get started right away. Happy reading!