Building your own backyard mountain bike trail is a dream for many riders. It’s a way to turn your outdoor space into an adventure park, improve your skills, and have fun with friends or family. But creating a trail is not just about digging and placing some rocks. It’s about planning, safety, smart use of space, and understanding what makes a good ride. Whether you have a small yard or acres to work with, the right approach can transform your land into a unique and exciting mountain bike experience.
Let’s explore how to build a backyard mountain bike trail step by step. You’ll learn about planning, materials, construction, safety, and maintenance. You’ll also see real examples, practical tips, and answers to common questions. With careful guidance and a bit of creativity, your backyard could soon become the best spot for mountain biking in your neighborhood.
Assessing Your Backyard
Before you start building, you need to know your space. A proper assessment helps you plan a trail that fits your yard and your riding style.
Measuring Your Area
Start by measuring your yard. Use a tape measure or a digital tool to check the length and width. Mark boundaries with stakes or flags. This helps you visualize the available space and avoid building too close to fences or property lines.
Checking Terrain And Soil
Look at the terrain. Is your yard flat, sloped, or hilly? Are there trees, rocks, or other obstacles? Different terrains allow for different types of trails. For example, a sloped yard is great for downhill runs, while flat areas are better for technical features.
Test the soil. Grab a handful and squeeze. If it’s sandy, you’ll need more support for jumps. If it’s clay, drainage could be a problem. Loamy soil is best—it holds shape but drains well.
Identifying Natural Features
Natural features like trees, logs, rocks, or hills can be used as trail elements. They add character and reduce construction effort. Decide which features to keep and which to remove. Remember, keeping mature trees helps with shade and prevents erosion.
Zoning And Permissions
Check local regulations. Some cities require permits for backyard projects, especially if you plan to move a lot of soil or build tall structures. If you live near neighbors, let them know your plans. Noise and dust can be a concern during construction.
Planning Your Trail Design
Design is the heart of any good mountain bike trail. A solid plan helps you build a trail that’s safe, fun, and suits your riding level.
Choosing The Trail Type
There are several types of mountain bike trails:
- Flow trails: Smooth, curvy, easy for beginners.
- Technical trails: Lots of rocks, roots, and sharp turns.
- Jump lines: Built for jumps and tricks.
- Pump tracks: Short loops with rollers and berms for speed.
Pick a style based on your skill level and yard size. Flow trails work well in most backyards, while jump lines need more space and safety measures.
Mapping Your Trail
Draw a map of your yard and sketch the trail route. Use a pencil so you can change things easily. Place trail features where there’s room. Avoid tight corners near fences or drop-offs. Ideally, your trail should loop—this lets you ride continuously without stopping.
Example Trail Layout
- Start zone near the house
- Flow section with berms (curved turns)
- Technical section over roots and rocks
- Small jump section
- Finish zone with space to slow down
Trail Width And Length
Backyard trails are usually 2–3 feet wide. This is enough for most bikes but keeps the trail compact. Trail length depends on your yard. Even a 50-foot trail can be fun if well-designed. Longer trails need more planning, but loops maximize ride time.
Safety Planning
Leave space for safety. Don’t put jumps near hard objects like walls or trees. Design exits for every difficult feature, so riders can bail out safely. Include clear sightlines—riders should see what’s ahead, not be surprised by obstacles.
Gathering Materials And Tools
The right materials and tools make building easier and safer. Some items can be found around your yard; others need to be bought or rented.
Essential Materials
- Shovels: For digging and shaping soil
- Rakes: For smoothing surfaces
- Wheelbarrow: To move dirt, rocks, and wood
- Landscape fabric: Prevents weeds and erosion
- Wood: For ramps, bridges, and supports
- Rocks: For technical features and drainage
- Sand or gravel: For drainage and surface stability
- PVC pipes: For drainage channels
- Rebar or stakes: To anchor features
Optional Materials
- Concrete: For permanent jumps or supports
- Plywood: For wooden ramps
- Rubber mats: For landing zones
- Paint or markers: To mark trail edges
Tool Checklist
| Tool | Purpose |
|---|---|
| Pickaxe | Breaking hard soil or rocks |
| Chainsaw | Cutting logs or clearing trees |
| Hammer | Building wood features |
| Level | Ensuring ramps are flat and safe |
| Measuring tape | Planning distances and spacing |
Cost Estimates
Building a backyard trail can be low-cost if you use natural materials. Expect to spend $100–$500 if buying wood, gravel, or renting tools. Advanced features (like wooden jumps) can cost more, up to $1,500 for larger builds.
Clearing And Preparing Your Site
Preparation makes construction easier and safer. Here’s how to get started.
Clearing Vegetation
Remove grass, weeds, and small plants from the trail area. Use a shovel or a hoe. If you have thick roots, a pickaxe helps. For larger trees, consider hiring a professional—chainsaws are dangerous for beginners.
Leveling And Shaping
Dig out uneven spots and fill low areas. Use a rake to smooth the surface. If you want berms or jumps, pile soil and shape it with a shovel. Compact soil by walking or using a tamper. Well-compacted soil prevents erosion and keeps features stable.
Managing Drainage
Water is the enemy of mountain bike trails. Poor drainage leads to mud, erosion, and unsafe riding. Plan drainage before building features. Slope the trail slightly to one side (about 2–5 degrees) to let water run off. Use rocks, gravel, or PVC pipes to guide water away from the trail.
Drainage Solutions Comparison
| Drainage Solution | Cost | Effectiveness |
|---|---|---|
| Gravel Layer | Low | Good for small trails |
| PVC Pipe | Medium | Best for heavy water |
| French Drain | High | Excellent for clay soil |
Removing Hazards
Check for hidden hazards—glass, nails, stumps, or old wires. Remove them before riding. Safety is always the top priority.
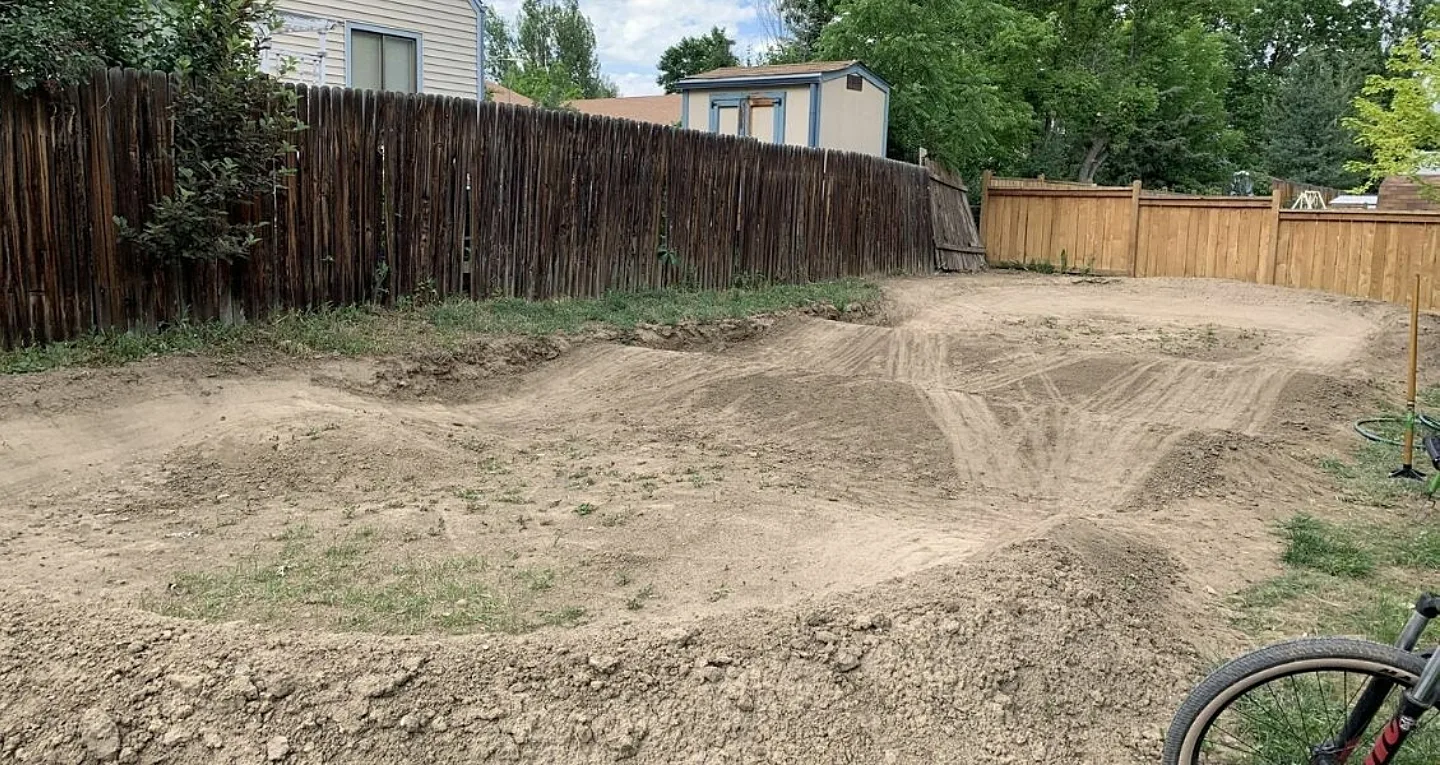
Building Trail Features
Features make a trail exciting. But they must be built safely and suited to your yard.
Berms (curved Turns)
Berms help riders turn fast and stay on the trail. To build a berm:
- Mark the curve with stakes.
- Dig out the inside of the curve.
- Pile soil on the outside, forming a bank.
- Compact soil firmly.
- Cover with gravel or mulch if needed.
Berms should be about 18–24 inches tall for backyard trails. Too steep makes them dangerous.
Rollers (small Mounds)
Rollers add flow and speed. Build by piling soil into a mound, then shaping with a shovel. Space rollers about 6–10 feet apart for smooth riding.
Jumps
Jumps are fun but risky. Keep backyard jumps small—12–18 inches high is enough. Build the takeoff (ramp) with compacted soil or wood. The landing zone should be clear, wide, and soft (try rubber mats or mulch).
Bridges And Wooden Features
Wooden bridges cross wet spots or add technical challenge. Use treated lumber for durability. Anchor wood with stakes or rebar. Keep bridges wide enough (at least 2 feet) and low to the ground for safety.
Rock Gardens
Rock gardens test balance and skill. Place rocks tightly together, mixing sizes for challenge. Fill gaps with soil so tires don’t slip. Keep rock gardens short (5–10 feet) for backyard trails.
Pump Track Elements
Pump tracks are loops with rollers and berms. They are great for skill-building and kids. Use compacted soil, space features evenly, and design for continuous motion.
Example Feature Mix For A Small Yard
- 2 berms
- 3 rollers
- 1 small jump
- 1 bridge
- 1 rock garden
These features fit most yards and offer variety.
Trail Surface And Finishing
A good surface is smooth, durable, and drains well. The finishing stage makes your trail ready to ride.
Soil Packing
After shaping, walk or roll over the soil to pack it down. Use a garden roller for best results. Packed soil lasts longer and resists erosion.
Adding Gravel Or Mulch
Gravel is best for wet areas. Spread a thin layer (1–2 inches) and pack it down. Mulch is good for dry spots and reduces dust.
Edge Marking
Mark trail edges with paint, flags, or logs. This helps riders stay on track and prevents accidents.
Landscaping For Safety
Plant grass or low shrubs beside the trail. This stabilizes soil and prevents erosion. Avoid thorny plants or those that attract bees.
Testing And Adjusting Your Trail
Testing is important for safety and fun. Ride your trail slowly at first. Watch for soft spots, loose rocks, or sharp turns.
Making Adjustments
If a feature feels too hard or dangerous, reshape it. Add more soil to jumps or widen berms. Fix drainage if water pools after rain.
Getting Feedback
Invite friends or family to ride. Different skill levels will notice problems you miss. Adjust the trail based on feedback.
Recording Trail Stats
Keep track of trail length, number of features, and types. This helps you plan upgrades and measure progress.
Example Trail Stats
- Length: 60 feet
- Features: 2 berms, 3 rollers, 1 jump, 1 bridge, 1 rock garden
- Difficulty: Beginner–Intermediate
Maintenance And Upgrades
Trails need care to stay safe and fun. Regular maintenance prevents problems and keeps your trail looking good.
Routine Maintenance
- Remove fallen branches and debris
- Fill in ruts or holes after rain
- Compact soil as needed
- Check wood features for rot or loose nails
- Trim plants beside the trail
Seasonal Care
In fall, clear leaves to prevent slippery spots. In winter, cover wood features or use sand for grip. Spring is good for upgrades and repairs.
Upgrading Your Trail
Once your trail works well, consider upgrades:
- Add new features (like larger jumps or technical sections)
- Expand the loop for longer rides
- Improve drainage with more gravel or pipes
- Install lights for evening rides
Safety Reviews
Every month, walk the trail and check for hazards. Fix problems before riding. Safety is always more important than speed or tricks.

Credit: www.youtube.com
Common Mistakes To Avoid
Many beginners make mistakes that can ruin a trail or cause accidents. Here are some to watch out for:
- Ignoring drainage: Water damage is the biggest threat to trails.
- Building too close to obstacles: Leave room from fences, walls, and trees.
- Overbuilding features: Keep jumps and ramps small at first.
- Skipping soil compaction: Loose soil leads to ruts and crashes.
- Using untreated wood: Rotting wood is unsafe and expensive to replace.
- Poor edge marking: Riders can go off-track and hit objects.
- Missing safety exits: Always provide ways to bail out safely.
Fixing these mistakes early saves time and money.
Real-life Examples And Inspiration
Many riders have built backyard trails and shared their stories. Here are a few examples:
Small Yard Flow Trail
James in Oregon built a 40-foot flow trail with two berms and rollers. He used old logs for edging and packed soil with a garden roller. His trail is perfect for beginners and kids.
Urban Pump Track
Maria in Denver turned her 30×20-foot yard into a pump track. She used compacted clay, PVC drainage, and recycled wood for bridges. The loop is short but allows continuous riding.
Technical Backyard Trail
Alex in Georgia created a technical trail with rock gardens and wooden ramps. He used local rocks, treated lumber, and mulch for landing zones. His trail is challenging but safe, thanks to careful planning and regular maintenance.
These stories show that you don’t need a huge yard or big budget to build a great trail. Smart design and creativity matter most.
Credit: usacycling.org
Comparing Diy And Professional Trails
Should you build a trail yourself or hire a pro? Here’s a comparison:
| Aspect | DIY Trail | Professional Trail |
|---|---|---|
| Cost | Low ($100–$1,500) | High ($2,000+) |
| Customization | High | Medium |
| Safety | Depends on skill | High |
| Time | Weeks to months | Days to weeks |
| Pride | Very high | Medium |
Most backyard trails are DIY. Professional builders are great for bigger projects or advanced features.
Tips For Safe Riding On Backyard Trails
Riding your own trail is exciting, but safety should always come first.
- Wear a helmet every time you ride.
- Check your bike before each session (brakes, tires, chain).
- Ride slowly at first, especially after rain.
- Practice jumps and technical features with a spotter nearby.
- Teach kids proper riding skills and supervise them.
- Avoid riding alone on new features—have someone watch.
Useful Resources
Want to learn more? The International Mountain Bicycling Association (IMBA) offers great guides on trail building and safety. Visit their site for advanced tips: IMBA Trail Building Resources.
You can also find videos and community forums for backyard trail inspiration and troubleshooting.
Frequently Asked Questions
How Much Space Do I Need For A Backyard Mountain Bike Trail?
You can build a trail in almost any yard. A minimum of 20×20 feet works for a pump track or short loop. Larger yards allow longer trails and more features. Always design based on your actual space and avoid crowding.
What’s The Best Soil For Building A Trail?
Loamy soil is best—it holds shape but drains well. Avoid sandy soil (too loose) and pure clay (poor drainage). If your soil is not ideal, mix in gravel or sand to improve stability.
How Can I Make My Trail Safe For Kids?
Keep features small, use soft landing zones (mulch or mats), and avoid sharp turns. Teach kids to ride slowly and always supervise them. Install clear markings and exits for tricky features.
Can I Build A Trail If My Yard Is Flat?
Yes. Flat yards are perfect for pump tracks, rollers, and small jumps. You can create artificial hills using soil or wood. Just plan drainage carefully to avoid mud and pooling water.
Do I Need A Permit To Build A Backyard Trail?
Most cities don’t require permits for small trails, but rules vary. If you plan to move lots of soil or build tall structures, check with your local government. Always talk to neighbors before starting to avoid conflicts.
Creating your own backyard mountain bike trail is a rewarding project. It brings adventure, skill-building, and fun right to your home. With careful planning, smart design, and regular maintenance, your trail can offer years of safe and exciting rides. Whether you’re a beginner or an experienced rider, your backyard can become a mountain bike paradise.

Credit: www.singletracks.com

Hello Guys! I am John Reese, a professional biker and my hobby is biking! I have been biking for last 12 years and I love using bikes while outing as well. Based on my experiences with the different type of bikes (mountain bikes, road bikes and hybrid bikes); I am sharing my opinion about various bikes so that a beginner can get started right away. Happy reading!