Changing the handlebars on a mountain bike might seem simple, but it’s a task that needs careful planning and precise steps. Whether you want a new riding position, a lighter handlebar, or just a fresh look, swapping handlebars can make your bike feel almost new.
Many beginners think it’s just about unscrewing a few bolts, but there’s more to it. You must check compatibility, consider your riding style, and follow specific steps to make sure everything fits and works safely. In this guide, I’ll show you how to change mountain bike handlebars step by step, give tips from real riders, and help you avoid common mistakes.
Why Change Mountain Bike Handlebars?
The handlebars are one of the most important parts of your mountain bike. They control your steering, affect comfort, and can change how your bike handles. Here are reasons why riders decide to change their handlebars:
- Comfort: If your current handlebars make your wrists or shoulders hurt, a new shape or width can reduce pain.
- Performance: Different handlebars can help with control, especially on rough trails or downhill sections.
- Style: New handlebars can give your bike a more modern or aggressive look.
- Weight Reduction: Upgrading from steel to carbon or aluminum can shave off grams, making your bike lighter.
- Customization: Everyone’s hands and riding style are different. Changing handlebars lets you personalize your bike.
Many mountain bikers notice big improvements just by switching to a handlebar that suits their body and riding style. For example, wider bars provide more control on technical trails, while narrower bars help in tight spaces.
Types Of Mountain Bike Handlebars
Before you change handlebars, you need to know the main types available. Each type affects riding position, comfort, and control.
| Handlebar Type | Shape | Common Use | Width Range |
|---|---|---|---|
| Flat Bar | Completely straight | Cross-country | 600–750 mm |
| Riser Bar | Raised center, curves upward | Trail, Enduro | 700–800 mm |
| Drop Bar | Curved down and back | Gravel, Touring | 400–460 mm |
| Bullhorn Bar | Forward curve | Urban, Time Trial | 600–720 mm |
Flat bars are good for speed and efficiency, usually seen on cross-country bikes. Riser bars give a more upright position and are popular for trail and enduro riding. Drop bars are rare on mountain bikes but common on gravel and touring bikes. Bullhorn bars are mostly for urban or time trial bikes.
Most mountain bikers choose riser bars for better control, but flat bars are lighter and preferred for racing.
Preparing To Change Handlebars
Changing handlebars isn’t difficult, but you need to be ready. Here’s what you need to do before starting:
Tools And Materials Needed
- Allen wrenches (usually 4, 5, or 6 mm)
- Torque wrench (for precise tightening)
- Screwdriver (for brake/shifter clamps)
- New handlebars (compatible with your stem)
- Grip glue (optional, for rubber grips)
- New grips (if you want to upgrade)
- Grease (for bolts)
- Rags (to clean parts)
Check Compatibility
- Bar Diameter: The center of the bar must match your stem clamp. Most mountain bikes use 31.8 mm or 35 mm.
- Width: Make sure the new bar fits your style and isn’t too wide for your frame or trails.
- Rise and Sweep: These affect riding comfort. Test different shapes if possible.
- Brake/Shifter Clamp Size: The new bar must allow you to mount your controls.
Measure Your Current Setup
Before removing anything, measure:
- Bar width (end-to-end)
- Rise (vertical height from center)
- Sweep (angle of grips)
- Position of controls (where brakes and shifters sit)
Take photos if needed. This helps you set up the new bar exactly how you like.
Step-by-step: How To Change Handlebars On A Mountain Bike
Let’s walk through the full process, from removing the old handlebars to installing the new ones.
1. Remove Grips
Most mountain bike grips are either lock-on or slip-on.
- For lock-on grips, use an Allen wrench to loosen the bolts, then slide off.
- For slip-on grips, use rubbing alcohol or compressed air to loosen. Twist and pull.
If grips are old or damaged, consider replacing them.
2. Remove Brakes And Shifters
- Use the correct Allen wrench or screwdriver.
- Loosen clamps for brake levers and shifters.
- Slide them off the bar carefully. Don’t let cables twist or kink.
Tip: Hang the controls gently on the frame or use a zip tie to keep them safe.
3. Remove The Stem Faceplate
- Use an Allen wrench to loosen the bolts on the front of the stem.
- Remove the faceplate. Keep bolts and plate in a safe place.
- The handlebar will now come free. Support it so it doesn’t drop.
4. Install The New Handlebar
- Place the new bar in the stem clamp.
- Put the faceplate back and hand-tighten bolts.
- Make sure the bar is centered. Look for marks or measure.
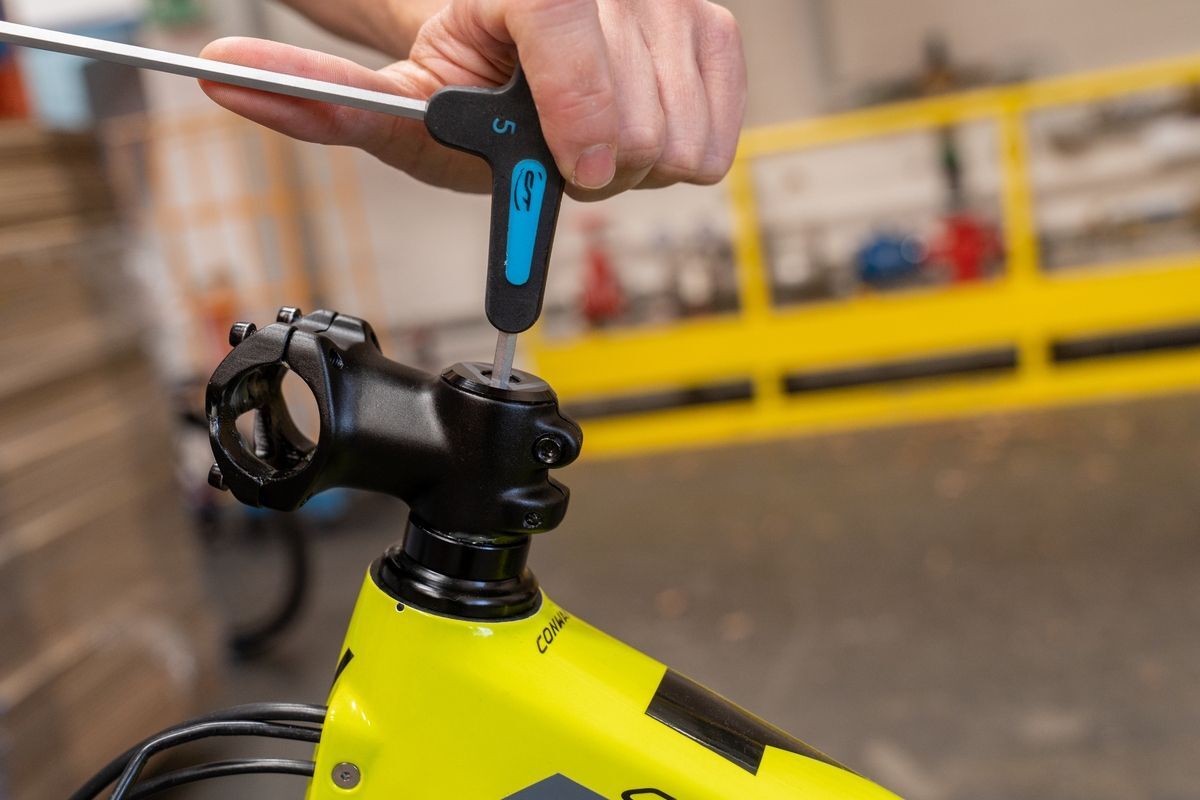
5. Adjust Angle And Tighten Bolts
- Rotate the bar to set the sweep and rise to your preference.
- Use a torque wrench to tighten the bolts evenly. Most stems require 5–6 Nm of torque.
- Tighten bolts in a cross-pattern (top left, bottom right, top right, bottom left) to keep pressure even.
6. Reinstall Brakes And Shifters
- Slide controls onto the new bar. Position them as before or adjust for comfort.
- Tighten clamps gently; don’t over-torque.
- Make sure cables are not pinched or twisted.
7. Install Grips
- For lock-on grips, slide them on and tighten bolts.
- For slip-on grips, use rubbing alcohol to ease installation. Let dry before riding.
8. Final Adjustments
- Sit on the bike and check hand position.
- Test brake and shifter function.
- Make sure everything is tight but not overtightened.
Don’t skip this last step. It’s common for beginners to forget checking cable tension and grip security.
Common Mistakes When Changing Handlebars
Many riders make errors when swapping handlebars. Avoid these common mistakes:
- Ignoring Bar Diameter: If the bar doesn’t match the stem clamp, it won’t fit.
- Not Using a Torque Wrench: Overtightening can crack carbon bars; undertightening can cause slipping.
- Misplacing Controls: Wrong brake or shifter position makes riding uncomfortable.
- Damaging Cables: Twisted or pinched cables can cause shifting or braking problems.
- Skipping Test Ride: Always check your setup before hitting tough trails.
One non-obvious tip: If you switch from a narrow to a wide bar, you may need longer cables. Many beginners miss this detail.
How Handlebar Change Affects Riding
Handlebar changes can have a big impact on how your bike feels and handles. Here are some differences you might notice:
Wider Bars
- More control in rough terrain
- Easier steering in technical sections
- More leverage for climbing
But, wide bars can make it harder to fit through tight trees.
Narrower Bars
- Faster steering and better handling in tight spaces
- Less leverage for descending or rough ground
Most modern mountain bikes use bars between 740–800 mm wide. If you’re not sure, start wide and cut down to your preferred width.
Different Rise And Sweep
- Higher rise: More upright, comfortable position
- Lower rise: More aggressive, forward-leaning stance
- More sweep: Easier on wrists, good for long rides
You may need to try a few setups to find what feels best.
Choosing The Right Handlebar For Your Mountain Bike
Picking the right handlebar is more than just shape or material. Here’s what matters most:
| Feature | Why It Matters | Beginner Tip |
|---|---|---|
| Width | Affects control and steering | Start with wider, cut down later |
| Material | Weight and strength | Aluminum is strong and affordable |
| Rise | Changes riding position | Try different rises for comfort |
| Sweep | Angle of grips to bar | More sweep = easier on wrists |
| Bar Diameter | Must match stem clamp | Check specs before buying |
Most beginners overlook sweep angle. Even a small change can make long rides much more comfortable.
Safety Tips After Changing Handlebars
Safety is important after any modification. Here’s how to make sure your new setup is secure:
- Double-Check Tightness: Use a torque wrench on stem and control clamps.
- Check Alignment: Make sure the bar is centered and controls are in easy reach.
- Inspect Cables: Look for pinching or stretching. Test brakes and shifting.
- Test Ride Slowly: Ride on flat, easy terrain first. Make small adjustments if needed.
- Recheck After First Ride: Bolts can loosen. Check everything again after a short ride.
One insight: Some carbon bars need special paste to prevent slipping. If you use carbon, ask your bike shop about this.
Upgrading Grips Along With Handlebars
Many riders change grips when swapping handlebars. Here’s why:
- Fresh grips improve comfort and control.
- Lock-on grips are easier to install and remove.
- Ergonomic grips help with wrist pain.
Grips come in many shapes and sizes. Try a few to see what feels best. If you ride in wet conditions, go for textured grips for better traction.
Adjusting Controls For Best Comfort
After changing handlebars, it’s important to adjust brakes and shifters for comfort:
- Brake lever angle: Should match your wrist angle when riding.
- Shifter placement: Easy to reach without moving your hand too much.
- Bell or lights: Place where they don’t block controls.
A tip many miss: If your hands feel tired, try rotating the bar slightly forward or back. Small changes can make a big difference.
How To Cut Handlebars To Your Preferred Width
If your new bar is too wide, you can cut it down. Here’s how:
Steps To Cut Handlebars
- Measure and Mark: Use tape to mark your preferred width.
- Use The Right Tool: A pipe cutter or hacksaw works best.
- Protect The Bar: Wrap tape around the cut area to prevent splinters.
- Cut Slowly: Don’t rush. Follow your marks carefully.
- File Edges: Smooth the cut ends to avoid sharp spots.
Tip: Don’t cut too much at once. Try small changes and test ride.
Real-world Example: Handlebar Change Impact
Let’s look at a real case. A rider upgraded from a 680 mm flat bar to a 780 mm riser bar. The result:
- Better control on downhills
- Less wrist pain due to more sweep
- Improved comfort on long rides
But, he found the bar too wide for narrow trails. After cutting down to 760 mm, it was perfect.
This shows that handlebar change is not just about style—it can change your whole riding experience.

Credit: www.youtube.com
Handlebar Materials: Pros And Cons
Handlebars come in three main materials: aluminum, carbon, and steel.
| Material | Weight | Durability | Cost | Comments |
|---|---|---|---|---|
| Aluminum | Light | Strong | Moderate | Most popular, good balance |
| Carbon | Very light | Can break under stress | Expensive | Use torque wrench, special paste |
| Steel | Heavy | Very strong | Low | Rare, mostly for budget bikes |
Aluminum is a safe choice for most riders. Carbon is lighter but more expensive and needs careful installation. Steel is heavy but strong—good for urban or budget bikes.
Troubleshooting After Handlebar Change
If you notice problems after changing handlebars, here’s what to check:
- Slipping Bars: Retighten bolts with a torque wrench.
- Loose Controls: Check clamps. Don’t overtighten.
- Strange Cable Feel: Look for pinched or stretched cables.
- Uncomfortable Position: Adjust bar angle, grip placement, or control layout.
- Noise or Creaks: Clean and grease bolts, check for cracks.
If you’re not sure, ask a bike shop for help. It’s better to be safe.

Credit: www.youtube.com
Mountain Bike Handlebar Change: Cost Estimate
Changing handlebars doesn’t have to be expensive. Here’s a rough estimate:
- New handlebars: $30–$150 (aluminum), $100–$300 (carbon)
- Grips: $10–$40
- Tools: $20–$50 (if you don’t have them)
- Bike shop labor: $30–$80 (if you prefer professional help)
Many riders do the job themselves, but if you’re unsure, a shop can help. Sometimes shops offer free installation if you buy the bar there.
Should You Change Handlebars Yourself Or Go To A Shop?
Most riders can change handlebars at home if they have the tools and confidence. Here’s when you might want professional help:
- If your bike has hydraulic brakes: These are harder to remove and reinstall.
- If you’re switching to carbon bars: Shops have the right paste and tools.
- If you’re not sure about cable routing: Shops can adjust cables for best performance.
If you do it yourself, take your time. Watch videos, follow step-by-step guides, and don’t rush.
Credit: employerschoicescreening.com
Advanced Handlebar Setups: For Experienced Riders
Some mountain bikers use special setups:
- Cut bars for narrow trails: Custom width to fit local terrain.
- Add bar ends: For extra hand positions.
- Install ergonomic grips: Reduce hand fatigue on long rides.
These setups are useful but not needed for most beginners. Try standard bars first, then explore advanced options.
Environmental Impact: Handlebar Materials
When choosing new handlebars, consider the environment. Aluminum can be recycled. Carbon fiber is harder to recycle but lasts longer. Steel is durable and recyclable.
If you care about sustainability, look for brands that use recycled materials or have good environmental practices. You can find more on this topic at Wikipedia.
Handlebar Change And Bike Fit
Changing handlebars affects your bike fit. If you have knee or back pain after the change, adjust your seat or handlebar position. Sometimes a small rise or sweep makes a big difference.
Bike fit experts can help, but many riders find their best setup through trial and error. Take notes, make small changes, and listen to your body.
Frequently Asked Questions
What’s The Most Common Handlebar Width For Mountain Bikes?
Most modern mountain bikes use bars between 740–800 mm wide. Wider bars provide more control, but you can cut them down for tight trails.
Can I Use Road Bike Handlebars On My Mountain Bike?
It’s possible, but not recommended. Drop bars are designed for road bikes and may not fit mountain bike controls or stem clamps.
How Do I Know If My New Handlebar Will Fit My Stem?
Check the bar diameter at the center. Most mountain bike stems are 31.8 mm or 35 mm. Match this to your new bar.
Is It Safe To Change Handlebars At Home?
Yes, if you have the right tools and follow steps carefully. Always use a torque wrench and check everything before riding.
What’s The Best Material For Mountain Bike Handlebars?
Aluminum is popular for strength and value. Carbon is lighter but more expensive and needs careful installation. Steel is strong but heavy.
Changing handlebars is one of the easiest ways to upgrade your mountain bike. With the right tools, a little knowledge, and careful steps, you can improve comfort, control, and style. Remember to check compatibility, measure your current setup, and make small adjustments for the best ride.
If you’re not sure, ask a bike shop or experienced rider for advice. And always test your bike before hitting tough trails. With your new handlebars, you’ll enjoy a smoother, safer, and more fun mountain biking experience.

Hello Guys! I am John Reese, a professional biker and my hobby is biking! I have been biking for last 12 years and I love using bikes while outing as well. Based on my experiences with the different type of bikes (mountain bikes, road bikes and hybrid bikes); I am sharing my opinion about various bikes so that a beginner can get started right away. Happy reading!