Mountain biking has changed a lot in the last decade. One of the most important upgrades is the switch from traditional tube tires to tubeless mountain bike tires. If you are curious about how these tires work, why riders prefer them, and what makes them different, you are in the right place. This guide will help you understand the technology behind tubeless tires, their benefits, and practical advice for anyone interested in making the switch.
Tubeless tires are not just a trend. They offer real performance gains, especially for riders who want to tackle rough trails or improve their ride quality. In this article, you will learn how tubeless tires work, what you need to use them, and some insider tips that even experienced cyclists sometimes miss.
What Are Tubeless Mountain Bike Tires?
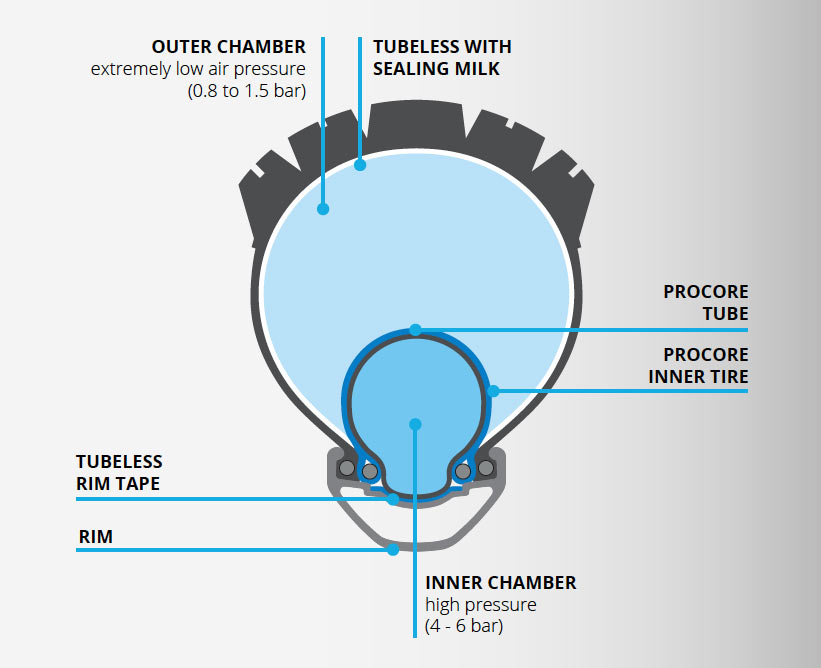
Tubeless mountain bike tires are tires that do not use an inner tube. Instead, the tire forms an airtight seal with the rim. This system relies on special rims and tubeless-ready tires. The space inside the tire is filled with air, just like a regular tire, but there is no separate tube inside.
Unlike traditional tires that need an inner tube to hold air, tubeless tires use a liquid sealant to close small holes and keep air inside. This sealant also helps prevent punctures from thorns or sharp rocks. The tire and rim must be designed to fit tightly together, so air cannot escape.
Key parts of a tubeless system:
- Tubeless-ready tire: Designed to fit tightly and seal with the rim.
- Tubeless rim: Has a special shape and often includes a rim strip to help seal the connection.
- Valve: A special tubeless valve is installed in the rim to allow air in and out.
- Sealant: Liquid that seals small holes and helps maintain air pressure.
This combination creates a system that keeps air inside the tire, even without an inner tube. It also allows the tire to flex and grip the ground better, which is important for mountain biking.
How Do Tubeless Tires Hold Air?
The main challenge with tubeless tires is keeping air inside the tire and rim. The tire bead—the edge of the tire—must fit tightly against the rim’s lip. This creates an airtight seal. When you inflate the tire, the pressure pushes the bead against the rim, making the seal even stronger.
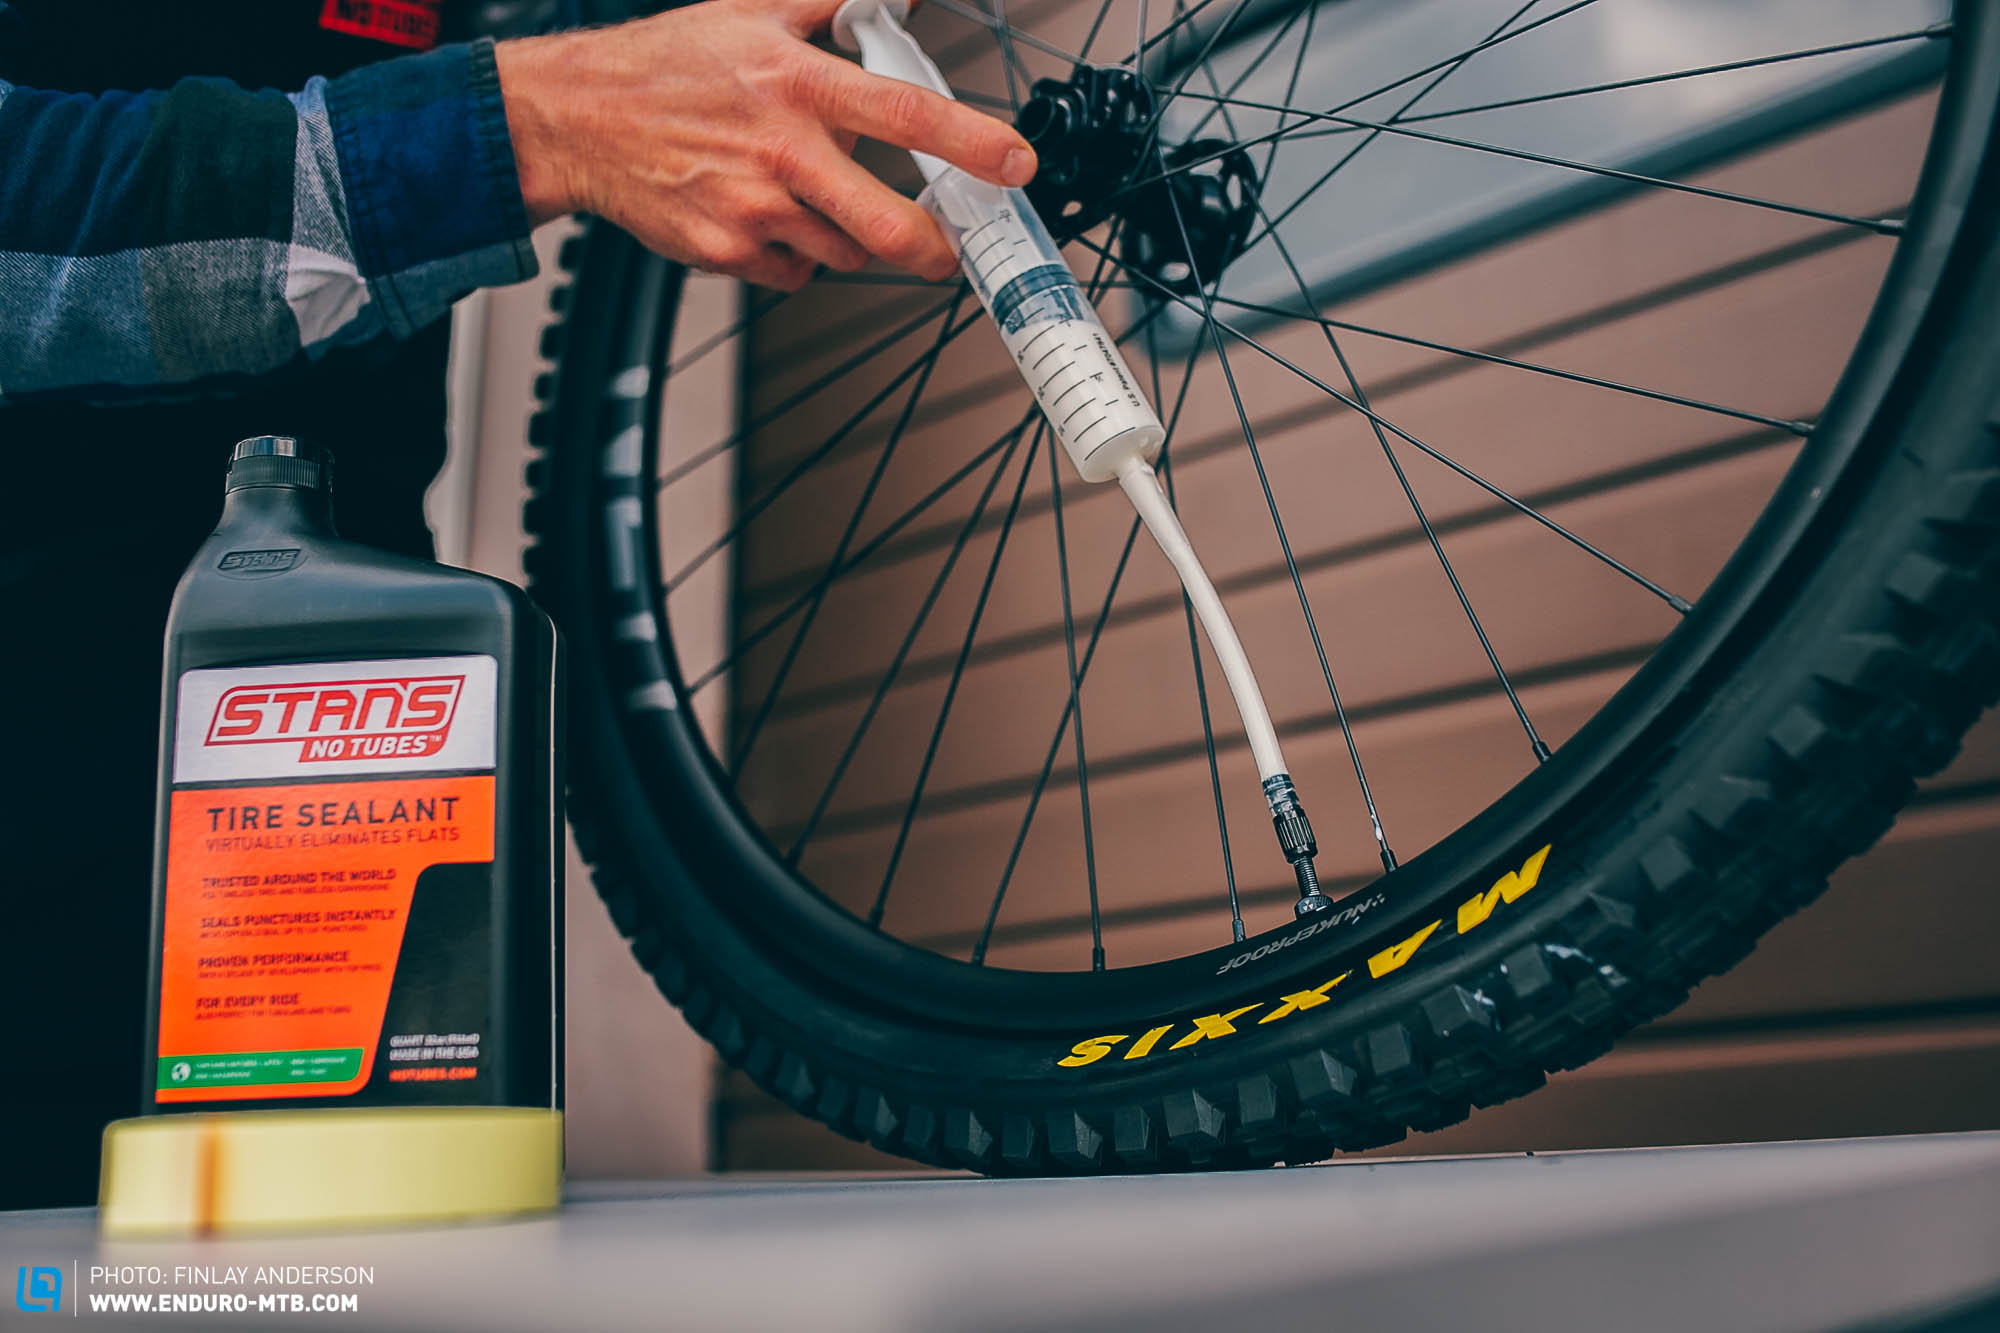
A liquid sealant is added inside the tire. This sealant spreads around as the tire rotates. If there is a small hole or gap, the sealant quickly plugs it. Most mountain bike riders use latex-based sealants, which are lightweight and effective.
Here is how air stays inside:
- The bead fits tightly against the rim.
- Sealant fills tiny gaps and seals small holes.
- The rim tape (or strip) covers spoke holes to prevent leaks.
- A tubeless valve fits snugly in the rim to allow inflation.
Over time, sealant can dry out or need replacing. Most riders check their sealant every 2–3 months.
Airtight Technology
Tubeless-ready rims and tires use precision engineering. The rim has a hook or channel that holds the tire bead in place. The tire bead is often made of strong materials like Kevlar. This keeps the tire from popping off, even at low pressures.
Some high-end rims use a “hookless” design. These rely on the tire’s shape and tight fit rather than a physical hook. Both systems work well, but you must always use compatible tires and rims.
Benefits Of Tubeless Mountain Bike Tires
Tubeless tires are popular for many reasons. Here’s why mountain bikers love them:
1. Fewer Flats (punctures)
Sealant inside the tire can quickly seal small punctures. For example, if you hit a thorn or a sharp rock, the sealant plugs the hole before you lose much air. This means you can keep riding without stopping to fix a flat.
2. Better Traction
Without a tube, you can run lower tire pressure. Lower pressure allows the tire to flex and grip the ground better. This is especially useful on loose or rocky trails. Riders often see improved control, especially when cornering or riding over rough terrain.
3. Smoother Ride
Lower pressure also makes the ride feel softer. The tire absorbs bumps and shocks. This reduces fatigue and makes long rides more comfortable.
4. Lighter Weight
Removing the inner tube saves weight. Every gram counts, especially on climbs. Some setups save 100–200 grams per wheel.
5. More Reliable
Because flats are less common and tires stay sealed, you spend less time fixing problems. This is important for long rides or races.
6. Easy Repairs
If you get a bigger puncture, you can still use a plug kit or even add a tube as a backup. This flexibility makes tubeless systems practical for all riders.
Comparing Tubeless Vs. Traditional Tube Tires
Understanding the difference between tubeless and tube tires can help you decide which is right for you. Here’s a simple comparison:
| Feature | Tubeless Tires | Tube Tires |
|---|---|---|
| Flat Protection | Excellent (sealant plugs small holes) | Limited (tube can puncture easily) |
| Weight | Lighter (no tube) | Heavier (tube adds weight) |
| Tire Pressure | Lower pressure possible | Must stay higher to avoid pinch flats |
| Ride Quality | Smoother | Stiffer |
| Setup | More complex | Simple |
| Maintenance | Sealant needs checking | Tube replacement |
Tubeless tires have clear advantages, but they require more careful setup and maintenance.

Credit: lebelbicycles.com
How To Set Up Tubeless Mountain Bike Tires
Setting up tubeless tires is not difficult, but it does take some care. Here’s a step-by-step guide:
- Check Compatibility
- Make sure your rims are tubeless-ready.
- Use tubeless-ready tires and valves.
- Clean the Rim
- Remove old tape or residue.
- Wipe rim with alcohol for a clean surface.
- Install Rim Tape
- Rim tape covers spoke holes and creates a seal.
- Use tape made for tubeless setups.
- Insert Tubeless Valve
- Push the valve through the hole in the rim.
- Tighten the valve nut so it seals tightly.
- Mount the Tire
- Fit one side of the tire bead onto the rim.
- Fit the other side, leaving a small gap to add sealant.
- Add Sealant
- Pour recommended amount (usually 60–120ml for mountain tires) into the tire.
- Rotate the tire to spread sealant evenly.
- Seat the Bead
- Use a high-volume pump or compressor.
- Inflate quickly so the bead pops into place.
- Check for Leaks
- Spin and shake the wheel.
- Look for bubbles or hissing sounds.
- Inflate to Desired Pressure
- Most mountain bike tires work well at 20–30 psi.
- Lower pressure for better traction, higher for more protection.
- Ride and Recheck
- Test on a short ride.
- Recheck pressure and sealant after a few days.
Common Setup Mistakes
Many beginners struggle with tubeless setup. Here are mistakes to avoid:
- Not using enough sealant
- Using non-tubeless rims or tires
- Not cleaning the rim before taping
- Over-tightening the valve nut (can damage rim)
- Not inflating quickly (bead may not seat)
If you follow these steps, your tubeless tires should seal well and be ready for the trails.
Real-world Performance And Data
Tubeless tires are now used by professional racers and everyday riders. Let’s look at some real-world numbers:
- Flat rate reduction: Studies show tubeless tires reduce punctures by 80% compared to tube tires.
- Weight savings: Typical tubeless setups save 150g per wheel.
- Pressure range: Tubeless tires can safely run as low as 18 psi, while tube tires often need at least 25 psi.
- Rolling resistance: Tests by Bicycle Rolling Resistance show tubeless tires can reduce rolling resistance by 5–10%.
This data shows tubeless systems are not just marketing hype—they deliver measurable improvements.
Credit: bikerumor.com
Choosing Tubeless Tires And Rims
Picking the right tubeless components is important. Here’s what to look for:
Tire Compatibility
Use tubeless-ready tires. These have strong beads and thicker sidewalls. Brands like Maxxis, Schwalbe, and Continental offer many choices.
Rim Design
Tubeless rims have a deeper center channel and a wider bead seat. Popular brands include Stan’s NoTubes, DT Swiss, and Mavic.
Sealant Quality
Choose a sealant that works in your climate. Latex-based sealants work well in most conditions, but there are specialty options for cold or hot climates.
Valve Choice
Tubeless valves are available in different lengths. Make sure the valve fits your rim depth. Some valves have removable cores, which makes adding sealant easier.
Size And Width
Match your tire width to your riding style and rim width. Wider tires give more grip but may be heavier.
Price Considerations
Tubeless setups cost more upfront. Expect to pay $30–$80 per tire and $20–$40 per valve kit. However, the savings in tubes, patches, and less downtime can make up for the cost.
Maintenance And Troubleshooting
Keeping tubeless tires working well requires some attention. Here’s what to check:
Sealant Refresh
Sealant dries out over time. Check every 2–3 months. Add more if needed.
Air Pressure
Tubeless tires can lose air slowly. Check pressure before every ride.
Cleaning
Dirt and old sealant can build up inside. Remove the tire once a year and clean the rim.
Valve Issues
Valves can clog with dried sealant. Remove the core and clean as needed.
Dealing With Punctures
Small punctures are sealed automatically. For larger cuts, use a tire plug kit. If that fails, install a tube to get home.
Credit: enduro-mtb.com
When Tubeless May Not Be The Best Choice
Tubeless tires are great, but they are not perfect for everyone.
- Non-tubeless rims: Older bikes may not have compatible rims.
- Cold weather: Sealant can freeze below 20°F (-6°C).
- Long-distance touring: Some riders prefer tubes for simplicity.
- Extreme conditions: Deep mud or sand can sometimes cause bead leaks.
If you ride in these situations, tubes may still be a better option.
Comparing Sealants
Different sealants offer different performance. Here’s a quick comparison:
| Sealant Brand | Seals Punctures | Longevity | Temperature Range | Cost |
|---|---|---|---|---|
| Stan’s NoTubes | Up to 6mm | 2–6 months | 20–120°F | $$ |
| Orange Seal | Up to 8mm | 3–6 months | -20–120°F | $$$ |
| Slime | Up to 3mm | 4–8 months | 32–100°F | $ |
Choose a sealant that fits your riding conditions and budget.
Tubeless Tire Pressure Guide
Finding the right tire pressure is key for performance and comfort.
| Rider Weight (lbs) | Trail Type | Recommended Pressure (psi) |
|---|---|---|
| 120–150 | Smooth | 18–22 |
| 151–180 | Rough | 22–26 |
| 181–210 | Technical | 24–28 |
| 210+ | Mixed | 26–30 |
Lower pressures give better grip. Higher pressures protect against rim damage. Adjust based on your weight and trail conditions.
Insider Tips For Tubeless Success
Even experienced riders can miss these tips:
- Keep a spare tube: Tubeless is reliable, but not perfect. Carry a tube for emergencies.
- Use a floor pump with a reservoir: This helps seat the bead quickly.
- Check bead seating: If the tire wobbles, reseat the bead.
- Rotate tires: Sealant can pool in one spot if tires sit unused. Rotate tires regularly.
- Avoid cheap rim tape: Poor tape leaks air and ruins the seal.
These tips can save you time and trouble on the trail.
Frequently Asked Questions
What Happens If I Get A Big Puncture With Tubeless Tires?
If the hole is too large for sealant to fix, use a tire plug to seal the gap. If that doesn’t work, you can install a regular tube to get home. Always carry a plug kit and a spare tube.
How Often Should I Add New Sealant?
Most riders add sealant every 2–3 months. If you ride in hot climates, check more often. Sealant dries out faster in warm weather.
Can I Use Regular Tires And Rims For Tubeless Setup?
It is possible, but not recommended. Tubeless-ready tires and rims are designed for airtight seals. Regular tires may not fit tightly, and regular rims may leak air.
Is Tubeless Harder To Set Up Than Tube Tires?
Tubeless setup takes more time and care. You need rim tape, valves, and sealant. Once set up, maintenance is not much harder than tubes. The initial setup is the most challenging part.
Do Tubeless Tires Work In All Weather Conditions?
Tubeless tires work well in most conditions. However, some sealants can freeze in cold temperatures. Use a sealant rated for your climate, and check tire pressure more often in extreme weather.
Switching to tubeless mountain bike tires can make your rides smoother, safer, and more fun. With the right setup and a little maintenance, you will enjoy fewer flats and better traction on any trail. The technology is proven, and more riders are making the switch every year.
If you are ready to try tubeless, follow the steps and tips above, and enjoy the benefits that come with modern mountain bike tires.

Hello Guys! I am John Reese, a professional biker and my hobby is biking! I have been biking for last 12 years and I love using bikes while outing as well. Based on my experiences with the different type of bikes (mountain bikes, road bikes and hybrid bikes); I am sharing my opinion about various bikes so that a beginner can get started right away. Happy reading!