Mountain biking is more than just pedaling through dirt trails and rocky paths. It’s about control, comfort, and the ability to tackle tough terrain. One of the most important parts of a mountain bike is the rear suspension. Many riders know it helps with bumps, but few understand how it really works, how it changes the ride, and why choosing the right system matters. If you’ve ever wondered what happens under your seat when you hit a root or drop, this guide will give you clear answers.
What Is Rear Suspension On A Mountain Bike?
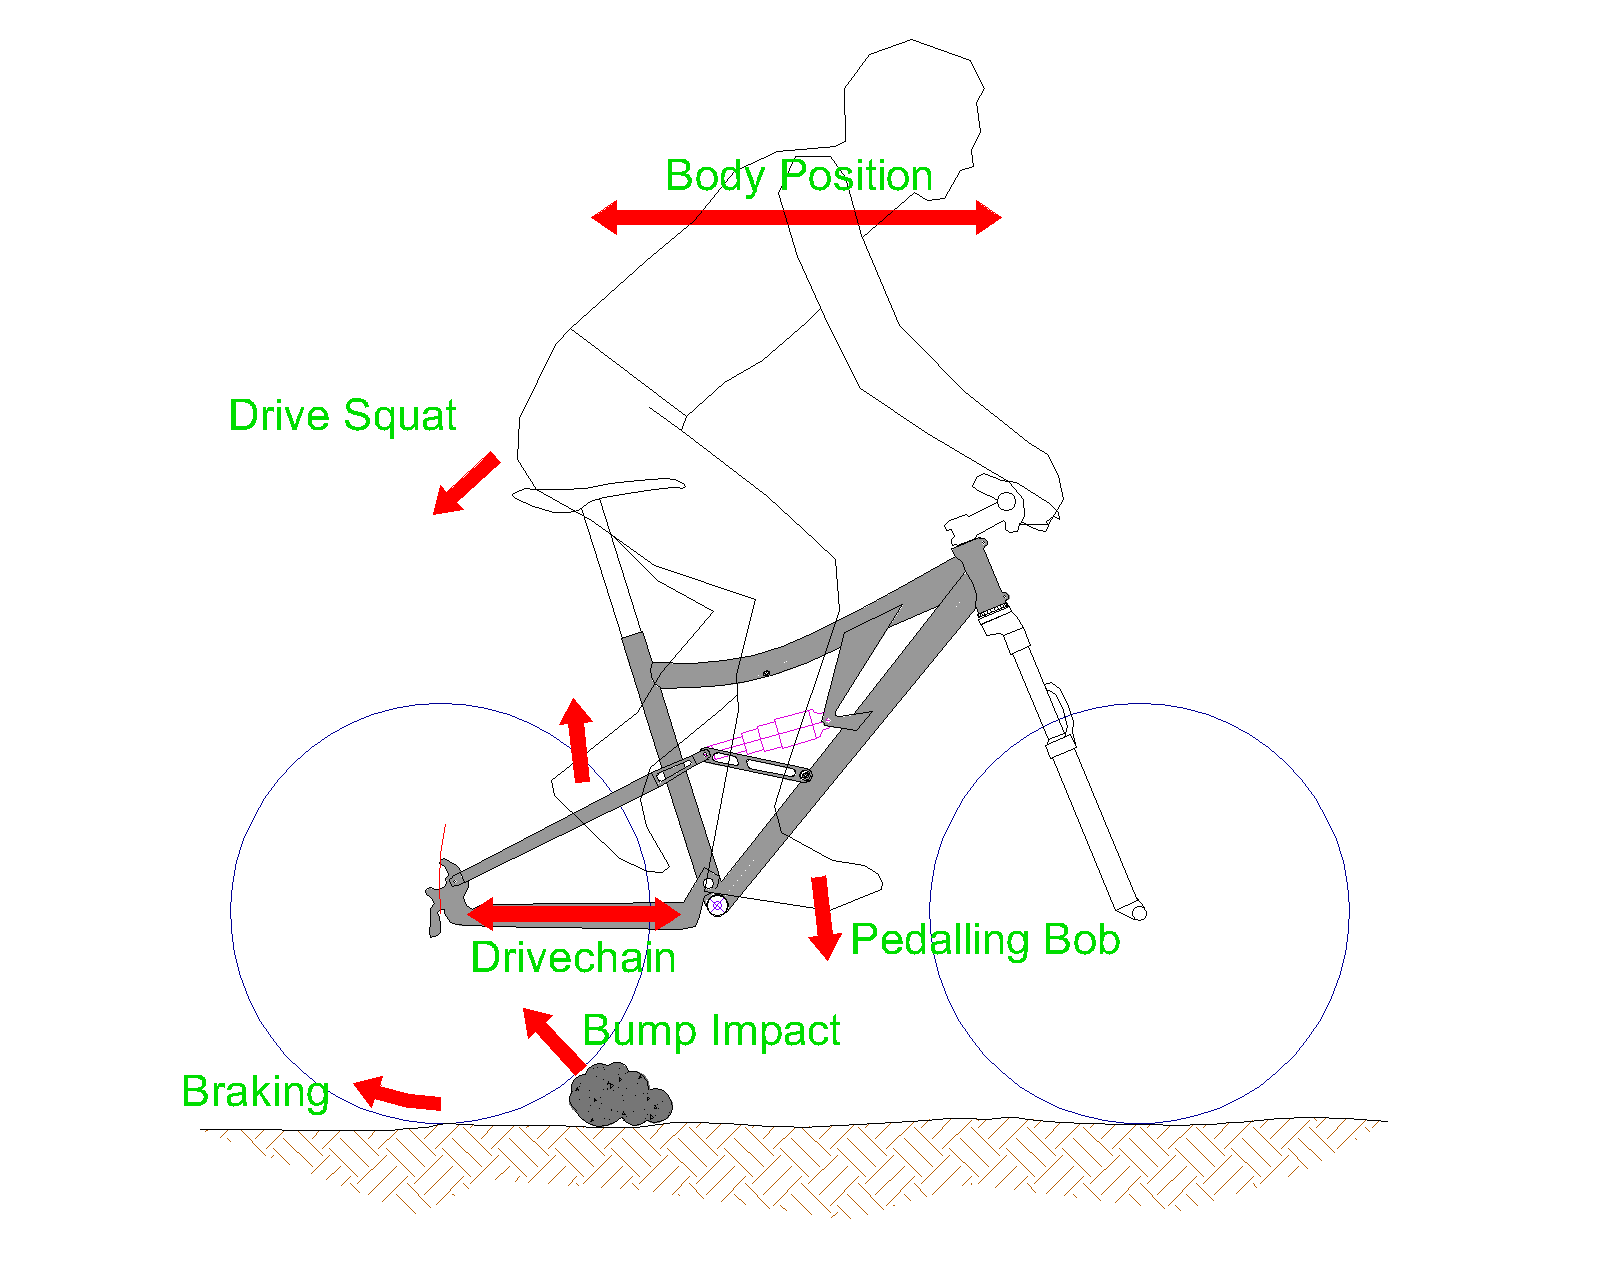
Rear suspension is the system that lets the back wheel move up and down when you hit bumps or rough ground. It’s made up of parts like the shock absorber, linkages, and sometimes pivots. When the rear wheel goes over a rock or drop, the suspension compresses, absorbing the impact. This keeps you in control, helps the tires grip the ground, and makes the ride smoother.
Mountain bikes with rear suspension are called full-suspension bikes. These bikes have both front (fork) and rear suspension, while hardtail bikes only have suspension in the front. Rear suspension is a big reason why riders can go faster and safer through technical trails.
Key Parts Of Rear Suspension
Understanding how rear suspension works means knowing its main parts. Each plays a different role and affects how the bike feels.
Shock Absorber
The shock absorber is the heart of the rear suspension. It’s usually a cylinder filled with air or oil. When the bike hits a bump, the shock compresses. The shock is responsible for controlling how quickly the suspension moves and returns.
- Air shocks use air pressure to provide resistance.
- Coil shocks use a metal spring.
Air shocks are lighter and easier to adjust, while coil shocks are often smoother and better for heavy-duty riding.
Linkages
Linkages connect the shock absorber to the bike frame and rear wheel. They help control how the suspension moves. Different designs make the suspension work in different ways, changing how the bike reacts to bumps and pedaling.
Pivots
Pivots are rotating points on the frame. They let the rear triangle move up and down. The placement of pivots affects how the suspension works.
Rear Triangle
The rear triangle is the part of the frame holding the rear wheel. It moves when the suspension compresses.
Lockout
Some shocks have a lockout feature. This lets you “turn off” the suspension for smoother, more efficient pedaling on flat ground.

Credit: www.youtube.com
How Rear Suspension Works: Step-by-step
To understand rear suspension, picture what happens when you ride over a bump:
- The rear wheel hits a bump and moves upward.
- The movement pushes the rear triangle, which compresses the shock absorber.
- The shock absorbs the energy, slowing down the movement and preventing a harsh impact.
- As you pass the bump, the shock extends, returning to its original position.
This process happens in milliseconds, making the ride smoother and keeping the tire in contact with the ground.
Damping
Damping is how the shock absorber controls speed. It slows down how fast the suspension compresses and rebounds. Good damping keeps the bike from bouncing or feeling unstable.
- Compression damping slows down how quickly the shock compresses.
- Rebound damping controls how fast it returns to normal.
Both are adjustable on most modern shocks.
Spring Rate
The spring rate is how hard or soft the shock is. Air shocks can be made harder or softer by changing air pressure. Coil shocks use different springs for different weights.
Types Of Rear Suspension Designs
Bike makers use many different designs. Each has strengths and weaknesses. Here are the most common types:
Single Pivot
A single pivot bike has one main pivot point. The rear triangle rotates around this point. It’s simple, light, and easy to maintain. However, it can be less effective at controlling pedal movement.
Horst Link (four-bar)
The Horst Link uses extra pivots and linkages. This design separates braking forces from suspension movement, making the bike smoother when you brake.
Virtual Pivot Point (vpp)
VPP bikes use two short links that create a “virtual” pivot point. This improves pedaling efficiency and smoothness over bumps. VPP bikes are popular for their balance of comfort and control.
Split Pivot
Split Pivot combines the single pivot with a floating brake pivot. This helps the suspension stay active even when braking hard.
Linkage Driven Single Pivot
This design uses linkages to control how the single pivot suspension moves, making it more adjustable and controlled.
Comparison Of Popular Suspension Designs
Below is a quick comparison of the most common rear suspension designs:
| Design | Pedal Efficiency | Braking Performance | Maintenance |
|---|---|---|---|
| Single Pivot | Medium | Medium | Easy |
| Horst Link | High | High | Medium |
| VPP | High | Medium | Medium |
| Split Pivot | Medium | High | Medium |

Credit: www.wideopenmountainbike.com
Why Rear Suspension Matters
Rear suspension isn’t just about comfort. It affects nearly every part of your ride.
Control
Good suspension keeps the rear wheel in contact with the ground, which improves traction. This means you can brake harder and turn faster without sliding.
Speed
With rear suspension, you can ride faster over rough ground. The bike absorbs impacts, letting you maintain speed and momentum.
Safety
A smoother ride helps prevent crashes. Sudden bumps can throw you off balance, but suspension reduces those shocks.
Fatigue
Rear suspension absorbs vibrations and big hits, so your body doesn’t have to. You’ll feel less tired after a long ride.
How Suspension Impacts Different Riding Styles
Not every mountain bike rider needs the same rear suspension. The type and setup depend on the terrain and riding style.
Cross Country (xc)
XC riders go for speed and efficiency. Rear suspension is often short travel (about 80-120 mm). It’s light and helps with quick climbs and fast descents.
Trail Riding
Trail bikes use rear suspension with medium travel (120-150 mm). This is a balance between comfort and efficiency, good for mixed terrain.
Enduro
Enduro bikes have longer travel (150-170 mm). They are built for hard descents and technical trails. The suspension is tuned for control at high speed.
Downhill
Downhill bikes use the longest rear suspension (180-220 mm). They are heavy and strong, made for steep drops and big jumps.
Comparison Of Suspension Travel By Riding Style
You can see the differences in suspension travel below:
| Riding Style | Suspension Travel (mm) | Main Focus |
|---|---|---|
| Cross Country | 80-120 | Speed & Efficiency |
| Trail | 120-150 | Balanced |
| Enduro | 150-170 | Control & Descents |
| Downhill | 180-220 | Maximum Cushioning |
Credit: www.wideopenmountainbike.com
Adjusting Rear Suspension: Setup And Tuning
Getting the right setup is key to good performance. Here are important steps and tips:
Setting Sag
Sag is how much the suspension compresses when you sit on the bike. Too little sag means the suspension won’t absorb bumps well. Too much sag makes the bike feel sluggish.
- Typical sag: 25-30% of the shock’s travel
To check sag:
- Sit on the bike in your normal riding position.
- Measure how much the shock compresses.
- Adjust air pressure or spring tension to reach the right sag.
Adjusting Damping
Most shocks let you adjust rebound and compression damping.
- Rebound: Controls how fast the shock returns after compressing.
- Compression: Controls how fast the shock compresses.
If rebound is too fast, the bike can bounce. If it’s too slow, the suspension feels “dead. ” Compression affects how the bike handles big hits.
Air Pressure Or Coil Spring
- For air shocks, use a pump to increase or decrease air pressure.
- For coil shocks, switch to a stiffer or softer spring.
Lockout And Open Modes
Use lockout for smooth trails or climbs. Open mode is best for rough terrain.
Common Setup Mistakes
- Setting the sag without wearing full gear (helmet, backpack, etc.)
- Ignoring rebound and compression adjustments
- Using too much air pressure, making the suspension harsh
- Forgetting regular maintenance
Maintenance And Common Problems
Rear suspension needs regular care. Neglecting it can lead to poor performance and costly repairs.
Cleaning
Keep the shock clean. Dirt can damage seals and linkages. Wipe down after each ride.
Lubrication
Lubricate pivots and linkages. This prevents squeaks and keeps movement smooth.
Shock Service
Most shocks need service every 50-100 hours of riding. This includes replacing seals and oil.
Checking For Play
If you feel movement or hear clunks, check for loose pivots or worn bushings. Tighten bolts and replace parts as needed.
Common Problems
- Leaking oil: Means seals are worn.
- Reduced performance: Often caused by low air pressure or damaged parts.
- Stiff movement: May be dirt or lack of lubrication.
Maintenance Checklist
- Clean shock and linkages after each ride.
- Lubricate pivots monthly.
- Check air pressure before every ride.
- Service shock every 50-100 hours.
- Inspect for damage and wear regularly.
Real-world Data: How Suspension Affects Performance
Studies show rear suspension improves mountain biking in measurable ways. According to a test by BikeRadar, riders with rear suspension completed rough downhill runs 10-15% faster than hardtail bikes. Another survey found that riders felt 40% less fatigue after long rides on full-suspension bikes.
Suspension also helps with safety. In rocky terrain, bikes with rear suspension reduce the risk of losing traction by 30%. These numbers show why rear suspension is a big deal for many riders.
Choosing The Right Rear Suspension
When buying a mountain bike, picking the right rear suspension is key. Here’s what matters most:
Rider Weight And Height
Heavier riders need stronger shocks or springs. Tall riders may want bikes with longer travel.
Riding Style
Pick a suspension with the right travel for your trails. Don’t choose a downhill bike for XC trails.
Adjustability
Look for shocks with easy-to-use adjustments. This makes it simple to tune for different rides.
Maintenance Needs
If you ride often or in muddy places, choose a simple design with easy maintenance.
Budget
Rear suspension can add cost. Air shocks are usually more expensive, but they’re lighter and more adjustable.
Comparison Of Coil Vs. Air Shocks
Below is a quick comparison to help you choose:
| Shock Type | Weight | Adjustability | Durability | Cost |
|---|---|---|---|---|
| Air Shock | Light | High | Medium | High |
| Coil Shock | Heavy | Medium | High | Medium |
Non-obvious Insights For Beginners
Many beginners think more suspension is always better. In reality, too much travel can make the bike sluggish and hard to pedal on smooth trails. It’s important to match suspension travel with your riding style.
Another common mistake is ignoring shock setup. Even an expensive suspension won’t perform well if sag and damping aren’t adjusted correctly. Take time to learn how to set up your shock for your weight and terrain.
Advanced Tips For Getting The Most From Rear Suspension
- Record your settings: Write down your air pressure, sag, and damping. This helps you return to your preferred setup quickly.
- Test on different terrain: Adjust your suspension for rocky trails, smooth paths, or jumps. The best setup is not always the same.
- Use manufacturer recommendations: Most brands have setup guides. Follow them for a starting point, then fine-tune for your needs.
- Don’t forget tire pressure: Suspension works best when combined with the right tire pressure.
For more technical details about suspension systems, see the Bicycle Suspension Wikipedia page.
Frequently Asked Questions
How Often Should I Service My Rear Suspension?
Most manufacturers recommend servicing every 50-100 hours of riding. If you ride in muddy or dusty areas, check more often. Regular maintenance keeps the shock working smoothly and prevents expensive damage.
Can I Use The Same Rear Suspension Setup For All Trails?
No. Different trails need different setups. Use less sag and firmer damping for smooth trails. For rocky or downhill terrain, increase sag and soften damping. Adjust before each ride for best performance.
What’s The Difference Between Air And Coil Shocks?
Air shocks are lighter and easier to adjust. Coil shocks are heavier but offer smoother performance, especially for aggressive or downhill riding. Choose based on your riding style and need for adjustability.
Why Does My Suspension Feel Harsh?
Harsh suspension is usually caused by too much air pressure or stiff springs. Also, check your damping settings. Make sure the shock is not locked out and has the correct sag.
Is Rear Suspension Worth The Extra Cost?
For most riders, yes. Rear suspension improves control, comfort, and safety. It’s especially valuable on rough or technical trails. If you mainly ride smooth paths, a hardtail may be fine, but for mixed or challenging terrain, rear suspension is often worth it.
Rear suspension is a game-changer for mountain biking. It makes rough trails smoother, helps you ride faster, and keeps you safer. Understanding how it works, how to set it up, and how to care for it will transform your riding experience.
Whether you’re a beginner or a seasoned rider, taking the time to learn about rear suspension will pay off every time you hit the trail.

Hello Guys! I am John Reese, a professional biker and my hobby is biking! I have been biking for last 12 years and I love using bikes while outing as well. Based on my experiences with the different type of bikes (mountain bikes, road bikes and hybrid bikes); I am sharing my opinion about various bikes so that a beginner can get started right away. Happy reading!