When you ride a mountain bike, the way your tires are inflated affects every part of your journey. Tire pressure changes how your bike feels, how fast you roll, and how safe you are. Too much pressure, and your tires feel hard, your grip suffers, and every bump shakes your bones.
Too little, and you risk flat tires, slow rolling, or even rim damage. Finding the right balance is not just about numbers—it’s about terrain, tire size, rider weight, and even weather. Many riders think there’s a one-size-fits-all answer, but that’s not true.
This guide will help you understand how inflated mountain bike tires should be, why it matters, and how to set the best pressure for your riding style.
Why Tire Pressure Matters For Mountain Bikes
Tire pressure is one of the most important factors in mountain biking. It’s not just about comfort—it impacts traction, control, and safety. When tires are inflated correctly, they grip the trail better, absorb shocks, and help you avoid accidents.
Low tire pressure lets the tire mold to the ground, giving more grip on loose or slippery surfaces. High pressure makes the tire firm, so it rolls faster but has less grip. If pressure is too high, your bike bounces off rocks and roots.
If it’s too low, your tire can pinch against the rim or even fall off.
Many beginners miss how much tire pressure affects their ride. They either stick with the factory recommendations or copy what friends use, not realizing that a few PSI can change everything. Even experienced riders sometimes forget to check their tires before heading out.
The right pressure gives you confidence, control, and a safer ride.
Understanding Psi: What Does It Mean?
PSI stands for pounds per square inch. It’s the unit used to measure tire pressure. Most mountain bike tires are rated between 20 and 40 PSI, but this is only a starting point. The ideal PSI depends on your weight, tire width, type of riding, and the trail conditions.
A tire’s sidewall shows a recommended PSI range, but this is often too broad. For example, a tire may say 30–50 PSI, but riding at 50 PSI off-road feels harsh and unsafe. Manufacturers set wide ranges because they don’t know your specific needs.
It’s up to you to fine-tune within this range.
Many riders use digital or analog pressure gauges. Don’t rely on squeezing the tire—this method is inaccurate and can lead to mistakes.

Credit: www.amazon.com
Key Factors Affecting Mountain Bike Tire Pressure
To find the best tire inflation, you need to consider several factors:
- Rider weight: Heavier riders need higher PSI to avoid tire squishing and rim damage. Lighter riders can use lower PSI for more grip.
- Tire width: Wider tires can handle lower PSI because they have more volume. Narrow tires need higher PSI to avoid pinch flats.
- Terrain: Rocky, rooty, or loose trails require lower PSI for grip. Smooth trails allow higher PSI for speed.
- Tubeless vs. tube tires: Tubeless tires handle lower PSI without pinch flats, while tube tires need more pressure.
- Riding style: Aggressive riders benefit from lower PSI for traction. Casual riders may prefer a slightly higher PSI for easier rolling.
- Weather: Wet or muddy conditions require lower PSI for better contact and grip.
Let’s look at these factors more closely.
Rider Weight And Tire Pressure
Your weight has a big effect on how much air you need. A 120-pound rider can run lower PSI than a 200-pound rider. If you’re heavier, your tires compress more, so you need extra air to keep them from bottoming out.
Here’s a simple rule: For every 10 pounds above or below average (about 160 pounds), adjust your PSI by 1–2. For example, a 200-pound rider might add 4–8 PSI more than someone who weighs 120 pounds.
Tire Width And Volume
Modern mountain bikes use wide tires—2. 3 to 2. 6 inches for trail bikes, up to 2. 8–3. 0 inches for plus-size bikes. Wider tires have more air inside, so they can run lower PSI without risk. If your tire is narrow (2.
0–2. 2 inches), you need a bit more pressure.
Here’s a basic comparison:
| Tire Width | Recommended PSI Range |
|---|---|
| 2.0–2.2 inches | 30–40 PSI |
| 2.3–2.6 inches | 25–35 PSI |
| 2.8–3.0 inches (plus size) | 15–25 PSI |
These are starting points. Adjust based on your weight and conditions.
Terrain And Trail Surface
Different surfaces change how much air you need:
- Rocky/technical: Lower PSI gives better grip, absorbs bumps.
- Loose/gravel: Lower PSI helps prevent sliding.
- Hardpack/smooth: Higher PSI rolls faster.
- Mud/wet: Lower PSI improves traction.
If you switch between trails, adjust your pressure before each ride. Many experienced riders carry a mini pump and gauge for quick changes.
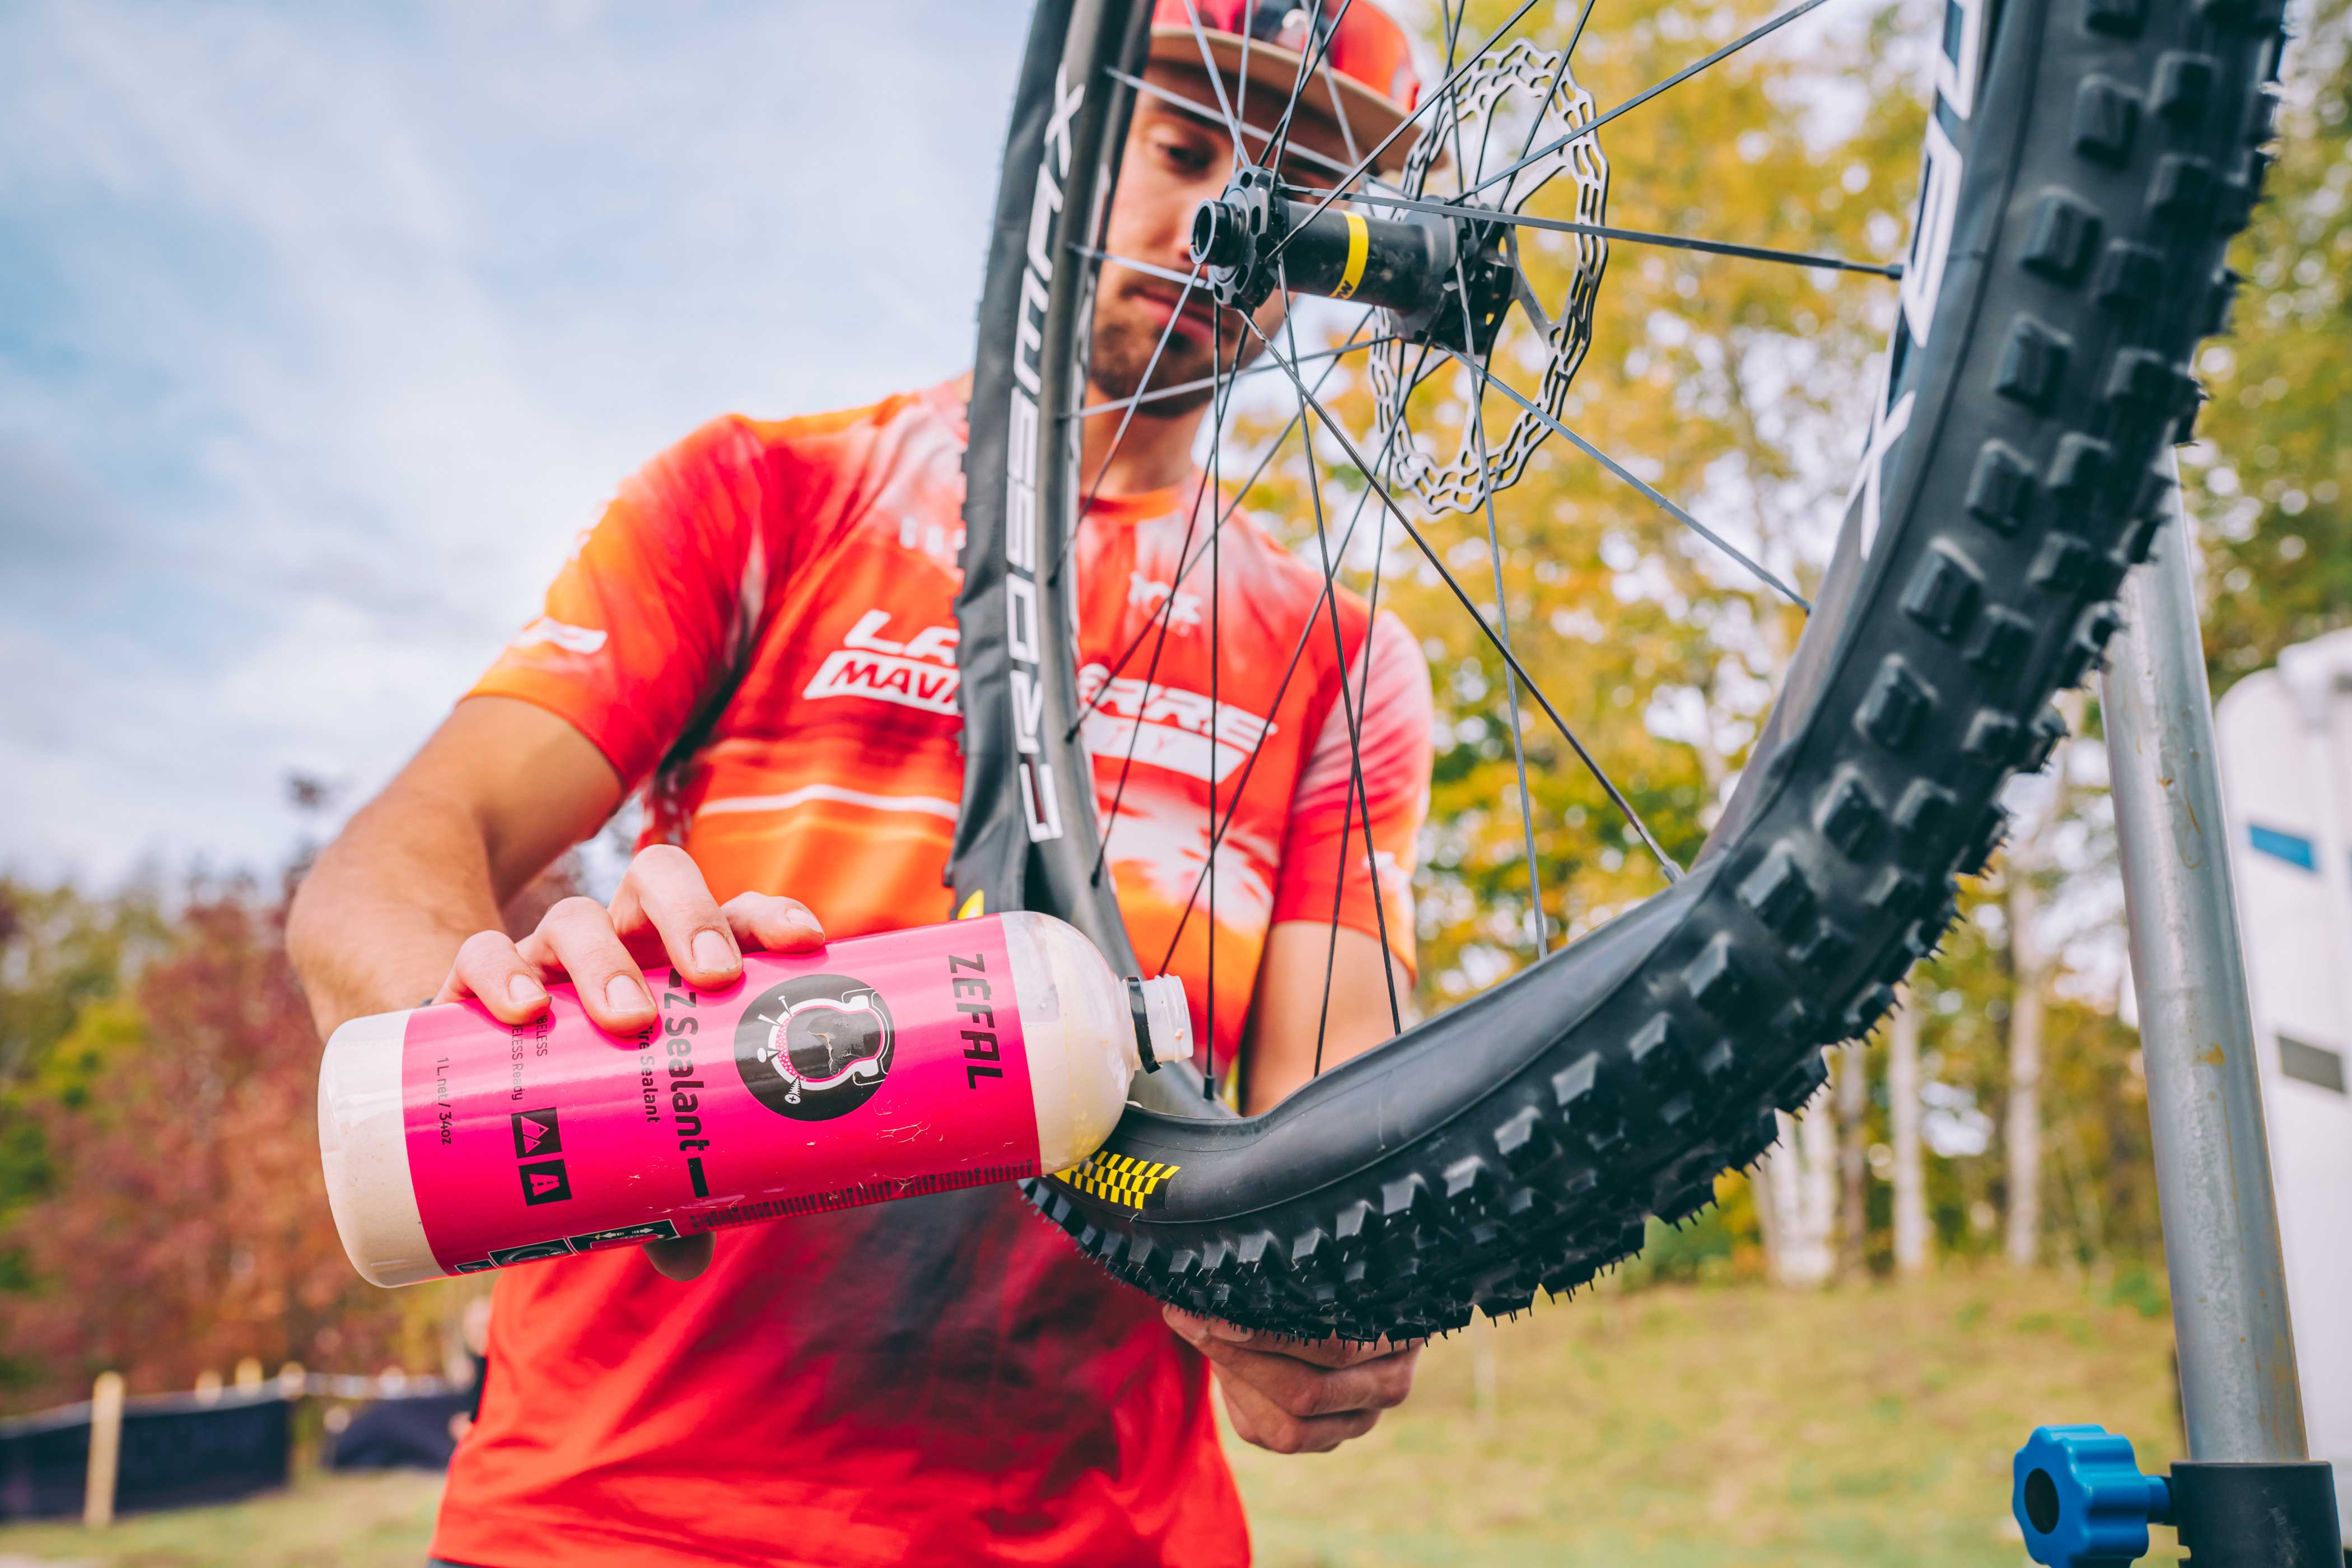
Tubeless Vs. Tube Tires
Tubeless setups are more common now. They let you run lower PSI without worrying about pinch flats (when the tire compresses and pinches the tube against the rim). Tubeless tires seal themselves using liquid inside, so they resist small leaks and punctures.
Tube tires need higher PSI because they’re more vulnerable. If you go too low, you risk “snakebite” flats, where the tube gets pinched.
Here’s a simple comparison:
| Tire Type | Safe PSI Range | Flat Risk |
|---|---|---|
| Tubeless | 18–30 PSI | Low |
| Tube | 25–40 PSI | Medium–High |
Tubeless costs more upfront but gives more flexibility. If you ride rough trails, consider switching.
Riding Style
Aggressive riders push their bikes harder, so they need more grip. Lower PSI lets the tire stick to the trail. If you ride fast, jump, or corner sharply, try dropping 2–3 PSI below your normal setting.
If you ride gently or mostly on smooth paths, higher PSI may be easier to pedal and maintain speed.
Weather Effects
Temperature changes affect tire pressure. Cold weather contracts air, lowering PSI. Hot weather expands air, raising PSI. Always check your tires before riding, especially if conditions change.
Wet or muddy trails need lower PSI for more contact with the ground. Dry and dusty trails may do better with slightly higher PSI.
How To Check And Adjust Mountain Bike Tire Pressure
Checking your tire pressure is simple but important. Most riders use a digital pressure gauge or a pump with a built-in gauge. Here’s a quick step-by-step:
- Remove the valve cap (usually Presta or Schrader).
- Attach the gauge or pump securely.
- Read the PSI on the display.
- Add or release air as needed.
- Replace the valve cap.
Don’t trust your fingers—squeezing the tire gives a poor estimate. Even a small change in PSI can make a big difference.
Practical Example: Setting Tire Pressure For A Trail Ride
Let’s say you weigh 160 pounds, ride a 2. 35-inch tubeless tire, and plan to hit rocky trails.
- Start with 25 PSI front, 27 PSI rear.
- Ride for a few minutes, feel how the bike handles.
- If it feels harsh, drop 1–2 PSI.
- If it feels too soft or bouncy, add 1–2 PSI.
Adjusting by small amounts helps you find the sweet spot. It’s normal for riders to fine-tune throughout the season.
Common Mistakes In Mountain Bike Tire Inflation
Many riders make mistakes with tire inflation. Here are some of the most frequent:
- Using maximum recommended PSI: The highest number on the tire is for extreme loads, not regular riding.
- Ignoring terrain changes: Not adjusting for different trails leads to poor performance.
- Failing to check before rides: Tires lose air over time; always check before you ride.
- Relying on feel alone: Hand-squeezing is inaccurate.
- Not considering weight: Heavier riders often use too little air, risking rim damage.
These mistakes can make your ride harder, less safe, and less fun. Avoid them by checking your pressure often and adjusting as needed.
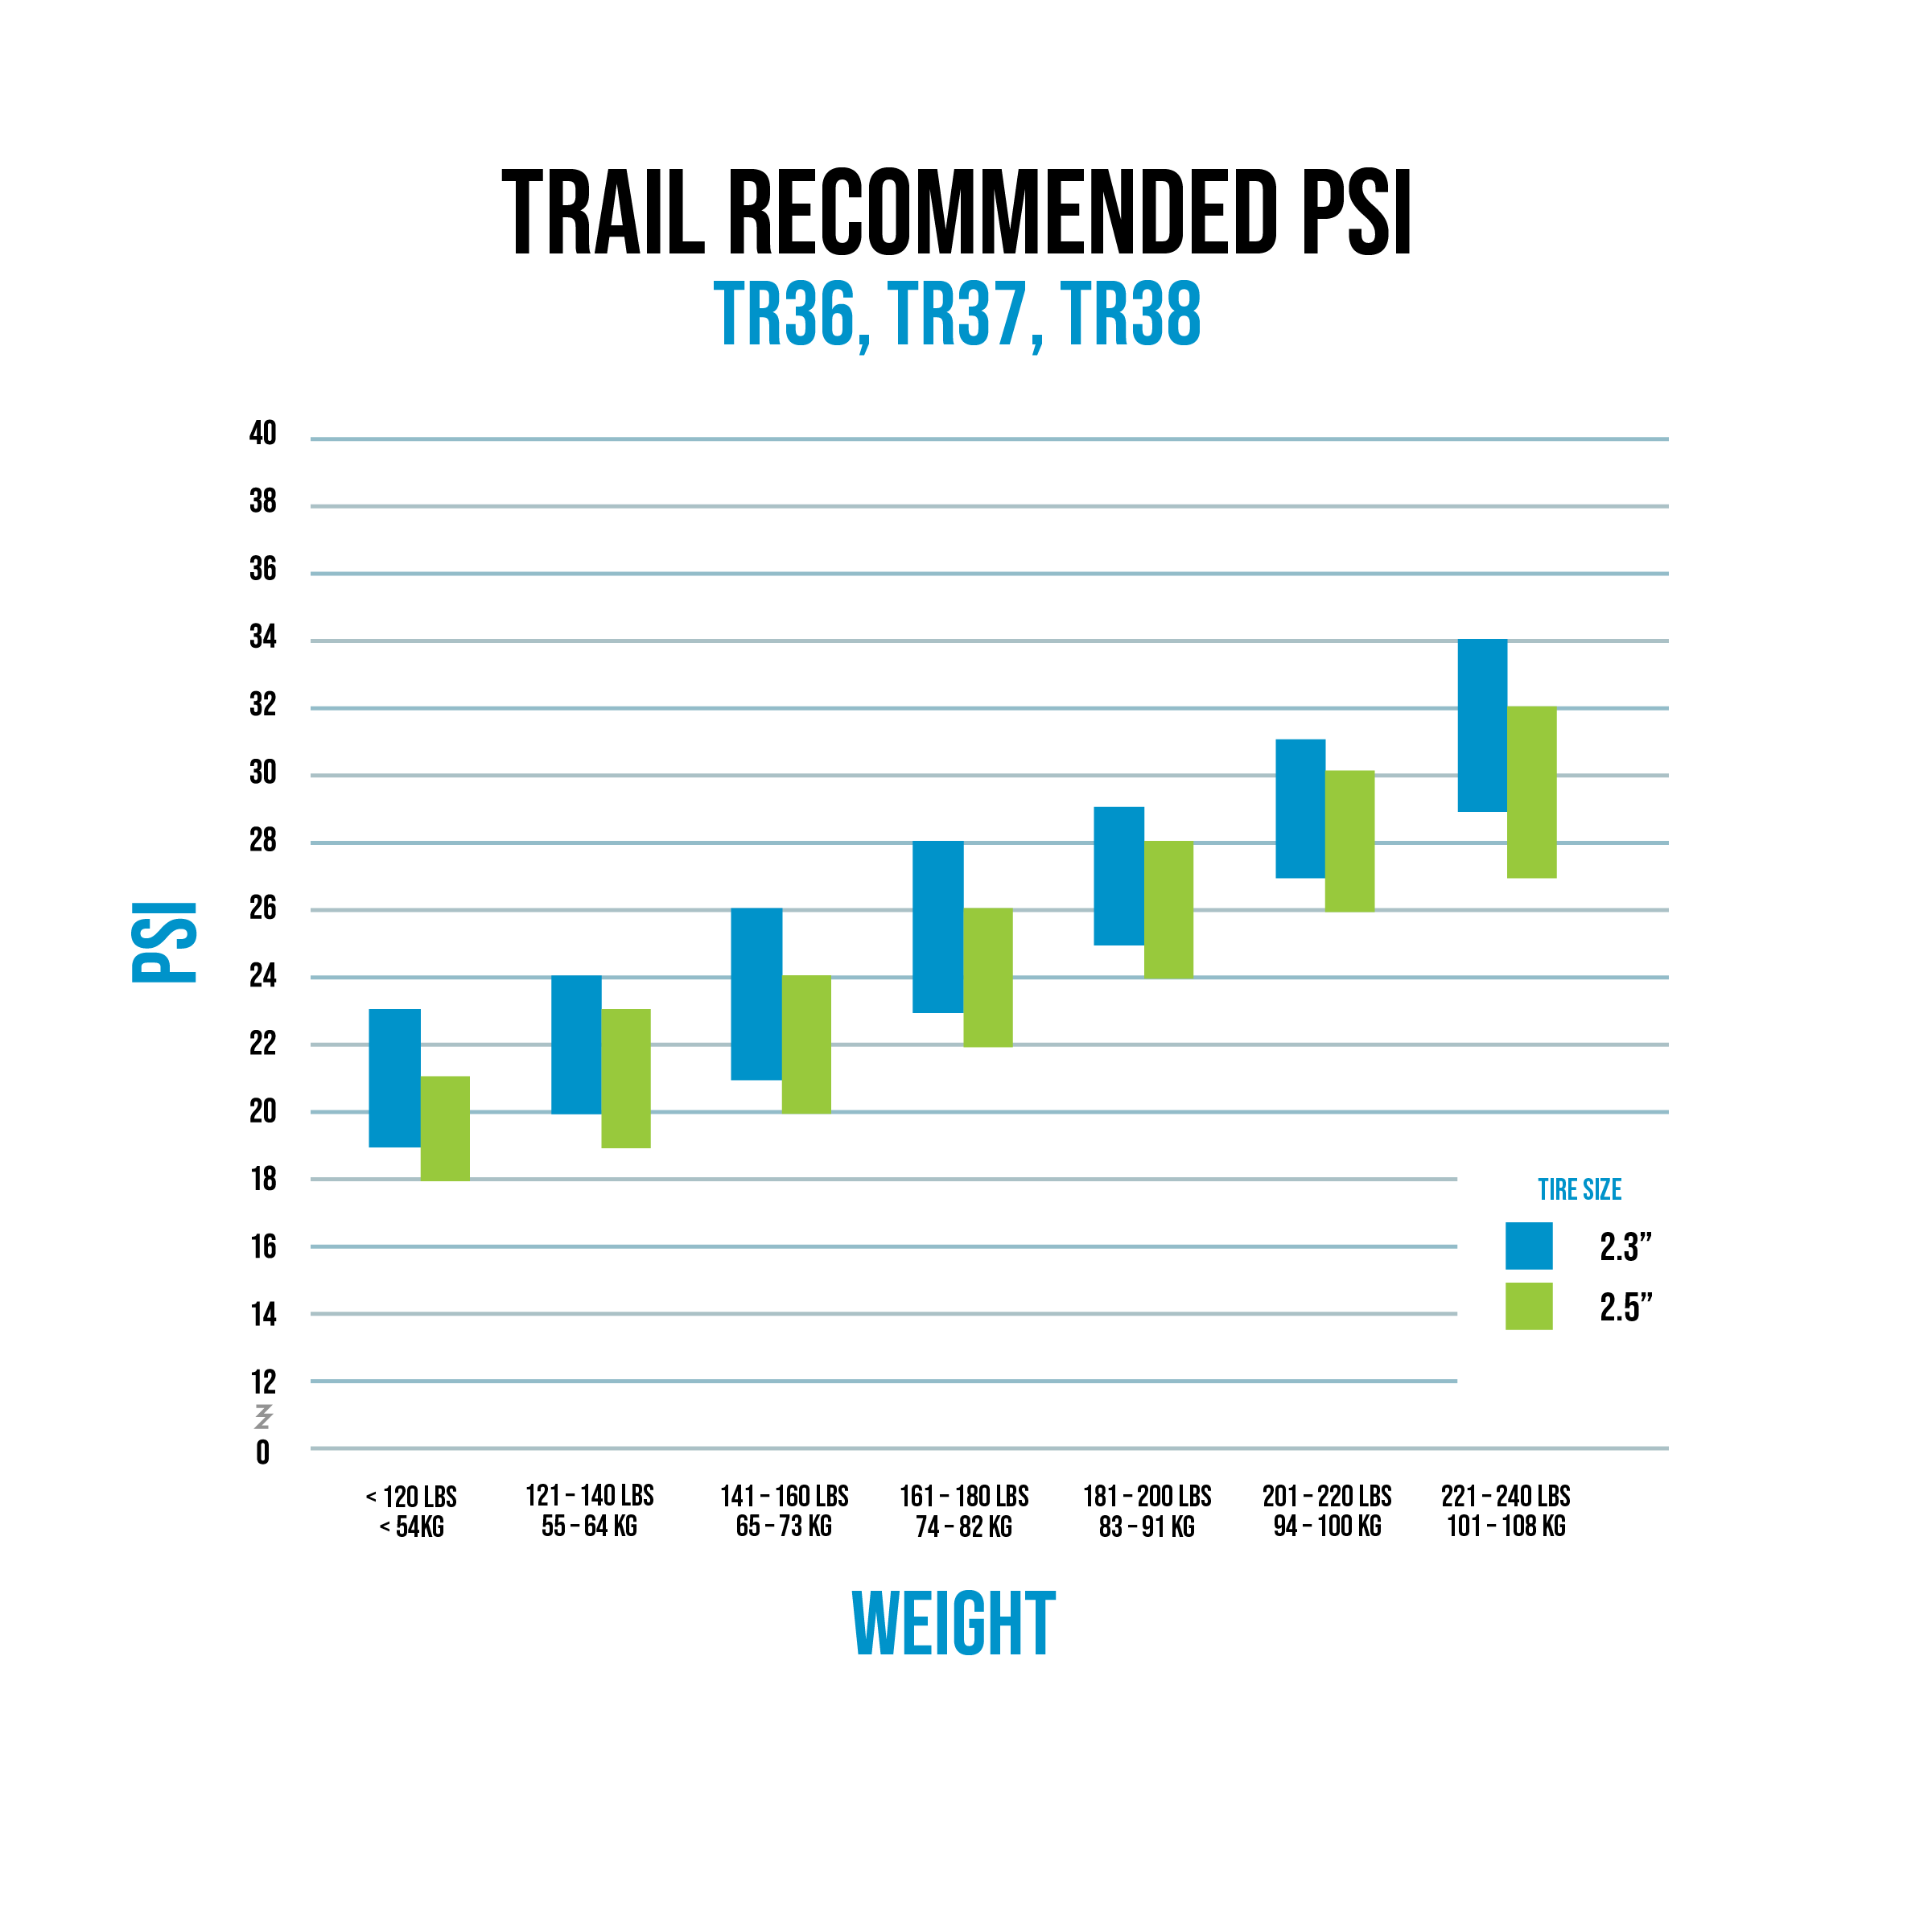
Recommended Psi For Different Mountain Bike Types
Mountain bikes come in several categories. Each has its own ideal tire pressure range. Here’s a breakdown:
Cross-country Bikes
- Tire width: 2.0–2.2 inches
- Typical PSI: 28–35
- Purpose: Speed and efficiency
- Best for: Hardpack, light trails
Trail/all-mountain Bikes
- Tire width: 2.3–2.6 inches
- Typical PSI: 22–30
- Purpose: Balance of grip and speed
- Best for: Mixed terrain
Enduro/downhill Bikes
- Tire width: 2.4–2.5 inches (sometimes wider)
- Typical PSI: 18–25
- Purpose: Maximum grip and control
- Best for: Steep, technical, rough terrain
Plus-size Bikes
- Tire width: 2.8–3.0 inches
- Typical PSI: 12–20
- Purpose: Extra grip, comfort
- Best for: Loose, soft surfaces
Fat Bikes
- Tire width: 3.8–5.0 inches
- Typical PSI: 5–15
- Purpose: Snow, sand, ultra-soft terrain
Fat bikes are a special case—very low PSI is normal for them.
Credit: www.zefal.com
How Tire Pressure Affects Performance
Changing tire pressure affects:
- Rolling resistance: Higher PSI rolls faster on smooth ground.
- Traction: Lower PSI grips better on rough or loose surfaces.
- Comfort: Lower PSI absorbs bumps; higher PSI feels harsher.
- Puncture risk: Too low PSI increases flat risk; too high can burst the tire.
Even 2–3 PSI difference can change how your bike feels. Many pro riders test different pressures before races.
Here’s a quick performance comparison:
| PSI | Rolling Speed | Grip | Comfort |
|---|---|---|---|
| High (35–40) | Fast | Low | Harsh |
| Medium (25–30) | Moderate | Good | Balanced |
| Low (15–20) | Slow | Excellent | Soft |
Most riders aim for medium PSI, adjusting for their style and trail.
How To Experiment And Find Your Ideal Tire Pressure
There’s no perfect PSI for everyone. The best way to find your ideal pressure is to experiment. Here’s a proven method:
- Start at the middle of your tire’s recommended PSI range.
- Ride your usual trail, noting how the bike feels.
- Lower PSI by 2–3 and repeat.
- If grip improves and comfort increases, keep lowering until the tire feels too soft or unstable.
- Raise PSI until you lose grip or comfort.
- Record your favorite setting.
Try front and rear tires separately. Often, riders use lower PSI in the front for grip and slightly higher in the rear for support.
Many beginners don’t realize that front and rear tire pressures can—and should—be different. The rear tire supports more weight and takes more impacts, so it needs a bit more air.
Non-obvious Insight: Tire Pressure Changes With Altitude
As you ride at higher altitudes, air pressure outside drops, and your tires may expand slightly. If you travel from sea level to mountains, check your PSI again. Even a small change in altitude can affect your setup.
Non-obvious Insight: Sidewall Strength Affects Psi Choices
Some tires have thicker sidewalls for extra strength. If your tire has strong sidewalls, you can run lower PSI without risking damage. If your sidewalls are thin, stay closer to the middle or upper end of the PSI range.
Credit: www.sabajebeto.co.il
Tools For Measuring And Adjusting Tire Pressure
To get accurate readings, use these tools:
- Digital pressure gauge: Gives precise PSI readings.
- Floor pump with gauge: Fast and easy for home use.
- Mini pump: Portable, but less accurate.
- CO2 inflator: Fast for emergencies, but not ideal for fine adjustments.
Invest in a good gauge—cheap models can be off by several PSI. Keep your tools clean and check them regularly.
Upgrading To Tubeless: Is It Worth It?
Tubeless tires are popular among mountain bikers. They let you use lower PSI for more grip and comfort. They also seal themselves after small punctures, reducing flats.
If you ride often or on rough trails, tubeless is worth considering. Upgrading costs $50–$100, but pays off in fewer flats and better handling. You’ll need:
- Tubeless-ready rims and tires
- Sealant liquid
- Special valves
Many riders see immediate benefits after switching.
For more on tubeless tires, visit Bicycling.com.
Tips For Maintaining Correct Tire Pressure
Keeping your tires at the right PSI takes regular attention. Here are useful tips:
- Check your pressure before every ride.
- Adjust for changes in weight, gear, or terrain.
- Use a reliable gauge, not just your hand.
- Re-check after big temperature swings.
- If you ride with friends, don’t copy their PSI—use your own numbers.
Small details matter. Even a small drop in PSI can change your ride.
Frequently Asked Questions
How Often Should I Check My Mountain Bike Tire Pressure?
It’s best to check before every ride. Tires lose air naturally, and changes in weather or terrain affect the ideal PSI. Even if your tires look fine, a quick check with a gauge ensures safety and performance.
Is It Okay To Use Different Pressures For Front And Rear Tires?
Yes, most riders use lower PSI in the front for grip and slightly higher in the rear for support. The rear tire carries more weight and takes bigger hits, so it needs extra air. Experiment to find what works for you.
What Happens If I Ride With Too Low Psi?
Riding with too low PSI increases the risk of pinch flats, rim damage, and poor bike handling. Your tires may feel sluggish and unstable. Only go very low if you have tubeless tires and thick sidewalls.
Can Weather Or Temperature Affect Tire Pressure?
Absolutely. Cold weather lowers PSI, and hot weather raises it. Always check your tires before riding, especially if conditions change. Adjust PSI as needed for wet, muddy, or dry trails.
Should I Use The Maximum Psi Listed On My Tire?
No, the maximum PSI is for heavy loads or pavement riding. For mountain biking, stay well below the max. Use the recommended range, and fine-tune based on your weight, terrain, and tire type.
Finding the right mountain bike tire pressure is a mix of science and art. The best PSI depends on your weight, tire size, terrain, and style. By understanding the factors, avoiding common mistakes, and experimenting, you’ll get a safer, faster, and more comfortable ride.
Don’t forget to check your pressure often, and adjust for changing conditions. The right tire inflation can turn a good ride into a great one.

Hello Guys! I am John Reese, a professional biker and my hobby is biking! I have been biking for last 12 years and I love using bikes while outing as well. Based on my experiences with the different type of bikes (mountain bikes, road bikes and hybrid bikes); I am sharing my opinion about various bikes so that a beginner can get started right away. Happy reading!