
Finding the right mountain bike seat height can turn a painful ride into a joyful adventure. Many riders, even experienced ones, overlook how much seat height affects comfort, power, and safety. Getting it right means you avoid knee pain, pedal more efficiently, and handle technical trails with confidence. If you’re new to biking or still searching for your ideal setup, this guide will help you master seat height—step by step—with practical advice and real-world examples.
Why Seat Height Matters On A Mountain Bike
Your seat height isn’t just about comfort. It impacts everything from your leg power to your control on rough terrain.
- Efficiency: When your seat is set correctly, each pedal stroke delivers maximum power. Too low, and your legs tire quickly. Too high, and you rock your hips, wasting energy.
- Injury Prevention: A poor seat height can cause knee, hip, or back pain. Over time, these small issues can become serious injuries.
- Bike Handling: Descents, jumps, and technical climbs all require different body positions. A well-set seat lets you move smoothly and react quickly.
Pro Insight: Many new riders copy a friend’s setup or trust the bike shop’s default. But the best height is personal—it depends on your body, riding style, and the trails you ride.
Key Factors Influencing Seat Height
Before making any adjustments, it’s important to understand what influences your ideal seat height.
- Inseam Length: Your inseam—the distance from your crotch to the floor—directly affects how far your seat should be from your pedals.
- Pedal Type: Flat pedals allow more movement, while clipless pedals lock your feet in place. This affects your leg extension and how you feel at the bottom of each stroke.
- Saddle Type: Wide, soft saddles can make you sit differently compared to narrow, firm ones.
- Shoe Sole Thickness: Even a few millimeters can change your effective leg length.
- Frame Geometry: Some bikes have steep seat angles or long travel, requiring small changes in setup.
Non-obvious tip: If you change your pedals or shoes, always check your seat height again. Small changes can add up, especially on longer rides.
How To Measure Your Inseam Correctly
Your inseam is the starting point for all seat height formulas. Here’s a proven way to measure it at home:
- Wear your usual riding shorts and socks.
- Stand with your back against a wall on a flat surface, feet about 6 inches apart.
- Place a hardcover book between your legs, spine up, and pull it up snug against your crotch. Imagine it’s your bike saddle.
- Mark the top edge of the book on the wall with a pencil.
- Measure the distance from the floor to the mark. This is your inseam in inches or centimeters.
Extra tip: Repeat the measurement twice for accuracy. If you get different numbers, use the average.
Common Methods To Find Your Starting Seat Height
There are several ways to estimate a good starting point. Each method has pros and cons.
1. The 109% Formula
This science-backed formula works for most riders.
- Multiply your inseam length (in centimeters) by 1.09.
- The result is the distance from the center of your bottom bracket (the pedal axle) to the top of your saddle.
Example: If your inseam is 80 cm, your seat height is 80 x 1.09 = 87.2 cm.
2. Heel-to-pedal Method
Simple and quick—good for beginners or field adjustments.
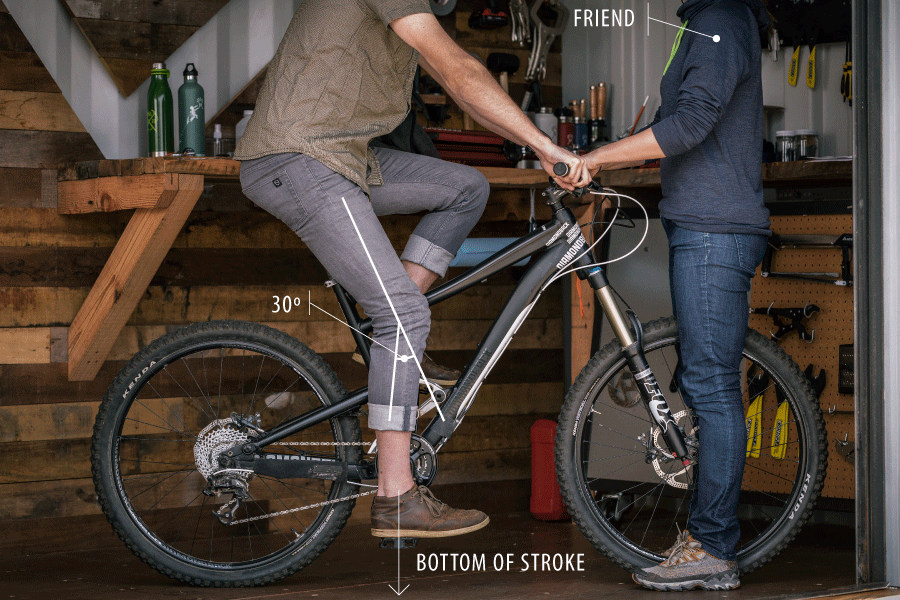
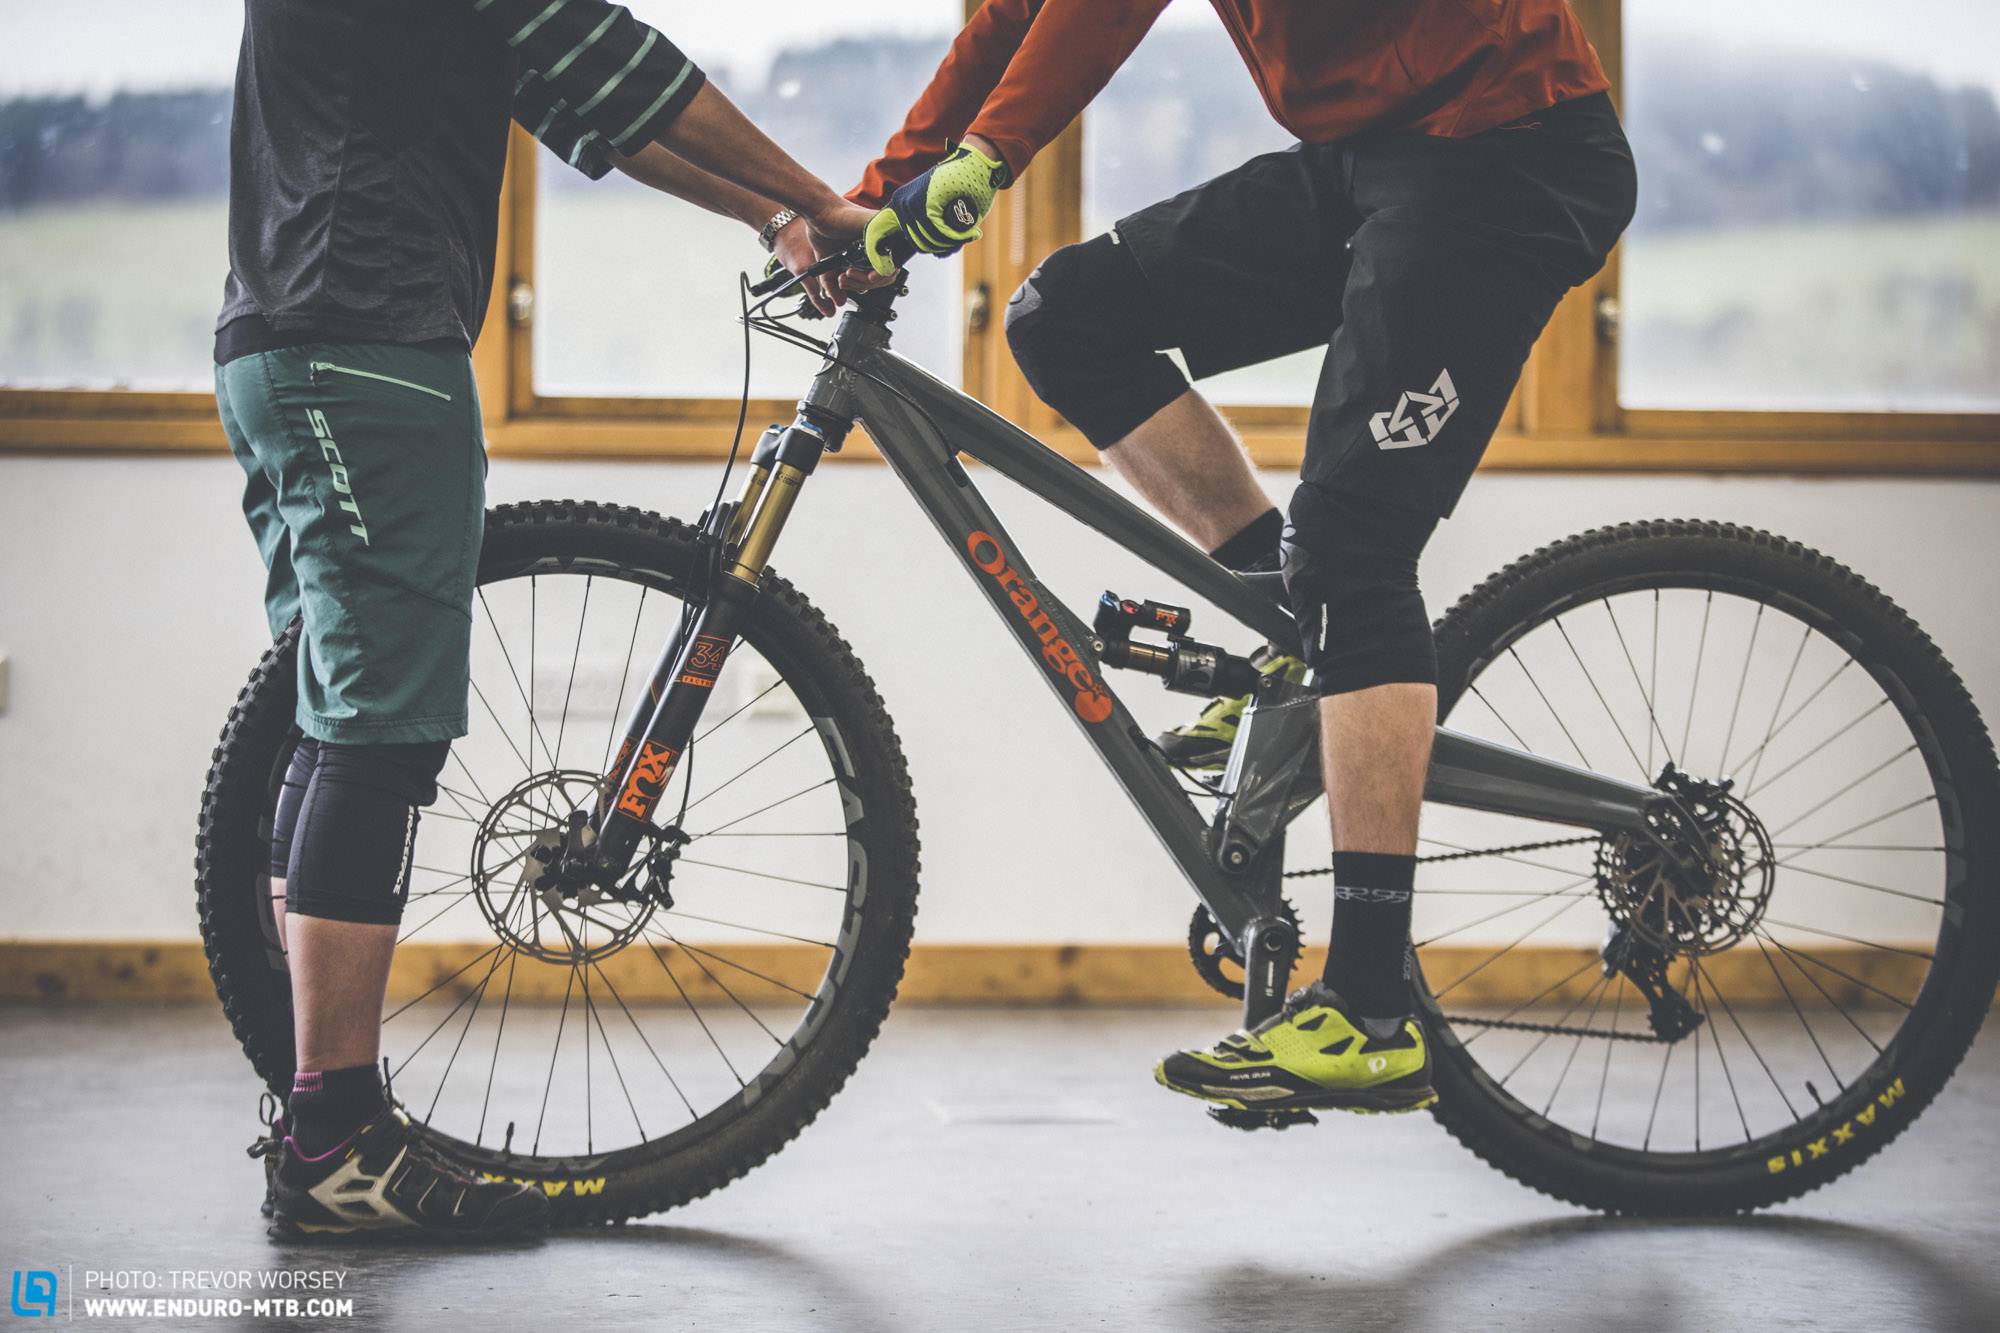
- Sit on your bike (hold onto a wall or friend).
- Place your heel on the pedal at its lowest point.
- Your leg should be almost straight, but not locked out.
- If your hips rock side to side, the seat is too high. If your knee bends a lot, raise the seat.
3. Holmes Knee Angle Method
Used by bike fitters for maximum accuracy.
- At the bottom of your pedal stroke, your knee should be bent at about 25–30 degrees.
- This usually requires a goniometer (angle-measuring tool) or a phone app.
Pro tip: The Holmes method works best if you have knee pain or want a dialed fit for racing.
4. Lemond Method
Another classic, similar to the 109% method.
- Multiply your inseam by 0.883.
- Measure this distance from the center of the bottom bracket to the top of the saddle.
Quick comparison:
| Method | Measurement Start | Multiplier | Best For |
|---|---|---|---|
| 109% Formula | Inseam (cm) | 1.09 | General riders |
| Heel-to-Pedal | On-bike | Visual check | Quick adjustments |
| Holmes Angle | On-bike | 25–30° knee bend | Knee pain, racers |
| LeMond | Inseam (cm) | 0.883 | Road cyclists, some MTB |
Credit: www.rei.com
Step-by-step: Adjusting Your Mountain Bike Seat Height
Let’s walk through the whole process, from tools to final testing.
1. Gather Your Tools
You don’t need much—usually just:
- Allen wrench (4mm, 5mm, or 6mm, depending on your seat clamp)
- Tape measure or ruler (centimeters or inches)
- Level (optional, for saddle tilt)
- Phone or goniometer (for knee angle method)
2. Set The Bike On Stable Ground
Find a flat, safe area. Lean your bike against a wall or use a bike stand. This keeps the bike upright and safe while you adjust.
3. Loosen The Seatpost Clamp
Use your Allen wrench or quick-release lever. Loosen just enough so you can slide the seatpost up or down. Don’t pull the seatpost out completely unless you’re also checking the minimum insertion mark (the line showing how deep the seatpost must stay inside the frame).
4. Adjust Seat Height Using Your Preferred Method
Pick one of the methods above. Measure carefully from the center of the bottom bracket (the pedal axle) to the top of the saddle, along the seat tube.
Non-obvious insight: Always measure along the angle of the seat tube, not straight up from the ground. The difference is small, but it matters for accuracy.
5. Tighten The Seatpost Clamp
Make sure the seatpost is straight (saddle aligned with the frame). Tighten the clamp to the recommended torque. Overtightening can damage carbon or lightweight posts.
6. Fine-tune On The Trail
No formula is perfect. Take a short ride:
- If your knees hurt in front, lower the seat slightly.
- If your hips rock or you feel stretched, lower the seat.
- If you can’t get full power or your knees hurt in back, raise the seat.
Pro tip: Make small changes—5mm at a time. Ride, then adjust again.
7. Mark Your Perfect Height
Once you find your ideal height, mark it. Use a piece of tape or a permanent marker. This helps if the seat slips or if you pack your bike for travel.
How Seat Height Affects Different Riding Styles
Mountain biking isn’t one-size-fits-all. Cross-country, trail, and downhill riders often set their seats differently.
Cross-country (xc)
- Goal: Maximum pedaling efficiency over long distances.
- Seat Height: Usually set high for full leg extension.
- Tip: Many XC riders use the 109% or Holmes method for efficient power.
Trail/all-mountain
- Goal: Balance between climbing and descending.
- Seat Height: Slightly lower than XC, to allow for quick body movement.
- Tip: Use a dropper post for rapid changes on technical terrain.
Downhill/enduro
- Goal: Maximum control on steep descents.
- Seat Height: Much lower, sometimes out of the way completely.
- Tip: Lower seat before dropping into rough sections, then raise for climbs.
Example: A trail rider might start with the 109% method, then lower the seat by 1–2 cm for technical rides.
Dropper Posts: The Modern Solution
A dropper post allows you to change your seat height with a lever—no tools needed, even while riding.
- Climbing: Raise the seat for power.
- Descending: Drop the seat out of the way for better control and movement.
- Technical sections: Adjust instantly, even multiple times on one trail.
Why it matters: Riders with dropper posts can run a higher climbing position, knowing they can drop the seat quickly for obstacles.
Data: In a 2020 survey, over 70% of mountain bikers preferred bikes with dropper posts for trail riding.
Seat Height Vs. Saddle Position: Don’t Confuse Them
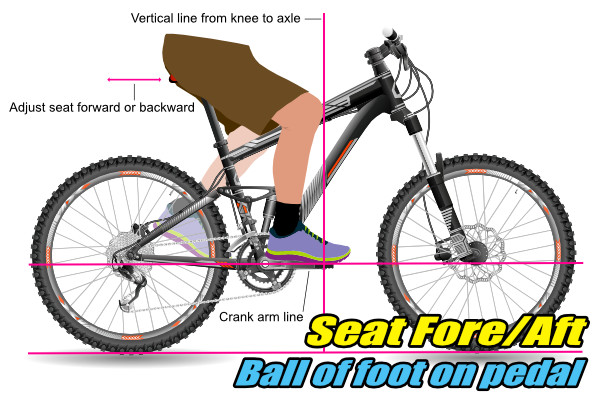
It’s easy to mix up seat height with saddle fore-aft (front-back) or tilt. Each adjustment affects your ride differently.
- Height: Distance from pedals to saddle. Affects leg extension and power.
- Fore-Aft: How far forward or back the saddle sits. Changes knee position and balance.
- Tilt: The angle of the saddle. Affects comfort, especially on long rides.
Important: Always set seat height first, then adjust fore-aft and tilt. Changing one can affect the others.
Credit: kath-familienpflege-es-nt.de
Troubleshooting Common Problems
Even after careful adjustment, you might notice issues. Here’s how to solve them:
- Knee Pain in Front: Seat is usually too low or too far forward.
- Knee Pain in Back: Seat is too high or too far back.
- Hip Rocking: Seat is too high.
- Numbness or Saddle Sores: Check saddle tilt and width, not just height.
- Can’t Reach Pedals Comfortably: Seat is too high, or saddle is too far back.
Practical tip: If you keep having problems, try a professional bike fit. They use video analysis and motion sensors for a perfect setup.
Quick Reference: Seat Height Ranges By Inseam
For a fast estimate, use this reference. Fine-tune after your first ride.
| Inseam (cm) | Recommended Seat Height (109% method, cm) | Seat Height (LeMond, cm) |
|---|---|---|
| 70 | 76.3 | 61.8 |
| 75 | 81.8 | 66.2 |
| 80 | 87.2 | 70.6 |
| 85 | 92.7 | 75.1 |
| 90 | 98.1 | 79.5 |
Note: These are starting points. Always adjust for comfort and control.
How To Adjust Seat Height During A Ride
Modern trails are unpredictable. Sometimes you need to change your seat height on the go.
- Manual adjustment: Stop, loosen the clamp, slide the post, and retighten. Fast, but interrupts your ride.
- Dropper post: Just press the lever and shift your weight. Instant height change.
Common mistake: Forgetting to reset the seat after a steep section. Get in the habit of checking before long climbs.
Insider tip: If you can’t afford a dropper post, mark your “climb” and “descend” heights on your seatpost for quick, repeatable changes.
Real-world Examples: How Pros Set Their Seat Height
Professional mountain bikers often tweak seat height for each race or trail type.
- Nino Schurter (XC World Champion): Uses the 109% method, then fine-tunes for each race. Prefers a slightly higher seat for flat courses, a bit lower for technical ones.
- Rachel Atherton (Downhill World Champion): Runs her seat much lower than her climbing position to allow full movement and control.
What you can learn: There’s no magic number. Start with a formula, but don’t be afraid to adjust based on the trail, your comfort, and your riding goals.
When To Re-check Or Change Your Seat Height
Your ideal setup can change over time. Check your seat height if:
- You get new shoes or pedals.
- You switch saddles.
- You ride a new bike.
- You notice new pain, discomfort, or performance issues.
- You lose or gain significant weight.
Seasonal tip: Cold weather gear (thicker shoes, extra layers) can add a few millimeters to your effective leg length.
Frequently Asked Questions
What If I Share My Mountain Bike With Someone Else?
If you share your bike, mark your seatpost with tape for each person’s perfect height. Quick-release clamps make switching easier. Always check before riding—using the wrong height can cause injury.
How Do I Know If My Seat Is Too High Or Too Low?
A seat that’s too high makes your hips rock side to side and can cause pain behind the knee. Too low puts extra pressure on the front of the knee and feels tiring. Listen to your body—pain or awkward pedaling usually means an adjustment is needed.
How Often Should I Check My Seat Height?
Check your seat height any time you change shoes, pedals, or saddle, or after a crash or hard ride. A quick check every month is a good habit, especially if you ride often.
Is There An Ideal Seat Height For Technical Terrain?
For technical trails, a slightly lower seat gives you more room to move and better control. If you have a dropper post, use it to adjust on the fly. For bikes without droppers, experiment with lowering the seat a few millimeters before tricky sections.
Where Can I Find More Detailed Bike Fit Information?
For advanced fitting, visit resources like Wikipedia’s Bicycle Fitting page or see a professional bike fitter. They can help with all aspects of fit, not just seat height.
Getting your mountain bike seat height right takes a little effort, but the rewards are huge—more comfort, fewer injuries, and better performance on every ride. Remember, the best seat height is the one that works for your body, your bike, and your trails. Test, adjust, and don’t be afraid to make small changes as your riding evolves. Happy trails!
Credit: enduro-mtb.com

Hello Guys! I am John Reese, a professional biker and my hobby is biking! I have been biking for last 12 years and I love using bikes while outing as well. Based on my experiences with the different type of bikes (mountain bikes, road bikes and hybrid bikes); I am sharing my opinion about various bikes so that a beginner can get started right away. Happy reading!