Riding a mountain bike can feel incredible—fast, smooth, and controlled—when your suspension is set right. But many riders overlook one key detail: preload adjustment. This simple tweak can change how your bike handles rough trails, climbs hills, and keeps you comfortable. Whether you’re new to biking or want to fine-tune your ride, learning how to adjust preload can make a big difference.
Most bikes come from the shop with a generic suspension setting. Riders have different weights, styles, and trail preferences, so the factory setup is rarely perfect for you. Preload adjustment is about matching the suspension to your body and riding style, helping you get the most out of your mountain bike.
This guide explains preload in clear terms, shows you how to adjust it, and gives you expert tips so you can ride with more confidence and control.
What Is Preload On A Mountain Bike?
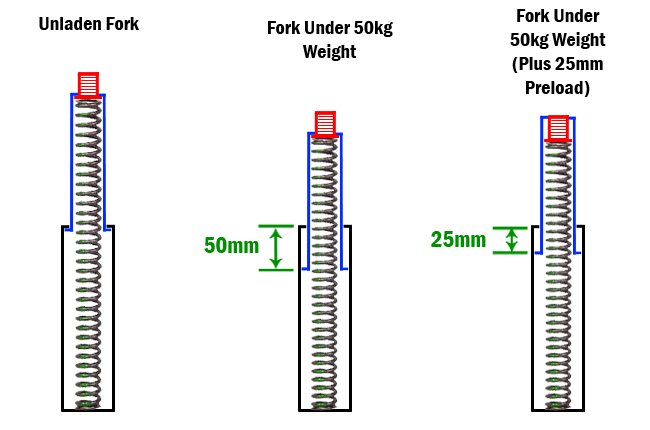
Preload refers to the initial tension applied to the suspension spring (either coil or air) before you even sit on your bike. This tension determines how much the suspension compresses under your weight—called sag—and how the bike responds to bumps and jumps.
Think of preload as the “starting point” of your suspension. If you set the preload too high, your bike feels stiff and bouncy. Too low, and you might bottom out (hit the end of the suspension travel) easily, making your ride harsh and less controlled.
Why Preload Matters
- Comfort: It helps absorb small bumps and reduces fatigue.
- Control: Proper preload keeps your wheels on the ground, improving grip.
- Performance: It affects how your bike handles jumps, drops, and corners.
Preload Vs. Air Pressure Vs. Rebound
Preload is often confused with other suspension terms. Here’s a quick comparison:
| Feature | Preload | Air Pressure | Rebound |
|---|---|---|---|
| Main Purpose | Sets initial spring tension | Adjusts air shock/fork stiffness | Controls return speed after compression |
| Adjustment | Preload collar (coil) | Pump (air) | Dial/knob |
| Typical Users | Coil suspension | Air suspension | All suspension types |
Types Of Mountain Bike Suspension
Before you start adjusting, know your suspension type. Mountain bikes use either coil spring or air spring systems.
Coil Suspension
- Uses a metal spring.
- Preload is adjusted by turning a collar on the shock or fork.
- Common on downhill and some trail bikes.
Air Suspension
- Uses air pressure instead of a metal spring.
- Preload is set by adjusting air pressure.
- Found on most modern cross-country and trail bikes.
Note: While “preload” is often used for coil shocks, air shocks achieve a similar effect by changing air pressure. The principles are similar, but the adjustment method is different.
Identifying Your Suspension
Check the side of your shock or fork:
- If you see a metal coil, it’s coil suspension.
- If you find a valve for a shock pump, it’s air suspension.
Understanding this difference is important because the way you adjust preload depends on the suspension you have.
How Preload Affects Your Ride
Setting the right preload transforms your experience on the trail. Here’s how:
1. Sag: The Key Measurement
Sag is the amount your suspension compresses when you sit on your bike. Most riders aim for 20–30% sag (the suspension compresses by 20–30% of its total travel under your weight). Too little sag means less grip; too much means you’ll bottom out often.
| Riding Style | Recommended Sag | Suspension Type |
|---|---|---|
| Cross-country (XC) | 20–25% | Fork & Shock |
| Trail/All-Mountain | 25–30% | Fork & Shock |
| Downhill | 30–35% | Shock |
2. Handling And Traction
When preload is set well, your bike tracks the ground smoothly. You’ll feel stable in corners, have more grip in loose dirt, and avoid bouncing off rocks.
3. Energy Efficiency
Too much preload makes the ride stiff, causing you to “bounce” and waste energy. Too little makes pedaling less efficient, especially when climbing.
Non-obvious insight: Even a small change in preload (as little as one turn of the coil collar or 5 psi in air shocks) can make a noticeable difference, especially on technical terrain.
Tools And Preparation
Before you adjust preload, gather these items:
- Shock pump (for air suspension)
- Spanner wrench or your hands (for coil preload collars)
- Tape measure or ruler
- Zip tie (for sag measurement)
- Bike stand (optional but useful)
- Notebook or phone to record your settings
Tip: Wear your normal riding gear (helmet, backpack, etc.) during setup. The extra weight affects sag.
How To Adjust Preload On Coil Suspension
Let’s get hands-on. Here’s a step-by-step guide for coil forks and shocks.
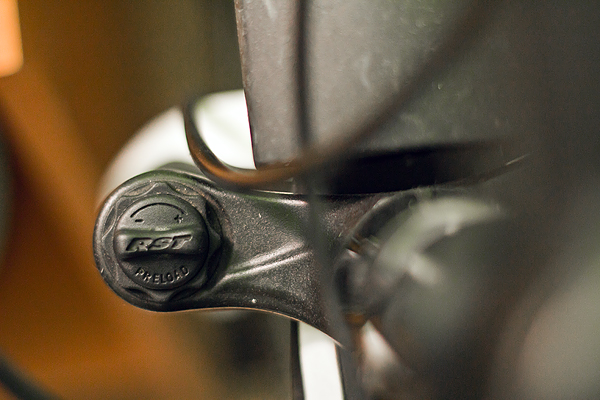
Step 1: Find The Preload Collar
Look for a round, usually notched ring at the top of the coil spring. This is the preload collar. It may be marked with arrows (plus/minus) or labeled “preload.”
Step 2: Measure Sag
- Stand your bike upright.
- Slide the rubber O-ring (or a zip tie) down to the seal on your fork or shock.
- Carefully get on the bike in your normal riding position (feet on pedals, hands on bars).
- Have a friend steady you, or balance near a wall.
- Step off gently, then measure how far the O-ring or zip tie has moved.
Formula:
Sag (%) = (distance Moved / Total Travel) × 100
For example, if your shock has 50mm travel and the O-ring moved 12mm:
Sag = (12 / 50) × 100 = 24%
Step 3: Adjust The Preload Collar
- To increase preload (reduce sag): Turn the collar clockwise (tighten).
- To decrease preload (increase sag): Turn it counter-clockwise (loosen).
Adjustment tips:
- Turn the collar in small increments (about half a turn).
- Check sag after each adjustment.
- Avoid compressing the coil more than 2–3 full turns—too much can damage the spring or make the ride harsh.
Step 4: Re-check And Fine-tune
Repeat steps 2 and 3 until you reach your target sag. Write down your final setting for future reference.
Non-obvious insight: If you need too much preload (more than 3 turns) to get the right sag, your spring might be too soft for your weight. Consider a firmer spring.
How To Adjust Preload On Air Suspension
Most modern mountain bikes use air shocks or forks. Here’s how to set preload (via air pressure):
Step 1: Locate The Air Valve
Find the Schrader valve cap (like a car tire) on your fork or shock. Remove the cap.
Step 2: Check Current Air Pressure
Attach your shock pump. Note the current pressure.
Step 3: Set Your Target Air Pressure
Most shocks have a sticker or chart with recommended pressures based on rider weight. If not, use this rough starting point:
| Rider Weight (lbs) | Fork Pressure (psi) | Shock Pressure (psi) |
|---|---|---|
| 120–140 | 50–70 | 90–110 |
| 140–160 | 70–85 | 110–125 |
| 160–180 | 85–100 | 125–140 |
| 180–200 | 100–115 | 140–155 |
| 200–220 | 115–130 | 155–170 |
Pump to the target pressure.
Step 4: Measure Sag
Just like with a coil spring, use the O-ring or zip tie method.
- Sit on the bike in full gear.
- Carefully step off.
- Measure sag as a percentage of total travel.
Step 5: Fine-tune Air Pressure
- Too much sag? Add air (increase pressure).
- Too little sag? Release air (decrease pressure).
Make small changes (2–5 psi at a time), then re-check sag.
Expert tip: Always use a proper shock pump, not a regular tire pump. Shock pumps are designed for higher pressures and won’t leak as much air when you disconnect them.
Step 6: Record Your Setting
Write down the final psi for your fork and shock. This helps you return to your favorite setup after travel or repairs.
Common Mistakes To Avoid
Many riders make the same preload errors. Here’s how to avoid them:
- Ignoring riding gear weight: Helmets, shoes, and backpacks add 5–10 lbs. Always measure sag with your gear on.
- Turning the collar too far: Over-compressing a coil can damage the shock and make it harsh.
- Not re-checking sag: Always check after each change.
- Using the wrong pump: Tire pumps aren’t accurate for shocks.
- Forgetting to record settings: You may forget your perfect setup after a bike shop visit.
Non-obvious insight: After setting preload, ride the same trail section at least twice. The first run tests the setup, the second confirms if it feels right. Don’t expect perfection on your first try.
Preload Adjustment For Different Riding Styles
How you set preload depends on where and how you ride.
Cross-country (xc)
- Aim for less sag (20–25%) for efficiency and less bobbing when pedaling.
- Slightly higher preload or air pressure gives a firmer ride.
Trail/all-mountain
- Target 25–30% sag for a balance of grip and comfort.
- Medium preload is usually best.
Downhill/freeride
- Go for 30–35% sag for maximum traction and bump absorption.
- Lower preload or spring rate for plushness.
Tip: Heavier or aggressive riders may need a firmer spring or higher air pressure to avoid bottoming out.

Credit: www.reddit.com
Adjusting Preload For Changing Conditions
Trails and weather aren’t always the same. Consider these adjustments:
- Muddy/wet trails: Softer setup (more sag) helps grip.
- Dry/hardpack: Slightly firmer preload improves speed.
- Bikepacking: Add preload (or air) if you carry extra gear.
Don’t be afraid to adjust preload during a ride if conditions change.
When To Change Your Spring Or Air Volume
If you can’t reach the right sag with preload alone, you might need a different spring or air volume spacer.
- Too much preload needed: Try a firmer coil spring.
- Too little sag, even at minimum preload: Try a softer coil or lower air pressure.
- Bottoming out often: Increase air pressure or use a firmer spring.
- Bike feels harsh at small bumps: Try a softer spring or lower pressure.
Some shocks allow you to add volume spacers to tune how the suspension ramps up (gets firmer at the end of travel). This is an advanced adjustment but can further fine-tune your ride.
Troubleshooting Preload Problems
If your bike doesn’t feel right after adjusting preload, check these common issues:
- Suspension doesn’t move smoothly: Check for worn bushings, low lubrication, or dirt.
- Shock tops out (makes a knocking sound): Preload might be too high.
- Bike dives under braking: Preload might be too low.
- Harsh ride over small bumps: Try less preload or a softer spring.
When in doubt, consult your bike’s suspension manual or ask a qualified bike mechanic for help.
Advanced Preload Tuning Tips
Once you master the basics, try these expert tweaks:
- Balance front and rear sag: Keeping sag even front and back helps the bike stay level and predictable.
- Micro-adjust for terrain: For rocky trails, slightly less preload increases grip. For jumps and drops, a touch more helps avoid bottom-outs.
- Mark your settings: Some riders use paint or tape on the preload collar to remember their favorite position.
Pro insight: Preload is just one part of your suspension setup. Fine-tuning compression and rebound damping can unlock even better performance, but always start with the correct preload/sag.
How Preload Adjustment Affects Suspension Lifespan
Proper preload not only improves performance but also protects your equipment. Too much preload stresses the spring and seals, leading to faster wear. Too little can cause harsh bottom-outs, damaging internals. Regularly check and adjust your setup to keep your bike running smoothly.
Real-world Example: Preload Adjustment In Action
Meet Alex, a 170 lb trail rider. His new full-suspension bike felt harsh and bounced off roots. The shop set his preload to the factory default.
- He measured sag: Only 10% on the rear shock.
- He reduced preload (loosened the coil collar two turns).
- Sag increased to 27%. The bike immediately felt smoother and gripped corners better.
- Alex wrote down his collar position for future use.
This simple change transformed his riding experience. You can do the same with your bike, often in less than 15 minutes.
Credit: lifeatlean.com
Frequently Asked Questions
What Is The Difference Between Preload And Sag?
Preload is the initial tension on the suspension spring, set by a collar (coil) or air pressure (air shock). Sag is how much the suspension compresses under your weight. Preload is how you adjust sag to match your body and riding style.
How Often Should I Adjust Preload?
Check your preload whenever your riding weight changes (e. g. , new gear, backpack) or when you notice your bike feels different. It’s also smart to check at the start of each riding season or after maintenance.
Can I Use A Regular Tire Pump For Air Suspension?
No, always use a shock pump. Regular pumps can’t reach the high pressure needed and may let out too much air when disconnecting.
Is Preload Adjustment The Same For Front And Rear Suspension?
The principles are the same, but front (fork) and rear (shock) may have different target sag percentages. Always check your bike’s manual for recommendations.
What If I Can’t Reach The Right Sag With Preload?
If you need to max out the preload collar (coil) or go beyond recommended air pressure, your spring might be the wrong rate, or you need a different volume spacer. Consider upgrading to a spring or air setup that matches your weight.
Final Thoughts
Adjusting preload on your mountain bike is one of the easiest ways to improve comfort, control, and performance. With just a few tools and careful steps, you can fine-tune your ride for any trail. Remember to measure sag, adjust in small steps, and always record your settings.
If you’re serious about mountain biking, learning this skill is essential.
For more on bike suspension and setup, visit the official Park Tool Suspension Guide. With the right preload, your bike will feel dialed in, letting you focus on the fun and freedom of the trail. Enjoy your next ride!
Credit: bicycles.stackexchange.com

Hello Guys! I am John Reese, a professional biker and my hobby is biking! I have been biking for last 12 years and I love using bikes while outing as well. Based on my experiences with the different type of bikes (mountain bikes, road bikes and hybrid bikes); I am sharing my opinion about various bikes so that a beginner can get started right away. Happy reading!