Building your own mountain bike from scratch is both exciting and challenging. You get to choose every part, customize the look and feel, and learn deeply about how bikes work. Whether you want a bike for rocky trails, downhill races, or smooth singletrack, making it yourself means you can match it perfectly to your style and needs.
This guide will help you step through the process confidently, even if you’re new to bike building. By the end, you’ll know how to select parts, assemble them, and avoid common mistakes that can cost time or money. Plus, you’ll gain practical tips that experienced builders use but rarely share.
Understanding What You Need: Planning Your Build
Before you start buying parts, you need a clear plan. Mountain bikes come in different types like hardtail, full suspension, cross-country, and downhill. Each type is built for a specific purpose.
If you’re unsure, a hardtail (only front suspension) is simpler and cheaper for beginners. A full suspension bike (front and rear shocks) offers more comfort and control on rough terrain but is harder to build and maintain.
Think about:
- Where you’ll ride most (smooth trails, rocky paths, steep hills)
- Your budget (building from scratch often costs $1,000–$5,000 depending on quality)
- Your size and riding style (aggressive, casual, racing)
You should also consider the climate and weather in your area. For example, if your trails are often muddy or wet, you may need special tires and waterproof bearings.
Non-obvious insight: Many beginners underestimate how much tools and small parts cost. It’s smart to set aside about 10–15% of your budget for tools, bolts, and adapters. Small expenses can add up quickly—think cable ends, spacers, and even grease.
Another thing beginners often miss: plan the build process before buying. Make a list of every part, and check compatibility across the whole system. This avoids delays and wasted money.
Choosing The Right Frame
The frame is the foundation of your bike. Picking the right one is crucial for fit, durability, and performance.
Frame Materials
Frames come in different materials:
- Aluminum: Light, affordable, strong. Good for most riders.
- Carbon fiber: Super light, absorbs shocks, expensive. Used for racing.
- Steel: Heavy, strong, smooth ride. Popular for budget builds.
- Titanium: Light, strong, expensive. Rare for DIY builds.
| Material | Weight | Price Range | Durability |
|---|---|---|---|
| Aluminum | Medium | $200–$800 | High |
| Carbon Fiber | Light | $800–$2,500 | Medium |
| Steel | Heavy | $150–$500 | Very High |
| Titanium | Very Light | $2,000+ | Very High |
Example: If you plan to ride aggressive trails and jumps, aluminum or steel is often better than carbon because it can handle more stress.
Sizing The Frame
To ride comfortably, you must match the frame size to your height and leg length. Most brands offer size charts. For example, a rider 5’6″–5’10” usually needs a medium (17–18 inch) frame.
Tip: If you’re between sizes, choose the smaller frame for better control. A smaller frame is easier to handle, especially when turning quickly or riding technical sections.
Check reach and standover height—not just seat tube length. A bike that’s too tall or long can be hard to control and uncomfortable on long rides.
Frame Features
Check for:
- Suspension compatibility: Hardtail or full suspension
- Wheel size: Common are 27.5″ or 29″
- Mounts: For brakes, derailleurs, bottle cages
Look for internal cable routing if you want a cleaner look and less maintenance. Frames with built-in mounts for racks or fenders are good if you plan to use your bike for commuting or touring.
Beginner mistake: Buying a frame without checking if it fits your chosen wheel and fork size. Always double-check specifications. Also, pay attention to bottom bracket type—some frames require special tools or adapters.
Selecting Forks And Suspension
The fork holds your front wheel and often provides suspension. For full suspension bikes, you also need a rear shock.
Types Of Forks
- Rigid fork: No suspension. Rare for mountain bikes.
- Suspension fork: Most common. Absorbs bumps.
Look for:
- Travel: How much the fork compresses (80mm–180mm). More travel means better shock absorption for rough terrain.
- Axle type: Quick-release or thru-axle (thru-axle is stronger).
Forks also come with lockout features, which allow you to turn suspension off for smoother surfaces. This saves energy when climbing hills.
Rear Suspension
If your frame supports it, choose a rear shock with adjustable settings for your weight and riding style. Some shocks have rebound and compression adjustments, letting you fine-tune how the bike handles bumps.
| Fork Type | Travel | Best For | Price Range |
|---|---|---|---|
| XC (Cross-country) | 80–120mm | Smooth trails | $150–$500 |
| Trail | 120–150mm | Mixed terrain | $250–$700 |
| Enduro/Downhill | 150–180mm | Steep/rough terrain | $400–$1,200 |
Non-obvious insight: Suspension forks often require a tapered steerer tube. Check your frame and fork compatibility before buying. Also, some forks use air springs, others use coil springs—air forks are lighter but need a shock pump for setup.
Another detail: look for forks with adjustable damping. This lets you tune how quickly the fork rebounds after a bump, which can improve control.
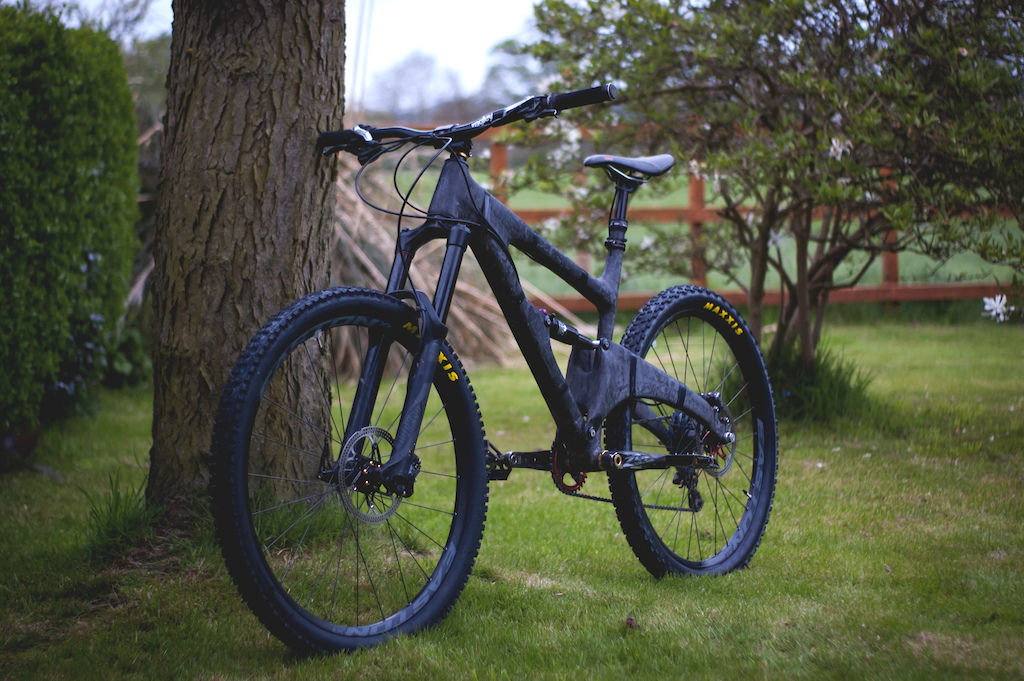
Picking Wheels And Tires
The wheels and tires affect how your bike rolls, grips, and handles.
Wheel Size
- 27.5 inch: Agile, good for technical trails
- 29 inch: Rolls over obstacles better, stable at high speed
For smaller riders, 27. 5″ wheels may feel easier to handle. For taller riders or those seeking speed, 29″ wheels are ideal.
Rim Material
- Aluminum: Standard, affordable
- Carbon: Light, expensive
Carbon rims are lighter but can crack under heavy impacts. Aluminum is more forgiving and easier to repair.
Hub And Spoke Count
- Hubs: Must fit your fork/frame axle type
- Spokes: More spokes (32–36) mean stronger wheels
Consider sealed bearings for hubs if you ride in wet or muddy conditions—they require less maintenance.
Tires
Choose tires based on terrain:
- Knobby tires: Good for loose dirt and mud
- Slick tires: For hard-packed or paved surfaces
Example: For rocky trails, a 29″ wheel with a 2.25″ wide knobby tire offers grip and stability. If you ride in dry climates, narrower tires (2.0″) are faster.
Tubeless tires are another option. They reduce flats and allow lower pressure for more grip, but need special rims and sealant.
Beginner mistake: Not matching tire width to rim width. Wider tires need wider rims. Also, check clearance in your frame and fork—a wide tire may rub.

Credit: gearjunkie.com
Choosing Drivetrain Components
The drivetrain lets you pedal and shift gears. It includes the crankset, bottom bracket, cassette, chain, and derailleurs.
Crankset And Bottom Bracket
- Crankset: The arms and gears you pedal
- Bottom bracket: Holds the crankset, fits inside the frame
Choose a crankset with 1, 2, or 3 chainrings. Modern bikes often use 1x (single chainring) for simplicity. Fewer chainrings mean less maintenance and easier shifting.
Check crank arm length—shorter arms (165–170mm) are better for technical riding, longer (175mm) suit taller riders.
Cassette And Chain
- Cassette: Rear gear cluster (8–12 speeds)
- Chain: Must match cassette and chainring
Higher-end cassettes are lighter and shift more smoothly but cost more.
Derailleurs And Shifters
- Front derailleur: Moves chain between front rings (optional)
- Rear derailleur: Moves chain across cassette
- Shifters: Mounted on handlebars
Non-obvious insight: SRAM and Shimano parts often don’t mix well. Stick with one brand for drivetrain components. Also, electronic shifting is available (Shimano Di2, SRAM AXS), but it’s expensive and complex.
If you ride in muddy areas, consider clutch derailleurs—they keep the chain tight and prevent drops.
| Drivetrain Type | Speeds | Best For | Price Range |
|---|---|---|---|
| 1x | 10–12 | Simplicity, trail | $200–$800 |
| 2x | 9–11 | Versatility | $180–$600 |
| 3x | 7–9 | Budget builds | $130–$400 |
Brake System Selection
Mountain bikes use either rim brakes or disc brakes.
Rim Brakes
- Cheaper, easier to maintain
- Less effective in wet/muddy conditions
Rim brakes are best for dry climates or light trail use.
Disc Brakes
- Mechanical: Uses cables. Good for budget builds.
- Hydraulic: Uses fluid. Stronger, smoother, requires more maintenance.
Choose disc brakes for serious mountain biking. Check that your frame and wheels have disc brake mounts.
Hydraulic brakes offer better modulation (control), which is important for technical riding. Mechanical brakes are easier to fix on the trail.
Tip: Hydraulic brakes need careful setup. If you’re new, consider mechanical disc brakes first. Also, buy quality brake pads—cheap pads wear fast and reduce stopping power.
Choosing Cockpit Components
The cockpit includes handlebars, stem, grips, and headset.
Handlebars
- Flat bars: Standard for mountain bikes
- Riser bars: Higher, more comfortable
Width affects control—wider bars (740–800mm) give better steering. Narrow bars (680–720mm) are faster on tight trails.
Handlebars also come in different shapes. Some have sweep (bend), which helps wrist comfort.
Stem
Connects bars to fork. Short stems (40–60mm) improve handling. Long stems (80–100mm) are more stable for cross-country.
Check stem diameter—match it to your handlebar and fork.
Grips
Rubber or foam. Ergonomic grips reduce hand fatigue. Lock-on grips are easier to install and remove.
Headset
Allows bars to turn smoothly. Make sure it matches your frame and fork.
Non-obvious insight: A mismatched headset can cause poor steering and even damage your frame. Also, loose headsets make noise and reduce control.
Saddle And Seatpost Choices
The saddle is your seat, and the seatpost holds it.
- Pick a saddle that matches your riding style. Narrow for racing, wide for comfort.
- Seatposts can be fixed or dropper (lets you adjust height while riding).
Women’s saddles are often shaped differently for comfort. Try different models before buying.
Tip: Dropper seatposts help on steep terrain but cost more. They let you lower the seat quickly, so you can descend safely and raise it for climbing.
Pedals And Accessories
Pedals come in two main types:
- Flat pedals: Easy for beginners, good for technical rides
- Clipless pedals: Attach to special shoes, give more power but need practice
For rough trails, flat pedals are safer—you can put your foot down quickly. Clipless pedals are better for racing or long rides.
Other accessories:
- Bottle cage
- Bike computer
- Lights
- Bell
Consider adding a small tool kit and spare tube to your bike. Mudguards are useful in wet weather.
Don’t forget basic accessories for safety and convenience.
Gathering Tools And Workspace
To build your bike, you’ll need tools:
- Hex (Allen) wrenches: Most bolts are Allen type
- Torque wrench: Prevents overtightening
- Cable cutters
- Bottom bracket tool
- Chain tool
- Screwdrivers
- Grease and lubricant
- Bike stand (optional but helpful)
Have a rag or towel handy for cleaning parts during assembly. Use a magnet tray to hold small bolts and washers—losing these slows your build.
Set up a clean, well-lit workspace. Lay out parts and tools before you start. If you work outside, avoid windy days—small parts blow away easily.
Step-by-step Assembly Process
Now, let’s build your mountain bike step by step. Take your time—rushing leads to mistakes.
1. Install The Headset And Fork
- Grease headset cups and press them into frame.
- Insert fork through headset, add spacers and stem. Tighten bolts evenly.
Check for smooth rotation—if it binds, loosen and retighten.
2. Attach Handlebars And Stem
- Fit handlebars into stem.
- Adjust angle for comfort.
- Tighten stem bolts, checking alignment.
Use a level to check bar height if you want precision.
3. Mount Wheels
- Insert wheels into fork and frame dropouts.
- Secure using quick-release or thru-axle.
- Check for proper alignment.
Spin wheels to check for rubbing or wobbles.
4. Install Bottom Bracket And Crankset
- Grease bottom bracket threads.
- Use tool to insert bottom bracket.
- Attach crank arms, tighten bolts.
Check for smooth rotation and no play.
5. Fit The Drivetrain
- Mount cassette on rear wheel.
- Install chain using chain tool.
- Attach derailleurs, adjust alignment.
- Connect shifters to derailleurs with cables.
Set cable tension so gears shift cleanly.
6. Set Up Brakes
- Mount brake calipers to frame and fork.
- Attach rotors to wheels if using disc brakes.
- Connect brake levers and cables (or hoses).
- Adjust pads for proper spacing.
Test braking power before riding.
7. Attach Saddle And Seatpost
- Insert seatpost into frame.
- Clamp saddle on top, adjust angle.
- Tighten seatpost clamp.
Set saddle height so your leg is almost straight when the pedal is at the bottom.
8. Install Pedals
- Apply grease to pedal threads.
- Screw pedals into crank arms (left pedal is reverse-threaded).
- Tighten securely.
Check for smooth spinning and no play.
9. Add Grips And Accessories
- Slide grips onto handlebars.
- Mount bottle cage, bell, computer, and lights.
Secure accessories tightly—they can rattle loose.
10. Final Adjustments
- Check all bolts for tightness.
- Adjust brakes and gears for smooth operation.
- Inflate tires to recommended pressure.
Non-obvious insight: Always test ride in a safe area before hitting trails. Small adjustments can make a big difference in comfort and performance. Listen for strange noises, and stop if anything feels wrong.
Common Mistakes And How To Avoid Them
Building a bike is not just about assembly—it’s about avoiding costly errors.
- Wrong part compatibility: Always check if each part fits with your frame and other components. For example, cranksets and bottom brackets come in different standards.
- Overtightening bolts: Use a torque wrench. Too much force can crack carbon parts or strip threads.
- Skipping lubrication: Grease all moving parts. Dry assembly causes wear.
- Cable routing errors: Poor cable routing leads to bad shifting and braking.
- Neglecting fit: Don’t just assemble; spend time adjusting saddle height, bar width, and stem length for your body.
- Buying cheap tools: Low-quality tools slip and damage parts. Invest in decent tools for safety and durability.
Also, avoid mixing old and new parts—sometimes they look compatible but don’t work well together.
Credit: www.pinkbike.com
Tuning And Testing Your New Bike
After assembly, your bike needs tuning.
- Brake adjustment: Pads should contact the rim or rotor evenly and firmly.
- Gear tuning: Derailleurs must shift smoothly without noise.
- Suspension setup: Adjust air pressure or spring tension based on your weight.
- Wheel truing: Spin wheels to check for wobbles. Adjust spokes as needed.
- Test ride: Check handling, shifting, and braking on a flat surface first.
Take your bike for a short ride, shift through all gears, and brake firmly. Bounce the bike to test suspension.
Tip: If you’re unsure about tuning, local bike shops often offer “build checks” for $30–$100. This can help prevent problems later.
Maintenance Tips For Your Custom Mountain Bike
Keeping your bike working well is as important as building it.
- Clean regularly: Dirt causes wear. Wipe frame and parts after every ride.
- Lubricate chain: Every 100–200 miles, or after wet rides.
- Check bolts: Monthly, especially after rough rides.
- Inspect tires: Look for cuts, worn tread, or low pressure.
- Suspension service: Every 6–12 months, depending on use.
Store your bike indoors if possible. Moisture and sun can damage parts over time.
Example: A study by BikeRadar found regular chain cleaning increases chain life by up to 40%. Proper maintenance saves money and keeps your bike safe.

Credit: www.youtube.com
Comparing Diy Builds Vs. Buying Complete Bikes
Let’s see how building your own mountain bike compares to buying a complete one.
| Factor | DIY Build | Complete Bike |
|---|---|---|
| Customization | High | Low–Medium |
| Cost | Varies, often higher | Usually lower |
| Learning Experience | Excellent | Limited |
| Warranty | Part-by-part | Full bike |
| Time Needed | 10–20 hours | Ready out of box |
Non-obvious insight: DIY builds let you upgrade parts easily in the future, while complete bikes may have proprietary parts that limit choices. Building yourself means you understand your bike deeply, which helps with repairs and tuning.
Where To Find Quality Parts
Getting good parts is half the challenge. Look for reputable online stores, local bike shops, and cycling forums.
- Online: Jenson USA, Chain Reaction Cycles, Competitive Cyclist
- Local shops: Ask about deals or advice for compatibility
- Forums: Pinkbike, MTBR, Reddit’s r/bicycling
Check for closeout deals and seasonal sales. Some shops offer discounts if you buy multiple parts.
Tip: Check for used parts. Many riders upgrade often, and used high-end parts can save money. Inspect used parts for wear, cracks, or missing pieces.
For more technical details, you can visit Bicycling Magazine, which offers in-depth reviews and guides.
Making Your Bike Unique: Customization Ideas
Once your bike is built, you can add personal touches.
- Custom paint or decals
- Colored grips, cables, or pedals
- Unique saddle or handlebar shapes
- Tubeless tires for fewer flats
You can also add frame protection tape, special bar ends, or even LED lights for night riding. Choose accessories that match your personality.
These small changes make your bike stand out and reflect your style. Some riders even name their custom bikes!
Frequently Asked Questions
How Much Does It Cost To Build A Mountain Bike From Scratch?
Building a quality mountain bike often costs between $1,000 and $5,000. The price depends on frame material, suspension quality, and whether you buy new or used parts. Tools and accessories can add another $150–$300. If you want top-of-the-line components, prices can rise quickly.
How Long Does It Take To Assemble A Mountain Bike?
Most people need 10–20 hours, including planning, buying parts, and actual assembly. If you’re experienced, you can build faster. Beginners should take their time to avoid mistakes. Allow extra time for tuning and fixing issues.
Do I Need Special Tools To Build A Mountain Bike?
Yes, you need tools like hex wrenches, a bottom bracket tool, chain tool, and torque wrench. Some parts, like hydraulic brakes, require extra tools. Good tools make assembly safer and easier. If you don’t own tools, some bike shops rent them or offer workshops.
Can I Build A Mountain Bike If I’m Not Mechanically Skilled?
Yes, but patience is key. Follow step-by-step guides, watch videos, and ask for help if needed. Start with a hardtail for simplicity. Practice basic repairs before tackling a full build. Mistakes are part of learning—don’t get discouraged.
What’s The Biggest Mistake Beginners Make?
The biggest mistake is buying incompatible parts. Always check frame, wheel, and component specs carefully. Another common error is overtightening bolts, which can damage parts. Forgetting to lubricate moving parts is another frequent issue.
Building your own mountain bike is rewarding. You learn new skills, save money in the long run, and get a bike that fits your needs perfectly. Take your time, ask questions, and enjoy every step. When you ride your custom bike, you’ll know it’s built just for you.

Hello Guys! I am John Reese, a professional biker and my hobby is biking! I have been biking for last 12 years and I love using bikes while outing as well. Based on my experiences with the different type of bikes (mountain bikes, road bikes and hybrid bikes); I am sharing my opinion about various bikes so that a beginner can get started right away. Happy reading!