Changing the gear cable on your mountain bike might sound tricky, but it’s a skill that can save you both time and money. A well-functioning gear cable means smoother shifting, less wear on components, and a better ride experience. Over time, cables stretch, rust, or fray, leading to poor shifting or even complete failure.
Learning how to replace your own gear cable is empowering. It helps you understand your bike better and keeps you safe on the trail. In this guide, you’ll learn everything you need—tools, step-by-step instructions, mistakes to avoid, and tips for perfect shifting.
Even if you’re new to bike maintenance, you’ll finish with confidence and a bike that shifts like new.
Why Gear Cables Matter On A Mountain Bike
Mountain biking puts unique stress on your gear system. Mud, rain, dust, and constant shifting take their toll. The gear cable connects your shifter to the derailleur and controls how smoothly your gears change. If the cable is damaged, sticky, or stretched, shifting becomes unreliable. You may hear grinding, experience ghost shifts, or even get stuck in one gear. For mountain bikers, this can mean the difference between a fun ride and a long walk home.
A fresh gear cable means:
- Crisp, reliable shifts
- Less friction and wear on expensive parts
- More control on technical trails
- Lower risk of snapping a cable far from help
Most riders overlook their cables until something goes wrong. But, regular replacement—typically once a year for regular riders, more often in wet or muddy climates—keeps your bike in top shape.
Tools And Materials Needed
You don’t need a full workshop to change your gear cable, but a few basic tools make the job easier and safer. Here’s what you’ll need:
- New gear cable (stainless steel is best for mountain bikes)
- New gear cable housing (if your old housing is worn, rusted, or cracked)
- Cable cutters (special bike cable cutters prevent fraying)
- 5mm Allen wrench (for most derailleur pinch bolts)
- Phillips screwdriver (for shifter covers, if needed)
- Needle-nose pliers (for pulling and holding the cable)
- Cable end cap (to crimp on and stop fraying)
- Bike stand (optional, but helpful for easy access)
- Lubricant (light oil for new cable)
- Clean rag (for wiping parts)
If you’re replacing both the inner cable and outer housing, make sure the housing matches the diameter of your gear system (typically 4mm for most mountain bikes).
Example: Gear Cable And Housing Price Comparison
Here’s a quick look at typical prices (as of 2026):
| Item | Budget Option | Mid-Range | Premium |
|---|---|---|---|
| Gear Cable (set) | $6 | $15 | $30 |
| Cable Housing (per meter) | $2 | $6 | $15 |
| Cable Cutters | $10 | $25 | $50 |
Most home mechanics can get excellent results with mid-range parts and tools.
When Should You Replace Your Gear Cable?
Many riders wait until shifting gets bad before acting. But catching cable problems early helps avoid damage and frustration.
Replace your gear cable if you notice:
- Slow, sticky, or inconsistent shifting
- Frayed or rusted cable ends
- Stiff or corroded cable housing
- The cable won’t return properly when shifting
- You’ve ridden in a lot of rain or mud recently
On average, replace every 12 months if you ride often, or after 1500–2000 miles. In wet, muddy, or salty conditions, check more often. Even if you don’t see problems, preventive replacement keeps your bike running smoothly.
Preparing Your Bike For Cable Replacement
A little preparation makes the process smoother and prevents small mistakes.
- Shift to the smallest cog (hardest gear) before starting. This releases cable tension and makes removal easier.
- Clean your bike, especially the drivetrain area. Dirt and grime can get inside new cables.
- Take a photo of your current cable routing. This is helpful if you get confused during reassembly.
- Work in a bright, well-lit place. Dropped cable ends are hard to find in the dark!
Common Cable Routing Types
Mountain bikes have different cable routing. Some run externally along the frame, others are internally routed (inside the frame). External routing is easier for beginners. Internal routing can be tricky—look for small holes at the frame ends and use internal routing tools if needed.

Credit: www.youtube.com
Step-by-step: How To Change A Gear Cable
1. Remove The Old Cable
A. Release Cable Tension
Shift your gears to the smallest cog (or smallest chainring for front cable). If needed, use the shifter until the cable tension is fully released.
B. Cut The Cable End Cap
Use cable cutters to snip off the crimped end cap from the old cable at the derailleur. This lets the cable slide out.
C. Loosen The Pinch Bolt
Find the pinch bolt where the cable attaches to the derailleur. Use a 5mm Allen wrench to loosen (not remove) the bolt. Slide the cable out.
D. Remove Cable From Shifter
Most mountain bike shifters have a small port or cover. Open it with a small screwdriver if needed. Push the cable out from the shifter—it may come out easily, or you might need to squeeze the shifter to line up the exit hole.
2. Inspect And (if Needed) Replace The Cable Housing
Carefully look at the cable housing:
- Is it cracked, rusted, or crushed?
- Are the liner and ends clean?
- Do you see rust or old lube inside?
If you see damage or rust, replace the housing:
- Remove the old housing sections.
- Measure and cut new housing to match the old length.
- Use cable cutters for a clean cut.
- Insert new ferrules (plastic or metal end caps) on both ends.
- Blow out dust and add a small drop of light oil inside each section.
Housing Replacement Example
Suppose your old housing is 60cm. Cut your new piece to match, using the old one as a template. Always cut squarely, not at an angle, to avoid shifting problems later.
3. Install The New Gear Cable
A. Thread The Cable Into The Shifter
Feed the new gear cable into the shifter port until you see it exit at the other end. Some shifters need you to shift to a specific position (check your manual).
B. Guide The Cable Through The Housing
Push the cable through each section of housing. If you feel resistance, check for sharp bends or blockages. Do not force the cable—it should move smoothly.
C. Route The Cable Along The Frame
Follow the same path as the old cable, using your reference photo. Secure with frame guides or clips. For internal routing, use a magnet tool or internal routing kit if available.
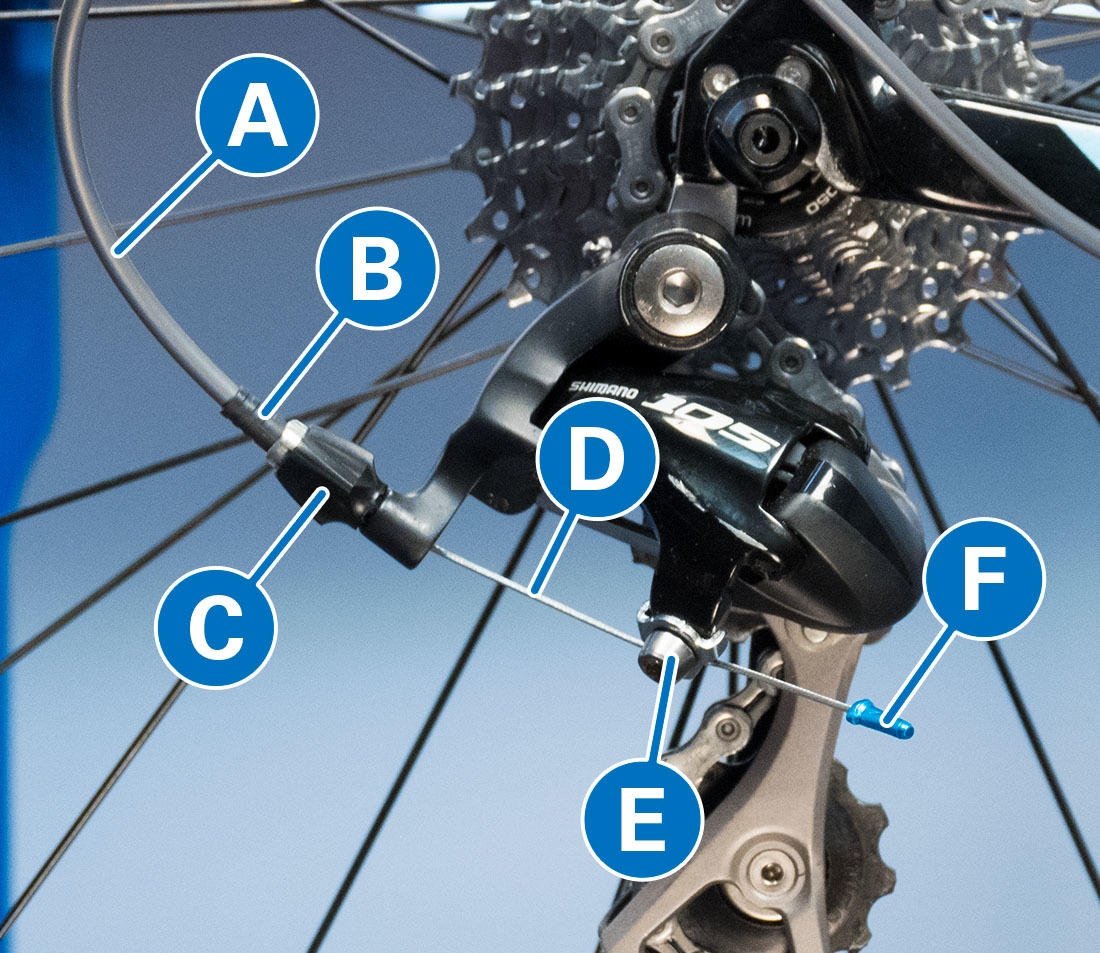
D. Attach The Cable To The Derailleur
Pull the cable tight (but not overly tight) with needle-nose pliers. Slide it under the derailleur’s pinch bolt. Tighten the bolt securely with your Allen wrench.
E. Cut The Excess Cable
Leave about 2 inches (5 cm) of cable beyond the pinch bolt. Cut the rest with cable cutters.
F. Crimp On A Cable End Cap
Place a cable end cap on the cut end and squeeze it with pliers. This prevents fraying and makes future changes easier.
4. Adjust Your Gears For Smooth Shifting
Changing the cable isn’t enough—you must adjust the tension for perfect shifting.
A. Use The Barrel Adjuster
Find the barrel adjuster near your shifter or derailleur. This fine-tunes cable tension.
- If the chain hesitates to shift to a bigger cog, turn the barrel adjuster counterclockwise (add tension).
- If the chain hesitates to shift to a smaller cog, turn it clockwise (reduce tension).
B. Test Shifting
Shift through all gears, up and down, while pedaling. Watch and listen for hesitation or skipping.
C. Fine-tune As Needed
Small adjustments make a big difference. Turn the barrel adjuster in tiny increments. If shifting is still rough, check the cable for kinks or housing for misalignment.
D. Check Limit Screws (if Necessary)
If you replaced the cable housing or had shifting problems before, check the limit screws on your derailleur. These control how far the derailleur moves. Consult your bike’s manual if you’re unsure.
Example: Gear Adjustment Table
This shows how barrel adjuster turns affect shifting:
| Problem | Barrel Adjuster Direction | Expected Result |
|---|---|---|
| Slow shift to larger cog | Counterclockwise | Faster upshift |
| Slow shift to smaller cog | Clockwise | Faster downshift |
| Chain jumps gears | Small adjustments in both directions | Smoother shifting |
Tips For Success And Common Mistakes To Avoid
Changing a gear cable seems simple, but small mistakes can create big problems. Here are some professional tips and common errors to avoid.
Tips For A Smooth Job
- Use proper cable cutters—regular pliers flatten and fray cables, making them hard to thread and adjust.
- Lubricate new cables lightly before installation. This prevents rust and keeps shifting smooth.
- Double-check cable routing before cutting. A wrong route means starting over.
- Secure all housing ends with ferrules. Loose housing causes shifting problems.
- Test under load. Spin the pedals while shifting to simulate real riding.
Mistakes That Cause Trouble
- Cutting the cable too short. Always leave enough for future adjustments.
- Forcing the cable through housing. If it doesn’t slide, check for blockages.
- Over-tightening the pinch bolt. Too much force can snap the cable.
- Skipping barrel adjuster tuning. Even a new cable needs fine-tuning.
- Not replacing damaged housing. Bad housing ruins new cables quickly.
Non-obvious Insights For Beginners
- Internal cable friction matters. Even if your housing looks fine outside, old liner inside can drag and ruin shifting. If in doubt, replace the housing.
- Humidity and mud inside the frame (for internally routed cables) can rust cables faster than you think. Always use stainless steel for mountain bikes, especially if you ride in wet conditions.
When To Visit A Bike Shop
Most mountain bikers can change a gear cable at home. But if you face these issues, it’s smart to get professional help:
- Internal routing that’s hard to access
- Shifter mechanisms that won’t accept a new cable
- Persistent shifting problems after new cable/housing and careful adjustment
- Bent derailleur or hanger
- Unusual noises, binding, or visible frame damage
A pro mechanic can diagnose tricky problems and prevent bigger failures.
How Often Should You Change Gear Cables?
Frequency depends on your riding style, terrain, and climate. Here’s a guide:
| Rider Type | Typical Replacement Interval | Notes |
|---|---|---|
| Weekend Rider (dry conditions) | Every 12–18 months | Inspect yearly |
| Regular Trail Rider | Every 9–12 months | Check after wet rides |
| Year-Round/Commuter | Every 6–9 months | Replace more in winter |
| Racing/Heavy Mud Use | Every 3–6 months | Carry a spare cable |
If you wait for visible damage, you might already have worn out other parts. Preventive replacement is always cheaper and safer.
Troubleshooting: If Shifting Still Isn’t Smooth
Sometimes, even after replacing your gear cable, shifting isn’t perfect. Here’s how to diagnose problems:
- Double-check cable routing. Did you follow the same path as the original? Misrouted cables create friction and strange shifting.
- Inspect the derailleur hanger. If it’s bent, gears won’t line up. A bike shop can straighten it.
- Check for stiff links or dirty chain. Clean and lube your chain if you hear grinding.
- Test limit screws. If the chain falls off or won’t reach every cog, adjust the high and low limit screws on the derailleur.
- Recheck cable tension. Sometimes, the cable stretches a little after first use. Retune with the barrel adjuster.
If you’re stuck, search for your specific bike model and shifter type. Many brands have online videos and manuals for detailed help.
Maintenance Tips: Keeping Your Gear Cable In Top Shape
After your new cable is installed and adjusted, simple maintenance extends its life:
- Wipe down the exposed cable after wet or muddy rides.
- Apply a small drop of lube at cable entry points every few weeks.
- Check for fraying or rust every month, especially before big rides.
- Keep your chain clean and lubricated. A dirty chain puts extra stress on cables.
- Avoid storing your bike outside in rain or snow—moisture ruins cables quickly.
Regular checks take just a few minutes but prevent most shifting problems.
Credit: www.subregionkk.pl
Upgrades: Is It Worth Paying More For Premium Cables?
You’ll see gear cables ranging from a few dollars to over $30. Is the upgrade worth it? Here’s what you get with higher-quality cables:
- Stainless steel or coated cables resist rust and reduce friction
- Teflon-lined housing for extra-smooth shifting
- Pre-stretched cables need less adjustment after installation
- Color-matched housing for a custom look
If you ride a lot in bad weather, or you want the smoothest possible shifting, premium cables can be a smart upgrade. For casual riders in dry climates, standard cables work well if replaced regularly.
Sustainability: What To Do With Old Cables And Housing
Don’t just toss your old gear cable in the trash. Most cables are made of steel and can be recycled with other metals. Check your local recycling center for drop-off options. Old housing usually goes in regular trash, but some bike shops collect scrap for recycling.
For creative types, old cables can be reused in art projects or as garden ties. Just make sure you remove sharp ends!

Credit: www.sepr.es
How Changing Your Own Gear Cable Builds Confidence
For many riders, the first successful cable change feels like a breakthrough. You no longer need to wait for a bike shop or worry about breakdowns far from home. Each repair gives you new skills and more confidence. Soon, you’ll be able to help friends on group rides or try other repairs—like replacing a chain or fixing a flat.
Even if you make a mistake, you’ll learn something valuable. The main thing is to take your time, follow instructions, and don’t rush. Mountain bikes are designed for maintenance, and most modern parts are user-friendly once you get started.
Frequently Asked Questions
How Do I Know If My Gear Cable Needs Replacing?
If your shifting feels sticky, slow, or unreliable, or if you see rust or frayed wires at the cable end, it’s time to replace your gear cable. Also, replace it if you’ve ridden through lots of mud or rain, or if the cable is more than a year old.
Can I Use Any Gear Cable On My Mountain Bike?
Most mountain bikes use standard 1.2mm gear cables, but always check your bike’s manual. Use stainless steel cables for better rust resistance. Avoid brake cables—they’re thicker and won’t fit properly in shifters.
What’s The Difference Between External And Internal Cable Routing?
External routing means the cable runs along the outside of your bike frame—easy to see and change. Internal routing sends the cable inside the frame for a cleaner look, but it can be harder to install and maintain. Use internal routing tools if your bike has this system.
Do I Need To Replace The Cable Housing Every Time?
Not always. If the housing is clean, smooth, and not crushed, you can reuse it. But if you see rust, cracks, or sticky shifting, replace it with new housing for the best results.
Where Can I Find More Help Or Videos For My Bike Model?
Many manufacturers and cycling organizations offer guides. For example, the Park Tool repair help site has trusted tutorials for most bikes and shifters.
Changing your own gear cable is more than just a repair—it’s a way to connect with your bike and ride with confidence. With patience, the right tools, and the steps above, you’ll master this essential skill and keep your mountain bike in top condition for every adventure.

Hello Guys! I am John Reese, a professional biker and my hobby is biking! I have been biking for last 12 years and I love using bikes while outing as well. Based on my experiences with the different type of bikes (mountain bikes, road bikes and hybrid bikes); I am sharing my opinion about various bikes so that a beginner can get started right away. Happy reading!