Many mountain bikers love the thrill of trails and fast descents, but few realize how much their ride depends on properly adjusted back brakes. If your rear brakes feel weak, squeak, or grab unpredictably, you risk not only bad performance but also your safety.
Learning to adjust back brakes can turn a frustrating ride into a smooth, controlled experience—whether you have rim brakes or disc brakes. You don’t need to be a pro mechanic; with the right steps, tools, and a bit of patience, anyone can do it.
Why Proper Brake Adjustment Matters
The back brakes on your mountain bike play a crucial role in controlling speed and stability. When brakes are poorly adjusted, stopping distance increases and you can lose control, especially on loose or steep terrain. Statistics from the National Highway Traffic Safety Administration show that over 30% of cycling accidents involve brake failure or improper brake setup. Adjusting your brakes properly can prevent these issues and improve your confidence on the trail.
Many beginners believe that only the front brake matters. But the rear brake helps you avoid skids, control descents, and stabilize your bike in tricky spots. It also prevents the bike from flipping forward during sudden stops. Proper adjustment isn’t just about safety—it’s about better riding.
Types Of Back Brakes On Mountain Bikes
Understanding which type of brake your bike uses is the first step. There are two main types:
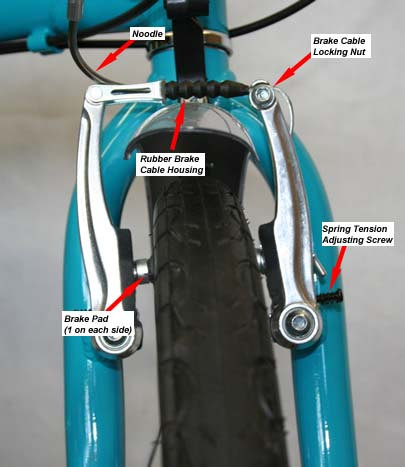
- Rim brakes: These use pads that squeeze the wheel rim to slow the bike.
- Disc brakes: These use a rotor attached to the wheel hub and calipers with pads.
Each type has its own adjustment process. Here’s a quick comparison:
| Brake Type | Common Features | Typical Issues |
|---|---|---|
| Rim Brakes | Lightweight, easy to maintain | Pad wear, misalignment, cable stretch |
| Disc Brakes | Strong stopping power, works in mud/wet | Rotor warping, pad contamination, hydraulic leaks |
If you’re not sure which you have, look at your rear wheel. Rim brakes have pads on either side of the rim. Disc brakes have a metal disc (rotor) near the center of the wheel.
Tools You Need For Adjusting Back Brakes
Having the right tools makes the job easier and prevents damage.
- Allen keys (usually 4mm, 5mm, or 6mm)
- Screwdrivers (Phillips and flathead)
- Needle-nose pliers
- Bike lubricant
- Clean rags
- Cable cutters (for rim brakes)
- Rotor truing tool (for disc brakes)
- Replacement brake pads (if needed)
A small bike stand is helpful but not essential. You can also flip your bike upside down for easier access.
Preparing Your Bike For Adjustment
Before you start, check for obvious problems:
- Inspect the brake pads for wear. If they’re thin or uneven, replace them.
- Look for dirt or debris on rims or rotors.
- Spin the rear wheel and listen for rubbing or scraping sounds.
- Check if the brake lever feels spongy or has too much travel.
Clean your bike’s braking surfaces with a rag and mild degreaser. Removing dirt and oil helps the adjustment process and improves performance.
Step-by-step Guide: Adjusting Rim Brakes
1. Check Brake Pad Wear And Position
Worn pads reduce stopping power. Look for the wear line marked on the pad. If pads are below this line, install new ones.
Pads must contact the rim evenly. To adjust:
- Loosen the pad fixing bolt with an Allen key.
- Position the pad so it touches the rim’s braking surface, not the tire.
- Tighten the bolt firmly.
Non-obvious tip: Many riders miss the angle of the pads. Pads should be slightly “toe-in”—front edge touches the rim first. This reduces squealing.
2. Center The Brake Arms
If one pad rubs the rim or the arms sit unevenly, center them:
- Loosen the brake mounting bolt.
- Move the arms so they sit equally spaced from the rim.
- Retighten the bolt.
Some brakes have small screws to adjust arm tension. Turn these to balance the arms.
3. Adjust Cable Tension
Cable tension controls how far the lever pulls before the pads hit the rim.
- Find the barrel adjuster on the brake lever or caliper.
- Turn it clockwise to loosen (pads move away), counterclockwise to tighten (pads move closer).
If the lever feels soft, increase tension. If the pads rub, decrease it.
4. Test Lever Feel And Brake Action
Pull the brake lever. It should engage the pads firmly after about half the lever’s travel. If it hits the handlebar, tension is too loose.
Spin the wheel and apply the brake. The wheel should stop quickly and evenly.
5. Fine-tune And Secure
After adjusting, double-check all bolts. Ride the bike and test braking at low speed. Make small adjustments to pad position or cable tension if needed.
Step-by-step Guide: Adjusting Disc Brakes
1. Inspect Pads And Rotors
Disc brake pads wear over time. Remove the wheel and look at the pads; if less than 1mm remains, replace them.
Check the rotor for warping. Spin the wheel and look for wobble. A slight bend can be fixed with a rotor truing tool.
2. Align The Caliper
Most disc brakes use two bolts to attach the caliper. To align:
- Loosen both bolts so the caliper can move slightly.
- Squeeze the brake lever fully and hold it.
- While holding the lever, tighten both bolts evenly.
This centers the caliper over the rotor.
3. Adjust Pad Clearance
Some calipers have a dial or screw to move the pads closer or farther from the rotor. Turn it until the pads are close but not rubbing.
Hydraulic brakes usually self-adjust, but mechanical ones need manual tuning.
4. Bleed Hydraulic Brakes (if Needed)
If your lever feels soft or goes to the bar, air may be in the system. Bleeding removes air and restores firmness. Use a bleed kit and follow the manufacturer’s steps.
Non-obvious tip: Even small air bubbles can cause big problems. Always use new hydraulic fluid and don’t rush the process.
5. Test Brake Action
Spin the rear wheel and pull the lever. The wheel should stop without noise or dragging. If you hear squeaking, clean the rotor and pads with rubbing alcohol.
Common Problems And How To Fix Them
Mountain bike brakes can develop issues over time. Here’s how to solve them:
- Squeaky brakes: Clean pads and rim/rotor. Toe-in pads for rim brakes.
- Weak braking: Replace worn pads, check cable/hydraulic tension.
- Lever hits handlebar: Increase cable tension or bleed hydraulic system.
- Pads rubbing: Center brake arms/caliper, adjust pad clearance.
- Uneven braking: Balance arm tension for rim brakes, align caliper for discs.
Many beginners forget to check for contamination. Oil, grease, or even sweat can ruin brake pads and rotors. Always keep them clean and dry.
How Often Should You Adjust Back Brakes?
Brake adjustment frequency depends on your riding style and conditions. If you ride in mud, sand, or rain, check brakes every 2–4 weeks. For dry, smooth trails, once every 2–3 months is enough.
Here’s a quick maintenance schedule:
| Riding Conditions | Adjustment Frequency | Common Wear Signs |
|---|---|---|
| Muddy/Wet | Every 2 weeks | Squealing, quick pad wear, reduced power |
| Dry/Trail | Every 2 months | Gradual pad thinning, lever looseness |
| Downhill/Frequent | Monthly | Overheating, rotor warping, fade |
Non-obvious insight: Regular adjustment not only keeps your bike safe, it also saves money. Worn pads can damage rims or rotors, leading to expensive repairs.
Credit: www.downtube.com
Tips For Better Brake Performance
A few extra steps can make your brakes work even better:
- Use quality brake pads designed for your terrain.
- Keep your cables lubricated—dry cables increase friction.
- Replace old cables and housing every year.
- For disc brakes, choose rotors with the right diameter (larger rotors offer more stopping power).
- Avoid touching rotors or pads with bare hands; oils can cause squealing.
- If you ride in wet conditions, consider pads made for moisture.
Many riders upgrade only their front brakes, but improving your back brakes can change your ride just as much.
Comparing Rim And Disc Brake Adjustments
Some riders wonder which system is easier to maintain. Here’s a side-by-side comparison:
| Feature | Rim Brakes | Disc Brakes |
|---|---|---|
| Adjustment Difficulty | Easy, simple tools | Medium, specialized tools |
| Maintenance Frequency | Higher (pads wear faster) | Lower (pads last longer) |
| Performance in Wet | Reduced | Excellent |
| Cost of Replacement | Low | Medium to high |
Disc brakes give better performance in tough conditions, but rim brakes are easier for beginners to adjust. Choose based on your needs, budget, and riding style.

Credit: www.fanatikbike.com
Mistakes Beginners Make When Adjusting Back Brakes
Even experienced riders make errors. Avoid these common mistakes:
- Forgetting to check pad alignment: Pads must hit the braking surface squarely.
- Ignoring cable or hydraulic fluid condition: Old cables or dirty fluid reduce power.
- Over-tightening bolts: This can strip threads or damage parts.
- Skipping test rides: Always test after adjustment to check performance.
- Not cleaning components: Dirt and oil ruin braking. Clean before and after adjusting.
Non-obvious tip: Many riders adjust only one side, thinking it solves rubbing. Always check both pads and arms/calipers.
When To Seek Professional Help
Most adjustments can be done at home, but some problems need expert care:
- Hydraulic leaks or air in the system
- Severely warped rotors
- Stripped bolts or mounting issues
- Persistent noise after cleaning and adjusting
Bike shops have tools and experience to fix complex problems. If you’re unsure, it’s better to ask for help than risk your safety.
Safe Riding After Brake Adjustment
After adjusting your back brakes, ride slowly in a safe area. Test braking at different speeds and surfaces. Practice emergency stops to feel the new setup. Remember, brakes bed in after a few rides—performance may improve as pads settle.
If you ride with others, ask them to check your work. Many cyclists miss small details, so a second opinion helps.
Frequently Asked Questions
How Do I Know If My Back Brakes Need Adjustment?
If your brake lever feels loose, the bike takes longer to stop, or you hear rubbing or squealing, it’s time for adjustment. Also, check if the pads look thin or uneven.
Can I Adjust Mountain Bike Brakes Without Special Tools?
Most adjustments need basic tools like Allen keys and screwdrivers. For disc brakes, a rotor truing tool is helpful. Hydraulic systems may need a bleed kit, which is specialized.
What’s The Difference Between Adjusting Rim And Disc Brakes?
Rim brakes adjust by moving pads and changing cable tension. Disc brakes require caliper alignment and pad clearance. Hydraulic disc brakes may need bleeding to remove air.
How Often Should I Replace Brake Pads?
Replace pads when they are worn below the manufacturer’s recommended thickness (usually about 1mm for disc pads, 2mm for rim pads). For heavy riders or tough terrain, check every month.
Where Can I Learn More About Mountain Bike Brake Maintenance?
A good resource is Park Tool, which offers detailed guides and videos for all brake types.

Credit: www.youtube.com
Final Thoughts
Adjusting your back brakes isn’t just a maintenance task—it’s a skill that makes mountain biking safer and more fun. With the right tools and steps, you can solve most brake problems at home. Remember to check pad wear, keep components clean, and test your adjustments before hitting the trails.
A well-tuned rear brake gives you confidence, control, and peace of mind, whether you’re riding for adventure or daily commuting. Take the time to learn, and your bike will reward you with smoother, safer rides every time.

Hello Guys! I am John Reese, a professional biker and my hobby is biking! I have been biking for last 12 years and I love using bikes while outing as well. Based on my experiences with the different type of bikes (mountain bikes, road bikes and hybrid bikes); I am sharing my opinion about various bikes so that a beginner can get started right away. Happy reading!