Every year, thousands of cyclists ship their mountain bikes across the country—or even around the world. Whether you’re moving, selling your bike, or heading to a big race, boxing your mountain bike for shipping is a skill that can save money, prevent damage, and avoid headaches.
But many people worry about doing it wrong. Will the bike arrive safely? Will the parts get scratched? Is it worth doing yourself instead of paying a shop?
Shipping a mountain bike is not just about sticking it in a box. You need the right tools, careful planning, and a little patience. This guide will show you step-by-step how to box a mountain bike for shipping, even if you’re not a bike mechanic.
You’ll learn what supplies you need, how to protect each part, and how to pack everything securely. Along the way, you’ll get tips that most beginners miss, plus practical advice to avoid common mistakes.
Let’s get started and make sure your mountain bike arrives safely at its destination.
Why Proper Boxing Matters
Mountain bikes are not cheap. The average cost of a new mountain bike in the US is around $1,000, with high-end models reaching $5,000 or more. Even a small scratch or bend can lower the value or make riding unsafe.
Proper boxing protects your bike from:
- Impact damage during transport
- Scratches from rubbing parts
- Bent wheels or handlebars
- Lost or loose parts
If you box your bike well, you’re also less likely to face problems with insurance claims if something goes wrong. Shipping companies often blame damage on poor packing.
Gathering Supplies And Tools
Before you start, get all the supplies and tools ready. Missing something can make the process harder and less safe for your bike.
Essential Supplies
You need these items for most mountain bikes:
- Bike box (standard size: 54″ x 8″ x 28″, but check your bike’s size)
- Wheel bags or bubble wrap for wheels
- Foam tubing or pipe insulation (for frame and fork)
- Zip ties or Velcro straps
- Packing tape (strong and wide)
- Plastic bags (for small parts)
- Cardboard sheets (to separate parts)
- Axle spacers (to protect fork and rear triangle)
- Allen wrenches (usually 4mm, 5mm, 6mm)
- Pedal wrench (15mm)
- Screwdriver (flat or Phillips)
- Scissors or utility knife
Optional But Helpful
- Torque wrench (for proper tightening)
- Gloves (to avoid greasy hands)
- Bike stand (makes disassembly easier)
- Permanent marker (label bags and parts)
Many local bike shops give away empty bike boxes. If you don’t have a box, ask them or check online marketplaces. Make sure the box is not torn or water-damaged.
Preparing The Bike For Disassembly
Before disassembling, clean your mountain bike. Dirt and mud can scratch paint and make packing messy. Use a gentle bike cleaner, soft brush, and dry cloth.
Take pictures of your bike from different angles. If you’re not familiar with bike assembly, these photos will help when you put it back together.
Shift the chain to the smallest ring and cog. This relieves tension and makes removing wheels easier.
Step-by-step Disassembly
Disassembling your mountain bike can sound complicated, but it’s manageable with clear steps. Here’s how to do it safely.
1. Remove The Pedals
Use a pedal wrench or Allen key. Remember:
- Right pedal: Turn counterclockwise to loosen
- Left pedal: Turn clockwise to loosen (reverse thread)
Put pedals in a plastic bag. Beginners often forget the thread directions and struggle. Mark the bag as “Pedals. ”
2. Take Off The Wheels
Release the quick-release levers or thru-axles. Carefully remove the front and rear wheels.
Remove the skewers or thru-axles and place them in another labeled bag.
3. Protect The Frame And Fork
Use foam tubing or pipe insulation to cover the main tubes: top tube, down tube, seat stays, and chain stays.
Place axle spacers in the fork and rear dropouts. These prevent crushing.
Wrap the fork legs and rear triangle with extra foam or bubble wrap.
4. Remove The Handlebars
Most mountain bikes have a faceplate on the stem. Use an Allen wrench to unscrew the faceplate bolts.
Take off the handlebars and wrap them in foam. Zip-tie the bars to the frame or fork, making sure they won’t scratch paint.
Don’t remove cables unless you’re confident reattaching them. Instead, keep cables attached and tuck everything neatly.
5. Lower Or Remove The Seat And Seatpost
Loosen the seatpost clamp and slide the seatpost down or remove it completely. This makes the bike smaller and protects the post.
Wrap the seatpost and saddle with foam or bubble wrap.
6. Remove Accessories
Take off bottle cages, lights, GPS mounts, fenders, or anything that sticks out. Put small items in labeled bags.
7. Protect The Derailleur
If possible, remove the rear derailleur using an Allen wrench. Wrap it and place it in a bag.
If you don’t want to remove it, wrap it carefully and secure it to the chainstay.
Beginners often skip derailleur removal, but it’s the part most likely to bend in shipping.
Credit: www.hotel-zurstadtcassel.de
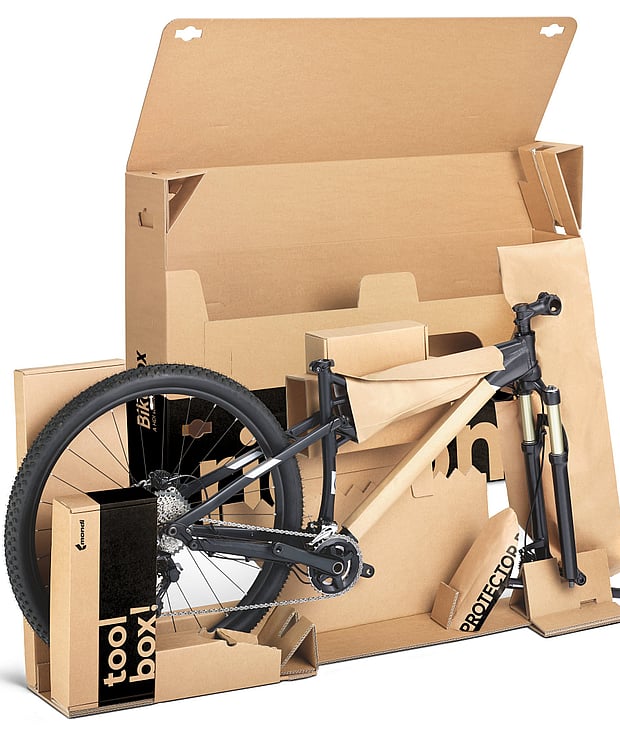
Packing Each Bike Part
Once your mountain bike is disassembled and protected, it’s time to pack everything in the box.
Frame Placement
Lay the frame in the box with the drivetrain facing up. This keeps the chainring and derailleur away from the box wall.
Add extra foam or cardboard under the frame for cushioning.
Wheel Packing
Wrap each wheel in bubble wrap or use wheel bags. Place wheels on either side of the frame inside the box.
Be careful: don’t let the wheels rub against the frame. Use cardboard sheets as separators.
Handlebar And Fork
Zip-tie the handlebars to the fork or frame. Make sure cables are not stretched or kinked.
If you removed the fork, wrap it and place it alongside the frame.
Seatpost, Pedals, And Small Parts
Put seatpost, pedals, and small parts in labeled bags. Place them in gaps around the frame or tape them to foam-covered parts.
Accessories And Tools
If you’re shipping tools, wrap them and place them in the box corners.
Closing The Box
Add extra foam or cardboard to fill gaps and prevent movement. Shake the box gently—if you hear rattling, add more padding.
Seal the box with strong packing tape. Tape all seams and corners.
Example Packing Layout
Here’s a common packing layout for a standard mountain bike:
| Bike Part | Box Placement | Protection Used |
|---|---|---|
| Frame | Center of box | Foam tubing, cardboard |
| Front Wheel | Left side | Bubble wrap, cardboard separator |
| Rear Wheel | Right side | Bubble wrap, cardboard separator |
| Handlebars | Tied to frame or fork | Foam wrap, zip tie |
| Seatpost & Saddle | Gaps in box | Bubble wrap, bag |
| Pedals | Bag taped to foam | Plastic bag |
| Small Parts | Corners or gaps | Labeled bags |
Packing Tips That Make A Difference
Many guides skip small details that really matter. Here are tips that most beginners miss:
- Remove brake rotors if possible. They bend easily. Wrap them and place them in a flat part of the box.
- Deflate tires slightly. Fully inflated tires can burst in air shipping. Leave enough air to protect the rim.
- Use axle spacers. They prevent forks and rear triangles from being crushed.
- Write your name and phone number on the box and inside. If labels come off, this helps recovery.
- Double-check cable routing. Cables should not be pinched or twisted.
- Photo documentation. Take pictures of every stage. If something breaks, you have proof for claims.
Mistakes To Avoid
Some mistakes can ruin your bike or delay shipping. Here are the most common:
- Using a box that’s too small: Parts will be cramped and damaged.
- Skipping padding: Frame and wheels will rub and scratch.
- Not labeling bags: Small parts get lost or mixed up.
- Forgetting to remove pedals or accessories: They can poke through the box.
- Leaving tires fully inflated: Risk of bursting in air transport.
- Loose parts in the box: Can move and cause damage.
If you’re unsure, visit a local bike shop or ask an experienced friend for help.
Choosing A Shipping Company
Not all shipping services handle bikes the same way. Some specialize in bike shipping and offer insurance and tracking.
Comparison Of Shipping Options
Here’s a quick comparison of popular US shipping companies:
| Company | Bike Shipping Service | Average Cost (Domestic) | Insurance | Tracking |
|---|---|---|---|---|
| FedEx | Standard shipping, Bike boxes accepted | $70–$160 | Optional, up to $1,000 | Yes |
| UPS | Standard shipping, Bike boxes accepted | $75–$180 | Optional, up to $1,000 | Yes |
| BikeFlights | Specialized bike shipping service | $45–$120 | Included, up to $1,000 | Yes |
| ShipBikes | Discounted bike shipping rates | $50–$130 | Optional | Yes |
BikeFlights and ShipBikes are often cheaper and safer for bikes. FedEx and UPS work well if you pack carefully.
Insurance And Tracking
Always use insurance for shipping a mountain bike. For a $1,000 bike, insurance usually costs $10–$20. If your bike is worth more, consider extra coverage.
Tracking lets you watch your shipment. Most companies offer real-time tracking.
International Shipping Advice
If you’re sending your mountain bike overseas, check customs rules. Some countries require bikes to be completely clean—no mud or plant matter.
Shipping internationally can cost $200–$500 depending on distance and speed.
Declare the bike’s value honestly. If you under-value, you risk losing money if something is lost or damaged.
Shipping Labels And Documentation
Print the shipping label and attach it securely. Use clear tape over the label.
Inside the box, include a printed sheet with:
- Your name
- Phone number
- Destination address
- Return address
Some shippers require a packing list. Write down all parts in the box.
Receiving And Reassembling Your Bike
When your bike arrives, inspect the box before signing. If you see damage, take pictures and note it with the delivery company.
Open the box carefully—don’t cut too deep and risk scratching parts.
Check all parts against your packing list. Look for missing or damaged items.
Use your photos to guide reassembly. If you’re not confident, ask a bike shop to help.
Real-world Example: Shipping A $2,500 Mountain Bike
Jane wanted to ship her $2,500 Specialized Stumpjumper from California to Colorado for a race. She followed these steps:
- Cleaned the bike, took photos, and got a free bike box from a shop.
- Removed pedals, wheels, handlebars, seatpost, and derailleur. Wrapped each part.
- Used foam tubing and bubble wrap for protection.
- Packed frame in the center, wheels on each side, and small parts in labeled bags.
- Used BikeFlights for shipping ($95 with insurance).
- Printed and attached the label, added her contact info inside.
- Bike arrived in 3 days with no damage.
Jane’s main insight: Axle spacers prevented her fork from getting crushed—a mistake she’d made in the past.
How Much Does Shipping Really Cost?
Shipping a mountain bike in the US costs between $45 and $180 depending on:
- Box size (bigger costs more)
- Destination (longer distance = higher price)
- Insurance (extra coverage increases cost)
- Speed (overnight = more expensive)
International shipping costs $200 to $500. Always compare prices and ask about insurance.
Environmental Impact
Shipping bikes has an environmental cost. A typical ground shipment emits about 2 kg of CO₂ per 100 miles. Air shipping is higher.
To reduce impact:
- Reuse bike boxes and packing materials
- Ship by ground when possible
- Offset emissions if offered by shipping company

Credit: www.movens.nl
Common Questions Beginners Have
When boxing a mountain bike, beginners often wonder:
- Should I remove the fork? Usually not needed unless the box is small.
- How much tire air should I leave? About 70% is safe for protection.
- Can I ship a bike fully assembled? Only if you use a very large box, but risk is higher.
- Should I pay for professional packing? For expensive bikes, it’s a good idea if you’re unsure.
- What if I lose a part? Always label and photo document every step.
Comparing Diy Packing Vs. Professional Packing
Some people pay bike shops to pack their bikes. Here’s a quick comparison:
| Aspect | DIY Packing | Professional Packing |
|---|---|---|
| Cost | $0 (your time) | $50–$100 |
| Time Required | 1–2 hours | 30–60 minutes |
| Skill Needed | Beginner to advanced | Expert |
| Risk of Damage | Higher if mistakes made | Lower |
| Custom Packing | Depends on your materials | Usually high-quality |
If your bike is very expensive or sentimental, consider professional packing.
Final Checklist Before Shipping
- All parts wrapped and protected
- Wheels separated from frame
- Axle spacers in fork and rear triangle
- Tires deflated to about 70%
- Pedals and small parts in labeled bags
- Accessories removed and packed
- Shipping label attached securely
- Contact info inside the box
- Insurance and tracking arranged
- Photos taken at each step
Where To Find More Guidance
For detailed packing diagrams and advice, check the official guides from BikeFlights. They cover many bike types and packing methods.

Credit: lastdragonhibachi.com
Frequently Asked Questions
How Big Should The Bike Box Be For A Mountain Bike?
Most mountain bikes fit in a box about 54″ x 8″ x 28″. Check your frame size. If your bike is larger, ask a shop for a bigger box or use two boxes joined together.
Is It Safe To Ship A Mountain Bike By Air?
Yes, but you must deflate tires to avoid bursting. Use extra padding as air shipping can be rougher than ground. Always insure your bike.
Should I Remove The Rear Derailleur For Shipping?
It’s recommended. The rear derailleur is easily bent. If you don’t want to remove it, wrap it well and secure it to the frame.
Can I Use Regular Bubble Wrap Instead Of Foam Tubing?
Bubble wrap works but foam tubing is better for frame tubes. Bubble wrap can slip and leave gaps. Combine both for best protection.
What If My Bike Is Damaged During Shipping?
Take photos, contact the shipping company, and file an insurance claim. Save your packing photos as proof. Most companies cover up to $1,000 by default.
Boxing a mountain bike for shipping is something you can learn with patience and care. By following these steps, using the right materials, and avoiding common mistakes, you’ll increase the chances your bike arrives safely and ready for the next adventure.
Remember, a little extra time spent boxing your bike now can save you hundreds of dollars—and a lot of stress—later.

Hello Guys! I am John Reese, a professional biker and my hobby is biking! I have been biking for last 12 years and I love using bikes while outing as well. Based on my experiences with the different type of bikes (mountain bikes, road bikes and hybrid bikes); I am sharing my opinion about various bikes so that a beginner can get started right away. Happy reading!