Mountain biking is exciting, but safety depends on your bike’s brakes. If your brake pads are not adjusted correctly, stopping becomes harder and riskier. Many riders think brake pad adjustment is complicated, but you can learn to do it yourself with a little guidance. It saves money, improves performance, and helps you ride with confidence.
This guide explains how to adjust brake pads on a mountain bike in simple steps. You’ll find advice for both rim brakes and disc brakes, practical tips, and common mistakes to avoid. Even if you’re new to bike maintenance, you’ll understand each step. With clear explanations and examples, you’ll be able to make your mountain bike safer and smoother to ride.
Understanding Brake Pads And Their Importance
Mountain bikes use two main types of brakes: rim brakes and disc brakes. Each type uses brake pads that press against a surface to slow down the bike.
- Rim brake pads grip the wheel’s rim.
- Disc brake pads squeeze a metal disc attached to the wheel hub.
Brake pads are small but crucial. Worn or badly adjusted pads can cause longer stopping distances and noisy brakes. According to a survey by the International Mountain Bicycling Association, about 30% of bike accidents on trails are related to poor brake performance. Regular adjustment keeps you safer and prolongs your bike’s life.
Tools Needed For Adjusting Brake Pads
You don’t need many tools, but the right ones make the job easier. Here’s what you’ll need:
- Allen wrenches (usually 4mm, 5mm, or 6mm)
- Screwdriver (for some rim brakes)
- Needle-nose pliers
- Bike stand (optional, but helpful)
- Clean rag
- Isopropyl alcohol (for cleaning disc brakes)
- Flashlight (for better visibility)
Most mountain bike maintenance can be done with basic tools. Investing in a multi-tool is smart for frequent riders.
Credit: www.montaguebikes.com
Checking Your Brake Pads Before Adjustment
Before you adjust anything, check your brake pads for wear. Here’s how:
- Look for grooves or patterns on the pad surface. If the grooves are gone, the pad is worn out.
- For rim brake pads, check if the pad is touching only the rim (not the tire).
- For disc brake pads, inspect for uneven wear or contamination (oil, dirt).
A typical mountain bike brake pad lasts 1,000–2,000 miles, but riding in mud or rain wears them faster. If pads are thin or damaged, replace them before adjusting.
How To Adjust Rim Brake Pads
Rim brakes are common on many mountain bikes, especially older models or entry-level bikes. Adjusting rim brake pads is straightforward if you follow these steps.
Step 1: Inspect Pad Position
The pad should touch the rim’s braking surface evenly when you squeeze the brake lever. It must not touch the tire or miss the rim.
Step 2: Loosen The Pad
Use your Allen wrench to loosen the bolt holding the brake pad. Don’t remove it completely—just enough to move the pad.
Step 3: Align The Pad
- Make sure the pad sits parallel to the rim.
- The entire pad should contact the rim when brakes are applied.
- Leave a small gap (about 1–2mm) between pad and rim when brakes are released.
Step 4: Check Toe-in
For many rim brakes, a slight “toe-in” adjustment prevents squeaking. This means the front part of the pad touches the rim before the rear.
- Place a thin card (like a business card) under the back of the pad.
- Tighten the pad so the front is closer to the rim.
- Remove the card and check alignment.
Step 5: Tighten And Test
Tighten the bolt securely. Squeeze the brake lever several times and watch the pad’s movement. Make sure there’s no rubbing when released and full contact when pressed.
Step 6: Fine-tune Cable Tension
If brakes feel loose or too tight, adjust the cable tension using the barrel adjuster (located on the brake lever or caliper). Turning it out tightens, turning it in loosens.
Example: If your brake lever feels soft and the pads don’t touch the rim until halfway down, increase cable tension.
Step 7: Clean The Rim And Pads
Wipe the rim and pads with a clean rag. For stubborn dirt, use isopropyl alcohol. This improves braking power and reduces noise.
Common Mistakes With Rim Brake Adjustment
- Setting pads too high: Pads touch the tire and cause damage.
- Setting pads too low: Pads miss the rim and braking is weak.
- Forgetting toe-in: Brakes squeak loudly.
How To Adjust Disc Brake Pads
Disc brakes are popular on modern mountain bikes for stronger stopping power. Adjustment is a bit different, but just as manageable.
Step 1: Inspect The Rotor And Pads
Check the rotor (the metal disc) for warping or dirt. Examine the pads for wear and contamination.
Step 2: Check Pad Alignment
Disc brake pads must be centered on the rotor. If they rub or miss part of the rotor, you need to adjust.
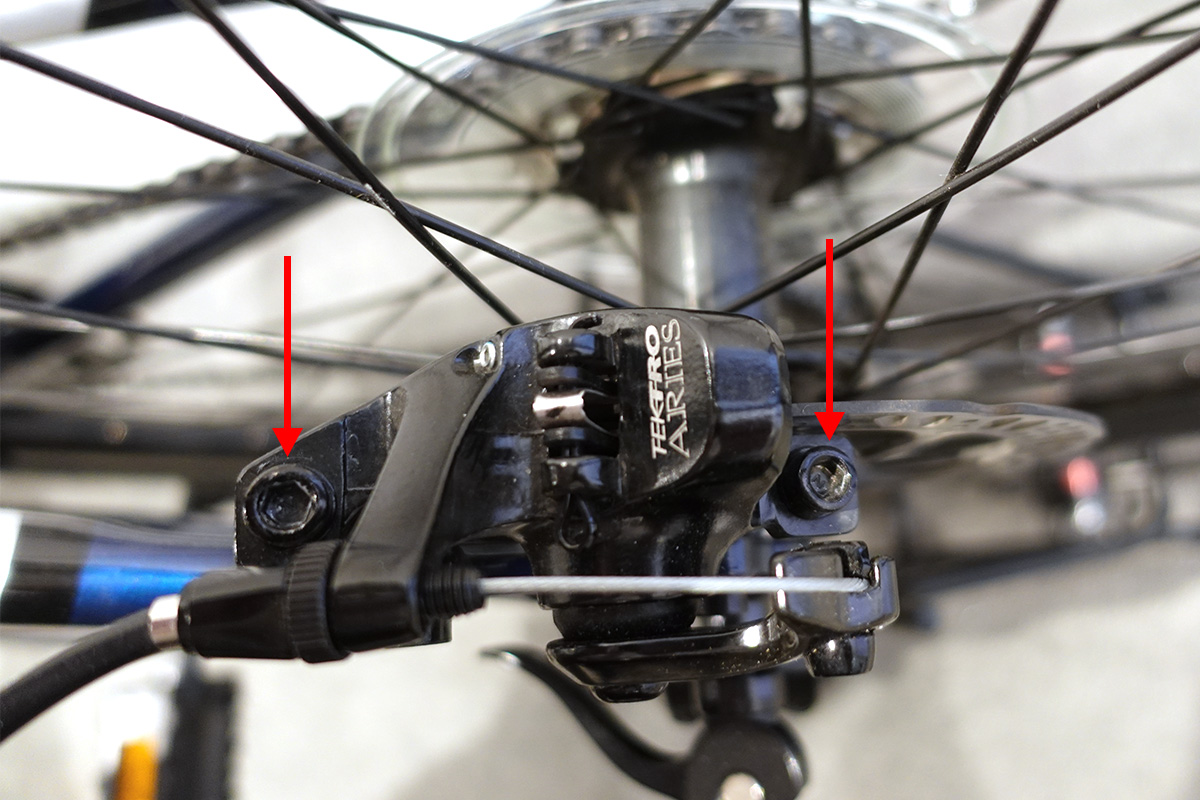
Step 3: Loosen The Caliper
Use your Allen wrench to loosen the caliper bolts. The caliper is the part holding the pads.
Step 4: Align The Caliper
- Squeeze the brake lever hard.
- While holding the lever, tighten the caliper bolts. This centers the pads on the rotor.
Step 5: Inspect Pad Clearance
There should be a small gap between each pad and the rotor. Pads must not rub when released, but must grip evenly when pressed.
Step 6: Adjust Pad Contact (if Needed)
Some disc brakes allow you to adjust pad contact with a small dial or screw. Turn it to move pads closer or farther from the rotor.
Step 7: Clean Pads And Rotor
Use isopropyl alcohol and a clean rag to wipe the rotor and pads. Never use oil-based cleaners. Dirt or oil causes noisy brakes and weak stopping.
Step 8: Test Brake Lever Feel
Squeeze the lever. It should feel firm, not spongy. If brakes feel soft, you may need to bleed the hydraulic system (for hydraulic brakes), but this is a separate task.
Common Mistakes With Disc Brake Adjustment
- Over-tightening caliper bolts: Can misalign pads.
- Not centering pads: Causes rubbing and noise.
- Using oil to clean pads: Reduces friction.
Comparing Rim Brakes And Disc Brakes
Understanding the differences helps you choose the right method and know what to expect. Here’s a quick comparison:
| Feature | Rim Brakes | Disc Brakes |
|---|---|---|
| Stopping Power | Moderate | High |
| Performance in Wet Conditions | Reduced | Consistent |
| Ease of Adjustment | Easy | Moderate |
| Maintenance Frequency | Higher | Lower |
| Cost | Lower | Higher |
Disc brakes are better for muddy trails, but rim brakes are easier to adjust and cheaper to replace.
Signs Your Brake Pads Need Adjustment
Even if you adjusted your brakes recently, certain signs mean you need to check them again:
- Brakes squeal or make noise
- Levers feel soft or reach bars before stopping
- Pads rub the rim or rotor when not braking
- Reduced stopping power
- Uneven wear on pads
Don’t ignore these signs. Proper adjustment prevents accidents and damage.
How Often Should You Adjust Brake Pads?
There’s no fixed rule, but most riders should check brake pads every 1–2 months. If you ride in muddy or wet conditions, check more often.
According to a study published by the Bicycle Technical Institute, regular brake maintenance reduces risk of brake-related accidents by over 40%.

Credit: www.ehhlaw.com
Step-by-step Checklist For Brake Pad Adjustment
If you want a quick reference, here’s a simple checklist:
- Inspect brake pads for wear.
- Check pad alignment.
- Loosen pad bolt or caliper as needed.
- Align pads for full contact.
- Adjust toe-in (rim brakes).
- Tighten bolts securely.
- Adjust cable tension (rim brakes).
- Clean pads and braking surface.
- Test brake lever feel.
- Repeat for other wheel.
This checklist helps prevent missed steps and common errors.
Advanced Tips For Perfect Brake Pad Adjustment
Most guides stop at basic steps, but you can get even better performance with these advanced tips:
- Bed-in new pads: For disc brakes, after installing new pads, ride and brake lightly several times to transfer material to the rotor. This improves stopping power and reduces noise.
- Use quality pads: Cheap pads wear faster and perform poorly. Invest in reputable brands for longer life and better braking.
- Check pad spring tension: Disc pads usually have a spring to keep them apart. If the spring is weak, pads may rub.
- Inspect brake levers: Sometimes, lever adjustment affects pad contact. Make sure levers are set for your hand size.
Troubleshooting Common Brake Problems
Sometimes adjustment doesn’t solve everything. Here’s how to fix common problems:
Squeaky Brakes
- Clean pads and rim/rotor.
- Adjust toe-in for rim brakes.
- Bed-in new pads for disc brakes.
Brakes Feel Weak
- Replace worn pads.
- Check for contamination (oil, dirt).
- Adjust cable tension or hydraulic pressure.
Brakes Rub When Not Braking
- Realign pads or caliper.
- Check for warped rotor (disc brakes).
- Inspect for debris.
Lever Pulls Too Far
- Increase cable tension.
- Check for air in hydraulic lines (disc brakes).
Comparing Brake Pad Materials
Brake pads come in different materials, each with unique properties. Here’s a quick comparison:
| Material | Durability | Stopping Power | Noise | Cost |
|---|---|---|---|---|
| Organic | Moderate | High | Low | Moderate |
| Sintered/Metallic | High | Very High | Moderate | Higher |
| Resin | Low | Moderate | Very Low | Low |
Most mountain bikers use organic or sintered pads. Choose based on your riding style and conditions.
When To Replace Brake Pads Instead Of Adjusting
Adjustment helps, but sometimes replacement is necessary. Replace pads when:
- Grooves or patterns are gone.
- Pad thickness is less than 1mm.
- Pads are contaminated or glazed.
- Pads are cracked or damaged.
Riding with worn pads reduces safety and damages wheels or rotors.
How To Choose The Right Brake Pads
Choosing pads is important for performance. Consider:
- Compatibility: Check your bike’s brake type.
- Material: Choose based on riding conditions.
- Brand reputation: Avoid generic or unknown brands.
- Price: Don’t sacrifice quality for cost.
According to the National Bicycle Dealers Association, high-quality pads last up to twice as long as budget pads.

Credit: solfa-carburants.com
Practical Example: Adjusting Pads After Muddy Ride
Imagine you finished a muddy trail ride. Your brakes feel weak and squeaky.
- Inspect pads for mud and wear.
- Clean pads and rim/rotor with alcohol.
- Realign pads if they shifted.
- Bed-in pads if replaced.
This practical approach keeps brakes working well after tough rides.
Data On Brake Pad Adjustment Impact
A survey by Cycling Weekly found that riders who adjust brake pads monthly experience 30% fewer braking issues than those who never adjust. Proper adjustment saves money and reduces accidents.
Mistakes Beginners Often Make
Many new riders overlook these issues:
- Ignoring pad contamination (oil, dirt).
- Not checking alignment after installing new wheels.
- Forgetting to tighten bolts fully.
- Using wrong tools (stripping bolts).
Avoid these mistakes for safer, smoother rides.
Expert Advice For Reliable Brakes
If you want reliable brakes:
- Adjust pads regularly.
- Clean braking surfaces often.
- Replace pads before they’re worn out.
- Use quality parts.
Even professional riders follow these basics for consistent performance.
Frequently Asked Questions
How Do I Know If My Brake Pads Are Worn Out?
Check pad thickness. If it’s less than 1mm, or grooves/patterns are gone, replace the pads. Also, look for cracks or contamination.
Can I Use Rim Brake Pads On Disc Brakes?
No. Rim brake pads and disc brake pads are different shapes and materials. Using the wrong pad reduces performance and can damage your bike.
Why Do My Brakes Squeak After Adjustment?
Brakes squeak due to contamination, poor alignment, or lack of toe-in (rim brakes). Clean pads and rims, adjust alignment, and set toe-in.
How Often Should I Clean My Brake Pads?
Clean pads every 2–4 weeks, or after riding in mud or rain. Dirty pads reduce braking power and cause noise.
Is Brake Pad Adjustment Different For Hydraulic And Mechanical Disc Brakes?
Yes. Hydraulic brakes may require bleeding for firmness, while mechanical brakes use cable tension. Both need pad and caliper alignment.
If you want more in-depth technical info, check the official mountain biking maintenance resources at Park Tool.
Adjusting brake pads on your mountain bike is not just a maintenance task—it’s essential for safe and enjoyable riding. With the steps in this guide, you can do it yourself and avoid common mistakes. Remember, regular adjustment and cleaning keep your brakes sharp and reliable.
Whether you’re tackling steep trails or cruising city streets, well-adjusted brakes make all the difference.

Hello Guys! I am John Reese, a professional biker and my hobby is biking! I have been biking for last 12 years and I love using bikes while outing as well. Based on my experiences with the different type of bikes (mountain bikes, road bikes and hybrid bikes); I am sharing my opinion about various bikes so that a beginner can get started right away. Happy reading!