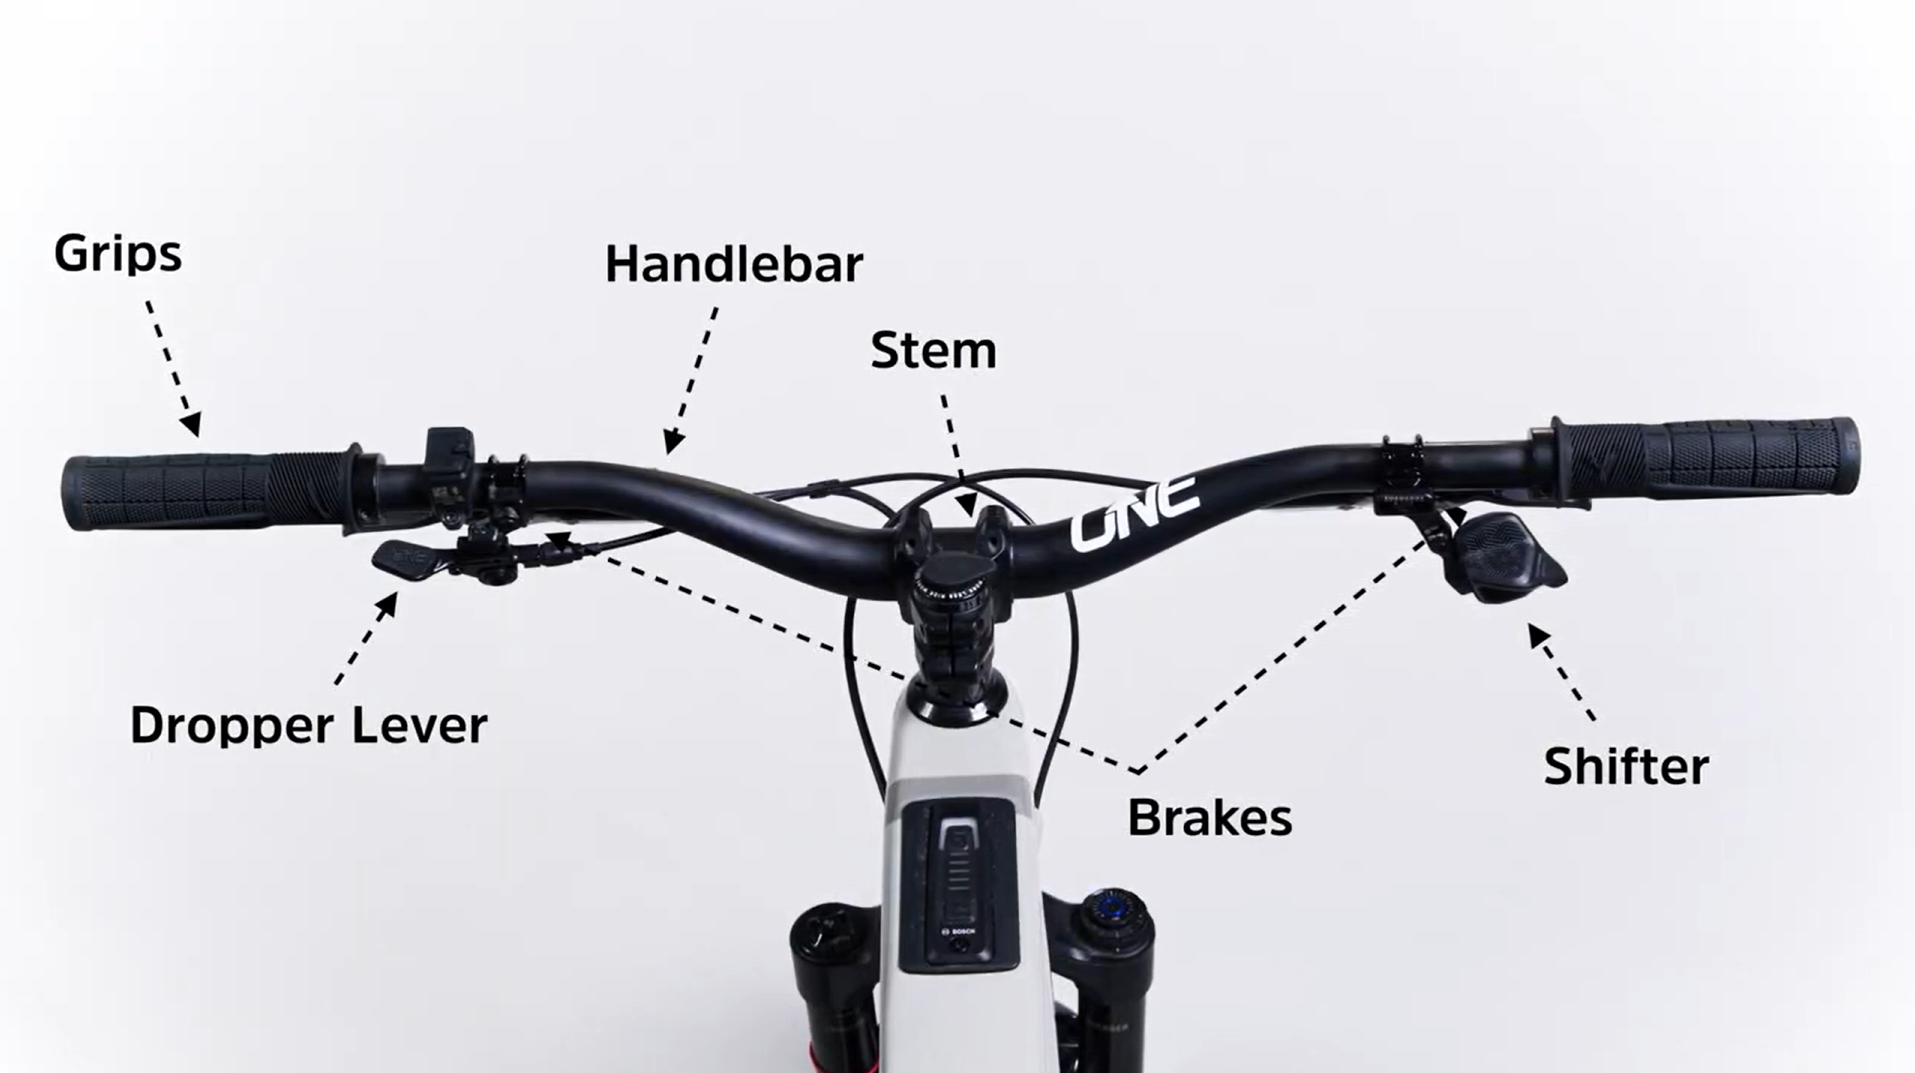
Adjusting the height of your mountain bike’s handlebars can feel like a small thing, but it can change everything: your comfort, your control, and even your safety. Whether you’re hitting rocky trails or riding to work, the right handlebar height helps you ride longer, avoid pain, and handle your bike confidently. Many riders don’t realize how much difference a few millimeters can make. If you’re new to mountain biking or you’re unsure how to make this adjustment, you’re not alone. This guide walks you through every step, explains the different types of handlebars and stems, and helps you find your ideal setup. You’ll also learn how to avoid common mistakes, spot signs of bad handlebar height, and compare different adjustment methods. By the end, you’ll know exactly how to adjust your handlebar height for your needs.
Why Handlebar Height Matters
Handlebar height is more than just a comfort issue. It affects how you sit, how you balance, and how you steer your mountain bike. If your bars are too low, you might get wrist pain, back aches, or feel unstable on rough terrain.
Too high, and you lose power when climbing or feel less in control on descents.
Many riders think bike fit stops at seat height, but that’s only part of the story. Handlebar height changes your body’s position. For example, a lower handlebar puts you in a more aggressive, forward-leaning stance. This is good for racing but tough on your wrists and back.
Higher handlebars keep you upright, better for long rides and casual biking.
Professional bike fitters often use a “drop” measurement—the vertical distance between the top of the saddle and the top of the handlebars. For mountain bikes, this is usually between 0 cm (level) and 5 cm (lower bars). But every rider is different. Your flexibility, riding style, and even the trails you ride will affect your ideal setup.
Signs Your Handlebar Height Needs Adjustment
It’s easy to overlook handlebar height, especially if you’re new to mountain biking. But if you notice any of these signs, it’s worth making an adjustment:
- Back pain after riding, especially in the lower back
- Hand or wrist numbness
- Neck soreness
- Poor control on steep descents
- Difficulty lifting the front wheel
- Feeling stretched out and uncomfortable
Noticing one or two of these? Your handlebar height may need a change. Adjusting isn’t just about comfort—it helps you ride safely and enjoy your bike more.
Types Of Mountain Bike Handlebar Adjustments
Before you start, it’s important to know there are several ways to adjust handlebar height. Mountain bikes use different types of stems and handlebars. The method depends on your bike’s design:
- Threadless stem adjustment (most modern mountain bikes)
- Quill stem adjustment (older or some entry-level bikes)
- Handlebar swap (changing to riser or flat bars)
- Stem swap (using a higher-rise stem)
- Adding/removing spacers (for threadless stems)
Let’s look at each method and how they work.
Threadless Stem Adjustment
Most mountain bikes since the late 1990s use a threadless stem. The stem clamps onto the steerer tube (the tube coming up from your fork). You can adjust height by moving spacers above or below the stem, or by swapping stems.
Quill Stem Adjustment
Older bikes and some basic mountain bikes use a quill stem. This stem slides into the steerer tube and is secured with a bolt. You can raise or lower the stem by loosening the bolt and moving the stem up or down.
Handlebar Swap
Changing to riser bars or flat bars changes handlebar height. Riser bars curve up, adding height. Flat bars are straight, lower and more aggressive.
Stem Swap
Some stems are made with a “rise”—the angle the stem points upward. Swapping to a higher-rise stem adds height. This is common for riders who need a big change.
Adding/removing Spacers
Spacers are small rings placed on the steerer tube. By moving spacers above or below the stem, you can raise or lower the bars. This only works if your steerer tube is long enough.
Tools Needed For Adjustment
Most handlebar adjustments need only basic tools:
- Allen wrenches (usually 4mm, 5mm, or 6mm)
- Torque wrench (for tightening bolts to correct strength)
- Grease (for quill stems)
- Measuring tape (to check height)
- Bike stand (optional, makes work easier)
If you don’t have a torque wrench, tighten bolts snugly but don’t overdo it. Overtightening can damage parts.
How To Adjust Handlebar Height (step-by-step Guide)
The method depends on your bike’s stem type. Here’s how to adjust both threadless and quill stems, plus tips for swapping bars and stems.
Adjusting Threadless Stem Height
Most mountain bikes use a threadless stem. Follow these steps:
- Remove the Top Cap
- Use a 5mm Allen wrench to loosen and remove the top cap bolt on the stem.
- Loosen Stem Bolts
- Loosen the two bolts on the side of the stem (where it clamps the steerer tube). Don’t remove them completely—just enough to slide the stem.
- Move Spacers
- If you want to raise the bars, move spacers from above the stem to below it.
- If you want to lower the bars, do the opposite.
- Reinstall Stem and Top Cap
- Slide the stem back onto the steerer tube.
- Put any remaining spacers above the stem.
- Replace the top cap and bolt.
- Tighten Bolts
- Use the torque wrench to tighten the top cap bolt. It should be snug, but not too tight.
- Tighten the stem bolts (usually to about 5-6 Nm).
- Check Alignment
- Make sure the stem is lined up with the front wheel.
- Stand over the bike and check from above.
- Test Ride
- Take a short ride. Check comfort and control. If needed, repeat steps to fine-tune.
Pro tip: Don’t put all spacers below the stem. Leave at least one above the stem if possible. This lets you lower bars later without cutting the steerer tube.
Adjusting Quill Stem Height
If your bike has a quill stem, follow these steps:
- Loosen Stem Bolt
- Use a 6mm Allen wrench to loosen the bolt on top of the stem. Loosen, don’t remove.
- Move Stem
- Gently wiggle the stem and pull it up to raise, or push down to lower.
- Don’t raise past the “minimum insertion” mark—this is important for safety.
- Tighten Stem Bolt
- Once you find your height, tighten the bolt.
- Use a torque wrench if possible (usually 8-10 Nm).
- Check Alignment
- Line up the stem with the front wheel.
- Tighten again if needed.
- Test Ride
- Go for a short ride. Adjust again if needed.
Non-obvious tip: Quill stems can seize over time. If the stem won’t move, try spraying penetrating oil and gently tapping with a rubber mallet. Never force it—if stuck, see a bike mechanic.
Swapping Handlebars For More Height
Sometimes moving spacers isn’t enough. Swapping to riser bars can add up to 40 mm (about 1.5 inches) of height.
- Remove Old Bars
- Loosen stem faceplate bolts.
- Take off grips, brake levers, shifters.
- Install New Bars
- Slide riser bars into stem.
- Reinstall components.
- Tighten Bolts
- Tighten faceplate bolts evenly (usually 5-6 Nm).
Fact: Riser bars are popular for trail and enduro bikes. Flat bars are common for cross-country (XC) racing.
Swapping Stems For More Height
Stems come in different “rise” angles, from 0° (flat) to 40° (very upright).
- Remove Old Stem
- Loosen stem bolts and remove.
- Install New Stem
- Slide new stem onto steerer tube.
- Tighten bolts.
- Reinstall Handlebars
- Attach bars to new stem.
Example: Swapping from a 6° rise stem to a 17° rise stem can add up to 30 mm of height.
Using Handlebar Extenders
Handlebar extenders are aftermarket devices that clamp onto your bars and add height. They’re less common but can help if your steerer tube is too short.
- Clamp extender onto bars.
- Adjust to desired height.
- Tighten bolts.
Warning: Extenders can add weight and may affect handling. Use only if other methods aren’t possible.
Comparing Handlebar Adjustment Methods
Choosing the right method depends on your bike, your needs, and your budget. Here’s a comparison of the main methods:
| Method | Height Range | Cost | Difficulty | Best For |
|---|---|---|---|---|
| Spacers (Threadless) | 0-30 mm | $0 | Easy | Minor adjustments |
| Quill Stem | 0-40 mm | $0 | Easy | Older bikes |
| Riser Bars | 20-40 mm | $20-$60 | Medium | Major changes |
| Stem Swap | 20-30 mm | $30-$100 | Medium | Big adjustments |
| Extender | 20-40 mm | $15-$35 | Medium | Limited options |
Insight: Most riders can use spacers for small changes. If you need a big change, swap bars or stems.
How To Measure Handlebar Height
Measuring handlebar height helps you track changes and find what works best. Here’s how:
- Stand the bike upright.
- Place a measuring tape from the center of the handlebar (where it crosses the stem) to the ground.
- Record the number.
- For comparison, measure from the saddle to the ground.
Pro tip: Many riders measure the “drop”—the distance from the saddle top to the handlebar top. For mountain bikes, drop is often 0 to -5 cm.
Finding Your Ideal Handlebar Height
There’s no single “right” height. It depends on your body, your riding style, and your bike. Here are some guidelines:
- Upright comfort: Higher bars suit riders who want comfort, ride trails, or have back issues.
- Aggressive performance: Lower bars suit racers, technical riders, or those with good flexibility.
- Neutral position: Level bars (same height as saddle) are a good starting point.
Try different heights and note how your body feels after rides. It’s normal to need several tries before finding your best setup.
Non-obvious tip: If you switch bikes or upgrade parts, always recheck handlebar height. Small changes can affect fit.
Credit: sajdikovehumence.sk
Common Mistakes To Avoid
Many beginners make mistakes when adjusting handlebar height. Avoid these to stay safe and comfortable:
- Ignoring the minimum insertion mark (for quill stems): Never raise past this mark, or the stem can break.
- Overtightening bolts: Use a torque wrench or follow manufacturer specs.
- Misaligning stem: Always check alignment before tightening.
- Making big changes at once: Change height in small steps, test ride, and adjust again.
- Forgetting other fit factors: Handlebar height is only one part of bike fit. Consider saddle height, stem length, and bar width too.
When To Seek Professional Help
If you’re unsure about adjustments, or if your bike needs a big change, a professional bike fitter can help. They use tools to measure your body, flexibility, and riding style. A fitting session costs between $50-$200 but can prevent injury and improve comfort.
Bike shops also have tools and experience. If your stem is seized, your steerer tube is too short, or you want a custom fit, don’t hesitate to ask for help.
Handlebar Height And Riding Style
Different mountain biking styles need different handlebar heights. Here’s how it breaks down:
Cross-country (xc) Racing
- Lower bars for aggressive position
- Helps with climbing and speed
- Typical drop: 2-5 cm below saddle
Trail Riding
- Moderate to high bars for comfort
- Helps with control on descents
- Typical drop: 0-2 cm below saddle
Enduro/downhill
- Higher bars for maximum control
- Helps keep weight back on steep descents
- Bars often level with or above saddle
Bikepacking
- Higher bars for all-day comfort
- Reduces strain on back and wrists
- Bars level or slightly above saddle
| Style | Recommended Bar Height | Benefits |
|---|---|---|
| Cross-Country | 2-5 cm below saddle | Speed, climbing |
| Trail | 0-2 cm below saddle | Comfort, control |
| Enduro/Downhill | Level or above saddle | Stability, safety |
| Bikepacking | Level or above saddle | Long ride comfort |
Example: If you switch from XC racing to trail riding, raise your bars for more comfort and control.
The Science Behind Handlebar Height
Studies show handlebar height affects muscle use and injury risk. A 2015 study in the Journal of Sports Science found that lower handlebars increase pressure on wrists and spine, while higher bars reduce strain but may limit power when climbing.
Another study showed riders with poor handlebar fit have a 30% higher risk of back pain. Correct fit can help prevent injuries, improve performance, and let you ride longer.
Non-obvious insight: Even small changes—like 5 mm—can make a noticeable difference. Don’t ignore minor discomfort.

Credit: www.youtube.com
Handlebar Height And Body Size
Your height and arm length affect ideal handlebar height. Taller riders often need higher bars. Shorter riders may prefer lower bars for better control.
Tip: If you’re under 5’5” (165 cm), start with bars level with the saddle and adjust down if needed. If you’re over 6’0” (183 cm), try bars slightly above saddle.
Adjusting Handlebar Height For Kids
Kids’ mountain bikes need careful adjustment. Too low, and kids strain their backs. Too high, and bikes feel hard to control.
- Start with bars level with saddle.
- Raise as needed for comfort.
- Check after growth spurts.
Tip: Kids grow fast. Check handlebar height every few months.
Handlebar Height And Accessories
Adding accessories—like lights, GPS mounts, or bags—can affect handlebar height and comfort. Heavier accessories may change handling.
- Mount accessories securely.
- Check height after adding new gear.
- Adjust if needed for balance.
Should You Cut Your Steerer Tube?
Some riders cut their steerer tube to save weight or lower bars. But this is a permanent change. Only cut if you’re sure about your fit.
Warning: Once cut, you can’t raise bars unless you swap stems or bars.
If you’re unsure, leave a spacer above the stem. This keeps options open.
Real-life Examples
Case 1: Emma rides trails and often gets wrist pain. She moves two spacers below her stem and swaps to riser bars. Her pain disappears, and she feels more confident.
Case 2: Alex races XC. He lowers his bars by moving spacers above the stem and switching to flat bars. His climbing improves, and he feels faster.
Case 3: Mia’s quill stem is stuck. She tries oil and tapping, but it won’t move. She visits a bike shop, and they free the stem safely.
Frequently Asked Questions
How Often Should I Check My Handlebar Height?
Check your handlebar height every few months, especially if you change parts or feel discomfort. Also check after big rides or crashes.
Can I Adjust Handlebar Height Without Special Tools?
Yes. Most adjustments need only Allen wrenches. For best results, use a torque wrench. Some quill stems may need grease or oil.
Is It Safe To Use Handlebar Extenders?
Handlebar extenders are safe if installed correctly and used within their limits. But they can change handling and add weight. Use only if other methods aren’t possible.
What’s The Best Handlebar Height For Beginners?
Start with bars level with the saddle. Adjust up for comfort or down for performance. Test ride after each change.
How Do I Know If My Handlebar Height Is Right?
The right height gives you comfort, control, and no pain after riding. If you feel pain, numbness, or instability, change height in small steps and test again.
Making the right handlebar height adjustment can transform your mountain bike experience. It’s a simple change, but it affects everything from comfort to control to safety. Try different heights, listen to your body, and don’t be afraid to ask for help. A well-fitted bike lets you ride longer, tackle tougher trails, and enjoy every adventure. For extra tips on bike fit and safety, you can check out resources like Bicycling.com. Remember, every rider is different. With the right handlebar height, your mountain bike becomes an extension of you—ready for any trail.

Credit: nisko.pl

Hello Guys! I am John Reese, a professional biker and my hobby is biking! I have been biking for last 12 years and I love using bikes while outing as well. Based on my experiences with the different type of bikes (mountain bikes, road bikes and hybrid bikes); I am sharing my opinion about various bikes so that a beginner can get started right away. Happy reading!