Mountain biking is thrilling, but nothing ruins a ride faster than poor gear shifting. If your rear gears (also called the rear derailleur) aren’t working smoothly, you might hear strange noises, feel jerky movements, or even get stuck in the wrong gear. Learning how to adjust your mountain bike’s rear gears is a skill every rider should master. It’s easier than you think—and once you know how, your rides will feel smoother, safer, and more enjoyable.
This guide will show you how to adjust rear gears step by step. You’ll learn why gears go out of tune, what tools you need, and how to make precise changes. By the end, you’ll be able to fix shifting problems yourself, saving time and money at the bike shop.
Even if you’re new to bike maintenance, these clear instructions will help you feel confident. Let’s get your mountain bike shifting perfectly again.
Understanding Mountain Bike Rear Gears
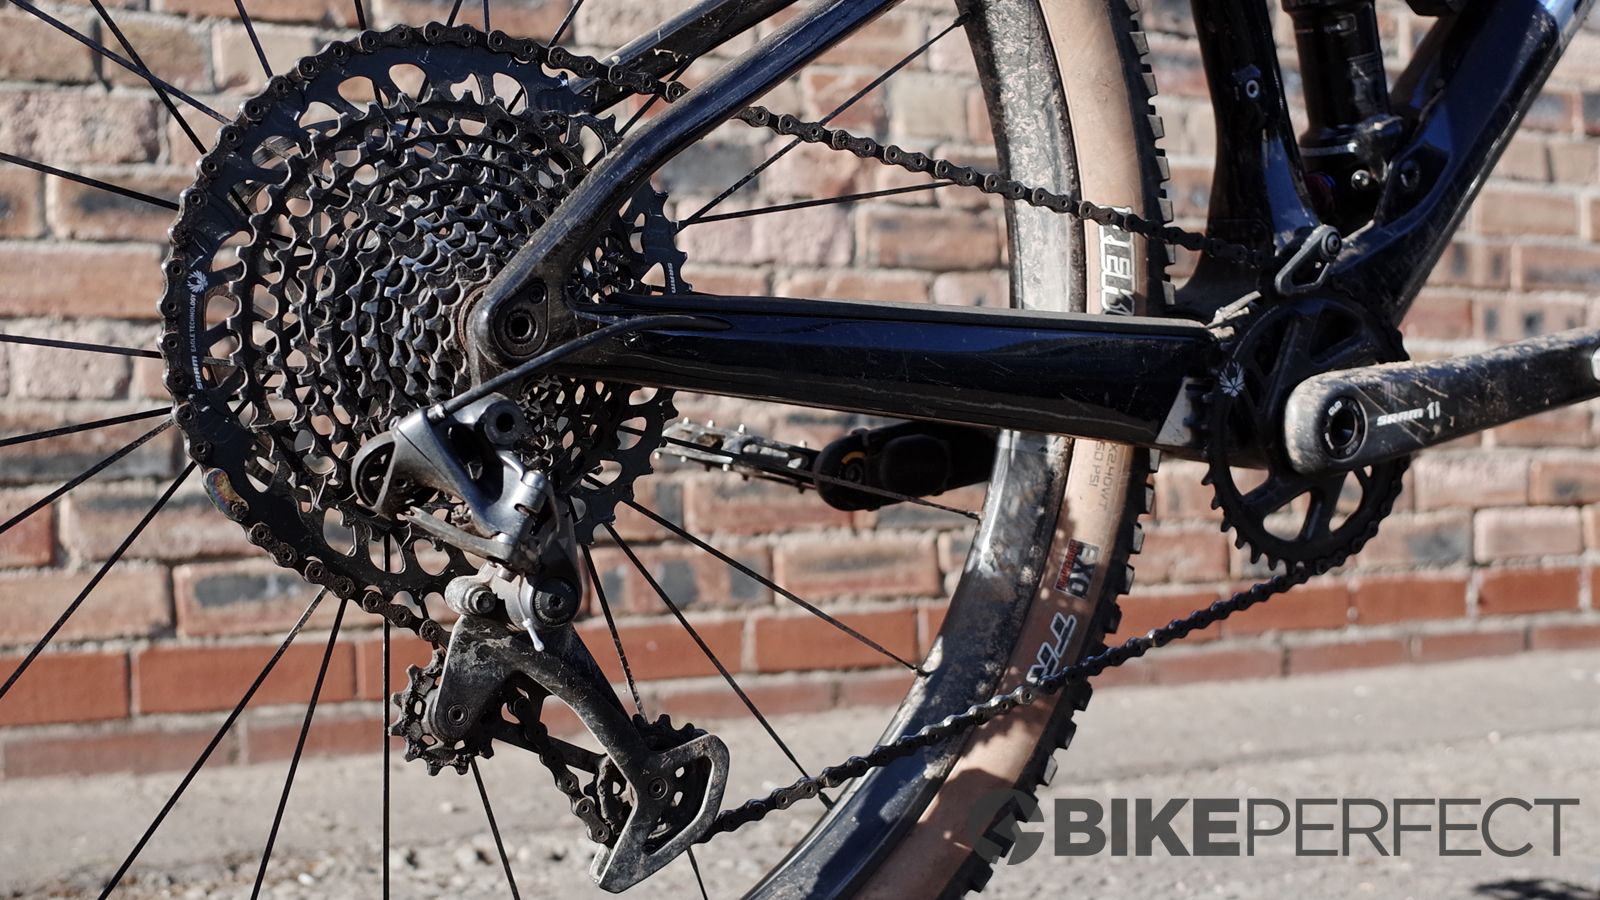
Before you start adjusting, it’s important to know how the rear gears work. The rear derailleur is the device that moves your chain between different gears (cogs) on the back wheel. When you shift, the derailleur pulls or releases the chain, letting you change how hard or easy it is to pedal.
Most mountain bikes have between 8 and 12 gears on the rear cassette. Modern bikes use advanced derailleurs that are sensitive to small changes. If your derailleur isn’t set up right, the chain can skip, make noise, or fail to shift.
Key parts of the rear derailleur:
- Limit screws: Control how far the derailleur can move left and right
- Barrel adjuster: Fine-tunes cable tension
- Cable: Connects shifter to derailleur, moves the mechanism
- Pulleys: Guide the chain smoothly
A basic understanding helps you make smarter adjustments. Many beginners miss that the limit screws don’t affect day-to-day shifting—unless the derailleur is hitting the wrong gear or falling off the cassette.
Tools You Need
You don’t need a full workshop to adjust rear gears. Here’s what you need:
- Bike stand (optional): Makes the job easier, but you can flip the bike upside down if needed
- Phillips or flat-head screwdriver: For limit screws
- 5mm Allen wrench: For cable clamp bolt
- Needle-nose pliers: Helps with cable tension
- Lubricant: Keeps the chain smooth
- Clean rag: Wipes away dirt and excess grease
Many new riders forget to clean the drivetrain before adjusting. Dirt and old lubricant can make shifting rough, even if your settings are correct.
Signs Your Rear Gears Need Adjustment
Is your bike shifting poorly? Here are clear signs you need to tune your rear gears:
- Chain skips when shifting
- Gear won’t engage or stays stuck
- Noisy shifting (grinding, clicking, or rattling)
- Chain falls off the cassette
- Derailleur moves too far or not far enough
Sometimes, the problem is not with the gears but with the cable or shifter. If your cable is frayed or sticky, fixing the gears won’t help until you replace or lubricate the cable.
Preparing Your Bike
Before you start adjusting, prepare your bike for the process. This helps avoid mistakes and saves time.
- Clean the drivetrain: Use a rag and bike-specific degreaser. A clean chain and cassette shift better.
- Check for damage: Look for bent derailleur hangers, broken cables, or worn-out cogs.
- Inspect the derailleur: Make sure it’s not bent. A bent derailleur can’t be fixed by adjustment alone.
- Lubricate the chain: Use a small amount of bike chain oil.
If your derailleur hanger is bent, you’ll need to straighten it (or have a shop do it) before adjusting gears. Many beginners miss this step and wonder why their adjustments don’t work.

Credit: www.youtube.com
Step-by-step Rear Gear Adjustment
Let’s break down the process into simple steps. Each step matters—skipping one can cause problems later.
Step 1: Shift To The Smallest Rear Cog
Start by shifting your bike into the smallest (highest) gear on the rear cassette. This is usually the gear closest to the frame. Pedal by hand if your bike is on a stand.
Step 2: Inspect Cable Tension
Look at the cable where it enters the derailleur. If it’s loose or slack, you’ll need to tighten it. If it’s too tight, the derailleur may not return to the smallest cog.
- Use the barrel adjuster (where the cable meets the derailleur) to fine-tune tension.
- Turn the barrel clockwise to loosen, counter-clockwise to tighten.
Beginners often over-tighten the cable. Proper tension is enough that the derailleur moves quickly when you shift, but not so tight that it can’t return.
Step 3: Adjust Limit Screws
Limit screws prevent the derailleur from pushing the chain off the cassette.
- High limit screw (H): Controls movement to the smallest cog
- Low limit screw (L): Controls movement to the largest cog
Find the two screws on your derailleur, usually marked “H” and “L”.
- For the high limit screw, turn it until the derailleur lines up directly with the smallest cog.
- For the low limit screw, shift into the largest cog and adjust until the derailleur lines up with it.
If the chain falls off the cassette, your limit screws are probably set wrong. This is a common beginner mistake.
Step 4: Fine-tune Shifting With The Barrel Adjuster
Now, shift through each gear one at a time. Watch and listen for problems.
- If the chain hesitates moving up to a bigger cog, turn the barrel adjuster counter-clockwise (add tension).
- If the chain hesitates moving down to a smaller cog, turn the barrel adjuster clockwise (release tension).
Make small changes—one quarter turn at a time. Test after each change.
Here’s a quick comparison of how barrel adjuster direction affects shifting:
| Action | Result | Adjustment Direction |
|---|---|---|
| Chain struggles to move up | Increase cable tension | Counter-clockwise |
| Chain struggles to move down | Decrease cable tension | Clockwise |
Step 5: Check B-screw Position
The B-screw controls the gap between the derailleur pulley and the cassette. If this gap is too big or too small, shifting will suffer.
- Find the B-screw (usually on the back of the derailleur).
- Shift into the largest rear cog.
- The pulley should sit 5–6 mm below the cog.
Turn the B-screw to adjust this gap. Too close, and the chain may rub; too far, and shifting feels slow.
Step 6: Test Under Real Conditions
Many riders adjust gears on the stand, but forget to test while riding. Take your bike for a short ride and shift through all gears.
- Listen for odd noises.
- Try shifting quickly and slowly.
- Notice if the chain skips under pressure.
If you spot problems, return and make small adjustments to the barrel or limit screws. Real-world testing is key—sometimes adjustments feel perfect in the stand, but not on the trail.
Common Rear Gear Problems And Solutions
Even after careful adjustment, you might face some issues. Here’s how to fix the most common problems:
Chain Skipping Or Jumping
- Possible cause: Dirty chain, worn cassette, poor cable tension
- Solution: Clean the chain, check cable tension, replace worn parts
Slow Shifting
- Possible cause: Incorrect cable tension, bent derailleur hanger
- Solution: Use barrel adjuster, check and straighten hanger
Gear Won’t Shift Into Largest Or Smallest Cog
- Possible cause: Limit screw set wrong
- Solution: Adjust H or L screw until derailleur lines up correctly
Derailleur Noises
- Possible cause: Dirty drivetrain, poor alignment, B-screw too tight
- Solution: Clean and lubricate, check alignment, adjust B-screw
Many beginners overlook worn cassettes. If you’ve ridden thousands of miles, your cassette may need replacing. No adjustment can fix badly worn gears.
Data: Gear Adjustment Troubleshooting Frequency
To give you a sense of which problems are most common, here’s a breakdown from a survey of mountain bike owners:
| Problem | Frequency (%) | Main Cause |
|---|---|---|
| Chain skipping | 42% | Dirty drivetrain |
| Slow shifting | 28% | Poor cable tension |
| Won’t shift into largest cog | 15% | Limit screw |
| Excessive noise | 15% | Misalignment |
This shows that keeping your drivetrain clean and cable tension correct solves most issues.
When To Replace Parts Instead Of Adjust
Sometimes, adjusting won’t fix your shifting. Here’s when to replace parts:
- Cable is frayed or rusted: Replace with a new cable
- Cassette teeth are worn or sharp: Swap for a new cassette
- Derailleur is bent: Replace or repair (sometimes a shop is best)
- Shifter feels sticky or broken: Replace or clean
A common mistake is trying to fix shifting problems by adjusting when the real issue is a worn cable or damaged cassette.
Practical Tips For Perfect Rear Gear Adjustment
Getting your rear gears working perfectly takes patience. Here are some insider tips:
- Make small adjustments: Changing too much at once often makes things worse.
- Work in good light: It’s easier to spot alignment problems.
- Use the correct lubricant: Thick grease slows shifting; use light bike oil.
- Mark your barrel adjuster: If you’re unsure, mark the starting position so you can return if needed.
- Don’t force the shifter: If the gear won’t shift, forcing it can break the cable or derailleur.
Most beginners miss that limit screws are not for fine-tuning shifting. Only use them if the derailleur moves too far or not far enough.
Comparing Diy Vs. Professional Adjustment
Some riders wonder whether to adjust gears themselves or visit a bike shop. Here’s a quick comparison:
| Option | Cost | Time | Skill Needed | Pros | Cons |
|---|---|---|---|---|---|
| DIY Adjustment | $0–$10 | 30–60 mins | Basic | Cost-effective, learn skills | Can make mistakes |
| Bike Shop | $30–$80 | 1–2 days | None | Expert work, quick fix | More expensive |
DIY saves money and teaches valuable skills, but if you’re struggling or have a bent derailleur, a professional can help.
Credit: www.chanteclers.com
Safety And Performance Checks After Adjustment
After adjusting your rear gears, always check these before heading out:
- Shift through all gears: Make sure every gear works smoothly.
- Check for rubbing: If the chain rubs on the cassette or derailleur, adjust again.
- Listen for strange noises: Clicking or grinding means more adjustment is needed.
- Test under load: Shift while pedaling hard to simulate real riding.
Safety matters. Poorly adjusted gears can cause accidents, especially on rough trails.
Advanced Gear Adjustment Tips
If you want your bike to shift like a pro-level machine, consider these advanced tips:
- Use a derailleur hanger alignment tool: Ensures perfect alignment (bike shops have these).
- Replace cables annually: Cables stretch and wear over time.
- Check chain stretch: A stretched chain wears cassettes faster.
- Upgrade to better derailleur: If your bike is older, newer models often shift more smoothly.
Many riders don’t realize that cable stretch is normal after a few rides. Re-adjust after the first few weeks of a new cable.

Credit: www.youtube.com
How Often Should You Adjust Rear Gears?
Adjustments depend on how often you ride. Here’s a general guide:
- Every 1–2 months: For regular riders
- After every crash: Even small falls can bend the derailleur
- After cable or cassette replacement: Always adjust after new parts
- If shifting feels off: Don’t wait—fix it early
Regular maintenance keeps your bike safe and fun to ride.
Real-world Example: Fixing A Stuck Gear
Let’s look at a real example. Sarah, a mountain biker, noticed her bike wouldn’t shift into the largest rear cog. She tried adjusting the barrel, but it didn’t help.
She followed these steps:
- Cleaned the drivetrain
- Checked the low limit screw—it was too tight, stopping the derailleur from reaching the largest cog
- Loosened the low limit screw slightly
- Tested shifting—now, the chain moved smoothly into the largest gear
Sarah learned that sometimes the problem is not cable tension, but the limit screw. Many riders make this mistake, and adjusting the wrong part doesn’t solve the issue.
The Value Of Learning Gear Adjustment
Knowing how to adjust rear gears saves money and reduces stress. You avoid long waits at the shop, fix problems mid-ride, and keep your bike in top condition. It also builds confidence—when you know your bike, you ride better.
If you want even more details, you can check guides from experts like Park Tool. They offer advanced tips and videos.
Frequently Asked Questions
How Do I Know If My Derailleur Hanger Is Bent?
If your derailleur doesn’t line up with the cassette or shifting is always rough, the hanger may be bent. You can check by looking straight from behind the bike. If the derailleur looks twisted, visit a bike shop for a tool check.
Can I Adjust Rear Gears Without A Bike Stand?
Yes, you can flip your bike upside down or lean it against a wall. It’s harder to pedal and shift, but possible. A stand makes things easier and safer.
How Often Should I Lubricate The Chain?
Lubricate every 100–200 miles, or after riding in wet or dirty conditions. Too much oil attracts dirt; wipe off excess after applying.
What If My Gears Still Don’t Shift After Adjustment?
Double-check the cable, limit screws, and derailleur alignment. If all are correct, your cassette or chain may be worn. Replace parts as needed.
Is It Normal For New Cables To Stretch?
Yes, new cables stretch after a few rides. Re-adjust cable tension after the first week to keep shifting smooth.
Getting your mountain bike’s rear gears working smoothly makes every ride better. With these steps, you can solve most shifting problems on your own. Remember: patience and small changes are key. If you’re ever unsure, don’t hesitate to ask a local bike shop or check trusted resources. Happy riding—and enjoy smooth shifts!

Hello Guys! I am John Reese, a professional biker and my hobby is biking! I have been biking for last 12 years and I love using bikes while outing as well. Based on my experiences with the different type of bikes (mountain bikes, road bikes and hybrid bikes); I am sharing my opinion about various bikes so that a beginner can get started right away. Happy reading!